


|
Like a lot of people in this thread, I not long ago did something that I haven't done in about a decade: spent money on a plastic model. The itch had been slowly building for years, since I always found model making relaxing. I was spurred to action by James May, who made a little TV series not long ago about old toys, the first episode featuring Airfix models. Anyway, I bought a car, just to relearn some of the old skills, and I think it turned out pretty well. The instructions told me to paint the faint lines of the rear defroster; I ignored them since I hadn't the slightest idea how  It was a Tamyia kit, which I've never built before. I'm blown away by how well it is made, and how much detail there is. Real tires, custom masks for painting the inside of the windshields, silver stickers to give the taillights proper depth. Things to be harshly self critical about : I never had an airbrush, and I suspect to get a absolutely perfect finish on the exterior, I think I would have needed one. Also, I screwed up the headlights; I melted the plastic a bit and they are now opaque  It's too bad, since the headlight assembly by itself is a work of art. I'm tempted to order replacement parts, simply because of how cool it looked with proper headlights. (Anybody done this with Tamyia?) Anyway, stuff I learned: It's too bad, since the headlight assembly by itself is a work of art. I'm tempted to order replacement parts, simply because of how cool it looked with proper headlights. (Anybody done this with Tamyia?) Anyway, stuff I learned:1. I need more / better paintbrushes. There was a bunch of details that took multiple tries, such as the black trim around the windows / roof. Partially this was caused by laziness of me not wanting to mask, but also thanks to my generally crappy cheap brushes. What kinda kit do you guys have? 2. What is primer? Back in my salad days I was savvy to washing your parts to start, and using spraycan gloss coat to get a nice glossy surface to paint on. Then, with teh dullcoat to get the finish right / lock in those decals. I didn't do that this time, simply because I felt like this was practice. So what's this spray primer, and what does it do? Is primer-ing separate from the operation mentioned above? 3. Decals: Help me, for god's sake help me! Like I said, I know about the gloss/dull trick, but that's mostly it. When making this model, there were several really tiny decals that took forever to put on properly, and then I apprently took too long, as they vanished later, apparently not having much stick left. This is important, as my next project is rather decal-heavy. What's this alchemical liquid that can help that I've heard mentioned? And how the heck do you get perfect decal alignment, save by eyeballing it? The instructions for my next project has specifications in millimeters.
|
 #
?
Mar 9, 2010 19:42
#
?
Mar 9, 2010 19:42
|
|


|

|
| # ? May 30, 2024 13:49 |
|
|
Nebakenezzer posted:neat little kit, questions and stuff... - Brushes: A lot of modelers swear by W. and N. 7series, but any decent art brand will do (Take good care of them). Four or five sizes should suffice (3,1,0,000). - Primer: gives �teeth� to a surface, so your paint won�t flake or rub off. Is REALLY Important. Make sure you wash your kit toroughly before a coat so it will stick better. I prefer the Japanese brand Mr.Hobby 1200 in rattlecans as primer (expensive but truly superior and awesome). A cheap alternative would be Krylon. I have never used it but some of my Amercan friends love it. ymmv. Don�t EVER use gesso like those warham �tards cos it obscures detail. - Decals: Don�t use them my self (prefer freehand) but if i remeber correctly �Mr.Hobby� (Gunze) Has some decent decal softener and setter avaible for easier application, so check those out... - Alignment: I use little bits of masking tape to mark tiny painted details/decals.
|
|
#
?
Mar 10, 2010 00:10
|
|

|
alcyon posted:- Primer: gives �teeth� to a surface, so your paint won�t flake or rub off. Is REALLY Important. Make sure you wash your kit toroughly before a coat so it will stick better. I prefer the Japanese brand Mr.Hobby 1200 in rattlecans as primer (expensive but truly superior and awesome). A cheap alternative would be Krylon. I have never used it but some of my Amercan friends love it. ymmv. Don�t EVER use gesso like those warham �tards cos it obscures detail. I've seen a lot of modelling magazines talk about using car body spray as primer but I've never tried it myself. It seems like a possibly good plan, since it comes in every colour you could ever want.
|
|
#
?
Mar 10, 2010 00:13
|
|


|
Danger - Octopus! posted:I've seen a lot of modelling magazines talk about using car body spray as primer but I've never tried it myself. It seems like a possibly good plan, since it comes in every colour you could ever want. I�ve always avoided it myself because I fear messing things up and clogging detail through overspray, but I�ve seen some fine results using it on replica film props. A friend of mine used simple car gray primer on a 5foot millenium falcon we built together and weathered it with hand painted oils and acrylics. Looked amazing. But one word of caution, try it out on a piece of scrap or something first.
|
|
#
?
Mar 10, 2010 00:34
|
|
|
I can't believe no one makes a model of the An-225.
|
|
#
?
Mar 13, 2010 08:03
|
|
|
Looks like there is one in 1:500
|
|
#
?
Mar 13, 2010 08:20
|
|

|
Might as well share a kit I've been working on. It's a "K�ster", a walking-chicken-robot of sorts from the Machinen Krieger line of kits. Very recently started working on this beastie again after breakin my wrists and a subsequent one year break from tinkering on it. (I really should repost this on the forum it was originally featured on as well btw, sorry guys!) Anyway, as of spring 2009, the kit looked something like this:  Far from finished It started out six months previous like this:  Truth be told i am a rather anal builder and spend excessive amounts of time cleaning, sanding and dryfitting parts for a perfect fit. In this case I had to heat up some crooked parts of the hull with steam and bend them back into shape -a rather stressfull chore. I spend a lot of time altering original kit parts. Below are some thin and fragile plastic detailing bits i replaced with steel and brass.  Some scratched parts. A pair of tiny smoke candles, made entirely of of brass, each about halve an inch high. I REALLY love scratch building bits.  Two techniques that might be of interest to armor builders. I didn't like the smooth plastic surface of the hull (It didn't look heavy enough), Recreated a cast iron look By dabbing a really thick primer/filler with a flat brush and lightly sanding the surface aterward. Secondly I scoured awoy the original weld lines, and redid all the beads with an epoxy putty (they are about 1.5mm wide)  Random close up of some additional detailing.  The project stalled last year just when i started some major alterations on the head. Not sure what I am gonna do with that. Will probably redo the entire thing with renshape and epoxy.
|
|
#
?
Mar 13, 2010 14:59
|
|
|
alcyon posted:Ma.K sex I like your maschine a lot. I found the Ma.K thing really confusing until a friend explained it to me, about how there were the drawings, then one line, now some more lines and scratchbuilding becoming canon kits.
|
|
#
?
Mar 13, 2010 20:52
|
|
|
Danger - Octopus! posted:I like your maschine a lot. Ma.k is really weird like that. It's the entire hobby rolled in one subject: Off the shelf kits, kit-bashing and scratchbuilding. I like the Ma.k. community cos it can provide a challenge for every level of skill. Take the Falke for example, the most famous Ma.k kit, one could just buy the kit and built/paint something cool.... or buy a p-38, a Honda s800, some pingpong balls and a shitload of epoxy putty and go all out bashing. Kow Sensei is so awesome
|
|
#
?
Mar 13, 2010 21:11
|
|
|
I just averted ruining a perfectly shaded model while I was washing/weathering and panel lining, It has a future coat (maybe its not thick enough?or still not fully dry?) and I was using a simple water/acrylic/tiny bit of FF wash to start. At the beginning it was working fine then as I went on (working in patches) I started having to rub real real hard to get the excess off, finally it got to where no amount of rubbing would remove the excess. So now I have a fairly decent sized part of my model that I have to repaint and I dunno what I did wrong some parts the wash went totally through the ff coat, and into base coats.
|
|
#
?
Mar 14, 2010 01:42
|
|
|
Kallikrates posted:I just averted ruining a perfectly shaded model while I was washing/weathering and panel lining, It has a future coat (maybe its not thick enough?or still not fully dry?) and I was using a simple water/acrylic/tiny bit of FF wash to start. At the beginning it was working fine then as I went on (working in patches) I started having to rub real real hard to get the excess off, finally it got to where no amount of rubbing would remove the excess. So now I have a fairly decent sized part of my model that I have to repaint and I dunno what I did wrong some parts the wash went totally through the ff coat, and into base coats. Probably an uneven coat or not fully dry. You could try and salvage your kit rubbing cottonswabs loaded with Isopropyl alcoholon the affected areas. Carefull though that stuff is harsh. (tbh I prefer a semigloss varnish as a barrier for washes to avoid such mishaps)
|
|
#
?
Mar 14, 2010 07:51
|
|
|
its already repainted, I'm just going to get some cheap oil based paint,no risk of it touching future and I can wipe on wipe off forever with turpentine.
|
|
#
?
Mar 14, 2010 09:00
|
|
|
That Ma.K stuff is interesting. I can't say I care for the standard suits much, but the chicken walkers are very intriguing. I can already see a sci-fi diorama of wounded nazis running from their destroyed tank as a russian Ma.K towers over them....
|
|
#
?
Mar 14, 2010 09:20
|
|

|
alcyon posted:Secondly I scoured awoy the original weld lines, and redid all the beads with an epoxy putty (they are about 1.5mm wide) You will tell us how you did this, or you will not leave the forums alive 
|
|
#
?
Mar 14, 2010 22:37
|
|


|
Cakefool posted:You will tell us how you did this, or you will not leave the forums alive (I'll take some some picure of tools used and will write something down later today. What are you most interested about the weld seams or the surface?)
|
|
#
?
Mar 15, 2010 07:17
|
|
|
Weld please. 
|
|
#
?
Mar 15, 2010 18:13
|
|
|
Cakefool posted:Weld please. Alright good sir, weld beads it is, huzzah! The welds shown here are classic 'fillet' weld the most recognizable type of weld. 1.) I started out by scouring away at surface with some needle files to get a proper 90degree angle and to give the surface some teeth and grip. 2.) Next I rolled a tiny bit of 2parts epoxy putty into a thin spagetti line about 1.5 mmm thick. I used Aves Apoxie for this. I assume since you are mostly a 40k player(?) you probably use greenstuff/kneadite yourself? But Aves (or MagicSculp for that matter) is far superior: -It's cheaper per pound -Has a longer working time -and while soft is water soluble and non toxic. This means while scupting you can simply wet a finger and manipulate it or wet your tools to avoid it sticking. Awesome stuff... Anyway, apply the putty to the seam, make sure it is sitting tightly in the corner and let it set for 30 mins or so, ensuring it will stick to the kit and not your tools. 3.) Tool making time (actuallty this is step 0.5) This will take some time, some very steady hands and some patience. a. take a thin brass tube and sand away halve of it with an flat needle file at one end. (I use brass because it is a soft metal and easily worked on/sanded) b. then 'chamfer' the outside edge to thin out the surface, making it more sharp c. chamfer the inside, so the prod can be placed and a 45degree angle on the soon to be welded surface with the round side of the prod facing up The end result should look something like this: 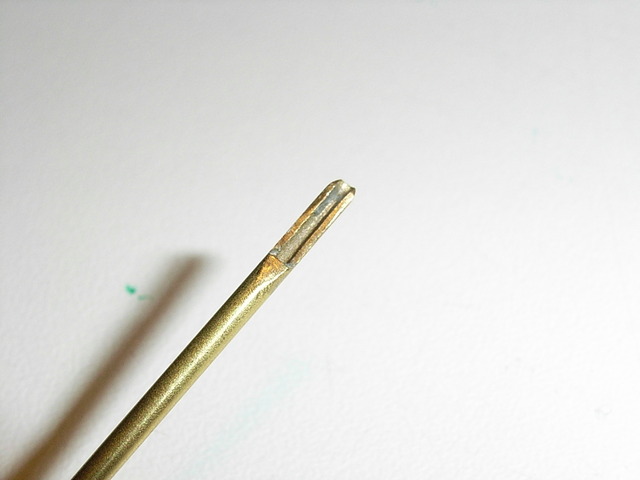 Shown here is the belly of the prod, the side facing the weld seam. 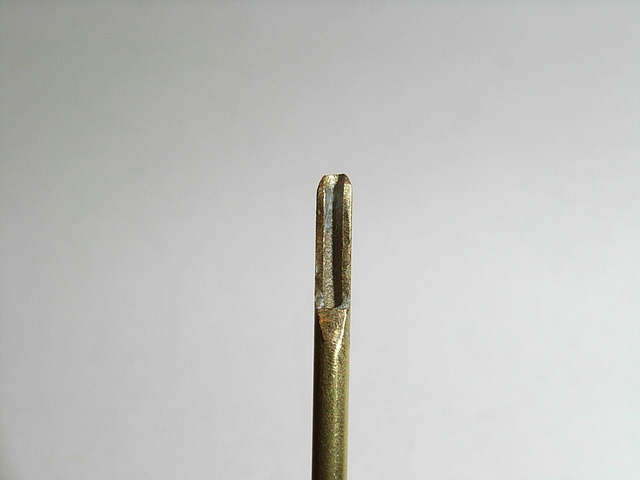 Please note that this -of course- is an extreme macroshot. the real thing is 1.5mm wide. I have made about halve a dozen of these prods each in a different size and scale. 4.) Welding time: Wet the prod slightly with water and gently press in to the putty at an 45angle. Move a bit and press again, repeat ad infintum. If done correctly a neat series of droplets should appear. All the beads should be pressed correctly in one pass if possible for the best result. It will look messy if you have to work the same area twice. 5.) While pressing the beads some excess putty will prob be pushed outward. Gently, GENTLY remove this with an xacto knife. This is usually the point where I gently caress up and have to redo the whole goddammn thing. It is crucial no pets or loved ones are anywhere near at this stage. This is a really difficult little trick to do correctly and some of the best modelers I know are absolutely crap at it, but if done well it looks awesome. Did I explain it well enough? Now where is my platinum...? alcyon fucked around with this message at 22:21 on Mar 15, 2010 |
|
#
?
Mar 15, 2010 20:02
|
|
|
a couple of companies sell sprues of weld beads, believe it or not. Edit - yours look really nice though. And re. your technique for making a rough looking surface - have you tried using Mr Surfacer? I've heard a few friends talk about it in glowing terms. Danger - Octopus! fucked around with this message at 20:30 on Mar 15, 2010 |
|
#
?
Mar 15, 2010 20:27
|
|
|
Danger - Octopus! posted:a couple of companies sell sprues of weld beads, believe it or not. Yeah I know problem with those sprues is that they are really difficult to apply to complex curves and areas. I've seen photoetch weldseams as well, but those were flat which kinda defeats their purpose. Problem with both kinds is that they are too even to look convincing. Strangely it is the flaws in the spacing of the beads what makes them look real. Mr.Surfacer indeed! Actually that surface effect was done with mr.surfacer 500. I LOVE the stuff, very versatitle for a ton of effects and as a liquid putty for blending seams. Mr. Surfacer 1200 in rattle cans is my favorite pre-paint-primer btw.
|
|
#
?
Mar 15, 2010 20:41
|
|
|
If anyone wants another look at simulated welds, Masa Narita does them on his Tiger project. In the same project, he also does dents in plastic, using a mysterious medical tool. I've started the preliminaries for my new project. I still need to buy paint, but nearly all of my tools are accounted for. Question on washing: would a acrylic wash over enamel work? And what's the thinner for acrylic?
|
|
#
?
Mar 15, 2010 21:16
|
|
|
Nebakenezzer posted:I've started the preliminaries for my new project. I still need to buy paint, but nearly all of my tools are accounted for. Question on washing: would a acrylic wash over enamel work? And what's the thinner for acrylic? An acrylic wash would certainly work, but why not try an oil wash after spraying a satin varnish. Acrillic thinner: distilled water, isopropyl alcohol or Tamiya x-20a, or any brand-specific thinner. I always find that most model makers buy too many paints and not enough thinner. (I use at least as much of the latter than the former.)
|
|
#
?
Mar 15, 2010 22:18
|
|
|
it also depends on the paint I've had some bad reactions with isopro and Vallejo game color at least for use in an air brush. Also I went and did a enamel wash on the model I almost ruined, worked nice but what do I use for a final satin/dull coat?
|
|
#
?
Mar 15, 2010 23:37
|
|
|
alcyon posted:An acrylic wash would certainly work, but why not try an oil wash after spraying a satin varnish. Thanks, I'll keep it in mind. While I'm not positive I'm going to do a wash, since discovering this thread I definitely have an itch to try out some of these new fancypants techniques.
|
|
#
?
Mar 15, 2010 23:45
|
|
|
Nebakenezzer posted:In the same project, he also does dents in plastic, using a mysterious medical tool. That's a battery operated Cautery Pencil. Normally used to cauterize tissue in the body during surgery to stop bleeding. I've never seen this particular type before, as the hospital where I work uses cauteries that connect to a larger control unit. These look very cool though for model work. More info: http://www.boviemedical.com/products_aaroncauteries_changeatip.asp alcyon posted:Acrillic thinner: distilled water, isopropyl alcohol or Tamiya x-20a, or any brand-specific thinner. Only use the Tamiya X20A thinner with Tamiya paints. Tamiya paints are different than most acrylics in that they have a lacquer component to them, so the Tamiya thinner is formulated for them. Using that thinner with other paints will usually destroy the paint. Bloody Hedgehog fucked around with this message at 06:43 on Mar 16, 2010 |
|
#
?
Mar 16, 2010 06:39
|
|
|
Bloody Hedgehog posted:Only use the Tamiya X20A thinner with Tamiya paints. Tamiya paints are different than most acrylics in that they have a lacquer component to them, so the Tamiya thinner is formulated for them. Using that thinner with other paints will usually destroy the paint.
|
|
#
?
Mar 16, 2010 07:23
|
|
|
Well gently caress me, so it does - that is a pain. The enamel thinner says the same "use only with Tamiya paints" thing. Would it still work with say the enamel based MIG washes or am I going to have to get the MIG thinner?
|
|
#
?
Mar 16, 2010 07:58
|
|

|
No Pun Intended posted:Well gently caress me, so it does - that is a pain. The enamel thinner says the same "use only with Tamiya paints" thing. after some Googling: "...The filters can be thinned further with MIG Thinner for Washes, Turpenoid, or any mild odorless paint thinner." You might find this interesting as well. It was written by Mig before he started selling his own thinner. http://www.missing-lynx.com/rare_world/rw04.htm
|
|
#
?
Mar 16, 2010 08:50
|
|
|
An easy mistake to make, as most of the time when I read something like "Only use this product with our other products.", I tend to think the company is just trying to get you to spend more money on their own stuff. As for the Mig washes, a turpentine analog would probably the most versatile thinner. You can get the stuff fairly cheap in any art store. Most of the low/no-odor stuff is under different names as they are derivatives of turpentine and not the pure stuff(you don't want the pure stuff; too caustic and smelly). Look for Turps, Turpenoid, Grumtine, Gamsol, Sansador, or plain old Odorless Mineral Spirits.
|
|
#
?
Mar 16, 2010 09:13
|
|
|
Well using high tech odor analysis (huffing it) the Tamiya enamel thinner gives of a mild turps smell so I guess it should work.
|
|
#
?
Mar 16, 2010 09:27
|
|
|
alcyon posted:Alright good sir, weld beads it is, huzzah! The welds shown here are classic 'fillet' weld the most recognizable type of weld. Brilliant, thanks. I'll try & have a go in the next couple of weeks. Unfortunately yes I mostly play with GW crap, but I'll try & get some magicsculpt or aves, kneedtite has always been a bit too rubbery for me. Tell you what, 1 more tutorial & Plat is yours. Your choice of subject.
|
|
#
?
Mar 16, 2010 17:42
|
|
|
alcyon posted:I used Aves Apoxie for this. I assume since you are mostly a 40k player(?) you probably use greenstuff/kneadite yourself? But Aves (or MagicSculp for that matter) is far superior: Where can one find Aves or MagicSculp in North America?
|
|
#
?
Mar 16, 2010 18:27
|
|

|
I get mine from https://www.theengineerguy.com
|
|
#
?
Mar 16, 2010 19:12
|
|

|
Cakefool posted:Brilliant, thanks. I'll try & have a go in the next couple of weeks. I'd be happy to share some more of my tips/ideas, plat or not ") . Not really sure what about : I could do an extensive write up on different tools and products maybe? or something about scratchbuilding models. (I am about to start a project for another forum I could share?, though that would be a long term thing). . Not really sure what about : I could do an extensive write up on different tools and products maybe? or something about scratchbuilding models. (I am about to start a project for another forum I could share?, though that would be a long term thing). Indolent Bastard posted:Where can one find Aves or MagicSculp in North America? This is the stuff you should be looking for: http://www.avesstudio.com/Products/Apoxie_Sculpt/apoxie_sculpt.html Aves Apoxie Sculpt. I usually buy it per pound, buy it you wanna try it first little test packages are available. The other company is MagicSculp / MagicSculpt. it is sold under both names and in differing packages but both are the same. I think it is slightly cheaper in Europe but ymmv. http://www.magicsculp.com/ I prefer Aves, but both brands are really good. Both are water soluble when wet, easier to work with and set way better than green stuff. alcyon fucked around with this message at 19:25 on Mar 16, 2010 |
|
#
?
Mar 16, 2010 19:18
|
|
|
A few excerpts from your scratchbuilding knowledge would always be welcome. Edit: Painting - do you use an airbrush? If so, some more realistic effects & tips are also welcome.
|
|
#
?
Mar 16, 2010 19:55
|
|
|
Cakefool posted:A few excerpts from your scratchbuilding knowledge would always be welcome. I am about to start a rather large Ma.K project: the Neuspinne, an obscure and fragile looking fourlegged walker with tons of bits and wires 'n poo poo. I'd best just write about different techniques as we go along. I figure that will make most sense, but even in the first stages there will (hopefully) be some neat stuff like shaping high-density-foam and epoxies. If all goes according to plan (and if I can find the right tubes for the skeleton), I will start sometime before early April. But if I may give one tip for starters: Planning is the most important 'technique' there is. Gathering every possible scrap of source material is so important. You won't believe how many hours I spend trawling the internet and ebay for some rare magazines and such. Making blueprints is by far my least favorite task, I abhor it, but it is prob. the most important step. I try to find reference points and points of scale in photographs and drawings and puzzle together a blueprint from that. I started out scratchbuilding some years ago as a StarWars film prop replica shipbuilder. For most ships there is a ton of source material (the films and photo's from the original props etc.), but the best and most accurate information is usually very rare and heavily guarded by other builders. Hardly anyone is willing to share key info for free. (Note: to be clear not money but other info is currency)I, for example, have some really key info on the the B-wing that 'they' will have to pry from my cold dead hands. I've spent months gathering that information on the 'scudioscale' ROTJ B-wing, before even doing anything 'real' (One day before I'm 65 I will actually start). Anyway, point is that most builders just start without any decent plans and ideas. I've seen too many project fail because of that. A project needs to and solidify before making it solid as it were. On airbrushes: Yes I do own several. My favorite is my trusty Devilbiss Aerograph 63, an oldie by now, but a beautifully engeneered piece of kit. Strangely, I use them less and less as time goes by. Nowadays just for basic basecoats, colormodulation (not really fond of that tecnique) and coats over salt and hairspray where I don't want to 'pull' too much at the underlaying paint (You are familiar with the salt and hairspray approaches?) To be honest, I find that most 'complex' painting washes, filters, chipping, weathering and what-have-you is best done (and more fun as well) with actual old fashioned brushwork, but that's just me I guess. alcyon fucked around with this message at 22:57 on Mar 16, 2010 |
|
#
?
Mar 16, 2010 21:58
|
|
|
I have an Iwata revolution CR, I'm familiar with the salt/hairspray, that was actually quite good fun. I'm happy with acrylics, thinning, basecoating, a little bit of shading etc. Just starting really. I need to get some oils & appropriate thinner & try the streaky rust effect, also the effect where you put spots of different colour over a basecoat & blend them to remove the uniformity. I tried colour modulation after reading a badly written article & tried to go from light down to dark, that really didn't work as well as it should. 
|
|
#
?
Mar 16, 2010 22:50
|
|
|
Cakefool posted:I have an Iwata revolution CR, I'm familiar with the salt/hairspray, that was actually quite good fun. Cakefool posted:I'm happy with acrylics, thinning, basecoating, a little bit of shading etc. Just starting really. I often used plastic food packaging for cookies and such to practice on, loads of curves an corners Cakefool posted:I need to get some oils & appropriate thinner & try the streaky rust effect, also the effect where you put spots of different colour over a basecoat & blend them to remove the uniformity. Cakefool posted:I tried colour modulation after reading a badly written article & tried to go from light down to dark, that really didn't work as well as it should. alcyon fucked around with this message at 23:42 on Mar 16, 2010 |
|
#
?
Mar 16, 2010 23:19
|
|
|
So I've been looking through SA, and I found that there are like three or four other threads dedicated to modeling one thing or another. Do you think unifying all these threads is a good idea? In the anime subforum for example, there is a thread about modeling giant assault mechs. Wait, make that modeling unbelievably expensive assault mechs. These people are spending more on a single model then I've spent buying everything: models, paints, supplies, the works. This is probably old hat to anyone ITT, but now that I've come back to this hobby I'm astonished at how many different 'types' of modelers there are. Diorama builders, wargamers, these robot builders. Not to mention all the resources now availibe on the net. When I stopped modeling, it was just when the internet was becoming available to me. Now it's ten years later, and the scope and depth of material relating to all things miniature is mind boggling to me. alcyon posted:I started out scratchbuilding some years ago as a StarWars film prop replica shipbuilder. For most ships there is a ton of source material (the films and photo's from the original props etc.), but the best and most accurate information is usually very rare and heavily guarded by other builders. Hardly anyone is willing to share key info for free. (Note: to be clear not money but other info is currency)I, for example, have some really key info on the the B-wing that 'they' will have to pry from my cold dead hands. I've spent months gathering that information on the 'scudioscale' ROTJ B-wing, before even doing anything 'real' (One day before I'm 65 I will actually start). Case in point: stuff like this. I'm so glad my largest problem right now is finding the right color green for my An-124's interior
|
|
#
?
Mar 18, 2010 19:49
|
|
|
Nebakenezzer posted:So I've been looking through SA, and I found that there are like three or four other threads dedicated to modeling one thing or another. Do you think unifying all these threads is a good idea? Probably not. Whatever was the most popular would drown out the rest, so if gundam modellers were more prolific posters, the thread would end up being a de facto gundam model thread until someone started a separate scale modelling thread like this one...
|
|
#
?
Mar 18, 2010 20:25
|
|
|

|
| # ? May 30, 2024 13:49 |
|
|
There's very little cross-interest between the fantasy types and the realism guys. I mean if it was just techniques then yeah great, but you can't expect every niche to get along.
|
|
#
?
Mar 18, 2010 21:12
|
|