


|
poxin posted:In the spirit of all things nixie, here is my project I "finished" a little while ago, just a simple clock. Still trying to get the code working as it's only been a paperweight for months. That is the only nixie clock that looks good. Ever.
|
 #
?
Jul 22, 2010 18:12
#
?
Jul 22, 2010 18:12
|
|


|

|
| # ? May 30, 2024 10:46 |
|
|
My new project is this Old Roadmaster girls bike: Planning to strip it and paint it(haven't decided on a colour yet, suggestions?), change all the bearings, buy some twistee parts for it. Should be a lot of fun. I also have an off road kick scooter I'm working on.
|
|
#
?
Jul 27, 2010 05:36
|
|

|
I started my long board press today, and am making it out of reclaimed oak planks. I also picked up some cheap plywood at the lumber supplier, these are all topsheets from when stuff is shipped, it will be perfect for some test decks.  It included a sheet of baltic birch.   Here is the largest piece of oak after being planed and having one side jointed.  Here is the cut up pile of plywood, cut in 4 1/2 foot and 3 1/2 respectively. The longest one is for the bottom of the press.  A couple test curves.  The 3 1/2 foot birch.  Hopefully by tomorrow evening I will have a test board in the press, and can be riding around on a ghetto plywood board by the end of the week. The press is just going to be simple and hopefully I can start making some boards with some rich mahogany veneers on them. I am going to pull a Ron Swanson and start leaving furniture quality longboards in my friends offices. 
|
|
#
?
Jul 27, 2010 06:53
|
|

 the Mods, they knew!
|
cultureulterior posted:Oh, it took me ages, but it can probably be done in a long weekend by someone who is dedicated and who has all his tools ready, especially as they now sell the electronics almost complete. I'm calibrating my own CupCake at the moment - following this tutorial to calibrate the Carve and Extrusion Width parameters in Skeinforge. I've not had much luck so far though - mostly everything I do makes the prints come out worse. I print a 2x2 Lego brick as a test as well; either the head tends to drag through the plastic, or the walls don't get any infill. The plastic also seems to keep flowing long after the extruder motor is stopped. I'm bad at photos but here are all the calibration prints I've been doing:  On the plus side, I've had a few moderately successful prints:  This 2x2 block actually fits an official Lego block!  This is a little crank for adjusting the Z-stage by hand, which is a little better than pulling on the belt.
|
|
#
?
Jul 27, 2010 15:24
|
|

|
Fib posted:This is a little crank for adjusting the Z-stage by hand, which is a little better than pulling on the belt. That's a good idea. Currently I'm seeing a lot of Z-stage slippage, which I haven't really fixed.
|
|
#
?
Jul 27, 2010 23:17
|
|

|
Big update for my guitar build. First off, Truss Rod!  Fretboard inlays (they're paisleys)  About where I'm at now. (taken before inlays)  I think I'm going to reshape the body near the control cover to follow the plate better. It may not look the greatest, but I'm real proud of myself 
|
|
#
?
Jul 28, 2010 01:17
|
|


|
I completed my press! Spent most of yesterday working on this and got a board in it at like 2 am last night. I got 3 pics taken before my camera decide to give up the ghost.    Then I finished assembly last night and and put a couple of pieces of ply in to test the shape. The reclaimed oak is pretty, since its all weathered and full of worm holes. :nature: Pics are horrible because I had to use photobooth on my hackentosh netbook. Empty Press top of press  2 sheets of ply glued with 4 hour epoxy    Crappy blank ready to cut.  The plan is to try to make a drop thru, I just need to borrow my buddies boards so I can make some traces. It looks pretty smooth except, that I need to take the belt sander to the press an fix the angle on a couple of the ribs. All this was done with out any plans except for looking at the toothless page. http://users.telenet.be/Toothless/Toothless/pages/instructions/press/press.html When you make stuff out of scraps and reclaimed wood it means you have to just MacGyver it and go with your gut.
|
|
#
?
Jul 28, 2010 21:54
|
|
|
Rotten Cookies posted:About where I'm at now. (taken before inlays) That looks loving awesome! What color is the body going to be, or are you going with some sort of natural finish that shows off the grain? If you're going with a solid color, maybe you could add an accent color/stripe at the bottom rather than recutting the body? Like, a blue body with a sky blue accent stripe along the bottom, with a white paisley. If not that, then maybe consider adjusting the location and/or shape of the paisley control cover slightly? A burst finish would solve the problem itself. That's a really cool shape guitar you penned, well balanced but unique, and I'd hate to see it change this late in the build.
|
|
#
?
Jul 29, 2010 08:46
|
|


|
Hadlock posted:That looks loving awesome! What color is the body going to be, or are you going with some sort of natural finish that shows off the grain? If you're going with a solid color, maybe you could add an accent color/stripe at the bottom rather than recutting the body? Like, a blue body with a sky blue accent stripe along the bottom, with a white paisley. If not that, then maybe consider adjusting the location and/or shape of the paisley control cover slightly? A burst finish would solve the problem itself. That's a really cool shape guitar you penned, well balanced but unique, and I'd hate to see it change this late in the build. Thanks! It's going to be stained blue, so the grain will hopefully show through. I forgot to take pictures of the test piece of maple in the blue dye. I'll get them up ASAP. The control cavity itself is already cut so I'll have to work around that if I'm going for a different shape for the paisley. There will be white binding along the edges of the body, so maybe that could work as your proposed accent line? I should mock up what it would look like in photoshop or something. I haven't had much physical progress this week because work has been hell (overtime on overnights. Ugh.) and I can't work on it too late in the evening. But this weekend I will do some real work! Thanks for the comments and input. I really appreciate it.
|
|
#
?
Jul 29, 2010 13:08
|
|
|
 Played with a laser cutter today, made a case for my logic analyser. http://thinkl33t.co.uk/?p=316 for more pictures. theparag0n fucked around with this message at 20:26 on Jul 30, 2010 |
|
#
?
Jul 30, 2010 20:23
|
|

|
So to answer what color this will be... In between the red lines is what I'm shooting for. That's two applications of blue RIT dye. The to the left is one coat, to the right is three. And guess who stopped being a lazy jerk and finished putting all the fret markers in?! That's right, ME!  I am so loving eager to finish this, but I really don't want to rush anything. Welp, off to work!
|
|
#
?
Aug 3, 2010 01:45
|
|
|
poxin posted:Yeah, I wanted to keep it as natural as possible. I used something called Howard Feed-n-Wax. I think they sell it at home depot. That stuff smells really good too. I used Tung oil on this amp - 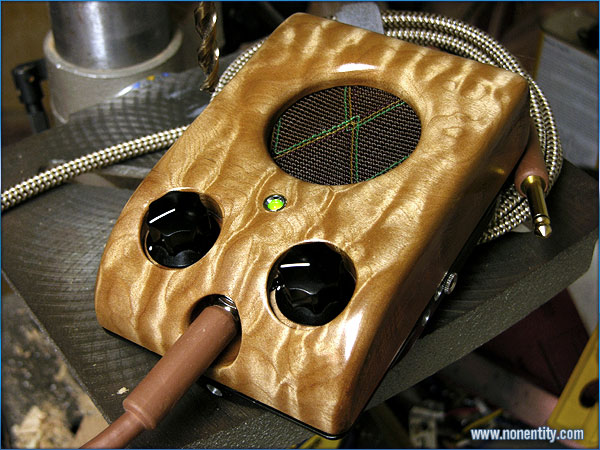 It produces a great finish, and will get more glossy the more you add to it, so it's nice to stop when you like what you see. It does start out matte, and 8 or 10 coats in starts to get nice and glossy.
|
|
#
?
Aug 3, 2010 19:09
|
|

|
This isn't as awesome as some of the stuff you guys are doing, but I'm building a small slide-in camper for the bed of my truck; it's not as intricate as it sounds because I'm neither electrifying nor plumbing it. It's not meant for luxuriating or anything - just a place to lie down after a hike, fishing or boating that'll be more secure than a tent and that I won't have to take down and stow once I'm ready to break camp. It's something I've not only wanted to do for a long time, but, philosophically, it's something I needed to do at this place in my life. It's 77" long and 48" wide between the wheels and the shelf that rest on top of them adds a few extra inches on either side. The front wall is going to be even with the cab at 38", but it'll sweep back a bit and then rise to 50". The bunk will fold up to the wall and lock in place revealing cabinets underneath and the back wall next to the bed will have cabinetry as well. I'm trying to think along the lines of a boat in terms of space optimization. First fitting.  Click here for the full 1600x1200 image. Ignore the studs in this picture. I had cut only three of them and just stood them up to get an idea of things. Since then, I've added three studs to each end as a buttress in addition to the regular wall studs.  Click here for the full 1600x1200 image. Incomplete Sketchup diagram.  Click here for the full 1024x683 image. EDIT: Got that wall framed up  Click here for the full 1600x1200 image. toomanyninjas fucked around with this message at 04:25 on Aug 5, 2010 |
|
#
?
Aug 4, 2010 05:59
|
|

|
That's awesome! I've always wanted to make a teardrop camper, which basically provides the same functionality as what you're going for. Now that I drive a Kia Soul, it would look so cute too. 
|
|
#
?
Aug 4, 2010 20:53
|
|

|
Well my project pales in comparison to some of yours, but here it is. I was in a Navy squadron that recently transitioned back to carrier ops. Pilots use this thing called a greeny-board to track grades of recent passes (landings) to recognize trends and for general bragging rights. It's made of 1/2" birch-ply with the diagonal grooves routed about 1/8" deep and I used mini poker-chips as markers(there are a few stuck in the picture). Each color represents a different grade and the name plates at the bottom are call-signs of our pilots. I suck at taking pictures, so I didn't get any of the completed board. This shot is about 90%. I put a lexan sheet over the grooves with a removable dowel at the bottom of each to hold the chips in until that scoring period is over and it's time to empty. kaiger fucked around with this message at 19:04 on Aug 7, 2010 |
|
#
?
Aug 7, 2010 19:00
|
|

|
Please tell me one of your pilots callsigns isn't named after Professor Snape from Harry Potter.
|
|
#
?
Aug 8, 2010 02:26
|
|

|
Yeah. It is. In the Navy callsigns aren't meant to be nice. He hates it.
|
|
#
?
Aug 8, 2010 02:52
|
|
|
kaiger posted:Well my project pales in comparison to some of yours, but here it is. I was in a Navy squadron that recently transitioned back to carrier ops. Pilots use this thing called a greeny-board to track grades of recent passes (landings) to recognize trends and for general bragging rights. It's made of 1/2" birch-ply with the diagonal grooves routed about 1/8" deep and I used mini poker-chips as markers(there are a few stuck in the picture). Each color represents a different grade and the name plates at the bottom are call-signs of our pilots. Neuticles is the best callsign i've ever heard
|
|
#
?
Aug 8, 2010 16:31
|
|

|
Just a quicky: I've got a white veneer knock-together desk and I wanted a monitor shelf. I had my monitor on a wire rack but it sagged so bad I had to use a cigar box and the special edition DVD of Total Recall to hold it up: So I went to home depot and bought a prefab white shelf and some door-stoppers. Assembly took about two minutes (or would have if one of the stoppers didn't twist loose from its mounting screw, hence the clamp and some JB Weld)  Voila! Easy-peezy. Uniform height without any need for precise cutting, and built-in rubber feet. The perfect shelf! 
|
|
#
?
Aug 8, 2010 20:23
|
|


|
Jeeze, I feel way out of my league posting in here. My fiancee and I have our wedding coming up in September. We've been doing pretty much everything DIY to save costs so we can spend our money in better places like the venue and photography. 40/50% off Michaels coupons have been a life-saver for us. Last night we built our cardbox out of pretty much dollar store materials. We wrapped three cardboard boxes in a damask print wrapping paper with some spray-on adhesive for a nice smooth look, and added some black cardstock 'lids' for style. Finished off with some red ribbon, a big blingy ring and fake pearls. We both think it looks pretty nice, and like it much, much better than any rental boxes. We just have to figure out how to top it, so I'm open to any suggestions. 
|
|
#
?
Aug 9, 2010 15:41
|
|

|
Sudden Infant Def Syndrome posted:Jeeze, I feel way out of my league posting in here. That looks really good! I made my own card box too & topped it off with a big bow:  It would look really nice if you could make a bow out of that same red ribbon.
|
|
#
?
Aug 10, 2010 00:19
|
|

|
I've recently started making geek inspired jewelry, after purchasing two pair of D20 earrings online. Instead of using single dice (die?), I chose to utilise (nearly) complete dice sets to create pieces to match the earrings:   I added glass spacer beads to separate the dice and make them slightly more, er, fashionable. The holes were drilled with a cheapo $30 drill from Bunnings and a 1.5mm bit. Unfortunately the plastic dust heats up and melts around the bit, gluing it inside the dice, so you need to take your time when drilling (or use a more expensive drill I guess). Next project? D20 rings or perhaps a necklace.
|
|
#
?
Aug 10, 2010 02:04
|
|

|
You could use a manual drill, or possibly wet drill them, would depend on the melt point of the plastic.
|
|
#
?
Aug 10, 2010 17:04
|
|
|
kaiger posted:Well my project pales in comparison to some of yours, but here it is. I was in a Navy squadron that recently transitioned back to carrier ops. Pilots use this thing called a greeny-board to track grades of recent passes (landings) to recognize trends and for general bragging rights. It's made of 1/2" birch-ply with the diagonal grooves routed about 1/8" deep and I used mini poker-chips as markers(there are a few stuck in the picture). Each color represents a different grade and the name plates at the bottom are call-signs of our pilots. Very cool! Not to mention these pilots are flying one of the coolest planes ever... the EA-6B Prowler. Great work dude!!!
|
|
#
?
Aug 10, 2010 20:27
|
|

|
Will it actually stop the bit from spinning? I'd suggest just keep the bit moving even pulling it back through. Don't stop the drill until you've gone through and pulled back out. I can't see it getting stuck while moving.
|
|
#
?
Aug 11, 2010 13:58
|
|
|
Here's a workbench I made to replace an old piece of crap that was falling apart. I wanted it to roll around, but also be stable when I worked on it. I found a really neat solution that someone thought up and proceeded to I really like the wheel design, aside from the hanging wood sticks. It takes about 10 seconds to get it up on the wheels, and even less to get it on the feet. I may eventually change it up with a shorter support that attaches at a 45 degree angle from the legs instead of the desktop. Excuse the terrible camera phone pictures, it's all I have right now.  *transformer sound* 
|
|
#
?
Aug 11, 2010 21:40
|
|
|
Loztblaz posted:Here's a workbench I made to replace an old piece of crap that was falling apart. Are those 4x4s for the legs? Those things are really nice solid pieces of wood. I didn't see any solid core door workbenches in here, probably because they are dead simple to make. Here's one I made.  Materials were: 30" x 80" solid core door, 4x4s for the legs, 2x4s for the skirts, and a bunch of wood screws. The total cost of materials was ~ $100. I took 3 days to put it together, but it was just me and I spent most of the time measuring and marking screw locations. Once it was finished (and 3 sheets of folded paper were put under one leg to balance it  Those 2x4s were warped, I swear) it is definitely the rock-solid nuclear-blast-surviving behemoth I was hoping for. I was going to add a hardwood top, but it's only going to be used for soldering and electronics work so I just put a drop cloth over it. Those 2x4s were warped, I swear) it is definitely the rock-solid nuclear-blast-surviving behemoth I was hoping for. I was going to add a hardwood top, but it's only going to be used for soldering and electronics work so I just put a drop cloth over it.Also I brought all the materials home in a '92 Camry so I don't want to hear any excuses as to why no one else can build one. DethMarine21 fucked around with this message at 19:19 on Oct 26, 2011 |
|
#
?
Aug 13, 2010 17:42
|
|
|
DethMarine21 posted:Once it was finished (and 3 sheets of folded paper were put under one leg to balance it On a garage/basement poured cement slab? It's more likely your floor isn't level. I about drove myself nuts trying to level some cabinets I made once in my garage. Measure, turn over, belt sander, turn back over (differing orientation), measure to find a DIFFERENT high corner was even FURTHER off than the first, rinse, repeat. Then it dawned on me the cement pad was neither consistent nor perfectly level.
|
|
#
?
Aug 13, 2010 19:53
|
|

|
DethMarine21 posted:I didn't see any solid core door workbenches in here, probably because they are dead simple to make. Here's one I made. I used particle board instead of a solid core door, but I built a garage workspace out of the $20 workbench plans and some pegboard last summer. Came out really well when it was all finished.   Similarly, my materials came home in a '99 Accord.
|
|
#
?
Aug 13, 2010 21:20
|
|


|
So my friends have once again said there is something I can't build. So of course I'm going to try. Electric Pocket Rocket. Out of Popsicle sticks. Do you think it can be done safely? I planned on using a minimum amount of metalwork for interior bracing, linkages, and shocks, but other then that try to make the body out of popsicle sticks. Baring that, cutting up 1/8" steel or aluminum and making what would look like a giant erector set. Which I feel would fit the spirit of the original challenge. Any input on this critical decision while I start getting the electric parts bought gathered?
|
|
#
?
Aug 13, 2010 22:38
|
|


|
M_Gargantua posted:Electric Pocket Rocket. If a Viking boat can be made out of popsicle sticks, I see no reason why a pocket bike couldn't. Just be sure to make a thread detailing the creation.
|
|
#
?
Aug 13, 2010 22:57
|
|

|
Say hello to Eugene my first plush, he is a goatbunny, I finished him last night.  
|
|
#
?
Aug 13, 2010 23:06
|
|

|
Seeing all these workbenches suddenly makes me want to build a workbench. I've never actually had one, and usually use the big brute garbage pails outside. So my guitar now has frets and a somewhat profiled neck! Woohoo!  It may not look that different from my last picture, but these are big accomplishments for me. Still to do: File the frets Cut + slot nut Pre-drill bolt-on holes Binding on body top Electronics Control plate and Truss rod cover (there's nothing to cover on the headstock) Dye + clearcoat Then there's the (I assume very annoying) process of figuring out which frets are high/low, and dressing them and whatnot. Getting the action just right. I'm anticipating there being a lot of work right at the end, right before it's finished. Hopefully I'm overestimating how much there is. EDIT: I decided to keep that little "weirdness" on the body near the control plate. I don't care, I've come to like it.
|
|
#
?
Aug 14, 2010 00:32
|
|
|
Looks pretty sweet! For fret leveling, I use a marble threshold I picked up at the hard ware store and epoxied some hard wood blocks to the back for handles. I use a spray adhesive and attach the sandpaper to it. The marble is dead flat and heavy enough that all you really have to do is push it back and forth a few times and everything is level.
|
|
#
?
Aug 14, 2010 15:04
|
|

|
Sudden Infant Def Syndrome posted:Jeeze, I feel way out of my league posting in here. I did something similar for my sister: 
Broodwich fucked around with this message at 07:09 on Aug 15, 2010 |
|
#
?
Aug 15, 2010 07:06
|
|

|
Broodwich posted:I did something similar for my sister: imageshack doesn't work on SA... Most people use http://waffleimages.com
|
|
#
?
Aug 18, 2010 20:09
|
|

|
M_Gargantua posted:Electric Pocket Rocket. FireStorm has the right idea. Glue together the frame in popsicle sticks (6 thick? maybe 12 thick for the rear trailing arm), then wet the finished frame in epoxy, wrap it in carbon fiber tape, then wet the fiber. Carbon fiber is expensive, but for a project like that you'd only need 1-2 yards of the stuff. Look at what people are doing with lost foam carbon fiber methods and recumbent bikes; a wood cored frame wrapped in CF is going to be similar in strength. While 10' of 3" CF tape is $60, 30' of 3" fiberglass tape is only $10.... http://malricsworld.blogspot.com/2008/12/29-december-2008-friend-of-mine-gilles.html  Click here for the full 1600x1200 image.  Click here for the full 1600x1200 image. Hadlock fucked around with this message at 21:05 on Aug 18, 2010 |
|
#
?
Aug 18, 2010 21:01
|
|
|
Two projects I've been working on: First I found an awesome old metal toolbox at goodwill and since I hate my tiny plastic toolbox which smells like a tacklebox, I decided an upgrade was in order. All it needed was a little paint first because it's got some rust and I personally don't care for a green toolbox. Original:   After sanding, priming, and painting!   All I have left to do is to rivet back on the name plate on the front. I'm not super pleased with the coating the rustoleum left, but it's not too terrible looking and it's not like it's not going to get beatup and scratched anyway. Second project is the restoration of some 5.1 headphones a friend gave to me with a completely busted cable. Very little of the original headphones are left In these first few pictures you can see the destroyed headset that is held together only with generic brand duct tape       In the end they aren't even done. You can still see the sharpie marks on the "bunny ears". Those were supposed to be temporary and cut down after I did some more work on the acrylic so that they'd be adjustable by unscrewing the wingnuts and sliding the ear assemblies up and down. HOWEVER, I took them to a LAN and the acrylic was completely destroyed. Everything except the speaker assembles(the important part) is broken beyond recognition. The next time I'm going to make it out of something stronger than acrylic, haven't decided what though. SpartanIvy fucked around with this message at 08:12 on Aug 23, 2010 |
|
#
?
Aug 23, 2010 08:10
|
|
|
SpartanIV posted:Headphones And people complain about the Grado "antennas." 
|
|
#
?
Aug 24, 2010 06:19
|
|

|

|
| # ? May 30, 2024 10:46 |
|
|
I'd complain too. Look how small they are!
|
|
#
?
Aug 24, 2010 07:32
|
|