


|
Traxxus posted:Sample of the stain, wasn't too sure about the gel type but with the large amount of vertical space it should make it easier. I'm a little nervous to start staining and clearcoat, while I've stained things before I have never used clearcoat, and am afraid to mess up something I've put so much time and effort into. Don't ever use a brush to apply a stain, grab a ratty white t shirt and soak it, glove up and hop to. Stains make brush marks entirely too visible (for me at least) EDIT: New page, really?  I'll have to get some pictures of the table I'm refinishing up I guess... I'll have to get some pictures of the table I'm refinishing up I guess...
|
 #
?
Dec 11, 2011 08:22
#
?
Dec 11, 2011 08:22
|
|


|

|
| # ? May 28, 2024 11:55 |
|
|
Traxxus posted:Sample of the stain, wasn't too sure about the gel type but with the large amount of vertical space it should make it easier. I'm a little nervous to start staining and clearcoat, while I've stained things before I have never used clearcoat, and am afraid to mess up something I've put so much time and effort into. I've heard gel stains are better for pine to help prevent blotching but I've never used them. You might want to use a conditioner first. The stain won't take as darkly but it will help with the blotching. As it is, it will be tough to match the oak to the pine. Your stand is over-built since those inside 2x4s don't touch the floor they are adding weight without supporting any. Won't hurt anything, just reduces your storage space. Nebulis01 posted:Don't ever use a brush to apply a stain, grab a ratty white t shirt and soak it, glove up and hop to. Stains make brush marks entirely too visible (for me at least) You're supposed to wipe off the excess stain so it shouldn't make any difference how you put it on. Using rags is one less thing to clean though.
|
|
#
?
Dec 11, 2011 10:09
|
|

|
Yeah the brush is for the conditioner not the stain, I got the conditioner cause I figured the plywood would suck up the stain like crazy and look different than the rest. The inside 2x4 is just a screw strip to hold everything together during the initial build, I didn't want it to be load bearing since all the weight would then be transferring to one tiny area, instead of the box frame spreading it out. This is the basic design I got from some aquarium forum. 
Traxxus fucked around with this message at 19:52 on Dec 11, 2011 |
|
#
?
Dec 11, 2011 19:48
|
|

|
Traxxus posted:The inside 2x4 is just a screw strip to hold everything together during the initial build, I didn't want it to be load bearing since all the weight would then be transferring to one tiny area, instead of the box frame spreading it out. If the inside 2x4s were supporting load, it would still be distributed throughout the frame. Load will take the most direct route to ground. As it is, the additional 2x4s are adding weight without providing support meaning that technically they weaken the structure but your stand is so sturdy it won't matter.
|
|
#
?
Dec 12, 2011 09:58
|
|
|
wormil posted:If the inside 2x4s were supporting load, it would still be distributed throughout the frame. Load will take the most direct route to ground. As it is, the additional 2x4s are adding weight without providing support meaning that technically they weaken the structure but your stand is so sturdy it won't matter. Ah I get it, you're right. It is sturdy as hell, especially since I added the back piece of plywood. I'll keep that in mind on my next build, a friend wants to build one for his 155 gallon tank, but has no tools or space so I offered mine up.  Same design, except with 2x8's for the box frames, because I want to avoid needing to use a center support for room for the sump tank or whatever else he needs for his saltwater setup. Should I build the bottom box frame with 2x8's as well? On the one hand I don't think it's really necessary, on the other hand it's gonna be over 1500 pounds of water alone, not counting everything else. Same design, except with 2x8's for the box frames, because I want to avoid needing to use a center support for room for the sump tank or whatever else he needs for his saltwater setup. Should I build the bottom box frame with 2x8's as well? On the one hand I don't think it's really necessary, on the other hand it's gonna be over 1500 pounds of water alone, not counting everything else.
|
|
#
?
Dec 12, 2011 14:14
|
|
|
Traxxus posted:Lots of ghetto clamping, forgive my lack of large clamps. Ghetto, schmetto. I use those pipe clamps all the time. They are awesome. Mister Sinewave posted:Mostly I think we're just lucky and her personality is right for it (she's really attached to us, is curious, and genuinely wants to go outside). Walks around the yard with a leash turned into walks around the neighborhood with a leash which led to park walks with a leash and eventually the leash just gets in the way, and so on. So I guess we did train her, but really just a side effect of indulging her appetite for outdoors while not letting her out unsupervised. (edit: By the way, you can't really make it out in any of the pics but when outside she always has a harness - ready for the leash if needed - but which more importantly has her name tag and contact info, etc just in case.) Oh my god you are awesome. My cat's much like yours, leash trained from kittyhood (supervised outdoor time), loves to travel and go on walks, occasionally even pretends to heel when people are looking. I want to make a catpack too! 
|
|
#
?
Dec 13, 2011 03:42
|
|


|
I have about a month off between semesters and I want to use it constructively, so I'm thinking of making a (smaller) version of this: http://www.instructables.com/id/Star-Map/?ALLSTEPS. The thing is, while I'm pretty handy, I haven't done any DIY type projects in years and never anything with electrical components. Is this feasible for someone with my level of inexperience? And if so, are there any basic materials or pieces of equipment that I should have besides what's listed in the tutorial? If this isn't the place for novice questions let me know and I'll move or delete it, just wanted to get some advice before I attempt anything.
|
|
#
?
Dec 13, 2011 05:25
|
|


|
Traxxus posted:Ah I get it, you're right. It is sturdy as hell, especially since I added the back piece of plywood. Yeah, the plywood sides will help distribute weight evenly you just have to make sure you have sufficient support going to the floor and that the floor is sturdy. Actually, when I built an aquarium stand I ran 2x4s from the top to the floor so the weight transferred directly. The plywood skins will help distribute the weight. Or if you want to stick with your design then I would lay the bottom 2x4s flat, think of how walls (sole plate & studs) and floors are built. I'm not sure just how heavy you need to go for 1500 lbs but I have seen 125G aquarium stands built from 2x4s. Here is a stand that is similar to yours but the corners go to the floor. The corners are built up 4x4s. http://www.thereeftank.com/forums/f6/staples-90-gallon-build-thread-176452.html And a nicely done bow front. http://www.livingreefs.com/my-50g-bow-front-stand-progress-t15412.html edit: Here was what I was originally thinking. http://www.arbreptiles.com/cages/75g_stand/index.shtml wormil fucked around with this message at 20:34 on Dec 13, 2011 |
|
#
?
Dec 13, 2011 19:34
|
|
|
MatCauthon posted:I have about a month off between semesters and I want to use it constructively, so I'm thinking of making a (smaller) version of this: http://www.instructables.com/id/Star-Map/?ALLSTEPS. The thing is, while I'm pretty handy, I haven't done any DIY type projects in years and never anything with electrical components. Is this feasible for someone with my level of inexperience? And if so, are there any basic materials or pieces of equipment that I should have besides what's listed in the tutorial? Yes do it just go. It'll be frustrating as hell at times, but you'll learn a lot and have something awesome in the end. This is how I do pretty much all of my projects.
|
|
#
?
Dec 15, 2011 00:44
|
|

|
Traxxus posted:Ah I get it, you're right. It is sturdy as hell, especially since I added the back piece of plywood. I'll keep that in mind on my next build, a friend wants to build one for his 155 gallon tank, but has no tools or space so I offered mine up. 2 x 8 would be a complete waste on the bottom. They will be resting on the floor so they will not flex from the weight. Also adding a 2 x 8 on the bottom will eat up all the room inside the stand. I built the same exact stand for a 220. In reality if I had to do it over I would have used 2 x 4 for the top and gone for the support member. I have a 40 gallon breeder I'm using for the sump and there is not a lot of room to work dude to the reduced opening size. Its fine once your inside the stand but the opening is too small.   Build album here http://imgur.com/a/Is3jH
|
|
#
?
Dec 15, 2011 20:25
|
|
|
Nice job on that, and looking at yours I can see how the bottom doesn't really matter. With the braces and coverings it's not going anywhere. How did you do the finish on it? He said he wants his black, I've been wondering the best way to do it.
|
|
#
?
Dec 16, 2011 14:11
|
|
|
I used an eggshell black from Lowes after a coat of kills primer. I used a good quality brush and thinned the paint a little. I ended up doing three coats trying to keep each one as thin as possible. I wanted a nice smooth finish. I really wanted spray it but budget didn't really allow me to rent / buy a good sprayer.
|
|
#
?
Dec 16, 2011 15:18
|
|
|
MatCauthon posted:I have about a month off between semesters and I want to use it constructively, so I'm thinking of making a (smaller) version of this: http://www.instructables.com/id/Star-Map/?ALLSTEPS. The thing is, while I'm pretty handy, I haven't done any DIY type projects in years and never anything with electrical components. Is this feasible for someone with my level of inexperience? And if so, are there any basic materials or pieces of equipment that I should have besides what's listed in the tutorial? Wow that looks amazing, I got all nerdy over the el wire Ton bag but this one would be amazing to make....
|
|
#
?
Dec 16, 2011 18:07
|
|
|
bEatmstrJ posted:
The post is from many moons ago, but I just made it through the thread and have to bring it up because goddamn is this beautiful. I'm stealing the concept and using it on either a niche/cove or medium wall in my place. Many thanks, you sexy genius.
|
|
#
?
Dec 31, 2011 10:20
|
|


|
Trabant posted:The post is from many moons ago, but I just made it through the thread and have to bring it up because goddamn is this beautiful. I'm stealing the concept and using it on either a niche/cove or medium wall in my place. Many thanks, you sexy genius. You're welcome. I get quite a few compliments on it. Hope yours goes just as well!
|
|
#
?
Dec 31, 2011 13:46
|
|

|
I�ve finally completed a pair of peddle trikes, just in time for the first snow of the year. I based the design on a set of plans from Atomic Zombie called the �Deltawolf�, but I made a number of changes for no other reason that I was trying to maximize what I could learn about welding and lathework from this project. Bikes are welded steel tube frame, a mix of mig and oxy/acetylene welds. I parted out a couple of donor bikes for the steering and drive components, as well as the front fork/wheel. The main axels are moly steel shafts with custom hubs made from turned and welded steel. The first trike turned out pretty heavy, but based on the little time I�ve spent peddling it seems to be fast. I�ve got the second bike in primer now, waiting for warm enough weather to paint.   I took a pretty comprehensive set of pictures during fabrication- is there enough interest for a thread?
|
|
#
?
Jan 3, 2012 20:30
|
|
|
Hell yeah! I love seeing the process of making something (awesome). You always forget the little problems and solutions when showing the finished product but I learn more from seeing mistakes. /surrogate learning
|
|
#
?
Jan 3, 2012 21:03
|
|
|
Well, it ain't that much, and it's probably closer to arts and crafts than the rest of this thread, but at least I made it. Given that I haven't done anything with wood/metal since... oh, shop days in 7th grade, I'm kinda proud of having actually not abandoned it when the jigsaw started acting up two seconds into it. Based on this instructable, here's a tea light cup warmer:   Made for a very well-received present... which would have been a much more useful suggestion about 2 weeks ago. Oops?
|
|
#
?
Jan 4, 2012 07:16
|
|
|
winnydpu posted:The main axels are moly steel shafts with custom hubs made from turned and welded steel. Could you tell me a little more about your main axle? My reverse trike land yacht uses bike wheels for the main wheels, but I built an unwieldy frame to mount each wheel. An axle would be so much nicer. How did you convert your wheel hubs? 
|
|
#
?
Jan 7, 2012 13:36
|
|
|
Trabant posted:
This is really awesome and would work well with my sealing mason jars when I am trying to keep tea warm. I'm thinking it might be more effective with just the pure flame on the cup itself, or with a thinner piece of metal ? Is it aluminum ? I think you would def. want to cap the top though if you want it to warm faster, looks like it would take forever otherwise.
|
|
#
?
Jan 7, 2012 17:43
|
|

|
Sun Dog posted:Could you tell me a little more about your main axle? My axles are 5/8" moly rods. I made my own wheel hubs from 1/8" steel plate. I cut four squares of metal, then roughed them into vaguely round shapes with a grinder. I turned them to 2.25" circles on my lathe. Then I drilled holes at 22� increments around each one.  After that I welded them onto the rods as best I could (this was pretty early along in the project, so my welding skill was even lower than it is now.  I painted the hub areas with black Rustoleum, which proved surprisingly robust. I bought 26" rims and spokes online. I used someone's java calculator to get a spoke length- you provide hub diameter, width and rim diameter. Lacing the spokes was very interesting and pretty fun. It is hard to get a straight and true wheel, mine are straight to within .015", but are at least 1/8" out of round (center of rim does not match center point of hubs). Not really noticeable when peddling.  I should also point out that I own a lathe and mill with indexing table, which made the process simpler. However, you can still build hubs like this with a cheap die grinder and hand drill. Print out a template for the hole locations, and if the outer diameter of the hub is not perfect it will not affect functionality in any way. Edit: I missed the land sailor- that looks like awesome crazy fun. Now I'm trying to decide if I can make a bolt-on bracket to hold the mast off of the sailing kayak I built a few years ago. winnydpu fucked around with this message at 22:49 on Jan 7, 2012 |
|
#
?
Jan 7, 2012 22:35
|
|
|
Are the spokes fixed length, or are you able to correct the off center axle somewhat by adjusting the tension?
|
|
#
?
Jan 7, 2012 23:09
|
|


|
Hadlock posted:Are the spokes fixed length, or are you able to correct the off center axle somewhat by adjusting the tension? Yea, someone who knew more than me could adjust it. The spokes have about 1/2" or so of thread. It was pretty easy to tune left or right by tweaking spoke tension. I used a dial indicator and spun the wheel around, tightening and loosening spokes until it read true. Then I looked at the rise and fall of the rim as it went around and said "screw it, close enough". I would guess that those who know what they are doing get it round first, then tune out the wobble. winnydpu fucked around with this message at 00:16 on Jan 8, 2012 |
|
#
?
Jan 8, 2012 00:13
|
|
|
Sun Dog posted:Could you tell me a little more about your main axle? My reverse trike land yacht uses bike wheels for the main wheels, but I built an unwieldy frame to mount each wheel. An axle would be so much nicer. How did you convert your wheel hubs? How fast can you go? What is capsizing like?
|
|
#
?
Jan 8, 2012 00:31
|
|

|
Plasma1010 posted:This is really awesome and would work well with my sealing mason jars when I am trying to keep tea warm. I'm thinking it might be more effective with just the pure flame on the cup itself, or with a thinner piece of metal ? Is it aluminum ? I think you would def. want to cap the top though if you want it to warm faster, looks like it would take forever otherwise. Glad you like it! I'm sure it would heat the cup/jar more if the flame were completely open, but I can see that getting a little tricky to pull off. Still, I'm sure it could be done... I'm only barely competent. And you're right, it's a 0.5" Al plate and rods. In terms of heat retention for a long time, steel would probably be much better choice (and a bitch to work with, I'm sure). But aluminum is a good heat conductor and the tea lights can stay lit for 2 hours at a time... if your drink lasts longer than that, you are one patient man. Or use a gallon-size jar?
|
|
#
?
Jan 8, 2012 02:16
|
|
|
Plasma1010 posted:I'm thinking it might be more effective with just the pure flame on the cup itself, or with a thinner piece of metal ? Is it aluminum ? I think you would def. want to cap the top though if you want it to warm faster, looks like it would take forever otherwise. I've always wanted a cup warmer for my shop... I'm always carrying coffee out there and it gets cold before I drink it. Seems like flame directly on the cup would leave soot and maybe crack the cup. I'm thinking a thinner top might be better too as aluminum doesn't hold heat well which is why aluminum fry pans are thin. One of these with a cast iron top would be sweet but I have no idea how you'd do that.
|
|
#
?
Jan 8, 2012 05:39
|
|
|
wormil posted:One of these with a cast iron top would be sweet but I have no idea how you'd do that.
|
|
#
?
Jan 8, 2012 06:12
|
|

|
Plasma1010 posted:This is really awesome and would work well with my sealing mason jars when I am trying to keep tea warm. I'm thinking it might be more effective with just the pure flame on the cup itself, or with a thinner piece of metal ? Is it aluminum ? I think you would def. want to cap the top though if you want it to warm faster, looks like it would take forever otherwise. Flame directly on cup would be bad because even a tea-light candle's flame is rather hot, enough to melt glass in fact. However the heat is rather 'spot' heat, so any diffusion with a good conductor (like an aluminum plate) will give you even heating to an area (perfect for warming coffee rather then breaking cups, or melting a hole in the bottom of a mason jar).
|
|
#
?
Jan 8, 2012 08:24
|
|

|
wheatpuppy posted:Maybe keep an eye out in antique shops for a cast-iron trivet? Great idea!
|
|
#
?
Jan 8, 2012 08:37
|
|
|
Designed and built myself a DJ booth. Complete with remote controlled RGB LED lights. I don't really like the look of flat black paint so I might throw some varnish on it just to give it a little protection and gloss, but I dont want to mess up the fabric front by getting varnish on it. So yeah, hindsight...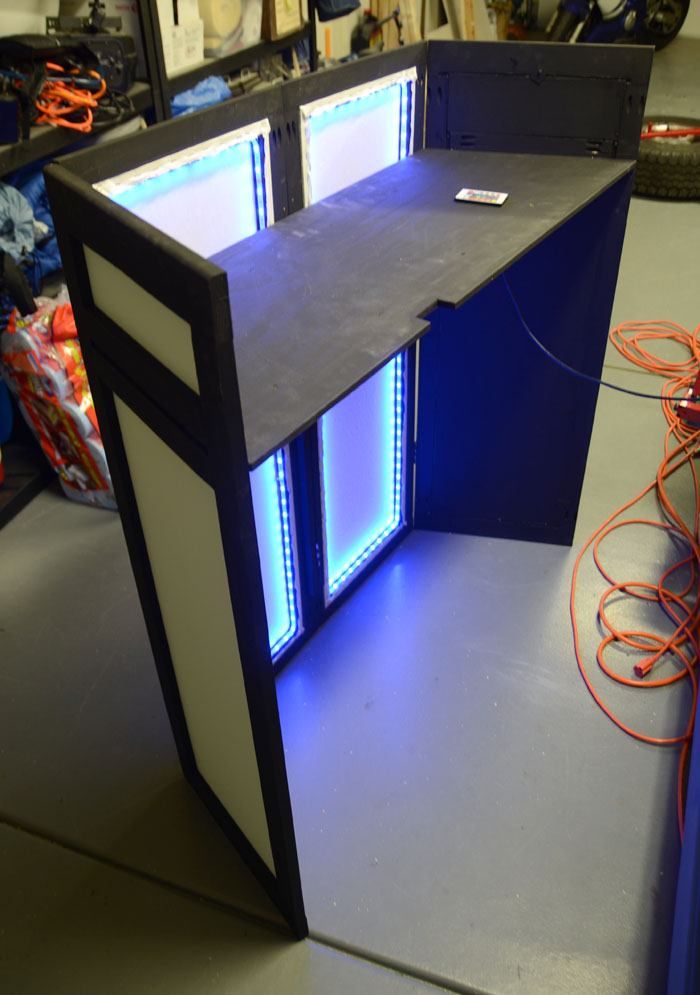  The whole thing folds into quarters so it fits nicely in my car. 
|
|
#
?
Jan 9, 2012 05:55
|
|
|
Scottw330 posted:How fast can you go? What is capsizing like? I haven't had the landsailer out in a stiff breeze to date, so I can't answer these questions yet. I need to finish installing the brakes first. I would imagine a capsize on land would not be the comfortable, cushy experience that it is on water. It would probably involve many tears and broken bits. I hope to avoid it. I don't expect to ever get this thing to go fast, either; speed is not my intention.
|
|
#
?
Jan 10, 2012 04:29
|
|
|
bEatmstrJ posted:Designed and built myself a DJ booth. Complete with remote controlled RGB LED lights. I don't really like the look of flat black paint so I might throw some varnish on it just to give it a little protection and gloss, but I dont want to mess up the fabric front by getting varnish on it. So yeah, hindsight... This is so cool! Would you mind explaining the electronics side a bit more? The strips look like something I saw on Adafruit, but that's just a guess. What approach did you take with the remote?
|
|
#
?
Jan 10, 2012 06:23
|
|

|
DahtBard posted:This is so cool! Would you mind explaining the electronics side a bit more? The strips look like something I saw on Adafruit, but that's just a guess. What approach did you take with the remote? The whole system is pretty basic. The kit can be purchased on ebay for about $20 shipped (minus the power supply which can also be purchased on ebay). eBay link Here is how it is setup in my situation. 
|
|
#
?
Jan 11, 2012 09:08
|
|
|
winnydpu posted:I took a pretty comprehensive set of pictures during fabrication- is there enough interest for a thread? You should make a bike building thread, I know there's several of us on here who have built a frame or two. I've been pretty interested in a tadpole trike for a bit, did you build your own jigs or just kind of eye it and cold set it?
|
|
#
?
Jan 13, 2012 02:01
|
|

|
Chickenbisket posted:You should make a bike building thread, I know there's several of us on here who have built a frame or two. I've been pretty interested in a tadpole trike for a bit, did you build your own jigs or just kind of eye it and cold set it? Happy to. I've got a new thread started- "Let's build trikes" I used a horizontal bandsaw for all my cuts, and kept everything square by clamping blocks to both pieces before welding. Accurate cuts go a long way to keeping things accurate, and to be frank minor distortions would not affect the design in a serious way.
|
|
#
?
Jan 15, 2012 00:43
|
|
|
I was feeling crafty for Christmas, so I made most gifts. This one's a Mario Block box that you can store stuff in. It's made from styrene for the panels, cast resin for the question marks, and wood for the cube frame. Outside: http://i.imgur.com/vY0id.jpg Inside, with an extra bonus. http://i.imgur.com/oaiqq.jpg And, this is a replica of Yoko's sniper rifle from Gurren Lagann was made for my girlfriend. It was made from cut MDF, PVC pipes, and then actual gun sling pivots, a scope attachment, and a bipod. The magazine comes off, which is held on by neodymium magnets. Sorry the pictures kind of suck. I never got around to taking decent ones aside from the ones I took on my phone when I presented it to her. http://i.imgur.com/jFPWL.jpg http://i.imgur.com/WiOMt.jpg http://i.imgur.com/ReXER.jpg Nilryna fucked around with this message at 23:16 on Jan 16, 2012 |
|
#
?
Jan 16, 2012 23:12
|
|

|
I made this cider press late last year. It's based on the Whizbang Cider design. It's made up of a separate grinder and press. The grinder uses a kitchen sink garbarge disposal to finely mash the apples. Then the press uses a hydraulic bottle jack to press the apple mash with the rack and cloth "cheese" method.  This is the top of the grinder. Nothing fancy, just a plain cutting board with the disposal mounted in the center. Use of a push stick is recommended if you like your fingers.  The mash comes out of the disposal and poops into a bucket. I used the original motor that came with the disposal and it worked, but got really hot after running for more than 5-10 minutes. I plan to remove the original motor and replace it with a general purpose motor before the next season starts. I wasn't sure if the original motor was going to work so I didn't mount anything permanently, hence the clamps holding things together.  This is the press in action. As you press the mash further down you have to add blocks under the jack. I made the pressing shaft shorter than the plan calls for because I wanted to be able to remove it if needed rather than disassembling the whole press.  Here's a close-up on the cheeses. I didn't have time to make the fancy bucket and round pressing discs so I just went with squares. 5 bags is possible but difficult to balance and tend to pop out as you press harder. 3 bags worked pretty well though. The bags are just $2 Walmart special nylon laundry bags. The tray and pressing plates are plain old cutting boards. I managed to get about 1 gallon of cider out of every 5 gallon bucket of apples.
|
|
#
?
Jan 17, 2012 02:54
|
|
|
That press is pretty cool. What are you going to do with all that cider?
|
|
#
?
Jan 17, 2012 03:25
|
|

|
Considering I work in IT, the only logical thing to do: fermentation. 5 gallons of hard cider and another 5 of cyser (mead made with cider instead of water).
|
|
#
?
Jan 17, 2012 03:36
|
|
|

|
| # ? May 28, 2024 11:55 |
|
|
Cpt.Wacky posted:
This is funny that my friends and I were just considering a cider press over the weekend. What do you think of a slow weighted system ? I was thinking to mash up the apples, put them in the bag in the barrel, put a wooden lid on the bag of apples then put heavy weight on top of the lid. I thought after a number of hours or so it would press the juice out. Good idea or not ? My friends and I are trying to keep things basic and simple, and use recycled materials (wood mostly) that we can find around to use.
|
|
#
?
Jan 17, 2012 17:14
|
|