


|
Balls! I was cleaning my airbrush and tightened the nozzle to much while reassembly it. The threaded part broke off in the socket  . Going to try backing it out slowly with some small pliers but if that doesn't work it looks like its coming to work with me tomorrow to meet Mr. Easy-Out. . Going to try backing it out slowly with some small pliers but if that doesn't work it looks like its coming to work with me tomorrow to meet Mr. Easy-Out.Edit: It actually came out with no force at all. It wasn't even tightened and it snapped off. Wonder if it was a defective part I've been getting lucky on up to now  . .
Sauer fucked around with this message at 03:08 on Jun 25, 2015 |
 #
?
Jun 25, 2015 01:48
#
?
Jun 25, 2015 01:48
|
|


|

|
| # ? May 31, 2024 08:56 |
|
|
Painting tiny little Memoir '44 figures is so relaxing once you start using a magnifier instead of your eyeballs. Progress! Now only like 40 more of each type of piece left to go... Just for the Allies... Then there's the Germans...  . .
|
|
#
?
Jun 25, 2015 02:30
|
|

|
Those infantry are only roughly 1/76 scale. I blasted through a full platoon of 31 in 1/100 last week with no magnifier. I really should have used a magnifier. My eyes may never recover.
|
|
#
?
Jun 25, 2015 03:10
|
|

|
Near disaster with my airbrush aside, everything worked out pretty well. I was afraid that shooting a dark colour over "whatever green the factory could find" would crush the varying tones in the green but it didn't, surprisingly. Salt chipping again turned out to be an awesome way to chip the crap out of your finish, and a piece of damp Mr. Clean Magic Eraser distressed the hell out of the top coat. Its a super fine sand paper that conforms to the shape of the surface so its great for fading your paint and taking off small layers to expose what is underneath. Its still basically sand paper though so don't overdo it. Dampen it with warm water and it will also remove any salt residue. Any salt left behind will fog the clear coat. The green and brownish paint is built up from numerous very thin layers, so the gaps left by the salt have actual depth to them that will trap a little bit of the dirt wash I'll apply after the decals, which will make the chips really pop. I'm betting I can mess up the decals using a magic eraser as well once they're completely set. Paasche wants to charge me nearly thirty bux to ship a new nozzle. That's four times what the nozzle costs. They're getting an irritated phone call tomorrow. Sauer fucked around with this message at 03:45 on Jun 25, 2015 |
|
#
?
Jun 25, 2015 03:24
|
|
|
Sauer posted:Balls! I have an Iwata and I can tell you I've had the nozzle break on me twice. You really can't put any force on it beyond what is necessary.
|
|
#
?
Jun 25, 2015 03:52
|
|


|
Sauer posted:Paasche wants to charge me nearly thirty bux to ship a new nozzle. That's four times what the nozzle costs. They're getting an irritated phone call tomorrow. The plane is coming along nicely. Go to Amazon and search for "Paasche airbrush parts". Under $15 for set of tip, needle, and aircap. Not sure what model you have, but there are a bunch of different ones for $13~$14.
|
|
#
?
Jun 25, 2015 04:53
|
|


|
So now that I have light, it was time to get back to making progress on the ship. I made 5 more breaching lines, attached them to the cascabel's on the 5 cannons, and then opened up the side gun carriage rings, put the line through them, and re-closed the rings. 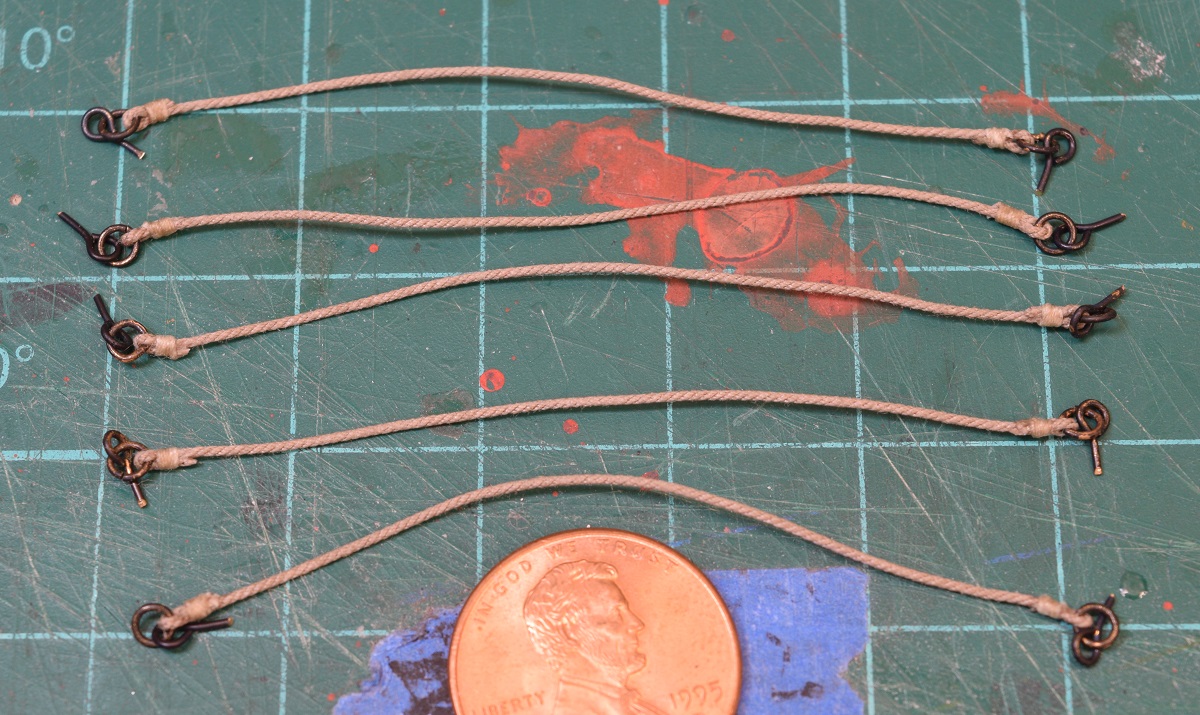 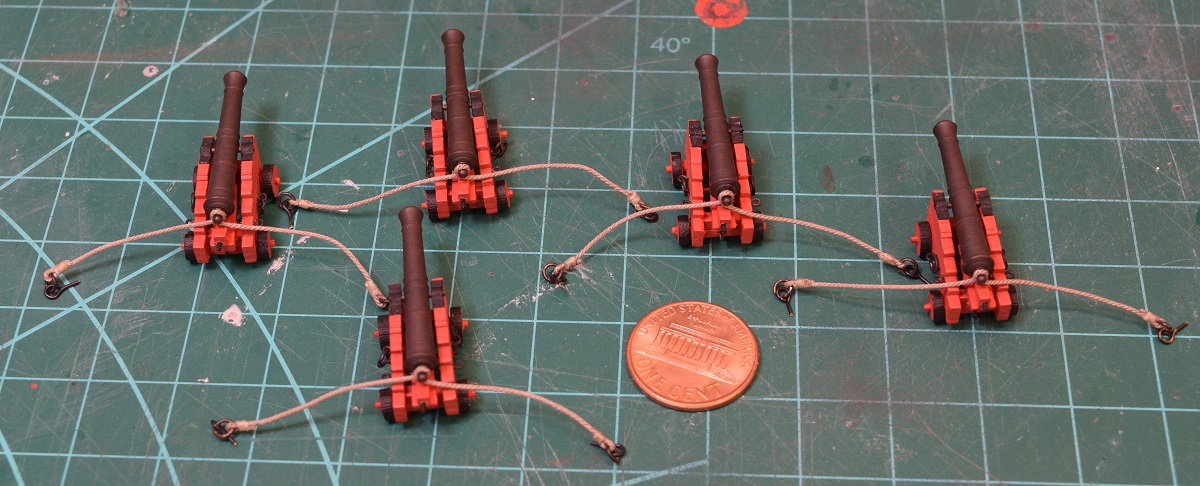 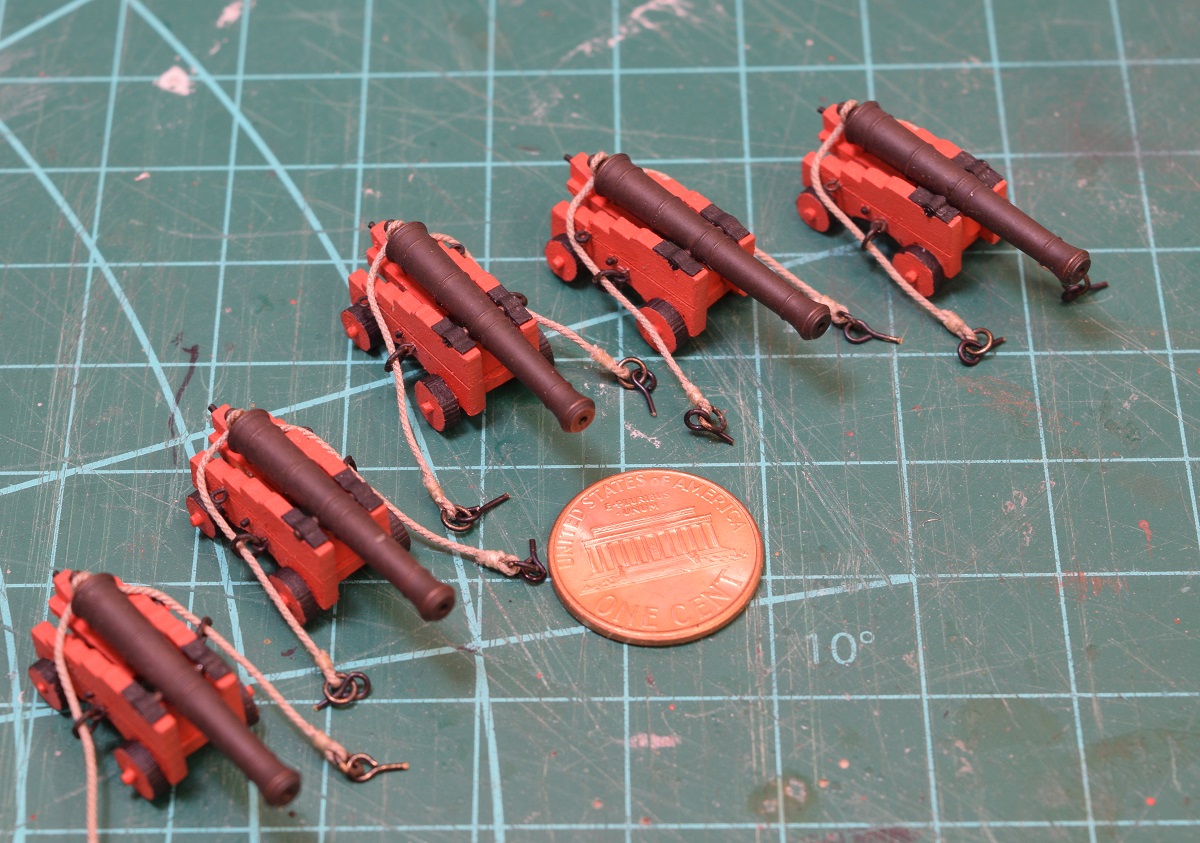 I then attached the breaching lines to the bulwarks, glued them in, and glued the guns down. 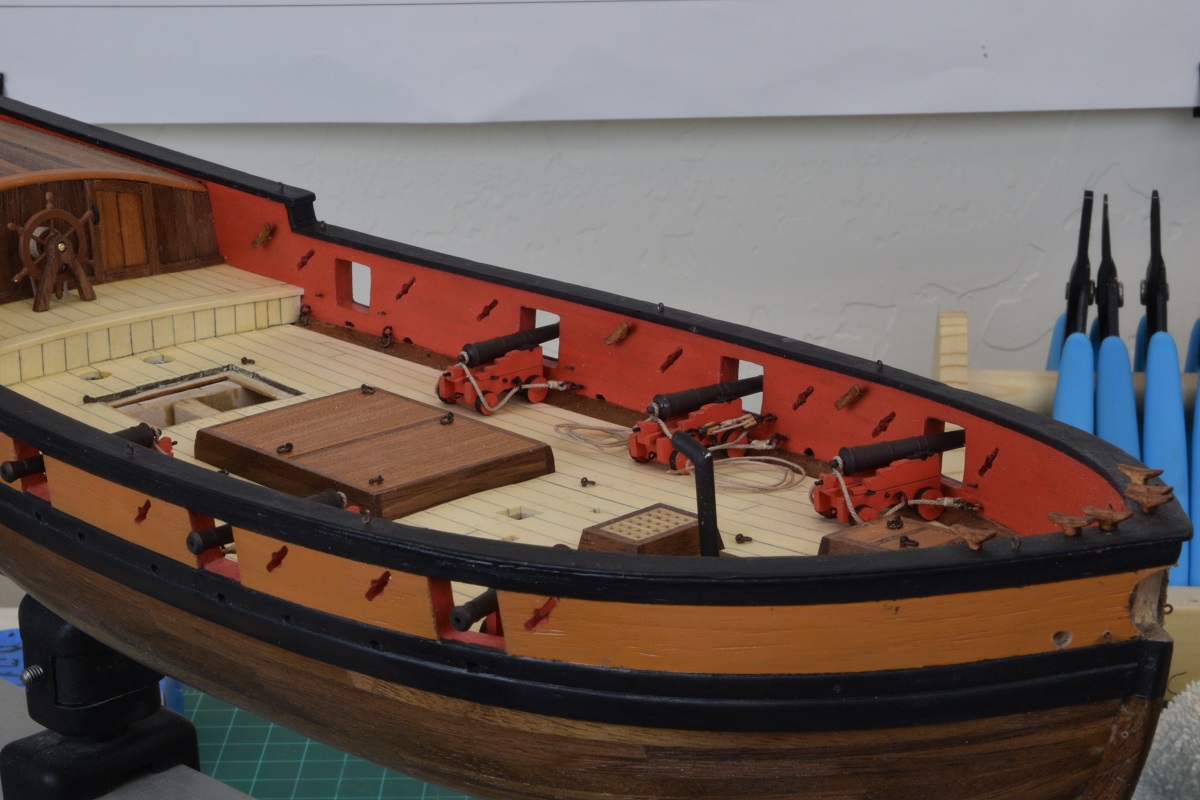 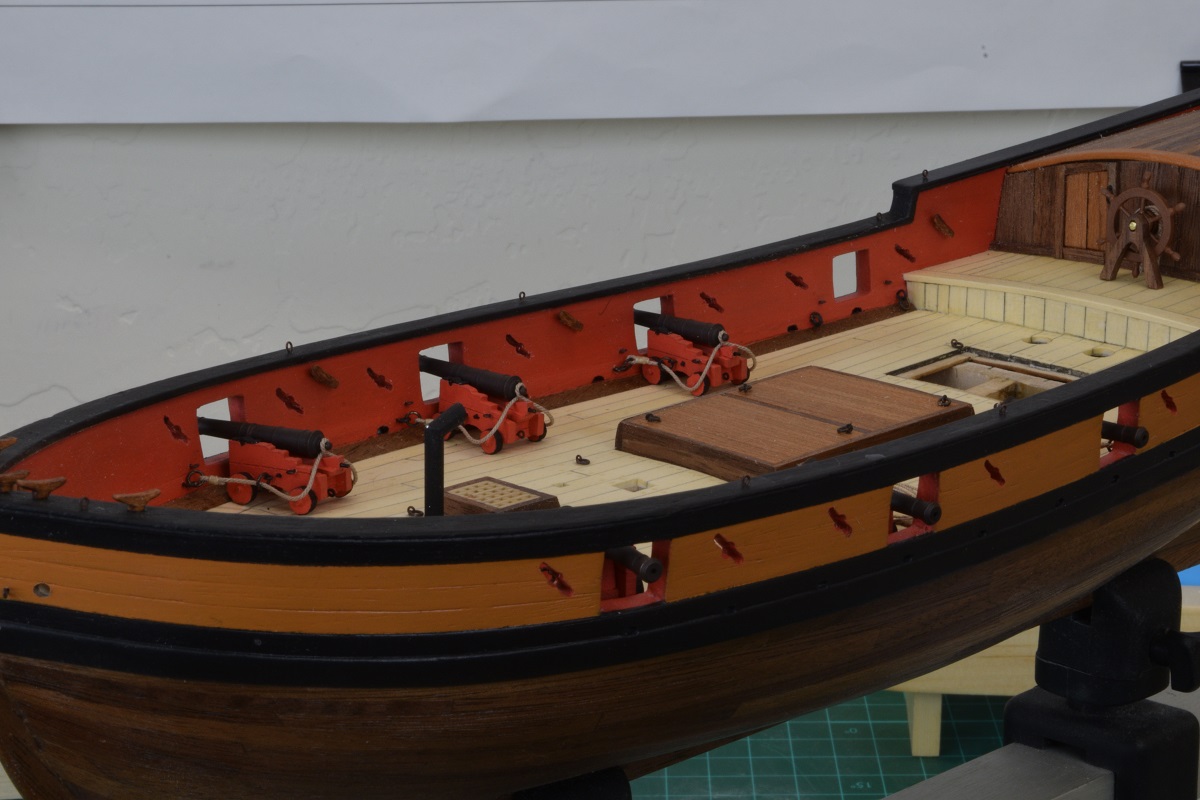 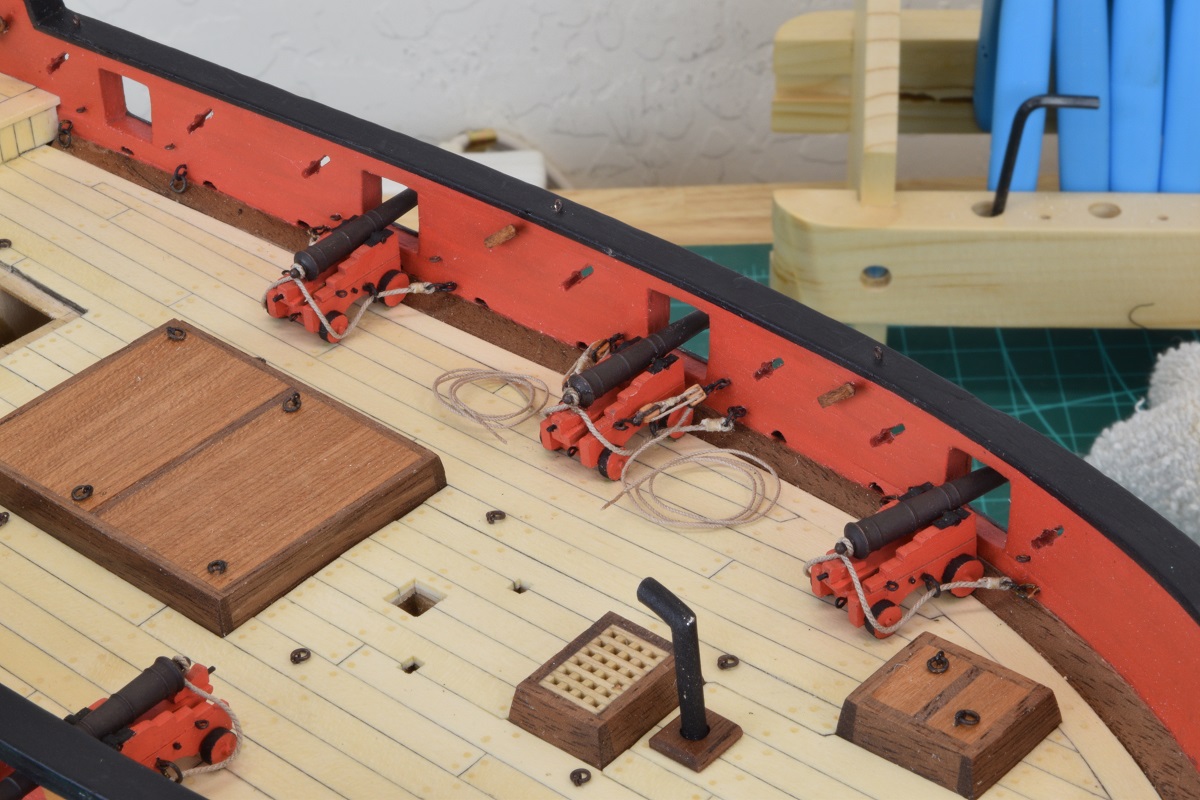 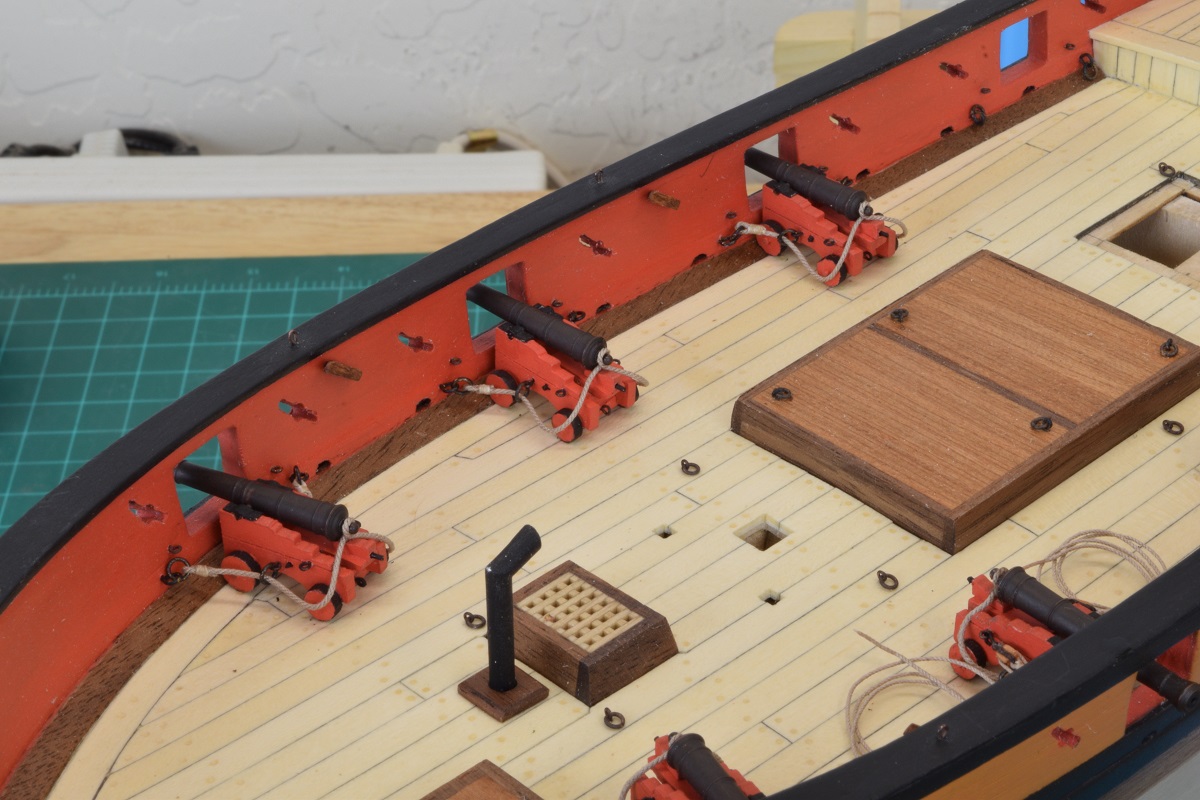 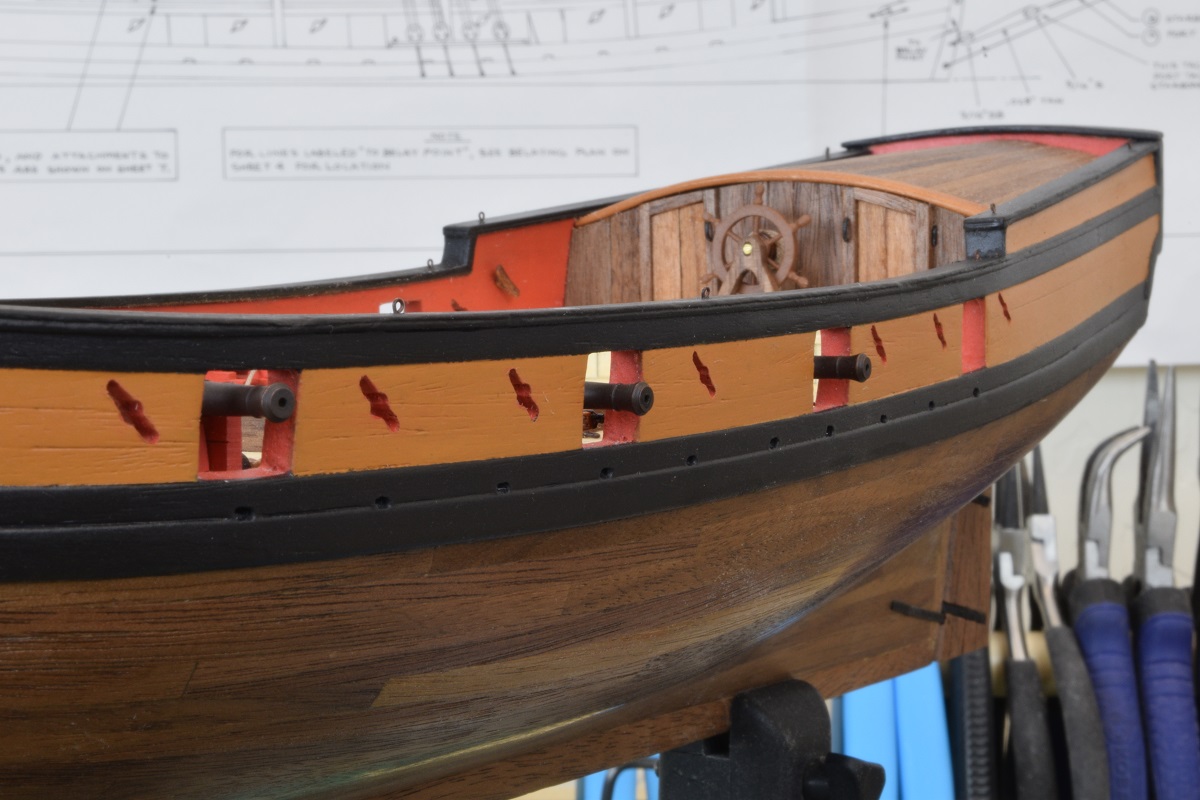 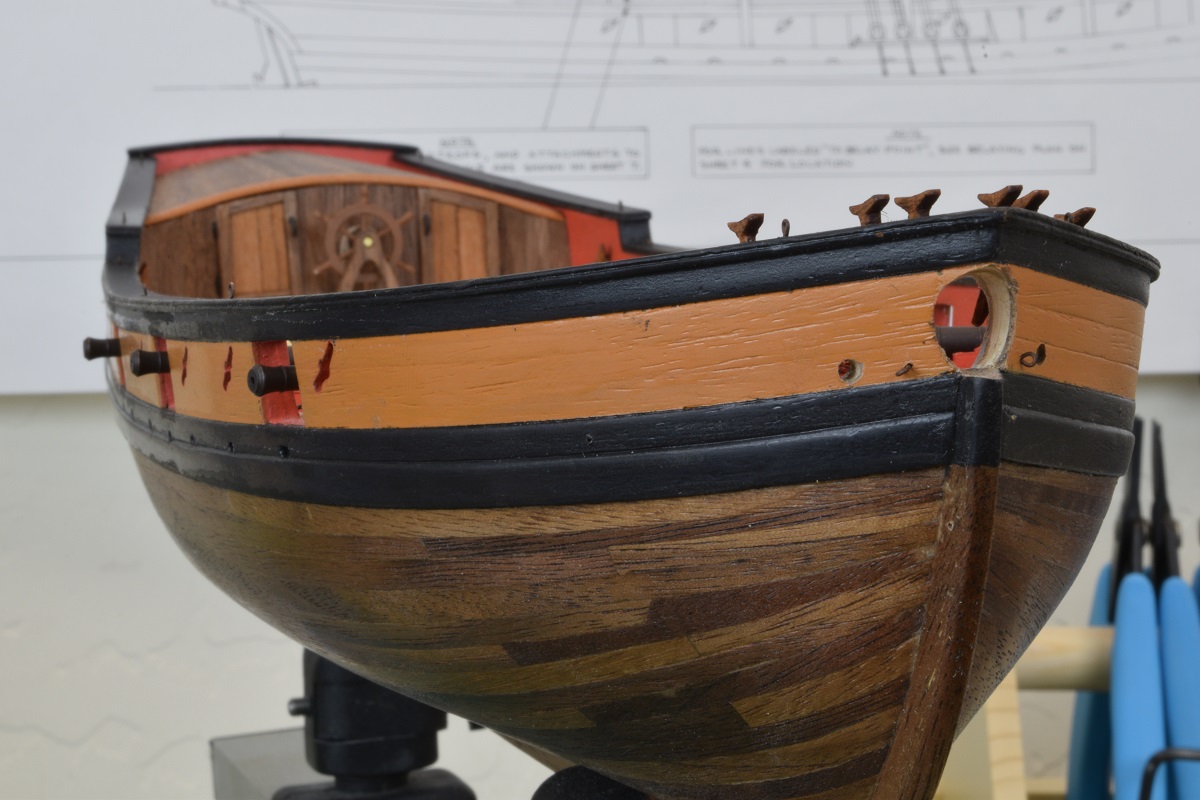 Everything in these pictures is now permanently attached to the ship (except for the sloppy rope coils that are just sitting there). I will attach the companionway later, I need to build and install a couple of elm-tree pumps that go really close to it, so I am waiting on that. I also need to do some touch-up here and there as I managed to ding some things, and knock a cleat loose while putting the cannons on. I really am far too clumsy for this hobby.
|
|
#
?
Jun 25, 2015 07:08
|
|
|
For your next boat, I'm assuming there's another boat, have you ever thought about doing one on commission? Boat building is one of the few areas in modeling where customers will pay out the nose for hand-crafted models. Nothing better than being able to indulge your hobby and get paid for it too.
|
|
#
?
Jun 25, 2015 07:25
|
|

|
I need to get my camera out to do it justice, but I added some gold-metal kits safety cage ladders to this thing. The fine brass ladders make the plastic railings the kit came with look terrible. I've never ever worked with etched brass before. gently caress it's expensive, but little details like this make a project. 
|
|
#
?
Jun 25, 2015 07:30
|
|


|
Bloody Hedgehog posted:For your next boat, I'm assuming there's another boat, have you ever thought about doing one on commission? Boat building is one of the few areas in modeling where customers will pay out the nose for hand-crafted models. Nothing better than being able to indulge your hobby and get paid for it too. There is no way in hell. First, doing this for someone else would probably have at least a vague time-line on it, and I don't think I'd like to work on a time-line. Second, while they may 'pay through the nose', the actual amount that they are typically willing to pay for a commission when you look at it in dollars per hour, would be way the hell below minimum wage. Consider this kit, and pretend for a moment that some silly rich person was willing to pay me say.. $2500 for it. I haven't kept any sort of a time log, but I'd be shocked if I didn't have well over 1000 hours into it by the time I'm finished (I started this thing in September if you remember). While I'm willing to invest that sort of time into something that I'm doing for fun, I'm not willing to work for $2.50 per hour. Third, then I wouldn't have a boat to look at in my house, since presumably whoever paid me to build it would probably expect to take it away from me. Pretty sure that wouldn't be acceptable.  Doing stuff on commission would rapidly take all the fun out of this and turn it into a job. I've made that mistake with hobbies before, and as soon as they become 'work', they also lose their appeal and fun. Baronjutter posted:I need to get my camera out to do it justice, but I added some gold-metal kits safety cage ladders to this thing. The fine brass ladders make the plastic railings the kit came with look terrible. I've never ever worked with etched brass before. gently caress it's expensive, but little details like this make a project. Those ladders look fantastic. Really make that whole piece pop.
|
|
#
?
Jun 25, 2015 07:49
|
|
|
The Locator posted:There is no way in hell. Agreeing on this. I sometimes do painting on commission, usually because the people who ask me can't paint that well and I want them to have have the kind of painted stuff that they wish for. Most of the time it works, but if I have a bunch of deadlines at work at the same time it gets frustrating to come home and know that someone is waiting for me to do hobby stuff for them. In my case I learned that I'm ok with very small projects (a few small houses, a handful of miniatures) that I can get out of the door in a couple of nights work if I need to, but large projects is worse (like when I painted 300 minis for a guy). I wouldn't dream of signing up for something as big as a wooden ship kit.
|
|
#
?
Jun 25, 2015 08:00
|
|

|
The Locator posted:There is no way in hell. I get what you're saying. Still, if you keep doing boats, you'll certainly get faster until that dollar to time ratio comes more in your favor. And if you don't like the commission aspect, lots of places will buy boats almost sight unseen, on your own schedule. A friend of my dads used to sell boats to architectural firms who wanted classy pieces to put in show homes and offices and the like. He didn't work for commission, just called them up when he was done and said "Hey, got another boat if you're interested."
|
|
#
?
Jun 25, 2015 08:02
|
|
|
Japanese freight train update Installed the chimney and feedwater system
|
|
#
?
Jun 25, 2015 12:23
|
|


|
Sauer posted:A large number of my supplies come from hobby shops in Australia. Which Australian online stores would you recommend? I'm in Australia but am yet to find a store with decent range and reasonable shipping costs.
|
|
#
?
Jun 25, 2015 13:55
|
|

|
The Locator posted:I used to use Green Putty http://www.amazon.com/Tube-Green-Pu...GBEWY9NJE4PDVGN I'll see if I can find it locally, and I'll also ask/look around in the model store. Considering I'm in Belgium ordering online isn't always a good option due to shipping costs and stuff.
|
|
#
?
Jun 25, 2015 14:02
|
|


|
Greyhawk posted:Japanese freight train update That thing is going to be awesome, but I'm not sure I'd enjoy waiting a month between updates if each update is something you can do in a reasonably short period of time.
|
|
#
?
Jun 25, 2015 16:23
|
|
|
The Locator posted:That thing is going to be awesome, but I'm not sure I'd enjoy waiting a month between updates if each update is something you can do in a reasonably short period of time. Well, each monthly delivery is split into 4 steps. So I do a step per week. Tgis is helpful in making me pace myself and do the build carefully, because I usually race ahead and gently caress things up. It also helps that I'm building the train in my office during my lunch break. It will take its permanent place on my office window sill anyway, so I'm building it up right there. If you want to spend some hours building at a time, it is absolutely the worst thing to get, I concur. Greyhawk fucked around with this message at 16:41 on Jun 25, 2015 |
|
#
?
Jun 25, 2015 16:39
|
|
|
I mocked up a container yard this morning making me a bit late for work. But trains. Here's my dark cave of a train room. It's going to be so awesome once I get those 3 LED work lights.  The container yard takes up about half this "wing" of the layout. To the right will be a little dock and I'm going to extend the bench out a few inches to add a strip of water wide enough to do a nice ocean scene and maybe fit a ship. There will be 1-2" deep industrial facades along the back. I don't know why I didn't figure it out earlier, but I can just nail my backdrop panels to the wall. Previously I built a whole self-supporting framework off the back of the bench. Landlord doesn't want things attached to the wall, but the backdrop is no more invasive than hanging a picture. 2 picture nail and I'm done! The gold-medal ladders really make things look good. They're a bit expensive but I think well worth it. I think the eye naturally registers what ever the most "fine" detail is on a model and then assigns that level of detail to the whole item/scene. Just that ladder makes the whole crane go up a couple notches, it really is the little details that make a model.   The counterpoint of course to a single really nice ladder making everything look good is that a single hosed up crooked railing or mistake or what ever instantly pulls the viewer out and makes everything look lovely.
|
|
#
?
Jun 25, 2015 17:11
|
|
|
Baronjutter posted:I mocked up a container yard this morning making me a bit late for work. But trains. This loving owns. Looks really, really good.
|
|
#
?
Jun 25, 2015 17:38
|
|
|
This whole thing looks really good, but I'm confused by this picture. Do you have a tiny circle train that runs in the underworld beneath your container loading site?
|
|
#
?
Jun 25, 2015 17:46
|
|
|
Customer service  "Carlos in Paasche's Sales Department posted:PLEASE NOTE THAT YOU DID NOT PAID FOR THE SHIPPING PROCESS ON YOUR ORDER IF YOU WOULD LIKE YOU CAN SEND THE PAYMENT THRUE PAYPAL @ paascheair@aol.com OR IF YOU WOULD LIKE A CHEAPER SHIPPING PROCESS I CAN SENDIT 1ST CLASS MAIL INT�L AND THAT WILL BE $8.00 PLEASE ADVISE WHICH WAY YOU PREFERRED THANKS Original formatting and AOL email address preserved. At least shipping on the replacement nozzle is no longer extortion and the whole order is now comparable in price to Amazon. Sauer fucked around with this message at 21:52 on Jun 25, 2015 |
|
#
?
Jun 25, 2015 21:35
|
|
|
Ohhhhhh, Paasche. Always the dumb little brother of the airbrush world.
|
|
#
?
Jun 25, 2015 22:44
|
|
|
See, I always assumed Paasche was some incredibly long lived German firm that first developed airbrush technology and made paint sprayers for the Luftwaffe during World War 2 or something
|
|
#
?
Jun 25, 2015 23:01
|
|
|
The Locator posted:This whole thing looks really good, but I'm confused by this picture. Do you have a tiny circle train that runs in the underworld beneath your container loading site? I first planned to make this a double-deck layout via a helix, but a helix is a nightmare to build and they're huge and I really have more than enough layout space. But I still needed a place for the trains to go, somewhere that represented the "outside world". So the mainline becomes a hidden track along the back behind the container-town dipping down low enough to go under the container yard while at the same time the container yard ramps up a bit. It's really hard doing this all and keeping grades under 2%. The hidden track you can see is double-tracked so there's space to park a train down there. Ideally you'd want a few nice long tracks for "staging", basically a holding area for trains not currently on your layout but represent trains that will come from the outsideworld at some point. It also of course gives your trains currently on your layout a place to go. When people do operations on their layout they'll build trains in their staging area, drive them onto their layout, do what ever switching needs to be done (break down the train) then do the reverse with other trains. Having only 1 staging track is a super compromise but it's better than nothing. I'm not like hard core into "ops" or anything, but I really don't get much enjoyment out of a basic roundy-round layout that does go anywhere.
|
|
#
?
Jun 25, 2015 23:04
|
|
|
Nebakenezzer posted:See, I always assumed Paasche was some incredibly long lived German firm that first developed airbrush technology and made paint sprayers for the Luftwaffe during World War 2 or something Paasche has been around forever, but they haven't really kept up with the times. Their airbrushes aren't really bad perse, and of course they make the VL, the longtime cheap workhorse of airbushes, but nobody really uses Paasche as their primary airbrush. They're a little clumsy, the teardown isn't as easy as it should be, etc etc. I have a big dumb one I use for throwing thicker paints and lacquers and other stuff I don't want to run through my Harder & Steenbeck. Love my H&S. Shoots stuff amazingly, and you can tear it down in about 5 seconds for cleaning.
|
|
#
?
Jun 26, 2015 00:18
|
|
|
I honestly haven't had a single complaint about the gravity fed Talon I've got other than snapping off the head of the nozzle, which was likely my fault. Its also my first and only airbrush though so I've got nothing to compare it to. Shoots paint just fine.
|
|
#
?
Jun 26, 2015 00:34
|
|
|
Bloody Hedgehog posted:... my Harder & Steenbeck. Never even heard of H&S before this post!
|
|
#
?
Jun 26, 2015 01:41
|
|
|
The Locator posted:Never even heard of H&S before this post! Very nice products, german engineering and all that. Apparently they're the go-to airbrush in Europe (like how Iwata is here), but a lot rarer in north america. I mean, just look at this sexy beast. 
|
|
#
?
Jun 26, 2015 02:41
|
|
|
I quite like the H&S brush I've got for fine detail work, it's very effective and has the nicest trigger action of any of the brands I've used. I recently got an Iwata HP-CS and have been putting it through its paces, and it's quite nice, as well. Both of them feel better in my hand and better on the trigger than my old workhorse of a Badger Krome, which is very functional, but kind of annoying to tear down for cleaning, and always seems to need more of it overall than the other two brushes.
|
|
#
?
Jun 26, 2015 03:11
|
|

|
Only one I have is a Badger 105 Patriot that I got really cheap on an Amazon lightning deal. So far it's working great for everything that I need it for, but someday maybe I'll get another one once I have enough experience with it to have the slightest clue of what I might want in a different brush.
|
|
#
?
Jun 26, 2015 04:37
|
|
|
Bloody Hedgehog posted:Very nice products, german engineering and all that. Apparently they're the go-to airbrush in Europe (like how Iwata is here), but a lot rarer in north america. It's more like the "I have wads of cash burning holes in my pocket whatever shall I do" airbrush. The one you posted is 200 Euro. Want another needle? That'll be 50 Euro please.
|
|
#
?
Jun 26, 2015 09:55
|
|
|
Tested are doing a series on painting models, its on their premium thing but the first videos decent. https://www.youtube.com/watch?v=LGvV72uMii4
|
|
#
?
Jun 26, 2015 10:03
|
|

|
Greyhawk posted:It's more like the "I have wads of cash burning holes in my pocket whatever shall I do" airbrush. Are they charging that much for needles in europe? You can get them here for $15.
|
|
#
?
Jun 26, 2015 10:22
|
|
|
Also - superior German engineering can be both a good, and a bad thing. I say this as someone who has owned a BMW and worked on it myself.
|
|
#
?
Jun 26, 2015 14:24
|
|
|
I'm reminded of that German tank that had something ridiculous like 77 parts for each tread of a tank. I mean, like, each link of each tread.
|
|
#
?
Jun 26, 2015 15:16
|
|


|
That was the Kettenkrad which had 70 per link with pin bearings. I can only assume how bad actual tanks got.
|
|
#
?
Jun 26, 2015 15:29
|
|
|
Whoops! My bad. Point still stands, I s'pose.
|
|
#
?
Jun 26, 2015 16:00
|
|
|
EDIT: disregard, i read bad
Greyhawk fucked around with this message at 16:33 on Jun 27, 2015 |
|
#
?
Jun 26, 2015 16:39
|
|
|
I made this riding bitt - it's a thing that a bunch of ropes tie off to later. It's just stuck in the deck for now, it won't get permanently installed until the mast is in and a bunch of rigging on the front of the mast is done since this would totally be in the way and make that a huge pain. The mast goes where that square hole you can see right behind this.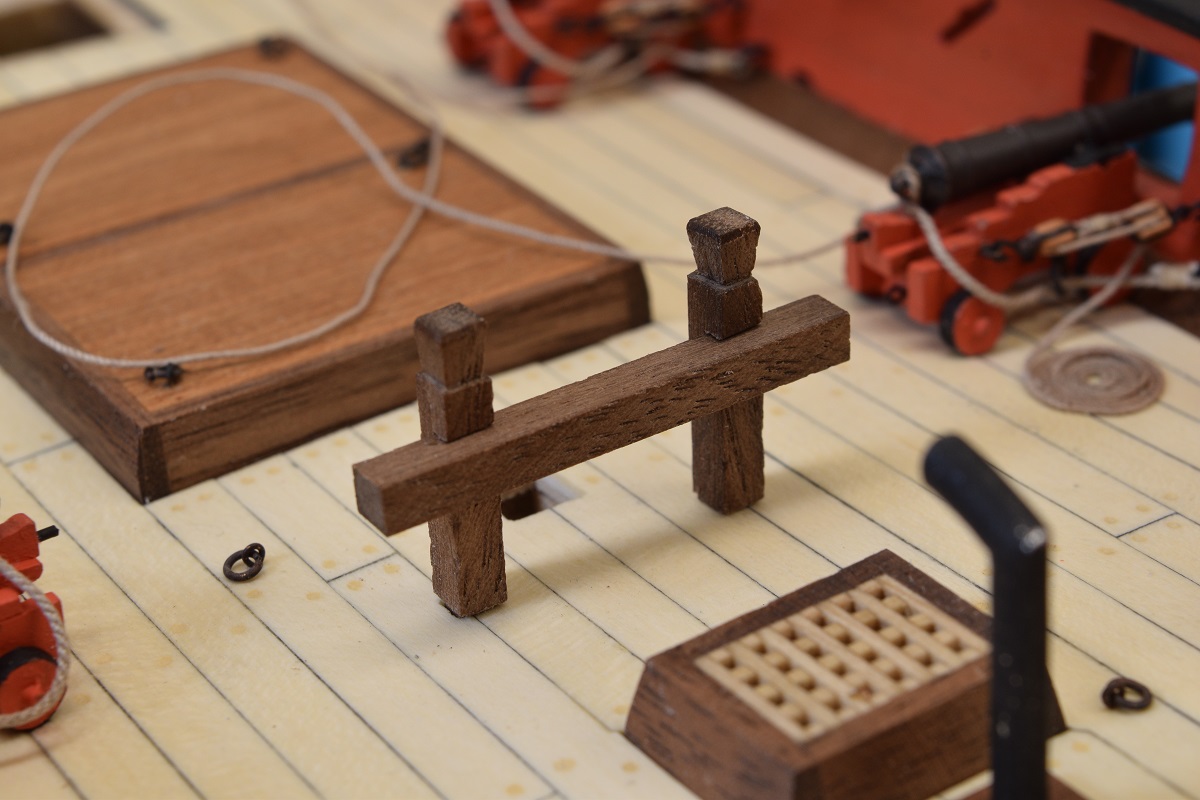 Half way there (with the guns)! I got one side fully rigged with the tackle, and made the little rope coils. What a pain in the butt that was until on the third one I figured out a technique that went pretty fast and not too painful. Not sure if I will complete the rest of the guns tonight or not. Will probably try to get at least a bit more done after resting my eyes. 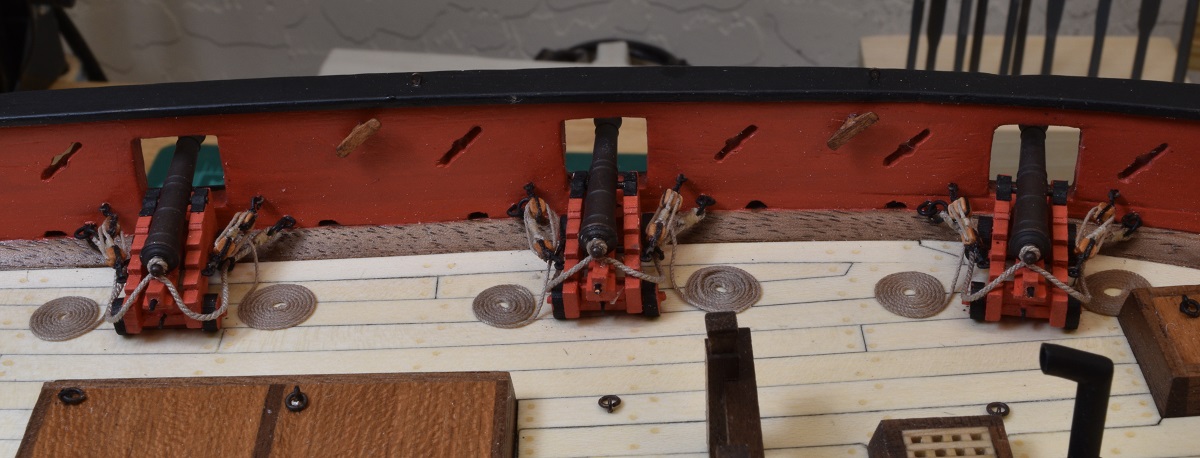   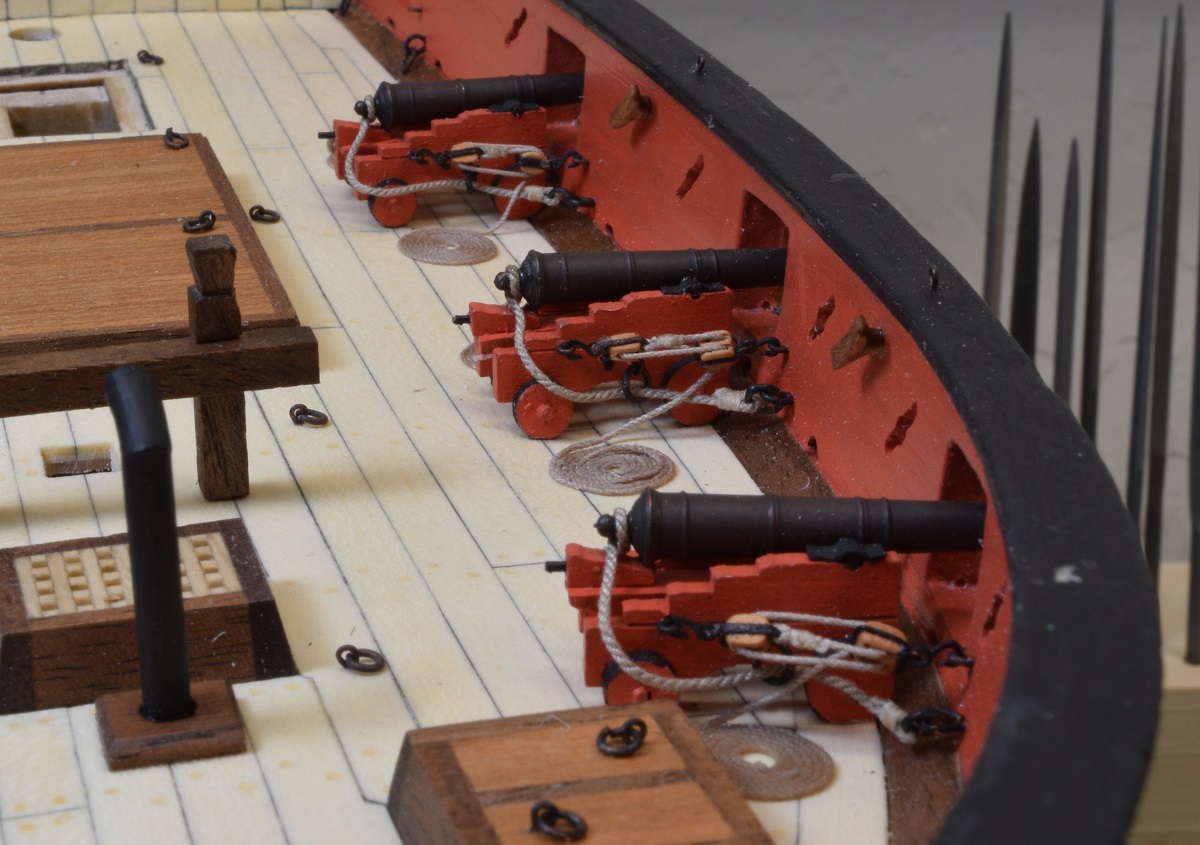
|
|
#
?
Jun 28, 2015 03:34
|
|
|

|
| # ? May 31, 2024 08:56 |
|
|
Sauer posted:I'm betting I can mess up the decals using a magic eraser as well once they're completely set. Trip report: Nope! Magic Erasers need to be wet for the abrasive effect to work so of course that's going to lift up the decals. Glad I tried it on a test piece first. Some 500 grit sandpaper, a light hand, and a clenched butt did work just fine though. Then give the decal a very light thinned out misting of whatever the base coat was to fade it slightly.   That's hopefully the last layer of clear coat I have to put on her now. Tomorrow she gets dirty. ^^ Holycrap that looks awesome.
|
|
#
?
Jun 28, 2015 03:40
|
|