


|
Dave Concepcion posted:Has anyone had any experience using glow-in-the dark paint to simulate sodium lamps/other lights? I've got a model freighter and I'm toying with the idea of using orange luminous pigment to paint where the bulbs would be on the deck lights to get a little subtle shine when it's dark, best would be some radium or tritium paint but that's getting hard to come by so maybe some superluminova or something of the sort? Anyone tried something similar? I actually found a solution to this that worked really well, using pico-LED lights and a drop of candlewax:      just ordered an additional 20 LEDs since this was just proof of concept
|
 #
?
Jan 11, 2016 19:59
#
?
Jan 11, 2016 19:59
|
|


|

|
| # ? May 29, 2024 05:17 |
|
|
hmm that sure were some lovely pictures, here's a bigger version of the last one to show how effective candlewax is as a light diffuser/bulb prop 
|
|
#
?
Jan 11, 2016 20:05
|
|
|
Nebakenezzer posted:Been building the Airfix Vampire: a ugly gap developed in one of the underwings, possibly because the intake behind the inlet was slightly outa place. If you are building the airfix, watch out for that. Mister Dog posted:Been building on the Revell: an ugly gap developed at every junction. If you're building the Revell, watch out for that. I'm on the Revell, and I'm also getting gaps everywhere EXCEPT the underside of the fuselage. The left wing is also OK. Right wing, however...   For a first attempt in however many years, it'll do. Also, this thing is tiny.
|
|
#
?
Jan 11, 2016 23:27
|
|

|
The fuselage is going together okay-ish for me. The tail, however, is pretty gappy. And who the gently caress thought it was okay to have this many pieces with no pegs or other means of alignment? Brovine: one of us put the engine nozzle in the wrong way. 
|
|
#
?
Jan 12, 2016 00:26
|
|


|
I just messed up the priming on the Stug III that I've worked on for for a few months. I'm pissed beyond believe, goddamn I should remember to clean my airbrush after AND before I want to paint. I'm soo done with modeling atm....
|
|
#
?
Jan 12, 2016 00:44
|
|


|
Blue Footed Booby posted:Brovine: one of us put the engine nozzle in the wrong way. Oh gently caress. It wasn't you. Erm... okay, can I fix this... EDIT: Yes. Yes I can. Pried the back half of the fuselage open while the glue was still softish, tore the nozzle out, put it back where it should be and re-glued. Thanks for spotting that! Brovine fucked around with this message at 00:54 on Jan 12, 2016 |
|
#
?
Jan 12, 2016 00:45
|
|
|
Hi-Mock is almost done. Went for an Iron Man Mk. XXII look. Gotta figure out what I want to do with the gun, so the right hand is waiting until then. I present: 'Hot-Mock' 
|
|
#
?
Jan 12, 2016 03:31
|
|

|
Boaz MacPhereson posted:Hi-Mock is almost done. Went for an Iron Man Mk. XXII look. Gotta figure out what I want to do with the gun, so the right hand is waiting until then. That owns bones.
|
|
#
?
Jan 12, 2016 04:26
|
|
|
Get a load of trucker decals and go full Megas with it
|
|
#
?
Jan 12, 2016 05:17
|
|


|
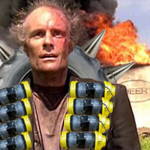
Forums Terrorist posted:Get a load of trucker decals and go full Megas with it In case some of you haven't seen the show:  And, yes, that is a car as its head.
|
|
#
?
Jan 12, 2016 06:25
|
|

|
Kibner posted:In case some of you haven't seen the show: And if you haven't seen the show, go watch Megas XLR. 
|
|
#
?
Jan 12, 2016 06:27
|
|

|
makka-setan posted:After a 20 year hiatus I decided to get building again. As a first project I got a hold of Bandai's new AT-ST. I bought a spray can of Tamiya light gray and some general aircraft wash. For details I relied on my old stash of mostly non-dried up enamel paints. Whattup, AT-ST bro! Killer work on this piece! I love the rust and dirt-spatter effects you've got all over this. The Empire has definitely put her through it's paces.
|
|
#
?
Jan 12, 2016 09:19
|
|


|
Bloody Hedgehog posted:Killer work on this piece! Thanks man! And thanks to the others that commented too! Since putting it together more pieces have cracked and the whole walker is falling apart. Will definitely have to re-do everything on a new kit. And I will try to go 100% acrylic in the future, I'm rage quitting enamel. But on a positive note I ordered a cheap AS186 compressor (with a "free" (probably awful) airbrush). Is Vallejo Air ok for regular brush painting? Maybe I'll buy one of those starter kits with 10-20 colors and maybe add some varnishes.
|
|
#
?
Jan 12, 2016 18:01
|
|

|
Hi-Mocks, huh? 
|
|
#
?
Jan 12, 2016 18:05
|
|


|
makka-setan posted:
They are ok for brushpainting, but maybe you need to have one or two more layers compared to the regular line because it's a bit thinner.
|
|
#
?
Jan 12, 2016 18:06
|
|
|
Why does that robot have a huge robo penis dragging on the ground?
|
|
#
?
Jan 12, 2016 18:30
|
|


|
Baronjutter posted:Why does that robot have a huge robo penis dragging on the ground? Those accessory kits are getting out of hand.
|
|
#
?
Jan 12, 2016 18:32
|
|

|
makka-setan posted:Thanks man! And thanks to the others that commented too! It's really just certain Bandai kits that don't like enamels, and particularly enamel thinners. Whatever plastic they use for their kits, especially this AT-ST which needed a more rigid plastic to support itself on such thin legs, is susceptible to attack from the thinners. Virtually any other kit from any other manufacturer plays fine with enamels. Saying that, I barely use enamels myself. Mostly just for pin-washes and glossy effects like fuel stains and the like. Vallejo Air is fine for brush painting; it may go on a little thin so you may need an extra coat, but it'll serve your purposes. Vallejos thicker paints made specifically for brushing go on like a dream though, probably my favourite paints for hand-brushing. Particularly their Game line of paints, which have a really nice heavy, opaque pigment load.
|
|
#
?
Jan 12, 2016 21:03
|
|
|
Other Revell vampire people: forgot to ask yesterday, but did any of you manage to attach the control panel decal? I couldn't get it to stay in place or mould itself to the surface so I gave up.
|
|
#
?
Jan 12, 2016 21:22
|
|
|
Brovine posted:Other Revell vampire people: forgot to ask yesterday, but did any of you manage to attach the control panel decal? I couldn't get it to stay in place or mould itself to the surface so I gave up. I just managed it earlier today. Couldn't get it to stay in place until I used some decal setter and a cotton bud to dry the excess. ...I have no idea what I'm doing.
|
|
#
?
Jan 12, 2016 23:45
|
|


|
Brovine posted:Other Revell vampire people: forgot to ask yesterday, but did any of you manage to attach the control panel decal? I couldn't get it to stay in place or mould itself to the surface so I gave up. Nope mine went in the fireplace
|
|
#
?
Jan 12, 2016 23:49
|
|

|
Baronjutter posted:Why does that robot have a huge robo penis dragging on the ground? I don't know why you're surprised when the rest of the robot is a collection of fully articulated testicles.
|
|
#
?
Jan 12, 2016 23:50
|
|
|
Luminaflare posted:I just managed it earlier today. Couldn't get it to stay in place until I used some decal setter and a cotton bud to dry the excess. You know what you're doing better than I do, if that helps! This evening I've painted the tyres and exhaust, attached the nose cannons, and attempted to fill the cracks on the assembled bits. Mostly the bodge method, with tiny shards of plastic and poly cement. It'll do.
|
|
#
?
Jan 13, 2016 00:02
|
|
|
Whoops. Put the elevator on upside down. Oh well. Also has anyone elses landing gear snapped as soon as you snipped them off the sprue? edit: I AM NOT GOOD AT GLUE 
Luminaflare fucked around with this message at 00:51 on Jan 13, 2016 |
|
#
?
Jan 13, 2016 00:14
|
|
|
Baronjutter posted:$80 worth of over-priced wood. Looks good. Your new track plan looks great as well.
|
|
#
?
Jan 13, 2016 01:10
|
|


|
Luminaflare posted:Whoops. Put the elevator on upside down. How many pieces are stuck to your fingers?
|
|
#
?
Jan 13, 2016 02:32
|
|


|
Baronjutter posted:Why does that robot have a huge robo penis dragging on the ground? To protect its robo balls, duh  . .
|
|
#
?
Jan 13, 2016 03:06
|
|
|
Luminaflare posted:Whoops. Put the elevator on upside down. Yeah that's how most of the small side windows on my still WIP Osprey ended up looking despite my best attempts to avoid it.
|
|
#
?
Jan 13, 2016 19:48
|
|

|
jadebullet posted:How many pieces are stuck to your fingers? Surprisingly, none. Cooked Auto posted:Yeah that's how most of the small side windows on my still WIP Osprey ended up looking despite my best attempts to avoid it. Yeah, they don't really fit on too well and I kept slipping. Don't have the best fine motor control ever. Any ways, fixed the cloudy windows, or at least the outside of them... I have a finger print on the inside. e: I have never used plastic putty before. A nail buffer shined the cockpit up nicely though. 
Luminaflare fucked around with this message at 22:05 on Jan 13, 2016 |
|
#
?
Jan 13, 2016 21:44
|
|
|
So I finished my Viggen, and have equipped it with the RB04 anti-ship missile. What is cool about this plane is that it apparently is the only plane to get a missile lock on the SR71 Blackbird. 
|
|
#
?
Jan 14, 2016 03:18
|
|
|
So how did you do the grime and panel lines in the end?
|
|
#
?
Jan 14, 2016 04:42
|
|


|
jadebullet posted:So I finished my Viggen, and have equipped it with the RB04 anti-ship missile. What is cool about this plane is that it apparently is the only plane to get a missile lock on the SR71 Blackbird. That's a very nice Viggen. 
|
|
#
?
Jan 14, 2016 11:32
|
|

|
That's a friggin' nice Viggen, brah.
|
|
#
?
Jan 14, 2016 11:55
|
|
|
Jonny Nox posted:So how did you do the grime and panel lines in the end? I had painted black lines on the raised panels before I put the base coat on, but discovered that a rattle can will just cover them up rather than leave a bit showing through, so I then used some fine sandpaper and wet sanded it down until they became revealed. I then used a charcoal pencil to further bring them forward, and used weathering powders for the thrust reverser buildup.
|
|
#
?
Jan 14, 2016 13:31
|
|
|
Scale modelers are insane. $500 for a 1/35 Tiger I kit? http://www.ebay.com/itm/1-35-Cyber-...%3D171676664578
|
|
#
?
Jan 14, 2016 16:25
|
|
|
Molentik posted:Scale modelers are insane. $500 for a 1/35 Tiger I kit? 21 watching Is is an unusually good kit, or just rare? Or neither, and e-bay being e-bay? E: Jesus H Christ, looking at the other auctions linked at the bottom, there's some very very expensive 1/35 kits out there.
|
|
#
?
Jan 14, 2016 16:36
|
|
|
Pretty sure you can get the full metal full interior Tiger for that much. Speaking of, why is it always the Tigers with outlandishly expensive kits?
|
|
#
?
Jan 14, 2016 17:12
|
|
|
Ensign Expendable posted:Speaking of, why is it always the Tigers with outlandishly expensive kits? https://www.youtube.com/watch?v=Z1yprwy97p4
|
|
#
?
Jan 14, 2016 17:34
|
|

|
It's a short run Dragon/Cyberhobby kit that (until Ryefields Tigger with full interior was released a few months ago, which costs only �70) the only/best kit for the early 'Afrika Tigger'. It was from the time that Dragon still supplied their kits with loads of goodies like metal barrel, clear plastic periscopes, PE and Magic Tracks etc.. The Cyberhobby label is a sub-label of Dragon which releases unusual versions of earlier Dragon kits in usually short runs. Some of those kits are very highly sought after a few years when they get rarer. Personally I don't get the fascination with the Tigger. I think it's a ugly looking box, but for some reason people are obsessed with it. It is one of those subjects that has literally every goddamn version released like the Stug (but the Stug is actually a cool tank).
|
|
#
?
Jan 14, 2016 17:35
|
|
|

|
| # ? May 29, 2024 05:17 |
|
|
Molentik posted:It's a short run Dragon/Cyberhobby kit that (until Ryefields Tigger with full interior was released a few months ago, which costs only �70) the only/best kit for the early 'Afrika Tigger'. It was from the time that Dragon still supplied their kits with loads of goodies like metal barrel, clear plastic periscopes, PE and Magic Tracks etc.. I like the Tiger I, but then I like most German tanks. The hull is a little bit too boxy, but there's something about the dimensions of the turret that I really like. The Pz. IV is higher on my favourite list, though.
|
|
#
?
Jan 14, 2016 18:23
|
|