


|
SEKCobra posted:So I dropped and mostly mixed a few thousand M3 screws. Although I have sorted them by hand already, I was inspired to build a sorting mechanismn and two days later I have just finished it. I am amazed by how well it works. I could even easily motorize it. That's super cool! How did you approach the problem? I've dabbled off and on, best I did was a laser-cut disk with different cutouts that slowly turns through a bunch of parts and eventually the right parts fall into the right holes. It's not very fast but it kinda worked.
|
 #
?
Aug 3, 2021 17:03
#
?
Aug 3, 2021 17:03
|
|


|

|
| # ? May 30, 2024 12:08 |
|
|
Deviant posted:i am unclear on why i should have to do that on a prusa PEI bed. My understanding is that the PEI is supposed to make that unnecessary. In addition to the fact that it's going to make a huge mess. It doesn't make a huge mess. Glue stick rapidly dries into a hard film and the only mess is that the bottom of the part is a bit sticky when you take it off. You rinse it in the sink and it's done. I think it's 100% worth the slight hassle in order to have prints that never come loose even if they're poorly designed and have no surface area. That is really weird if it's PLA and you've done everything you said. There should be plenty of surface energy at that point. You can try lightly sanding the bed with 800 grit sandpaper, scuffing it until it's all foggy. Sagebrush fucked around with this message at 17:09 on Aug 3, 2021 |
|
#
?
Aug 3, 2021 17:06
|
|


|
Sagebrush posted:glue stuff same goddamn results with glue, and now i got that to clean off the loving bed.
|
|
#
?
Aug 3, 2021 17:07
|
|


|
InternetJunky posted:How do you mix your resins and not make a gigantic mess? Just pour some into the vat and stir it with a silicone spatula. If you want to be precise, you could pour a measured amount of bth colors into an empty resin bottle. Deviant posted:i am unclear on why i should have to do that on a prusa PEI bed. My understanding is that the PEI is supposed to make that unnecessary. In addition to the fact that it's going to make a huge mess. How long have you been using it? Did you try turning it over?
|
|
#
?
Aug 3, 2021 17:07
|
|


|
Deviant posted:same goddamn results with glue, and now i got that to clean off the loving bed. It's water soluble and takes 30 seconds in the sink. If you can't get PLA to stick to the glue stick that came with the printer, you've got something hosed up. In the first picture, your support lines are heavily over-squished. I don't know if that's because you're over-extruding or because the nozzle is too close, but those are supposed to have an obvious gap between them. Look at the width of the trace running left to right and compare it to the width of the support traces. Something there is wrong. Sagebrush fucked around with this message at 17:19 on Aug 3, 2021 |
|
#
?
Aug 3, 2021 17:13
|
|
|
Deviant posted:same goddamn results with glue, and now i got that to clean off the loving bed. Print this and adjust z until you�re within like 0.01 tolerance https://www.prusaprinters.org/prints/25261-first-layer-calibration-test
|
|
#
?
Aug 3, 2021 17:15
|
|


|
Doctor Zero posted:
Yes, I've gotten consistently inconsistent results on both sides. Sockser posted:Print this and adjust z until you�re within like 0.01 tolerance i'll try it. it's gotta be better than prusa's built in method.
|
|
#
?
Aug 3, 2021 17:27
|
|
|
Doctor Zero posted:Just pour some into the vat and stir it with a silicone spatula. If you want to be precise, you could pour a measured amount of bth colors into an empty resin bottle.
|
|
#
?
Aug 3, 2021 17:31
|
|

|
The Eyes Have It posted:That's super cool! How did you approach the problem? I tried looking up different approaches,but gave up quickly. I came up with my own linear mechanismn. First thing I do is righting the screws (at this stage I could also easily seperate out different sizes, but there was no need for that for me). Right now I am doing it with a simple 'handshaker', but you could easily add this to a 'classic' rotary mechanismn. This gives me perfectly straight screws on a rail, which I can directly feed into the next stage. It's a slanted plane with cutouts that are just large enough for every size. The screws basically are supported at the top and bottom until they get to their size, at which point the tip is no longer supported and they tip down, rotating over the rail. I can add some illustration tomorrow if you want.
|
|
#
?
Aug 3, 2021 17:36
|
|


|
Deviant posted:Yes, I've gotten consistently inconsistent results on both sides. Okay, so my calipers only go to .1 increments, but I printed that and got 0.2, 0.3, 0.5, 0.7, and 0.9mm thick. ie -.1 the whole way across except layer 1, meaning i'm a tad too close? averaging that out we get -0.08. My sheet profile is currently at -0.850, so i'd want to tweak to what, -.780ish? am i parsing this right mentally?
|
|
#
?
Aug 3, 2021 17:41
|
|
|
Deviant posted:Okay, so my calipers only go to .1 increments, but I printed that and got That�s right, yeah And then repeat
|
|
#
?
Aug 3, 2021 17:46
|
|
|
Glue stick is not going to make a huge mess. It'll create a little extra work when you clean the bed, that's all.
|
|
#
?
Aug 3, 2021 17:52
|
|

|
SEKCobra posted:I tried looking up different approaches,but gave up quickly. I came up with my own linear mechanismn. First thing I do is righting the screws (at this stage I could also easily seperate out different sizes, but there was no need for that for me). Right now I am doing it with a simple 'handshaker', but you could easily add this to a 'classic' rotary mechanismn. This gives me perfectly straight screws on a rail, which I can directly feed into the next stage. It's a slanted plane with cutouts that are just large enough for every size. The screws basically are supported at the top and bottom until they get to their size, at which point the tip is no longer supported and they tip down, rotating over the rail. I'm a little fuzzy on the plane and how the cutouts work exactly, a picture would be swell if you can swing it.
|
|
#
?
Aug 3, 2021 17:59
|
|
|
Sockser posted:That�s right, yeah So here's my concern with that. I adjusted my Live Z from -.85 down to -.78. the reprint came out more accurately, at .2, .4, .6, .7, and .9, giving me an average of -0.04 However, even the -.78 version looks like it may have been a bit too far off the bed?  this first layer isn't very well 'squished together', to use prusa's words, and the individual strands seperate fairly easily.
|
|
#
?
Aug 3, 2021 18:02
|
|
|
ImplicitAssembler posted:Glue stick is not going to make a huge mess. It'll create a little extra work when you clean the bed, that's all. I was going to say. If the glue stick is making a huge mess you're applying too much.
|
|
#
?
Aug 3, 2021 18:34
|
|

|
Incidentally, I notice you aren't having any adhesion problems with these layer test files and the same black filament.
|
|
#
?
Aug 3, 2021 18:39
|
|
|
CapnBry posted:Another great material for making an enclosure if you have a Dollar Tree store nearby is "Dollar Tree Foam Board" made by Redi-board. It is foam with paper on both sides, 20"x30" and costs a dollar a sheet. The foam gives it excellent insulation properties, and it is super easy to cut and work with. My printer I made a little stick frame out of a couple dowels and some 3D printed corners to join them, and the enclosure sits on that. However, a double layer of the foamboard would be ~9mm thick and pretty rigid on its own for a Prusa-sized printer (mine is a giant C-Bot). Instead of a door I just have a piece of lexan that goes into a lip/flap to cover the front and I just lift it off and away when I need to. I find that gets in the way a lot less than a swinging always-attached door. The lexan is the expensive part but the box can be built for under $10 I'd imagine. Oh nice, thanks for the tips! As a relatively new beginner, I think I should read up a little more if I want to wing an enclosure design. But that's cool. I never would have considered using foamboard.
|
|
#
?
Aug 3, 2021 19:02
|
|

|
Sagebrush posted:Incidentally, I notice you aren't having any adhesion problems with these layer test files and the same black filament. I was only having adhesion issues with supports when i started this mess. If i let it run long enough to try and lay down 'real' bits, they stuck just fine. but that still doesn't address the fact that this methodology seems to be making me back my nozzle out too far?
|
|
#
?
Aug 3, 2021 19:03
|
|
|
When I'm printing with supports, I like to have a big fat 0.3mm first layer and then all subsequent layers be whatever my "real" desired layer height is, and then adjust my first layer spacing with the Live Adjust until I get good adhesion on the supports because yes, they are weird. There's also a setting somewhere that you have to toggle that will put a miniature skirt on the base of support lines so that they adhere to the bed better, maybe dig around for that in the Support settings?
|
|
#
?
Aug 3, 2021 19:19
|
|
|
InternetJunky posted:How do you mix your resins and not make a gigantic mess? Digital kitchen scale, then I just pour however many grams into the larger bottle. There's enough headroom to do the 10% I've been aiming for at least Then just close the lid and shake the poo poo out of it. Pretty much every combo I've done so far works this way, even 50/50 color mixes
|
|
#
?
Aug 3, 2021 19:32
|
|


|
Well, a few tweaks later, and pulling my nozzle way further back than I thought, I have beautiful bottom layers and supports. Ended up at .775, which is way higher than i expected. 
|
|
#
?
Aug 3, 2021 19:59
|
|
|
Heyy nice. It's what I said in my first post. Having the nozzle too close can physically peel the traces off the bed. though I did tell you not to read that part so my bad Those support traces look just about perfect, so keep that picture around and refer to it in the future.
|
|
#
?
Aug 3, 2021 20:13
|
|
|
Sagebrush posted:Heyy nice. It's what I said in my first post. Having the nozzle too close can physically peel the traces off the bed. though I did tell you not to read that part so my bad i place the blame squarely on prusa's live z calibration feature. it tells you to look for squished lines, which had me going far too close (closer to 0.850)
|
|
#
?
Aug 3, 2021 20:28
|
|
|
InternetJunky posted:I'm constantly topping up vats while printing so I guess I'd have to premix, but that just seems like it would be a massive mess with mixing cups and funnels and resin dripping everywhere. I'm curious enough to give it a try, but is there actually a measurable difference in durability when you mix in 10-20% flexible resin? the easy way to blend resins with a constantly-topped-up tank is to go by weight, you don�t have to use any measuring cups or anything like that if you�re clever about it: - get a scale with 1g or preferably 0.1g resolution - weigh a resin tank when completely empty, make a note of that figure - weigh a resin tank while completely full at the max level you�re liable to work with, subtract empty tank weight from full weight to find the �maximum fill weight� sans tank. write that down too. we�re assuming all resins weigh the same which is not true, but is true enough to not distort the results by more than a fraction of a percent for most resins so we can ignore it - mix your initial blend by weight, dividing the maximum mass into the proportions of resins you want to combine. i usually mix a little less than a full batch, maybe 90%, to leave some wiggle room and to prevent me having to choose between overfilling the tank or settling for the wrong proportions because one of the resins was less dense than anticipated or w/e - next time you want to top the tank up, weigh the partially-full tank and subtract the empty tank mass to be left with the partial resin mass. subtract that from the max fill and you get the total resin weight required to refill the tank. divide *that* into the resin blend proportions to get the required refill weights for each resin - put tank on the scale, tare it so you�re starting from zero, and add the required resins to the tank no extra mess or handling, and it lets you maintain a fairly consistent product from part to part despite being a veritable acrylate resin pot-au-feu Ambrose Burnside fucked around with this message at 14:36 on Aug 4, 2021 |
|
#
?
Aug 4, 2021 10:50
|
|

|
Is the Photon S any good? They're on sale for $180 right now. https://www.anycubic.com/collections/special-offer/products/anycubic-photon-s?variant=30084941283388 EDIT: Click the white variant for the one that's in stock. You can also get the Wash and Cure 2.0 with it for a total of $308
|
|
#
?
Aug 4, 2021 10:57
|
|
|
biracial bear for uncut posted:Is the Photon S any good? They're on sale for $180 right now. They're marginally better than the original Photon because they have a stronger UV light, so slightly faster printing, but they're still color LCD machines. There's nothing particularly wrong with them if you don't care how long stuff takes to print, and they do have that nice dual-Z rail for stability... but any more modern monochrome machine will give you the benefits of current tech with much faster print times and longer screen life. The price for the bundle seems a little tempting, but I honestly still don't think it's it's a good buy.
|
|
#
?
Aug 4, 2021 11:18
|
|

|
How much hassle would it be to obtain and swap in a monochrome screen? Or is that 90% of the machine cost? The dual Z rail looks nice, but then again I'm not familiar with the various cheap SLA machines to know if there is a monochrome version out there made by someone else with a similar Z setup.
|
|
#
?
Aug 4, 2021 13:49
|
|
|
I'm having a hard time pulling the right info up this morning, but from what I understand, upgrading an S model to monochrome basically entails gutting it and replacing the motherboard, screen, and touch screen. By the time you buy the printer and all the other parts I think you'd be well past the cost of just buying a mono machine from the start. For what it's worth, my Photon Mono prints beautifully and I've never had any wobble issues with it. I haven't heard a lot of complaints about any of the common machines in that regard, with the exception of Elegoo's new Mars 4K machine. A couple of reviewers have noted that their Z axis isn't terribly stable so that may be one to steer away from for now. I don't know if you're in the USA, but Anycubic seems to be running a sale on Amazon right now. $50 off the Photon Mono and $30 off the Wash and Cure. Those are prices I'd absolutely jump on if I didn't already own them.
|
|
#
?
Aug 4, 2021 14:35
|
|
|
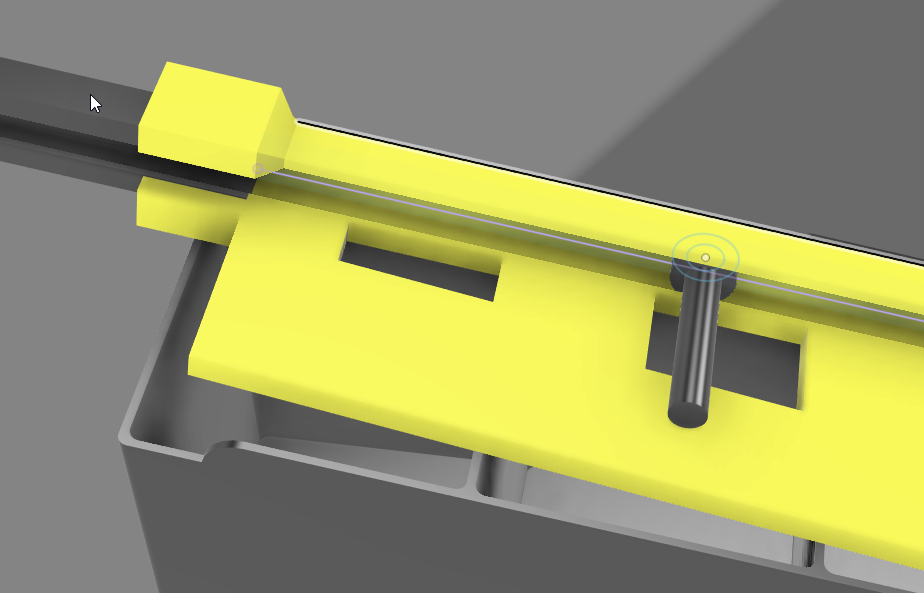 As promised here is a picture of my screw sorting machine. Please note, that the plane needs to be tilted forward by approximately 45� (In addition to the 10� slope to the right), I have not made this change in the design yet and achieved it by simply holding it that way. This way the screws dangle from the bottom edge (a bit hard to see) and the top edge is not present in this part of the machine. This makes the screws drop in more easily, the shortest size I have has a too heavy had to drop in fast enough otherwise. It also prevents the screws twisting a bit.
|
|
#
?
Aug 4, 2021 14:37
|
|
|
biracial bear for uncut posted:Is the Photon S any good? They're on sale for $180 right now. Just get a VOXELAB Proxima 6 instead if budget is your primary concern. Even cheaper than $180, but monochrome and capable of the same quality as a Mars2 Pro or Mono SE. I printed on one for months and was completely happy with it.
|
|
#
?
Aug 4, 2021 14:50
|
|
|
So, the results are as follows on my stuff: - leveling my live z helped with supports - the transition PLA from printed solid is still definitely a little dodgy - they're sending me a new roll to try out, apparently they say they have made changes to their manufacturing process and would like me to review/report back. - i ordered a new steel sheet from prusa just in case my PEI is on its way out, if not i'll have it. But i'm still using hatchbox et al for anything critical in the meantime Deviant fucked around with this message at 17:32 on Aug 4, 2021 |
|
#
?
Aug 4, 2021 17:21
|
|
|
biracial bear for uncut posted:How much hassle would it be to obtain and swap in a monochrome screen? Or is that 90% of the machine cost? The dual Z rail looks nice, but then again I'm not familiar with the various cheap SLA machines to know if there is a monochrome version out there made by someone else with a similar Z setup. It�s not just the screen it�s the mobo too. And maybe the light source. Doesn�t really seem worth it when the mono is so cheap.
|
|
#
?
Aug 4, 2021 18:39
|
|
|
I'll probably give SLA printers another try after I finish some home projects. Gonna be dumping money in insulation and sealants for a building/shop in the back yard of the home I just closed on so I can turn it into a 3d printing/CNC workshop and keep the noise down so as not to bother the neighbors (mainly in the CNC mill/etc. stuff, the 3d printers are already super quiet).
|
|
#
?
Aug 4, 2021 20:47
|
|
|
Congrats on the house!
|
|
#
?
Aug 4, 2021 21:45
|
|
|
SEKCobra posted:
Neat, thanks for the visual.
|
|
#
?
Aug 5, 2021 06:59
|
|
|
Just got a BLTouch 3.1 to install on my Ender 3. Running BTT SKR E3 Turbo on Marlin bugfix-2.0.x. I get an M112 SHUTDOWN error when the BLTouch triggers while auto-homing on the Z axis. I followed the steps here https://www.reddit.com/r/BIGTREETECH/comments/ep9z5n/skr_mini_e3_12_and_bl_touch_v31_probing_issues/ to enable 5v mode, but it's still halting. Any ideas?
TastyShrimpPlatter fucked around with this message at 08:59 on Aug 5, 2021 |
|
#
?
Aug 5, 2021 08:55
|
|

|
Do any of you know an effective way to get curved surface profiles? I tried reference images, but the curves are not easily photographed.
|
|
#
?
Aug 5, 2021 14:06
|
|
|
SEKCobra posted:Do any of you know an effective way to get curved surface profiles? I tried reference images, but the curves are not easily photographed. What do you mean by 'profiles'?
|
|
#
?
Aug 5, 2021 14:47
|
|
|
Doctor Zero posted:What do you mean by 'profiles'? I am trying to create a cover that attaches to my car, but there are tons of curves intersecting it and I am trying to match them basically.
|
|
#
?
Aug 5, 2021 15:46
|
|
|

|
| # ? May 30, 2024 12:08 |
|
|
contour gauge
|
|
#
?
Aug 5, 2021 16:13
|
|

