


|
therunningman posted:Good to know, I'll be more careful and not leave it soaking. PRU blue and PRU pink are definitely a thing. My Mosquito's way too light, but I was going by the box directions instead of the real deal. PRU blue's sort of richer than sea blue, and it's camouflage, 'cos the sky's blue innit? They figured out that didn't work relatively quick and decided to try out pink instead, since it'll fuzz out and blend moderately well against a light sky. In practical terms it became pretty moot once the Luftwaffe got their poo poo sufficiently pushed in to not be able to mount intercepts on recon flights. So if you ever see a Pepto pink Spitfire, now you know what's up. Crap, snipe.  
grassy gnoll fucked around with this message at 08:35 on Dec 8, 2022 |
 #
?
Dec 8, 2022 08:30
#
?
Dec 8, 2022 08:30
|
|


|

|
| # ? May 30, 2024 14:09 |
|
|
mllaneza posted:Or a big clear plastic bag you can work in to get the tiny parts off the sprue. Not my idea, it might have been suggested in this very thread! I've found it quite useful when working with PE that comes with clear adhesive plastic on each side to leave the back layer on when I'm cutting it as it means the PE remains stuck to the plastic.
|
|
#
?
Dec 8, 2022 11:15
|
|

|
tidal wave emulator posted:I've found it quite useful when working with PE that comes with clear adhesive plastic on each side to leave the back layer on when I'm cutting it as it means the PE remains stuck to the plastic. Either that or stick a piece of masking tape across the back of the PE. I even do this when cutting small plastic parts of the sprue to keep them from shooting off.
|
|
#
?
Dec 8, 2022 18:41
|
|


|
I tend to use a piece of double sided tape stuck to my bench then stick the PE sprue on the tape. That way when I cut out the pieces they don't fly anywhere they stay stuck to the tape.
|
|
#
?
Dec 8, 2022 19:19
|
|
|
SkunkDuster posted:I even do this when cutting small plastic parts of the sprue to keep them from shooting off. Brilliant.
|
|
#
?
Dec 9, 2022 00:45
|
|
|
SkunkDuster posted:Either that or stick a piece of masking tape across the back of the PE. I even do this when cutting small plastic parts of the sprue to keep them from shooting off. I've heard this tip like six times and it never sticks in my head. Every time it's like "oh son of a bitch."
|
|
#
?
Dec 9, 2022 02:49
|
|

|
If I ever build a Spitfire it will definitely be pink! Thanks for the explanation.
|
|
#
?
Dec 9, 2022 03:08
|
|
|
grassy gnoll posted:PRU blue and PRU pink are definitely a thing. My Mosquito's way too light, but I was going by the box directions instead of the real deal. PRU blue's sort of richer than sea blue, and it's camouflage, 'cos the sky's blue innit? They figured out that didn't work relatively quick and decided to try out pink instead, since it'll fuzz out and blend moderately well against a light sky. In practical terms it became pretty moot once the Luftwaffe got their poo poo sufficiently pushed in to not be able to mount intercepts on recon flights. Am I misremembering, or did they try painting the F-117 in that pink for similar reasons, only to go back to black because it wasn't macho enough for the pilots?
|
|
#
?
Dec 9, 2022 04:16
|
|


|
Beats me. If it runs on a turbine and doesn't have treads, I don't know anything about it I didn't learn from cartoons. The aviation threads might be able to tell you, though.
|
|
#
?
Dec 9, 2022 11:01
|
|
|
Phy posted:Am I misremembering, or did they try painting the F-117 in that pink for similar reasons, only to go back to black because it wasn't macho enough for the pilots? I don't know about pink, but some of the early test flights were to be done in daylight, and even most of the area 51 staff weren't cleared to know anything about it. So they used desert colors to make it difficult to make out details of the shape.  There was also this scheme, later on, once the plane was publicly announced:  Edit: this one was an early test prototype got media blasted to remove the radar absorbent paint (still classified) so it could be put on display. The work crew did not enjoy the process, and used the plane to express themselves 
Blue Footed Booby fucked around with this message at 16:26 on Dec 9, 2022 |
|
#
?
Dec 9, 2022 16:01
|
|
|
Blue Footed Booby posted:There was also this scheme, later on, once the plane was publicly announced: I had a little snap-tight model with this paint scheme as a kid
|
|
#
?
Dec 9, 2022 16:27
|
|


|
Blue Footed Booby posted:I don't know about pink, but some of the early test flights were to be done in daylight, and even most of the area 51 staff weren't cleared to know anything about it. So they used desert colors to make it difficult to make out details of the shape. It's entirely possible I'm conflating previously hearing about WWII air camo pink with what you just said.
|
|
#
?
Dec 9, 2022 19:08
|
|
|
After a little over a month's work, I'm happy to share my first 1/350 ship build. This is the USS San Francisco (CA-38) conducting a continuous-fire shore bombardment of Japanese positions on Guadalcanal in September, 1942. Continuous fire, as opposed to salvo fire, means the guns fire independently as soon as they're loaded. It increases the volume of fire while sacrificing rate of fire. I used a lot of Tom's Model Works PE accessories on it, including doors, porthole covers, ladders, radars, stairs, and catapults. TMW PE is great, but their instructions just plain suck. To paraphrase, the catapult's instructions are something like, "1. Cut pieces 1-25 off PE fret. 2. Build catapult." sigh. Anyway, with a decent reference book, it turned out okay. The Trumpeter kit isn't super impressive, so I had to do some custom work to improve the bits on the masts, the propeller guards, and the funnels. Most of what you see in those places is stretched sprue cut to length and glued. I'm reasonably happy with the fire effects, though if I do something like that again, I'll probably try some different techniques. Most of what I found online for examples/tutorials was overdone in my opinion. Period photos for cruiser bombardment don't show enormous billowing balls of smoke and fire like you see on battleships. Anyway, for a first go, it turned out well enough. 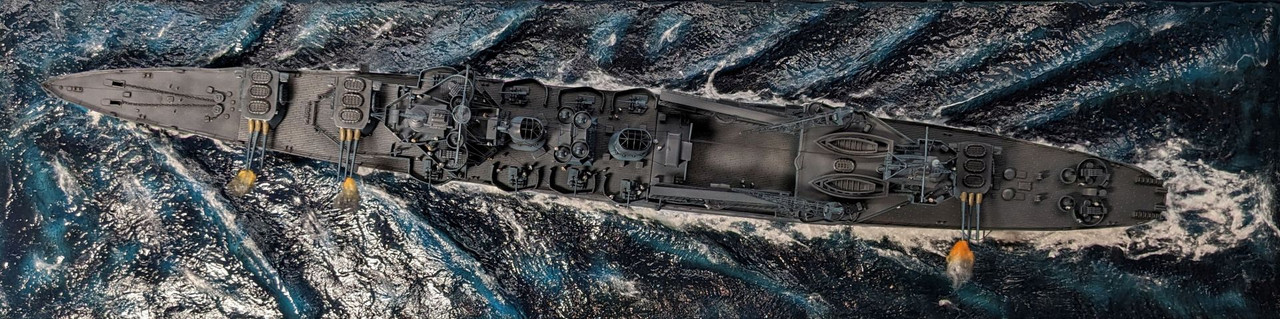 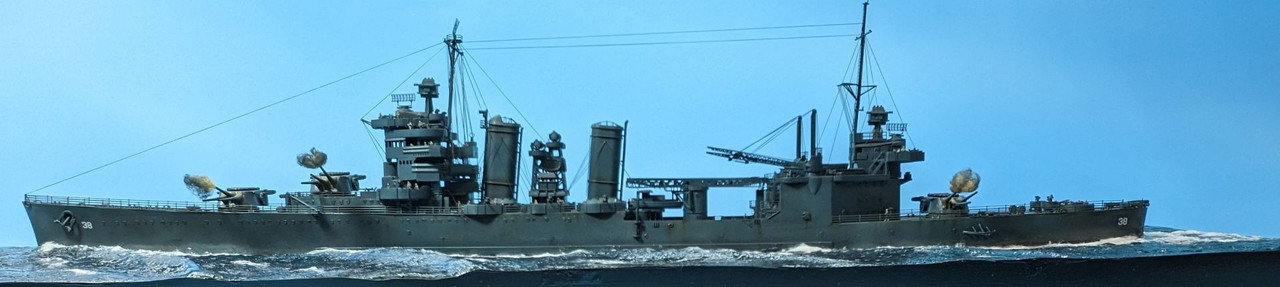 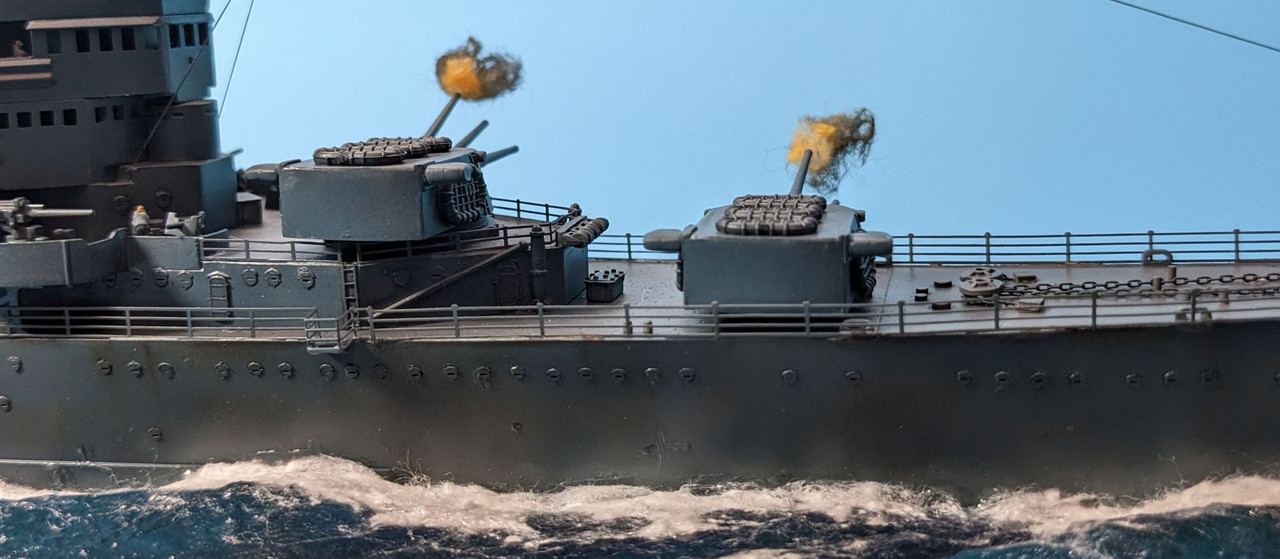 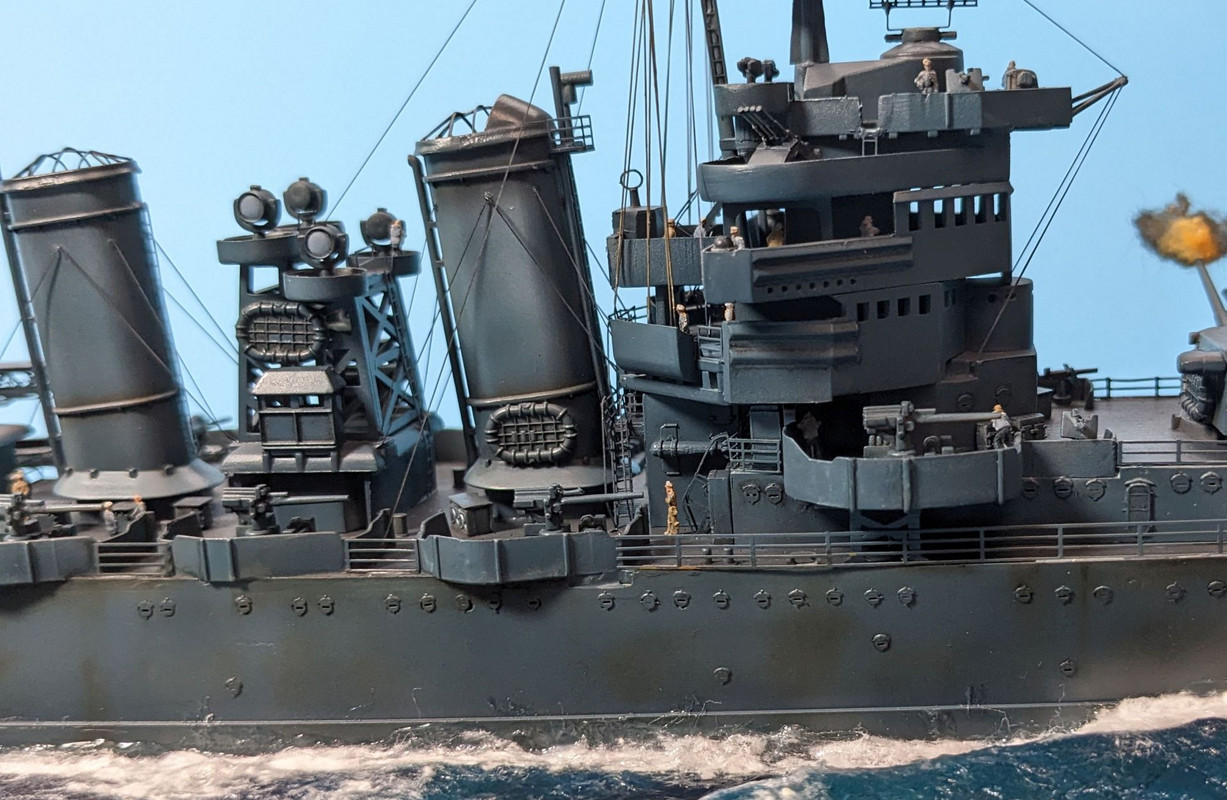      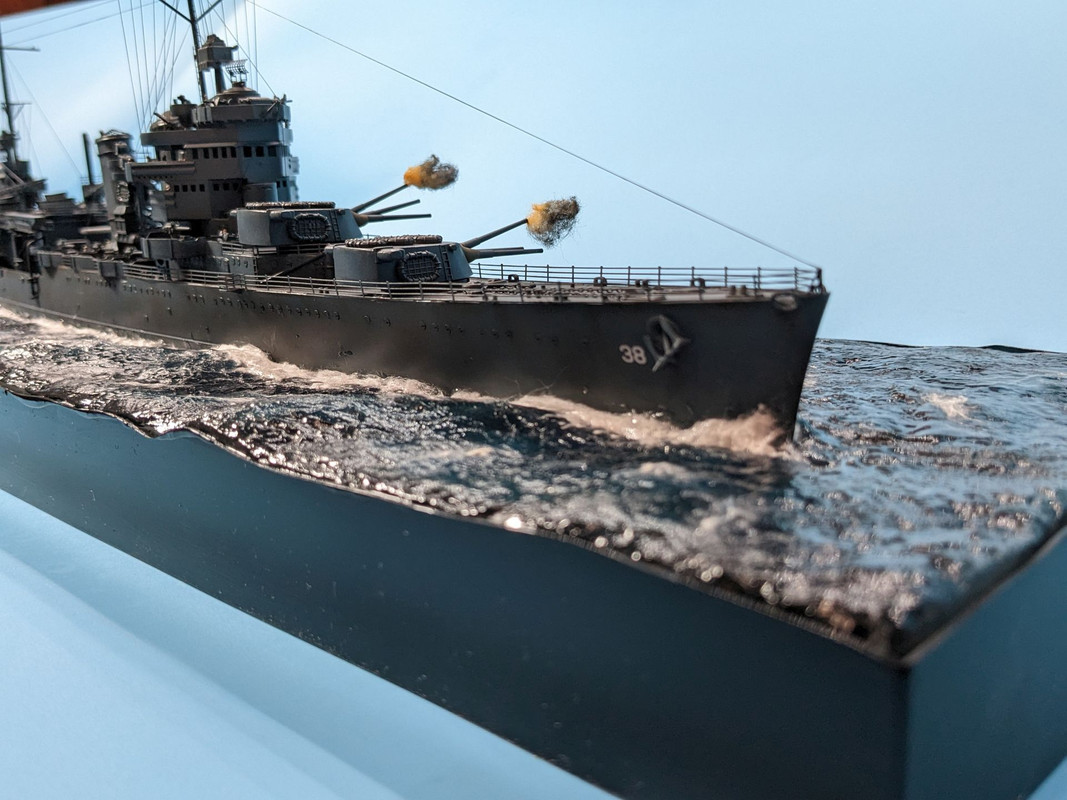 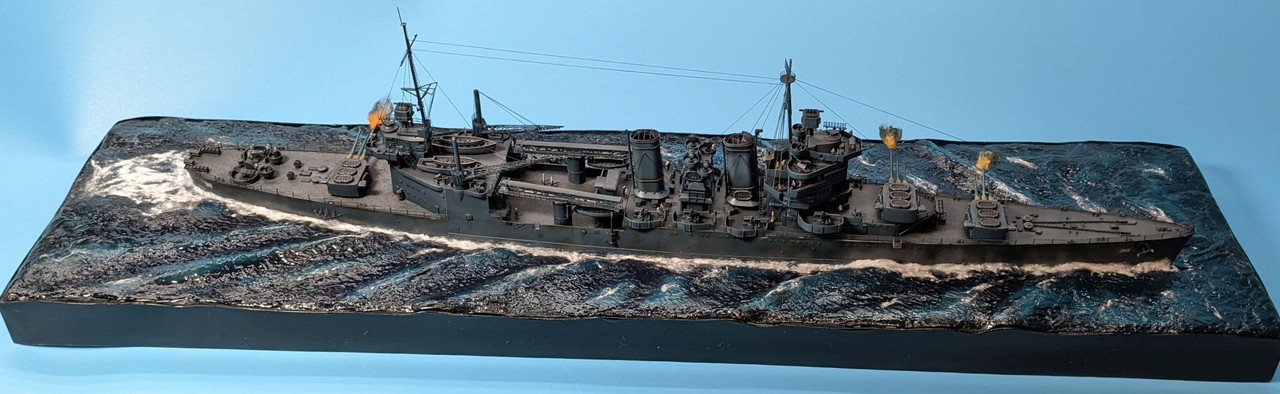   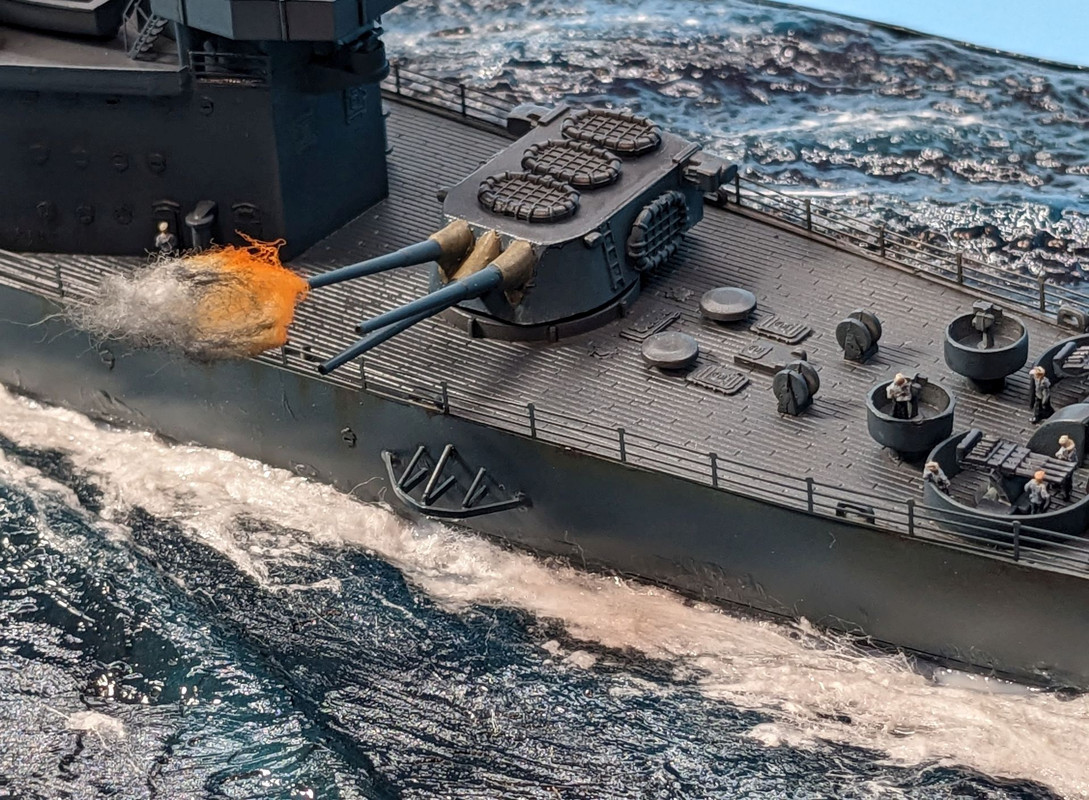 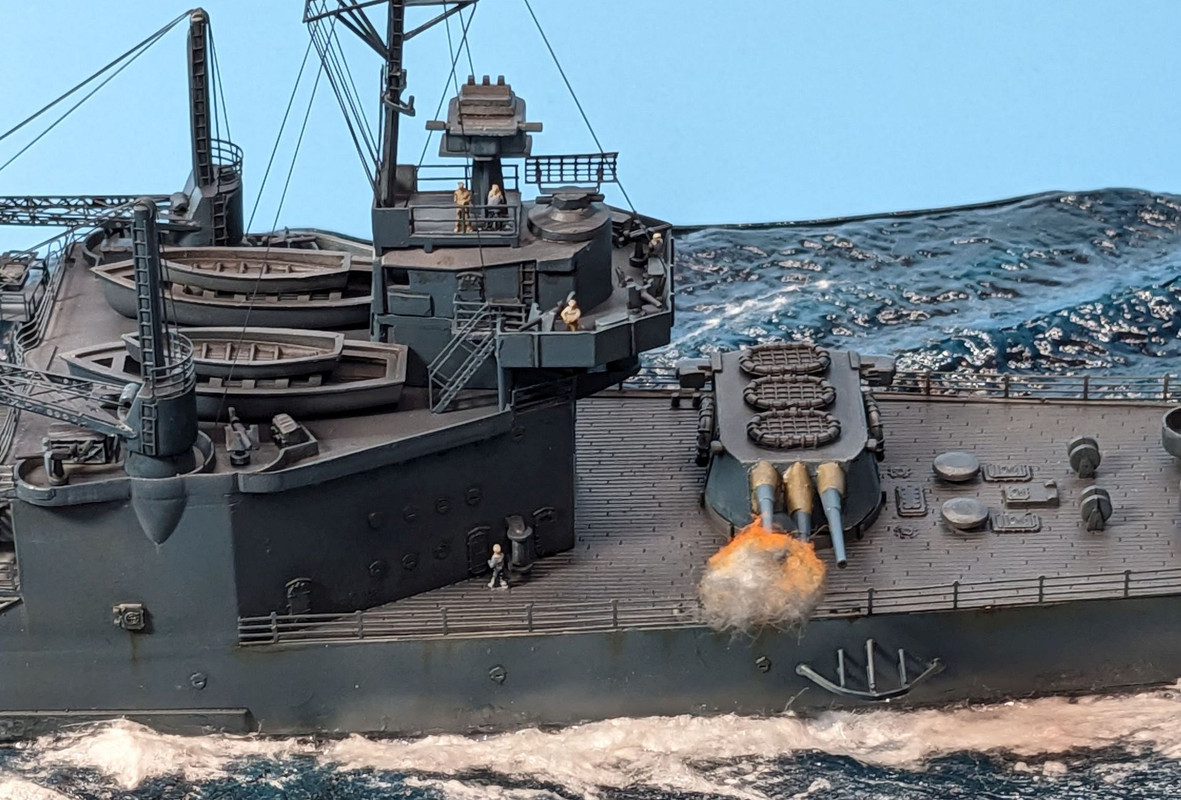 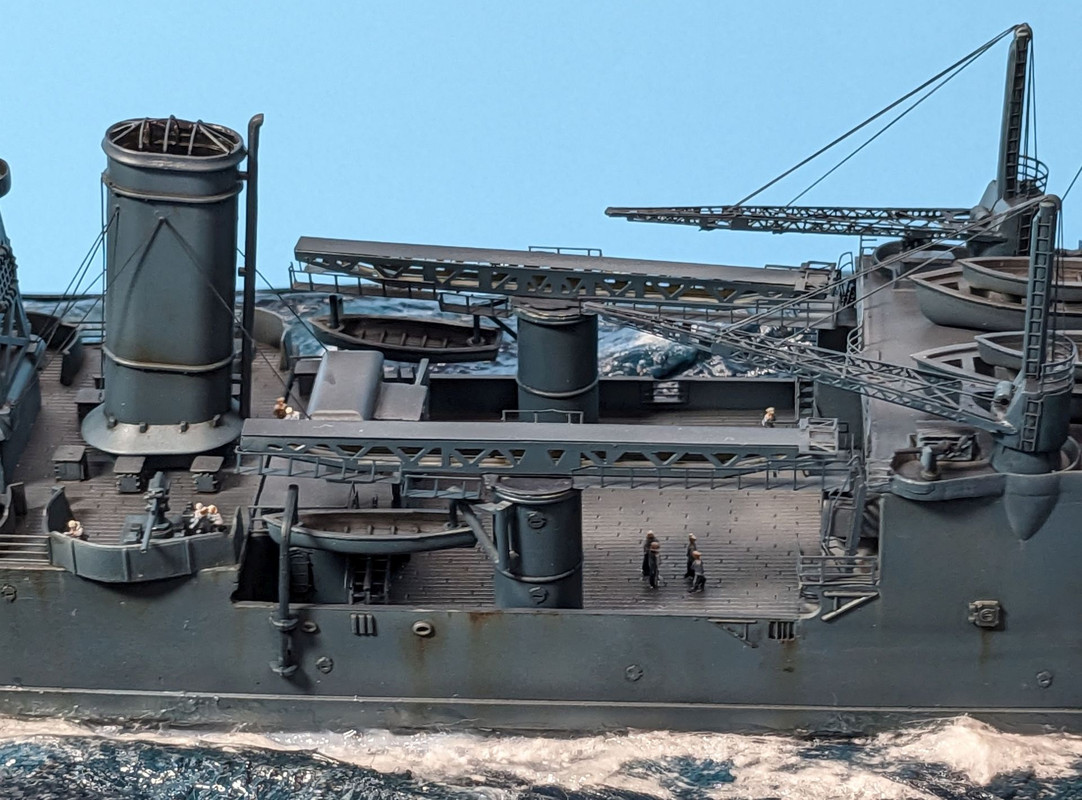 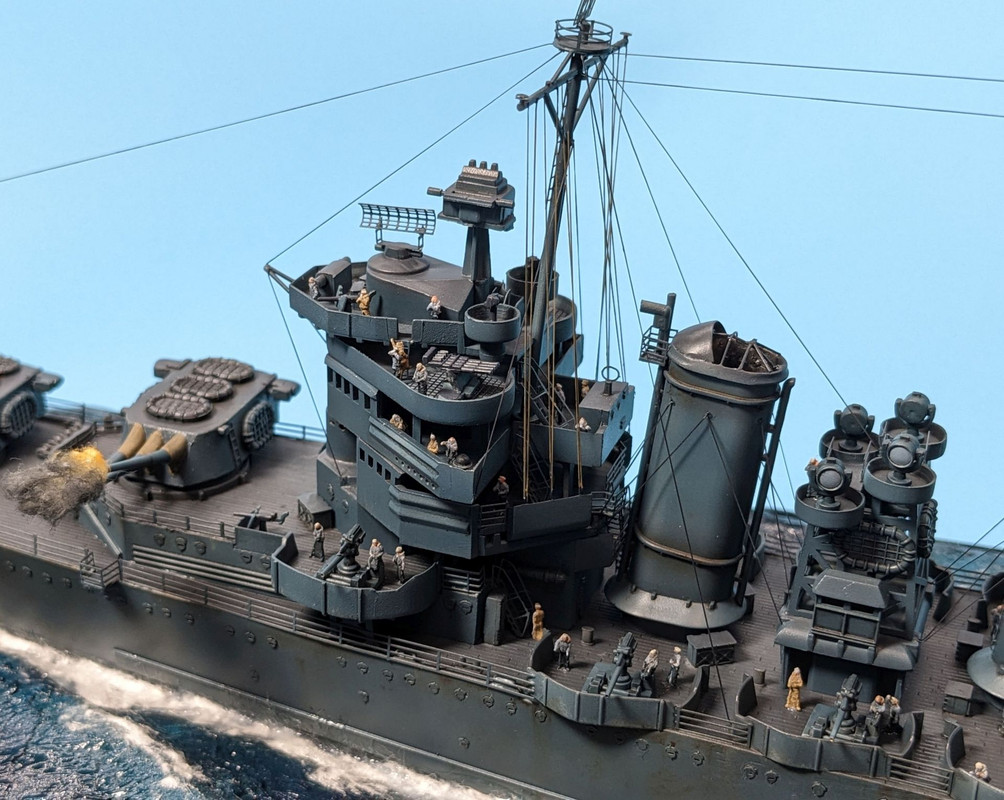 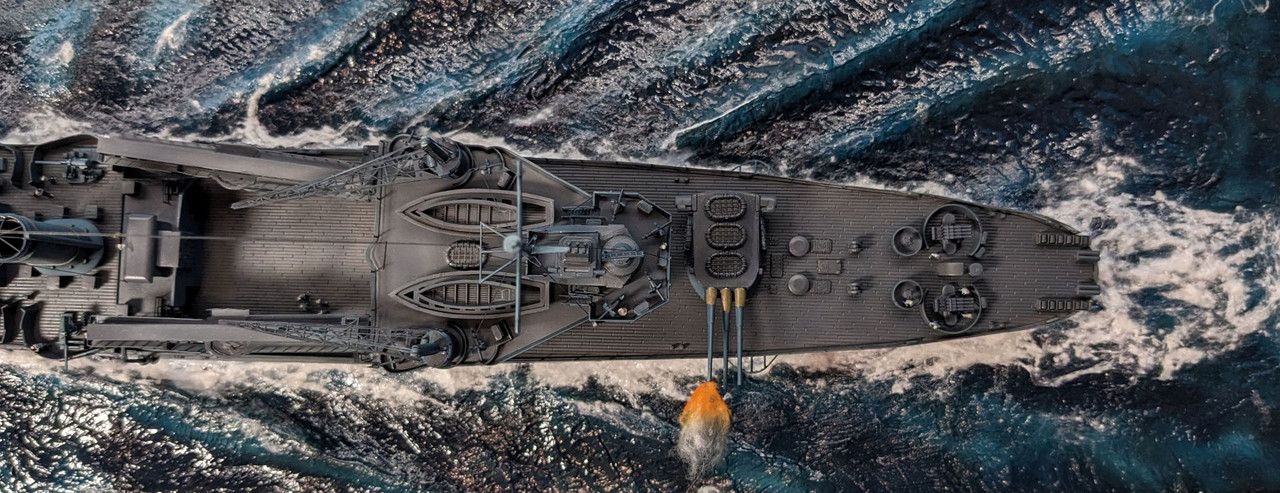 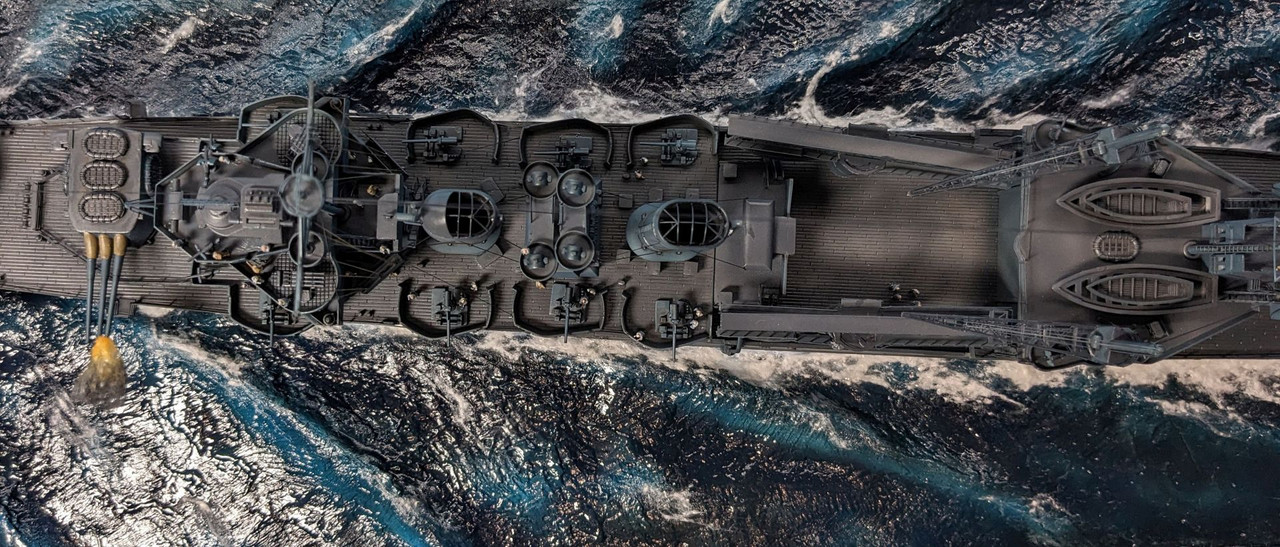 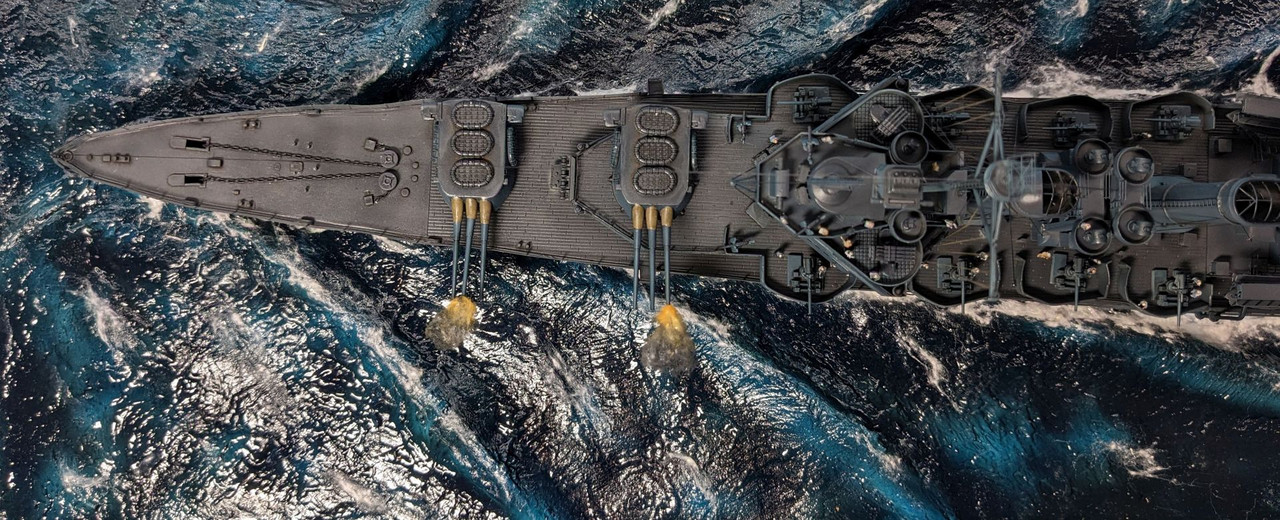  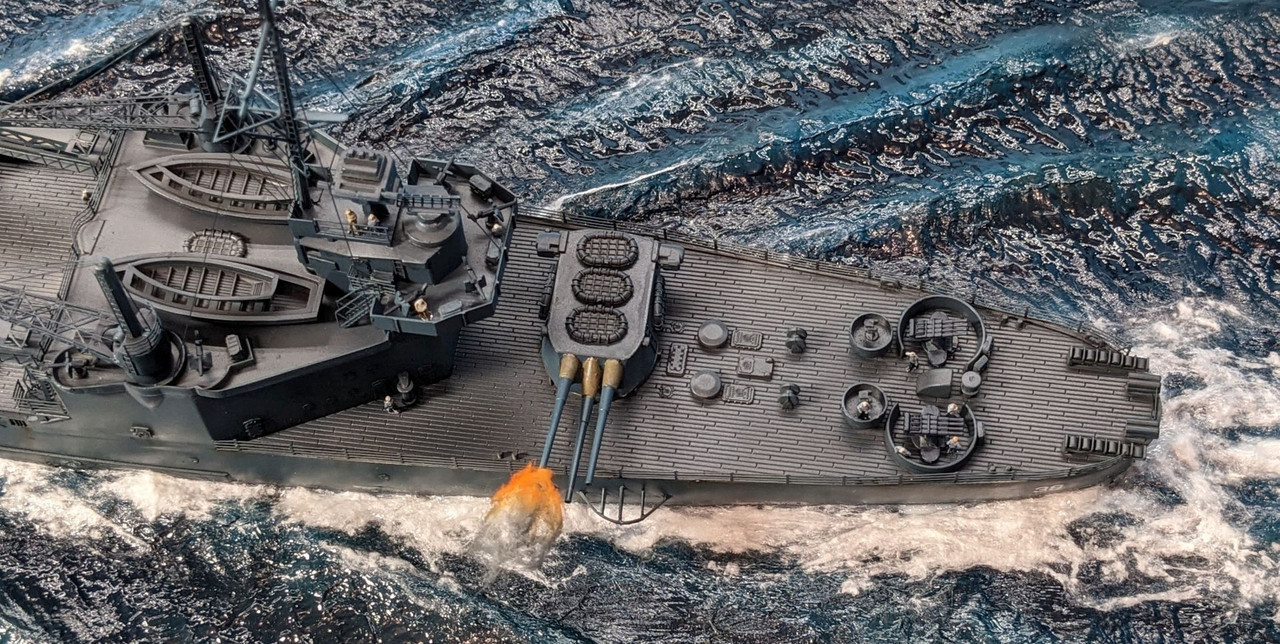 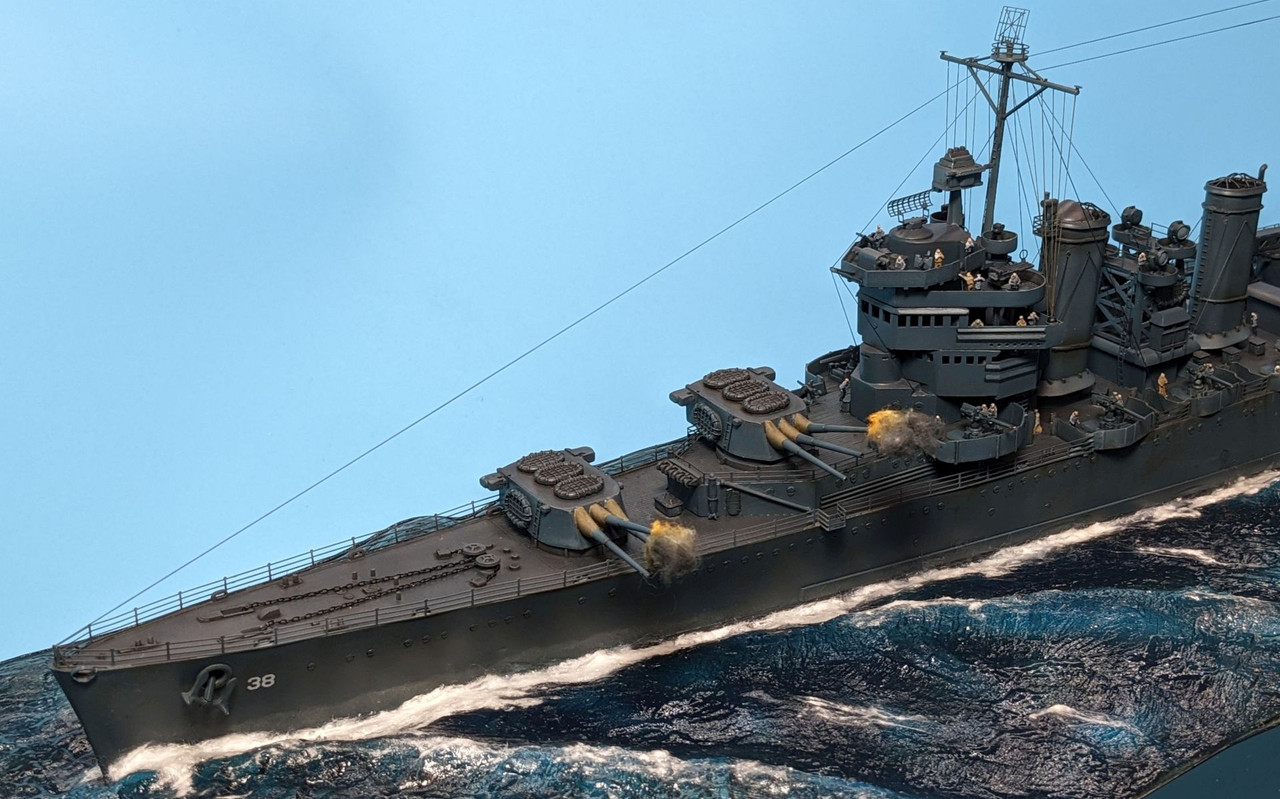 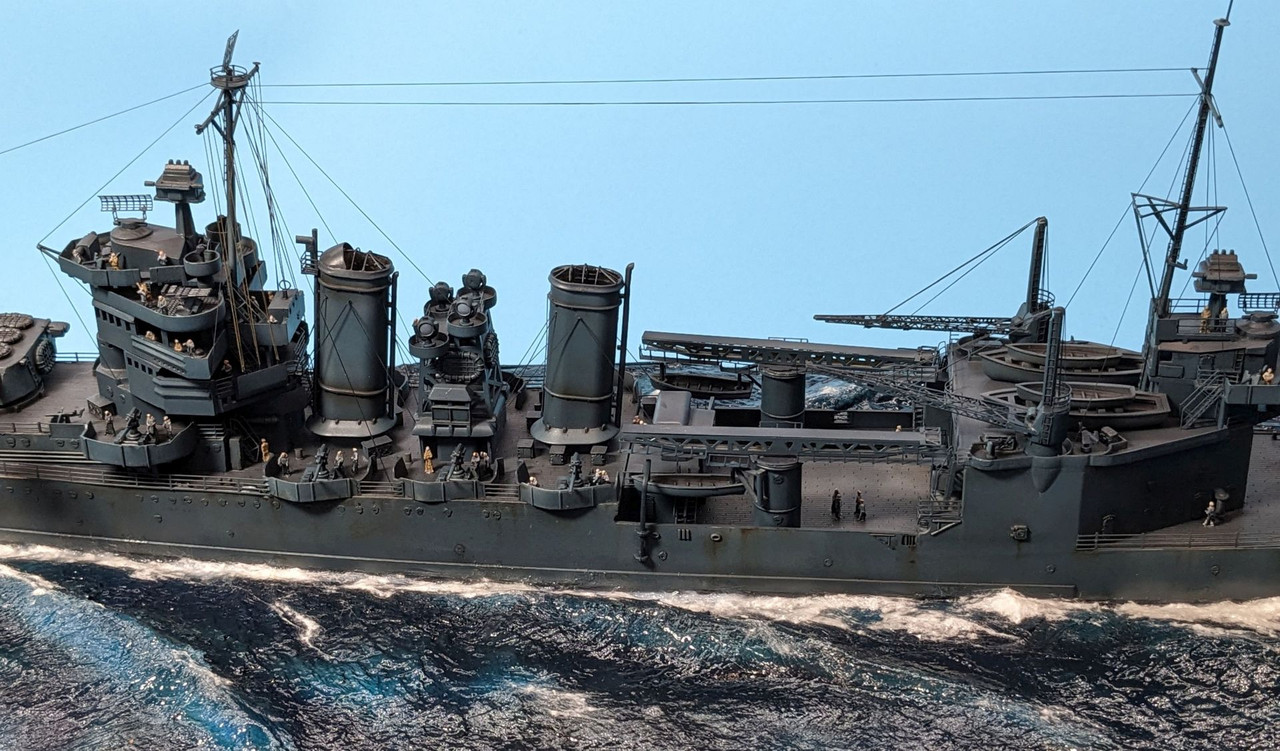 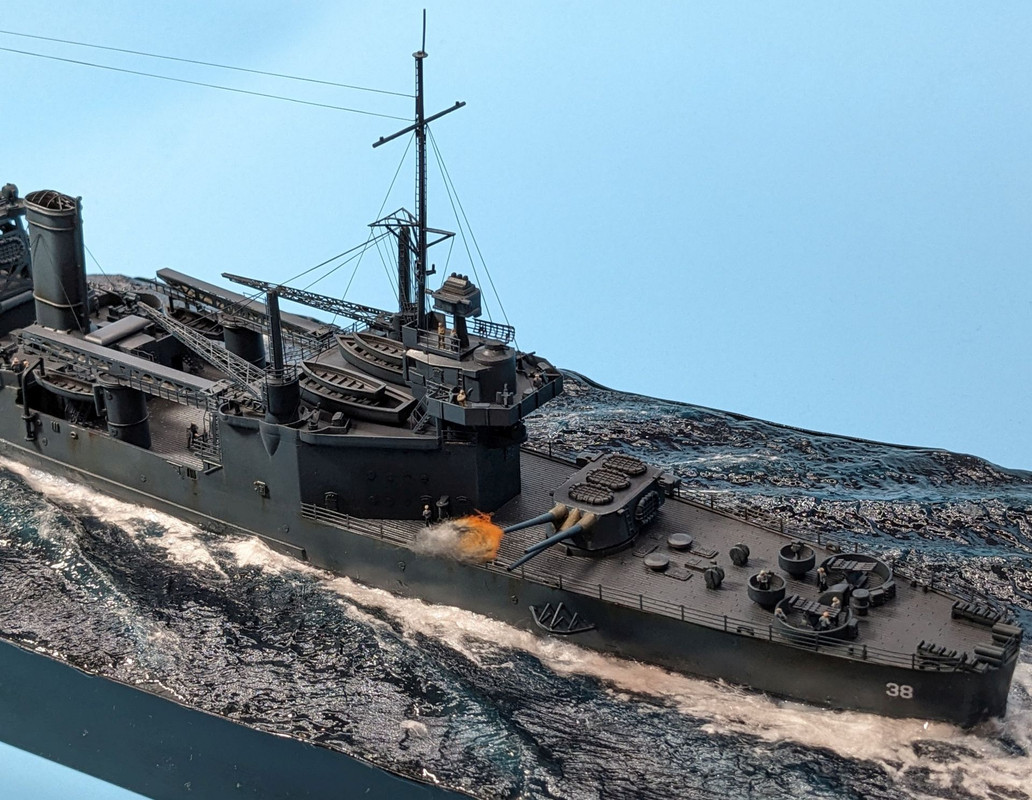
|
|
#
?
Dec 9, 2022 19:21
|
|
|
Gewehr 43 posted:After a little over a month's work, I'm happy to share my first 1/350 ship build. This is the USS San Francisco (CA-38) Awesome... thanks for sharing all those pics!
|
|
#
?
Dec 9, 2022 19:25
|
|


|
drat.
|
|
#
?
Dec 10, 2022 01:28
|
|

|
FrozenVent posted:drat.
|
|
#
?
Dec 10, 2022 01:38
|
|
|
I'm calling this Corvette ZR1 done. I should have done more test fitting, the body and chassis really don't want to line up well at all. I am pretty happy with the clear coat it's the first time I tried 2K clear.      
|
|
#
?
Dec 10, 2022 02:52
|
|
|
That turned out well. Nice work! Gonna have to look for some 2K I think.
|
|
#
?
Dec 10, 2022 06:13
|
|
|
Great paint on that Vette. I'm always amazed at the beautiful glassy smooth finishes that car model guys manage to get.
|
|
#
?
Dec 10, 2022 06:43
|
|
|
The Locator posted:Great paint on that Vette. I'm always amazed at the beautiful glassy smooth finishes that car model guys manage to get.
|
|
#
?
Dec 10, 2022 12:04
|
|

|
Gewehr 43 posted:After a little over a month's work, I'm happy to share my first 1/350 ship build. This is the USS San Francisco (CA-38) conducting a continuous-fire shore bombardment of Japanese positions on Guadalcanal in September, 1942. Continuous fire, as opposed to salvo fire, means the guns fire independently as soon as they're loaded. It increases the volume of fire while sacrificing rate of fire. I used a lot of Tom's Model Works PE accessories on it, including doors, porthole covers, ladders, radars, stairs, and catapults. TMW PE is great, but their instructions just plain suck. To paraphrase, the catapult's instructions are something like, "1. Cut pieces 1-25 off PE fret. 2. Build catapult." sigh. Anyway, with a decent reference book, it turned out okay. The Trumpeter kit isn't super impressive, so I had to do some custom work to improve the bits on the masts, the propeller guards, and the funnels. Most of what you see in those places is stretched sprue cut to length and glued. Lovely work! Big fan of this. The Locator posted:Great paint on that Vette. I'm always amazed at the beautiful glassy smooth finishes that car model guys manage to get. Likewise, I can never get the hang of spraying gloss clear coats. If I ever built a car model it'd have to be a rally car covered in mud or something as I know otherwise I'd drive myself nuts with specs of dust or hair getting stuck in the clear coat.
|
|
#
?
Dec 10, 2022 18:45
|
|
|
Any tips for applying old decals. Got an old Revell F15, probably 20 plus years old. Getting a bit of tearing on application. Is it purely just time soaking first. Or has anyone got any other tips?
|
|
#
?
Dec 11, 2022 01:25
|
|
|
Lovely work on all the models in this thread. I'm slowly working my way through the thread. Currently at about page 150 I have vicariously lived through several wooden ship builds Assume work everyone!
|
|
#
?
Dec 11, 2022 01:34
|
|
|
sarujin_nz posted:Any tips for applying old decals. Got an old Revell F15, probably 20 plus years old. Are you using placing and setting chemicals? Or just water?
|
|
#
?
Dec 11, 2022 08:09
|
|
|
FrozenVent posted:Are you using placing and setting chemicals? Or just water? Mr Mark softer and setter. Warm water for the decal soaking for 60s, setter brushed where I want. Setter once it's in place The issue is decals are tearing trying to slide off the backing. Generally only using wooden toothpicks and cotton buds to move them.
|
|
#
?
Dec 11, 2022 10:23
|
|
|
Are they tearing because they seem to be sticking too hard to the decal paper, or just disintegrating by themselves? 60s might be too long and maybe damaging the decal - try 10-15s and then placing it on a bit of kitchen paper to soak up the water and then leaving it for 30s or so before trying to slide it off the backing paper. It's possible that the carrier film on top of the decals has degraded, in which case you could try brushing microscale decal film over them to create a new layer of carrier film. tidal wave emulator fucked around with this message at 12:39 on Dec 11, 2022 |
|
#
?
Dec 11, 2022 12:23
|
|
|
I'll give the shorter water soak a try on a couple. But the decal film, not a product I've come across before. I'll try to source some incase the above doesn't fix it.
|
|
#
?
Dec 11, 2022 13:41
|
|
|
Any reason you wouldn't want to buy a set of aftermarket decals? There's gotta be hundreds of aftermarket decals set for an F-15 and it'd be less hassle than trying to recondition ancient kit decals.
|
|
#
?
Dec 11, 2022 14:51
|
|
|
Cthulu Carl posted:I had a little snap-tight model with this paint scheme as a kid I think if you were approximately 10 in 1991, you were just issued that kit by the DoD
|
|
#
?
Dec 13, 2022 22:26
|
|


|
I have now started putting together my first kit since 1997. It is a 1/35 Trumpeter AVGP Cougar. So far I've put some pieces on backwards and stabbed myself with the Xacto blade but it's going pretty well otherwise. Tamiya Extra Thin is effectively like magic compared you what I used back then. Thinking about the painting and building a small list of colors to order. Overall 5/5. Strongly enjoying myself.
|
|
#
?
Dec 17, 2022 08:17
|
|
|
therunningman posted:stabbed myself with the Xacto blade I think that deserves a gang tag.
|
|
#
?
Dec 17, 2022 13:53
|
|
|
Latest one from me, probably the last for 2022, a quick lil build before I start something more ambitious next year, S-Model's (or 'Sextant') 1/700 Imperial Chinese Navy ironclad Ting Yuen. It was straightforward to put together, albeit the photoetch is really soft and easily distorted so the railings needed to be carefully handled and folded to shape. The rigging wasn't too complicated and the guy I bought it off on ebay had stuck woodhunter laser cut decks into the box which were a nice bonus.        
|
|
#
?
Dec 17, 2022 15:53
|
|
|
That�s a cool unusual ship, especially loving the boats. Looks a bit clean though are you going to apply filters?
|
|
#
?
Dec 17, 2022 16:14
|
|
|
What a goofy looking ship. The model is well built and presented. I like your water quite a bit, could you share your technique?
|
|
#
?
Dec 17, 2022 17:42
|
|
|
FrozenVent posted:That’s a cool unusual ship, especially loving the boats. Probably not, I just wanted to do a wee quick build and there's not much in the way of reference images to work from for weathering it. It's such a small model anyway that there's little space to really dirty it up. Gewehr 43 posted:What a goofy looking ship. The model is well built and presented. I like your water quite a bit, could you share your technique? Cheers! My technique is based off of the tinfoil technique that loads of YouTubers demonstrate, but basically: 1. Cut base to size (I use ~inch thick corrugated cardboard insulation that comes in those meal delivery kit things but any base would work) and a corresponding piece of thick card 2. Trace around the outline of the hull onto the thick card then glue this onto the base (you need to do this or the glue later will warp the card when it dries) 3. Slap down PVA/wood glue everywhere other than the hull outline, then place rolled up sausages of tinfoil where you want the wake and other big waves 4. Gently wrinkle up some thick tin foil (thin stuff is too fragile and wrinkles too much) and smooth it over the glue and let it dry 5. Brush woodland scenics water effects (basically a thick gel-like PVA) over the foil and wait for it to dry to give it rigidity 6. Airbrush Tamiya XF-17 sea blue all over it (sometimes I might prime it black first but I don't always bother) 7. Brush another layer of woodland scenics water effects over it, you gotta go quite thin with it as if it's too thick it dries opaque. The first couple of coats I might go thick to build up some wave shapes and then hit it with more XF-17 to cover it up 8. Randomly spray v thinned down near-black like NATO/rubber black over the water to give it a bit of variation in-between the waves, usually I go overkill with this then have to knock it back with a thin coat of XF-17 9. Final coat of water effects, stipple it into the wake behind the ship to make it all choppy 10. Dry-brush white enamel paint onto the wakes, then maybe a little bit more dynamic wave action with water effects - it's really designed for making moving water rather than sea scapes so you can sculpt it fairly well 11. Measure up and make a frame out of plasticard to fit around the cardboard and airbrush it all black 12. Glue the ship into the hull space, discover it doesn't quite fit and have to fettle it into position, break some parts off in the process and swear next time you'll leave them off until it's already in place. It sounds like quite a lot written down, but it's reasonably straightforward. If I was better with colours I'd probably try adding some greens and blues to the mix but I don't want it to end up too bright and I'm fairly happy with the compromise I've found.
|
|
#
?
Dec 17, 2022 18:50
|
|
|
tidal wave emulator posted:Latest one from me, probably the last for 2022, a quick lil build before I start something more ambitious next year, S-Model's (or 'Sextant') 1/700 Imperial Chinese Navy ironclad Ting Yuen. Very nice. I'm always impressed by you guys that can work in 1/700 scale. My eyes just aren't good enough as I'm old now, so I will stick to my 1/48'th stuff if I ever get back in the shop.
|
|
#
?
Dec 17, 2022 19:31
|
|
|
tidal wave emulator posted:Wonderful information Thank you! I've used the tin foil technique before, but yours looks a lot more organic than what I came up with. I'll have to play with it a bit more. On steps 9 and 10, you mention water effects. What product are you using?
|
|
#
?
Dec 17, 2022 22:25
|
|
|
The Locator posted:Very nice. I'm always impressed by you guys that can work in 1/700 scale. My eyes just aren't good enough as I'm old now, so I will stick to my 1/48'th stuff if I ever get back in the shop. I'm trying to make as much use out of my eyesight as I can before it goes! Gewehr 43 posted:Thank you! I've used the tin foil technique before, but yours looks a lot more organic than what I came up with. I'll have to play with it a bit more. Just the same woodland scenics product from the earlier steps.  It's supposed to be used for waterfalls and dynamic water, which means it works well for curling over breaking waves and things, but I found it's fine for doing waves if I'm just building up thin layers on the foil. I've got some deluxe materials 'making waves' stuff which seems to be a much more gel-like water based resin product and dries crystal clear rather than slightly rubbery, so I might give that a go at some point. I've never done actual resin pouring. Some pals of mine are very prolific waterline kit builders and they've got a very simple technique just using wood glue to product a silty, shallows type effect:    I'd like to get to a place where I can just knock out sea bases quickly like that and spend more of my time focused on the kits.
|
|
#
?
Dec 17, 2022 22:51
|
|
|
Very cool ship, made me check out the wiki article for its history. Seems like an unusual subject! And such tiny scales. Thanks for sharing the water techniques.
|
|
#
?
Dec 18, 2022 09:36
|
|
|

|
| # ? May 30, 2024 14:09 |
|
|
Is that a scratchbuild? Or a mod of an existing kit maybe?
|
|
#
?
Dec 18, 2022 09:51
|
|


