|
Teabag Dome Scandal posted:I'm in the process of selling my house. It is currently empty and the temperature outside is supposed to start dipping below freezing for a few hours at night. The house is built on top of an un-insulated crawl space . Should I be worried about the pipes freezing? Day time temps should be above freezing except for a day or two where it might snow. Normally, I wouldn't think about it while living there but being vacant with no water being used I'm a little concerned but I'm not sure if I should be. I know an easy solution is to leave a tap running but if I don't need to waste the water I would prefer not to. You could set-up a couple battery-operated lawn sprinkler timers to run water a few times a day here & there. The best thing would be to shut off the main, drain the pipes and if you can, blow out the lines with compressed air. You could turn off the heat after that. Don't forget the toilets & sink traps if you turn off the heat. RV antifreeze is your friend. PainterofCrap fucked around with this message at 03:44 on Dec 17, 2022 |
 #
?
Dec 17, 2022 03:42
#
?
Dec 17, 2022 03:42
|
|


|

|
| # ? May 29, 2024 14:04 |
|
|
Teabag Dome Scandal, does the house have internal shutoffs for the outside taps? It's not a thing for me in Central Texas but it was a thing up in Yankeeland. The idea is you close the one in the closet and open the outside one. It'll drain the line to the external faucet.
|
|
#
?
Dec 17, 2022 06:35
|
|

|
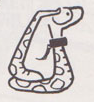
I�m so bad at this poo poo I don�t even know if this is considered a plumbing issue to put in that thread or not. Like it feels like yes because of my potential to get wet, but also no because I�m hoping to not involve pipes. So here it is. Like many people, I am the proud owner of an indoor toilet and despite the fact it�s relatively new it�s not working properly. For a few months it would run continuously following a flush and my way to deal with it was take the top off and apply pressure wherever felt good until it would make �the good noise� then stop and I could ignore it again. Alas in the same way this doesn�t work forever with the human body, it got to the point where this doesn�t help anymore. Here is a photo of the toilet guts as it feels easier than trying to explain which type of toilet it is.  Don�t let the water level being below the top of that cylinder on the right fool you, it desperately wants to fill up and run over the edge but I�ve cut the water and flushed it to stop this. Things I�ve tried based on YouTube videos full of people badly explaining stuff they don�t appear to know much about : * adjusted that screw on the left hand side, I�ve gone from one extreme to the other and back and tried parts in between and it seems to make no difference. * underneath that right hand side cylinder is a yellow rubber seal that apparently is super prone to failure. The one I took off seemed mainly fine but had a tiny crack in the rubber I guess? I was not filled with confidence that this was the answer, and it appears that was correct as it also made no difference. Are there any other obvious quick and easy attempts I could make to resolve this by myself without having to call someone in? Money is naturally tight at this time of year, but if it�s a �beyond my abilities� thing I�ll just stump up the cash and sell my dogs Xmas or something. (I will not actually do this).
|
|
#
?
Dec 17, 2022 21:34
|
|


|
EL BROMANCE posted:I�m so bad at this poo poo I don�t even know if this is considered a plumbing issue to put in that thread or not. Like it feels like yes because of my potential to get wet, but also no because I�m hoping to not involve pipes. I consider myself �eh, alright� at this sort of stuff, and I�d say it�s well within the realm of at least trying it yourself. Luckily your pic includes the model of your toilet, and here�s the parts diagram from Kohler. I would replace K-1188999 (Flush Valve Kit, the center part of your pic) and K-GP1138930 (Fill Valve Kit, the left). Turn off the water at the shutoff below the toilet (if this is seized up/not working, don�t force it, but you�ll need to turn off water to the whole house/another shut off branch if you�ve got one), and then drain the tank. Then you can go about replacing them (probably several videos you can find on YouTube, and it sounds like you�ve watched a couple of them already). I�m sure somebody more knowledgeable can come along and potentially tell you how to do it for <$50, but for ~$50, that�s how I�d tackle it. Or at least try before calling a plumber.
|
|
#
?
Dec 17, 2022 23:07
|
|


|
Thanks! The cutoff for the toilet works fine luckily so that definitely gives me a good place to start ")
|
|
#
?
Dec 17, 2022 23:25
|
|
|
Any tips for pulling the old gasket out of my garage door? The thing must be original (17 years old) so any attempts to pull it out with vise grips just snap the thing off in chunks and leave the material in the channels. It's 30 degrees out, which isn't great but it's only going to get ridiculously colder the next weeks so I wanted to replace it since my new one came in after 60 days of waiting. The picture shows just the remaining material in chunks but to the right off-camera the full old gasket is intact. Ideally I could pull it out in 1-2 large pieces. At this point I've tried taking cat claws and flathead screwdrivers in the channel to budge or pull out and haven't gotten anything moving.
|
|
#
?
Dec 17, 2022 23:47
|
|

|
I'm replacing some t5 flurouscent bulbs in my hvac closet with LEDs. However the LED ones I got turned out to have a slightly larger diameter (about 0.2 inches). They still fit in the slots, but don't go on. new bulb https://www.lightbulbs.com/product/satco-11904 Do these bulbs have to be installed in a specific orientation? maybe that's the issue. The documentation for the new bulb even says "replaces F8T5 lamps" which these old ones clearly are
|
|
#
?
Dec 18, 2022 06:59
|
|

|
Did you remove the ballast from the fixture?
|
|
#
?
Dec 18, 2022 07:58
|
|


|
IOwnCalculus posted:Did you remove the ballast from the fixture? no, i have no idea what that is and it didn't come with any instructions I just looked it up, drat that's annoying. I will take out the fixture and take a look, thanks
|
|
#
?
Dec 18, 2022 18:41
|
|
|
this is what I'm looking at after unscrewing it from the wall. edit: yes it did have instructions, not sure why i said they didn't https://satco.com/products/S11904 the brown things are labeled as the ballasts. is it just a matter of disconnecting the black wires from the ballast on both sides and then connecting them directly? also those two white cylinders are called starters if it's just a matter of cutting the black wires where they go in and out of each ballast and starter and then connecting the two ends I think I can do that, but still might contact an electrician instead. 
actionjackson fucked around with this message at 20:05 on Dec 18, 2022 |
|
#
?
Dec 18, 2022 18:58
|
|
|
They make retrofit LEDs that are supposed to be ballast compatible but I haven't had much luck with them.
|
|
#
?
Dec 18, 2022 20:38
|
|
|
I would just return the LED inserts and buy a new LED fixture like this: https://www.amazon.com/gp/product/B00PDHX6EM or Lithonia makes some ultra slim that don't diffuse as well for something like this HVAC room.
|
|
#
?
Dec 18, 2022 20:48
|
|
|
 Currently have this gross dusty moldy ancient looking exhaust fan in my bathroom. Won't even suck a piece of TP to the vent when running. The metal square is about 8.5" x 8.5" and almost looks like it's been spackled in place. I am thinking this Broan-NuTone w/light should fit the space and hopefully not be too crazy of a swap job. Guessing I'll need to get into the attic to detach/secure the ducting? If I already have metal HVAC tape do I need to buy "bath fan installation duct tape" specifically for this or can I just use the metal tape? Any tips and tricks for this job?
|
|
#
?
Dec 18, 2022 21:30
|
|


|
Danhenge posted:They make retrofit LEDs that are supposed to be ballast compatible but I haven't had much luck with them. yeah when I did my search on a big light bulbs site this was the only one that met my criteria of T5, 12" even. most of them are 36" or 48" which makes sense given they are often used for institutional use i did see that lithonia one, it might be a better choice. not going to put something 4000K in though because I hate cool lights. that's what I have right now. i also notice wraparounds like that all have at least 2000 lumens which is way too high for me. I have 800 right now and that's plenty. I would still like to know how I can do this bypass though, if I'm going to get rid of the fixture there's no harm in trying it first (outside of killing myself i guess) actionjackson fucked around with this message at 21:58 on Dec 18, 2022 |
|
#
?
Dec 18, 2022 21:35
|
|
|
My home was built in 2004 and has two 40 gallon water heaters. They're clearly at the end of their life and need to be replaced. Is there any reason the builders installed 2 tanks instead of one large one other than a cost cutting measure? I would prefer to replace with one larger one.
|
|
#
?
Dec 18, 2022 22:10
|
|
|
it seems to me that given the black wire feeds through both the ballast and the starter, you would want to make four cuts where the red lines are, strip, and then connect those wire pairs that went into the ballast and starter respectively
actionjackson fucked around with this message at 22:25 on Dec 18, 2022 |
|
#
?
Dec 18, 2022 22:21
|
|
|
Bobfromsales posted:My home was built in 2004 and has two 40 gallon water heaters. They're clearly at the end of their life and need to be replaced. Is there any reason the builders installed 2 tanks instead of one large one other than a cost cutting measure? I would prefer to replace with one larger one. There are a lot more choices today than their might have been in 2004 as far as height vs width. You may not have the ceiling height for what used to be a 80+" tall water heater (you can get 80s that sit squat and are 60-ish these days, probably even shorter if you're willing to pay more) What is the ceiling height in your utility room/area? You need space on top of it for service. I'm assuming we're talking about electric water heaters.
|
|
#
?
Dec 18, 2022 22:25
|
|

|
Motronic posted:There are a lot more choices today than their might have been in 2004 as far as height vs width. You may not have the ceiling height for what used to be a 80+" tall water heater (you can get 80s that sit squat and are 60-ish these days, probably even shorter if you're willing to pay more) These are gas, sorry I didn't mention. They're 51 inches tall, i think they could've easily fit something a foot taller. It's a big unfinished basement. 
|
|
#
?
Dec 18, 2022 22:46
|
|
|
Bobfromsales posted:These are gas, sorry I didn't mention. They're 51 inches tall, i think they could've easily fit something a foot taller. It's a big unfinished basement. Quick look at homde depot suggests a 40 gal tank is $600, while a 100 gal one is $2800, so you'd be saving money by just doing a like for like replacement. Is there a reason you don't like having two?
|
|
#
?
Dec 18, 2022 23:01
|
|


|
Given surface area to volume probably impacts efficiency etc. I would guess that one large heater takes less energy to keep a given volume of water hot than two smaller heaters. However if you can sometimes just turn off one heater when you don't need that much water kept hot maybe that's even better, it looks like there's valves up above on the cold side but I can't see if there's hot side valves that would let you do that. But you could add them in if you wanted to.
|
|
#
?
Dec 18, 2022 23:46
|
|

|
actionjackson posted:it seems to me that given the black wire feeds through both the ballast and the starter, you would want to make four cuts where the red lines are, strip, and then connect those wire pairs that went into the ballast and starter respectively Spec sheet says they are the double ended wiring type, so you want to end up with this: 
|
|
#
?
Dec 18, 2022 23:58
|
|


|
thanks, I did look at the bulb and on one end there is a little black circle so I'm guessing that's the L side I can also see from my fixture that the white wires go into the middle... bulb holders, so that would be where the neutral side of the bulb goes. actionjackson fucked around with this message at 00:12 on Dec 19, 2022 |
|
#
?
Dec 19, 2022 00:06
|
|
|
here are the paths of the two black wires. i think the green one can be neutralized before it gets to where the starter is. so instead of ending at green 3 end at green 1. for the red, I think I can cut at red 1 and red 2 and join those two pieces, thus bypassing the ballast. I could also just cut and join at green 1 and green 2. edit: oops, green 3 and red 3 should be switched actionjackson fucked around with this message at 01:42 on Dec 19, 2022 |
|
#
?
Dec 19, 2022 00:37
|
|
|
Flipperwaldt posted:Spec sheet says they are the double ended wiring type, so you want to end up with this: looking at this again, if I put in the bulb so that neutral is on left, and hot on right, then the black/white coming from the left tombstone (between the two 3s in my picture) would go to the neutral coming from the wall, and the black/white coming from the right tombstone would go to the hot coming from the wall?
|
|
#
?
Dec 19, 2022 06:07
|
|
|
actionjackson posted:looking at this again, if I put in the bulb so that neutral is on left, and hot on right, then the black/white coming from the left tombstone (between the two 3s in my picture) would go to the neutral coming from the wall, and the black/white coming from the right tombstone would go to the hot coming from the wall? Also, which way round you put the bulb doesn't matter as it's alternating current.
|
|
#
?
Dec 19, 2022 16:52
|
|
|
Because I am old and getting over covid (I'll have more excuses soon) I can't find the thread or posts where the goon recommended trying Tru-Tone LED Christmas bulbs that are supposed to mimic the old-style incadescent C7 & C9 bulbs I use in my strings. Well, I bought a sample of them, and put a couple in my front light display, and holy crap, I cannot tell them apart from incandescent (one batch I bought is pink - which looks better than it should - so I can spot the test bulb). The color temperature and brightness is dead-on. I am sold, and will be migrating to them over the next few years. If I decide to sell the stock of incandescents that I have, it may offset some of the cost; Tru-Tones are still expensive, but if they are as durable as LEDs tend to be they will be worth it - they are a bit more than legacy bulbs on eBay. Tru-Tones look far better than the Chinese incandescents I have. drat. The only problem is that Tru-Tone is (unsurprisingly) sold out of holiday colors (red, green white, but also blue) so I have to keep checking back with them on availability.
|
|
#
?
Dec 19, 2022 17:04
|
|
|
Flipperwaldt posted:I think so, if I'm reading what you're saying right. I suspect it's not even necessary that the power goes to both pins on each side. I think the schematic just seeks to differentiate from the other type of led bulb that can be powered from one end, where one pin would be L and the other N on the same end. ok - I'm confused because one side of the bulb has a little black dot, so I thought that meant the load side. but there is no L/N labeling Here's a better pic after taking it out. I marked neutral and load side. cut at orange lines and join, same for green lines. the two whites coming out of the top connect to the white coming from the wall, and the same for the two blacks (the right one isn't in the pic). sound good? the reason I think of the left as the neutral side is because you have the white and black in that wire nut - not sure why that is. Looks like it's continuing the current to the ballast, which then goes to the hot cwire in the wall
|
|
#
?
Dec 19, 2022 17:27
|
|
|
PainterofCrap posted:Because I am old and getting over covid (I'll have more excuses soon) I can't find the thread or posts where the goon recommended trying Tru-Tone LED Christmas bulbs that are supposed to mimic the old-style incadescent C7 & C9 bulbs I use in my strings. Glad they lived up to your expectations, usually new stock has been showing up in late october, if you join their mailing list which at this point isn't too spammy, you get advance notice of the stock refresh.
|
|
#
?
Dec 19, 2022 17:38
|
|


|
finished connecting (I don't have a nut driver to remove the ballast), going to just test this side with the one black and one white going to the box, and cap the other two for now. well and the ground obv
|
|
#
?
Dec 19, 2022 17:56
|
|
|
actionjackson posted:ok - I'm confused because one side of the bulb has a little black dot, so I thought that meant the load side. but there is no L/N labeling  You just have to take out the starter and insert the bulb. No rewiring required.
|
|
#
?
Dec 19, 2022 17:57
|
|
|
hmm alright well i already did the bypass but the led specs literally say "ballast bypass" so I don't think they are supposed to be connected to one i did call satco and they said yes just bypass both actionjackson fucked around with this message at 18:21 on Dec 19, 2022 |
|
#
?
Dec 19, 2022 18:00
|
|
|
IT loving WORKED WOOOOOOOOOOOOOO
|
|
#
?
Dec 19, 2022 18:40
|
|
|
PainterofCrap posted:Because I am old and getting over covid (I'll have more excuses soon) I can't find the thread or posts where the goon recommended trying Tru-Tone LED Christmas bulbs that are supposed to mimic the old-style incadescent C7 & C9 bulbs I use in my strings. +1 to this. I had the tab open in Chrome on my phone since they were recommended either here or TFF chat in December of last year. Finally looked at it a week or two before Thanksgiving, when they still had the 25-bulb packs of classic blue, red, orange, green, but were sold out of white. Substituted yellow for white, so it just looks like our lights have spent years in a household with heavy smokers. Had to buy the C7 string from some other company because they were sold out of the TruTone versions of those, too. Pretty sure my wife will want a TruTone string and potentially the clear versions of the bulbs with the visible "filament" next year. Qwijib0 posted:Glad they lived up to your expectations, usually new stock has been showing up in late october, if you join their mailing list which at this point isn't too spammy, you get advance notice of the stock refresh. Holy poo poo, I figured it was going to be January or February when we could order them again. I did sign up for the newsletter, and it has been blissfully non-spammy.
|
|
#
?
Dec 19, 2022 19:27
|
|


|
I�m trying to replace the 1/4� plastic tubing underneath my sink that is used to supply water to a sink tap and the fridge. It started leaking so I got new compression nuts and tubing. These are the little fittings that come with a nut, ferrule, and brass insert for the plastic tube. I kept the plastic adapter that converts the 1/4� to the 3/8� tap supply and the brass tee that splits the supply off the the tap and the fridge because I doubt either one of those was leaking. What�s the secret to tightening these compression nuts without loving it up? The packaging says 1/4 turn, the internet says 1/2 to 1 and 1 and 1/2. I feel like I�m in the Goldilocks story where I keep loving up the ferrules by over torquing or I go too light and the whole tube just shoots off the nut and squirts me with water. I can�t find the sweet spot. Anyone got any tips and tricks for this? Or do I just buy a whole bag of ferrules and go ham until water doesn�t spray me in the face?
|
|
#
?
Dec 19, 2022 23:28
|
|


|
Depends on the materials I find. It's a feel thing, but to get the feel I'd suggest snugging just a little bit, turn the water back on and then snug until it stops dripping, then go a touch more. Remember that feel for next time.
|
|
#
?
Dec 20, 2022 00:05
|
|
|
Hed posted:Any tips for pulling the old gasket out of my garage door? If you unscrewed those Phillips, would it let you remove a piece and give you better access to the gasket?
|
|
#
?
Dec 20, 2022 13:43
|
|
|
I actually hadn�t considered those screws may be holding in just the center �U� shape. I figured it was my entire door footing. I�ll check this out more especially since it will be a balmy 40 today before it pops to single digit lows later this week
|
|
#
?
Dec 20, 2022 19:37
|
|
|
This is how the upstairs railing, the one that keeps you from falling from the hall down on to the stairs, is attached to the wall. That's it.  1. Am I right in thinking this belongs in the Crappy Construction thread? 2. If so, what do I do to strengthen it? We clung to it last night because we got a ShakeAlert. Yes, it wobbles.
|
|
#
?
Dec 20, 2022 20:26
|
|


|
quick test of my ballast and starter bypass - it went a hell of a lot faster this time!
|
|
#
?
Dec 20, 2022 22:07
|
|
|

|
| # ? May 29, 2024 14:04 |
|
|
Arsenic Lupin posted:This is how the upstairs railing, the one that keeps you from falling from the hall down on to the stairs, is attached to the wall. That's it. IMHO, it's more a question of what the screw is hitting in the wall. If it's long enough and hitting a stud, it should be able to support a lot of weight. If it's just screwing into that trim piece with only drywall behind it, well, it seems a bit thin. The fact that it's on a corner makes me hope there's a stud there, but there's no way to be sure from just an internet picture. Do you have a stud finder? Putting them in at an angle like that is called toenailing, and it's generally the correct way to attach two solid blocks of wood together at 90-degree angles, like I'm hoping you've got there. So if it's screwing into something solid, you could probably snug it up by a) upgrading to a slightly larger screw and/or b) toenailing in from the underside as well for even more strength. If, on the other hand, there is no stud there, you're going to have a much harder time doing this properly. Not sure what tools you have on hand, but if you want to back the existing screw out, you'll need a star-drive bit. They come in different sizes, like T-25, T-30, etc. Often-times screwdriver sets will come with some star-drive bits these days, so you may luck out and not need to buy anything.
|
|
#
?
Dec 20, 2022 23:35
|
|