


|
(Old thread fell into the archives due to a period of extreme busy-ness - can still be found at https://forums.somethingawful.com/showthread.php?threadid=3776650) Since my last posting, a bunch has happened with my car stuff and I figured I'd get back to posting occasional updates. First thing - I still have the DC5. I will always have the DC5.  Nothing else short of a Bongo van is gonna carry those tires. -- I have decided that if I'm going to modify any car, I'm going to start with the one least fucken needing it like a good idiot, so I've begun acquiring the parts to upgrade the C7z06 to have the 2.9 Whipple supercharger with supporting modifications including a ZR1-style sidemount intercooler set and secondary port-style fuel injectors. Basically it's upgrading the car to do what GM did with the ZR1, but keep the Z06's handling and braking benefits over the road / GT car. The completed engine will look a bit like this  And (preface: have no interest in street racing) should also produce a fairly withering amount of power if completed builds using it are any indication https://www.youtube.com/watch?v=5CtyPftBD1A. An easy 1000whp is possible but I'm actually only aiming for a maximum of 750 as I intend to keep using the car on the track. The nice thing about the Whipple is that it's basically the supercharger than the C7 would have come with if it was an uber-expensive Euro supercar instead of an affordable US one. It even gets better MPG than stock if downtuned, courtesy of the twin screw design having boatloads less parasitic losses. -- In the interests for the extreme opposite end of supercar ownership, I bought a $500 EK Civic. It came to me full of hoarder stuff, with four different sizes of wheel unified by their all running exposed canvas, a ruined interior that smelled to cannabis and turds, a battery held in place by gravity alone with seized brake pistons, seized brake drums, and seized wheels. I might post more later if people are interested in the process, but basically I fixed everything on the car, going from this   Over a few nights  To this    And discovering that you can buy track slicks in the pathetically small size of 14x185x45 in the bargain. Naturally you need to use these at the track. https://www.youtube.com/watch?v=mDDJst1pcic So, for a car with basically no power that's considered too heavy compared to 80s Hondas, it did actually really well. The sloppy jalopy suspension didn't prove a hindrance to handling and it never overheated its brakes or radiator despite having the hell beat out of it and basically was way more car than I expected, even if it had the same straight line acceleration as a horse with no legs. https://www.youtube.com/watch?v=c0UAXNHcSV8 it also drifts a tiny bit thats nice too Ultimately, the rules for the 2K cup and Lemons both proved prohibitive (you essentially explicitly need to a non-road-legal chassis in order to be competitive), and my times began to plateau, so I ended up selling it to another racecar person. Even though it served no more purpose at that point I kind of miss the car for the sheer determination-in-gutlessness it had and I think it'd have survived a 24 hours race no trouble.  that'll do, pig. that'll do Anyway, since I wanted to spend time more in RWD I decided I should just pretty much set all my fucken money on fire and rub sulfuric acid on my ballsack -- this car sucks. gently caress this car. it doesnt even get punctuation. it doesnt even get a nice photo.  I bought this 3SG-E BEAMS Altezza with the intention of giving it a mild cleanup and taking it out on the track ASAP. Deciding to do it properly like I did with the Civic, I picked up a spare set of OEM wheels, put semislicks on the cheap and terrible Chinese alloys that came on the car, tried my best to tune the enormously stiff 12kg springs in the HKS HiperD shocks that came with the car and head off to Taupo after an oil and brake fluid change. the results sucked https://www.youtube.com/watch?v=NbLRAhVe97Y Thankfully, two nuts remained on my wheelhub and it was possible to limp the car back into the pits.   The concentric spacers, as it turns out, weren't up to my standard of driving where the brakes actually get hot. They exploded almost immediately into the trackday and with them gone the cheap Chinese wheels begin shaking on the hub, destroyed themselves on the studs and began to back off the wheel nuts. I went around to tighten them and discovered every single wheelnut on the whole car was finger tight after tightening them to spec at the beginning of the session. Even besides the wheels falling off, due to the HKS suspension combined with stock swaybars, the car also has a habit of developing extremely strong oversteer at random even with mild throttle input: https://www.youtube.com/watch?v=m1g-SUYcMHM that is at 3000rpm in 3rd gear on the orientation lap. When changing the transmission fluid to try to fix the crunch that had developed shortly into the trackday when going down from 3rd to 2nd gear, I noted that the fill and drain plugs were unusually tight, and that the fill plug for the transmission didn't have any tool marks on it, which it always usually does due to the half-height nut and being inaccessible without a 24mm spanner. Well the drain plug looked like this  And the fluid looked like this  And I looked like I was buying a new transmission. So I did, and got a new clutch and new flywheel (single mass), spent hours installing those, and decided to at least have a bit of fun/punishment and take the car rallycrossing for being such a bitch.  not bad against a grid full of 12 year old rally wunderkind The rallycross was fine and actually fun as hell (sorry, no videos for this one), but on the way home somehow the oil cap blew off the engine and sprayed hot oil on the headers, forcing me to ditch the car to pick up a replacement lest the thing burn to the ground. So basically the Altezza is an arsehole car and it's cost me close to $8000 to get it fixed when it cost $5000 to buy it. If I never follow up this starting post it's because it's probably killed me when I track it again tomorrow having done my best to fix all the issues it had last time.
|
 #
?
Sep 27, 2018 11:26
#
?
Sep 27, 2018 11:26
|
|


|

|
| # ? Jun 10, 2024 12:53 |
|
|
This is the best thread.
|
|
#
?
Sep 27, 2018 11:40
|
|

") EVERYWHERE
EVERYWHERE 


|
Quick update - I survived the Altezza on the race track. With all enormous amount of work and money put into the car, it finally drives like a slightly lumpy Toyota clone of a BMW economy sedan. I'll look to put some videos up later but basically the average lap time has improved from 2:09 last time to 1:55, most of that courtesy of having better suspension maintenance. i also have discovered the fuel pump is broken because of course it is
|
|
#
?
Sep 28, 2018 08:15
|
|
|
Finally, someone else buys a cheapo semi-lux moneypit.
|
|
#
?
Sep 28, 2018 14:10
|
|


|
Seat Safety Switch posted:Finally, someone else buys a cheapo semi-lux moneypit. but the internet told me that all toyotas are unbreakable and that the 2jz is the best engine ever made and that the trueno is basically a supercar has it all been lies?!
|
|
#
?
Sep 28, 2018 20:57
|
|
|
Spades posted:but the internet told me that all toyotas are unbreakable and that the 2jz is the best engine ever made and that the trueno is basically a supercar I've seen that BMW's N54 is the 2JZ of German cars. Y'all seen how good that's workeded out for me. (but goddamn, even my kids say "this car is so fast" on a daily basis. Tradeoff.) meatpimp fucked around with this message at 00:53 on Sep 29, 2018 |
|
#
?
Sep 29, 2018 00:36
|
|
|
i dunno what the N54 holds on a stock block, but the S54 is kind of an upgraded spiritual successor in a way to the 2JZ. They hold a ton of power. The RB is the one with issues so that might fit the N54 more 
BlackMK4 fucked around with this message at 01:02 on Sep 29, 2018 |
|
#
?
Sep 29, 2018 00:59
|
|

|
BlackMK4 posted:i dunno what the N54 holds on a stock block, but the S54 is kind of an upgraded spiritual successor in a way to the 2JZ. They hold a ton of power. The RB is the one with issues so that might fit the N54 more N54 stock block: 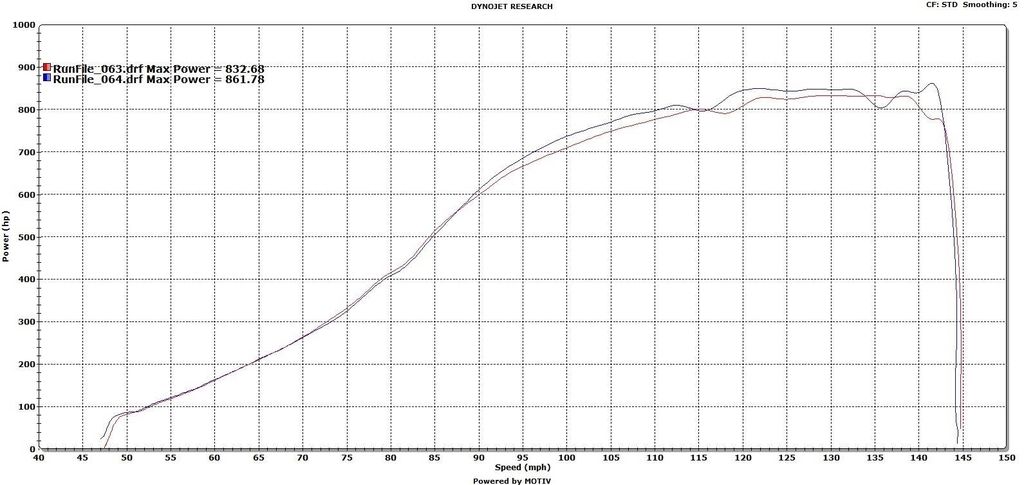 Mine is not nearly so silly, and in a stupid big wagon, and it's still fast.
|
|
#
?
Sep 29, 2018 01:10
|
|
|
Spades posted:but the internet told me that all toyotas are unbreakable and that the 2jz is the best engine ever made and that the trueno is basically a supercar no all of this is true actually
|
|
#
?
Sep 29, 2018 02:00
|
|

|
SquirrelGrip posted:no all of this is true actually I had a customer today facing a +-6 grand engine replacement on a stick shift 2000 4 runner. He asked me what would I do (and be honest like your not at your job right now he added) and without hesitation i was like 2jz swap.
|
|
#
?
Sep 29, 2018 02:14
|
|

|
SquirrelGrip posted:no all of this is true actually Yesterday's trackday was actually shared with a friend who happened to have a broken Toyota with a 2JZ swap that had exploded - sadly it was another Altezza and not a Trueno so I can't claim the full trifecta this time around. Going to try to dig out the fuel cradle tomorrow and get the serial for the Altezza - will try to get some pictures and see. Supercharger has shipped, so it should be here in a few days barring customs deciding to send the thing back to America for no reason like they did with half the other stuff. I'm still trying to muster motivation to get all this stuff installed as nobody has been able to get me any details on how loud the Mantic triple plate clutch will be in comparison to the twin plate stock clutch and the idea is to actually make the car better rather than just faster (the latter of which is easy if you don't care about the former). For fun's sake, a 'build list' on the Altezza so far, largely constituting it to the point that it's almost as performant as the Civic: Totally Mint As Altezza - $4,500 Second hand AR-1 semislicks for track use - $300 Balancing crappy DTM wheels - $80 Trackworthy Brake pads, brake rebuild kit, brake repaint, new bleeder screws and dust caps, brake fluid flush - $500 Floor mats and retainers - $50 New Bushings - $200 New front ball joints - $200 Wheel bearings - $200 Wheel Alignments - $80x3 Unseizing coilover collars - $20 in bandages and medical alcohol Air filter - $30 MAF Cleaner - $20 Throttle body cleaner - $20 Transmission fluid - $50 Oil change and filter - $90 24mm spanner for weirdly placed fill nut - $25 Concentric spacers so DTM wheels don't explode on the track - $20 New wheel studs after DTM wheels exploded on track - $20 New transmission after transmission also exploded on track - $750 Single mass flywheel and new clutch - $1000 Mates rates clutch install - $150 Replacement wheel brace - $15 Curbed up OEM wheels x2 - $150 Set of OEM wheelnuts - $30 Restoration of curbed up OEM wheels including paint and primer and balancing - $350 New road tires - $700 Labour - about 50 hours so far inc. 20 hours at Garage for $1600 General disposables and other crap - a little over $1000 at this point Right now it's making perhaps 150 horsepower due to intake and exhaust leaks which I haven't been able to hunt down yet. It whistles like it has a turbocharger but it oh so very much does not have a turbocharger. Due to the combined cable as well as fly by wire throttle, I am suspecting it may be cutting power due to fueling system issues - it was also getting about 8mpg highway when I benchmarked it (MAF et al being cleaned raised this to about 30mpg). I also am investigating if it's possible to mate a stock set of OEM shock hats and bushings to the HKS coilovers as the pillow balls in the coilovers have worn down to the point they make constant clanging noises even on flat surfaces. Spades fucked around with this message at 05:08 on Sep 29, 2018 |
|
#
?
Sep 29, 2018 05:00
|
|
|
Preoptopus posted:I had a customer today facing a +-6 grand engine replacement on a stick shift 2000 4 runner. He asked me what would I do (and be honest like your not at your job right now he added) and without hesitation i was like 2jz swap. 2 questions: 1) how the gently caress did they break a 4Runner? The 5VZ is nigh indestructible. If it�s the 3RZ, I don�t know much about them. 2) is all that cost labor or getting a reman engine or both? If I was the customer, I�d just slap a junkyard motor in it and call it good.
|
|
#
?
Sep 29, 2018 19:59
|
|
|
22RE-T swap. 
|
|
#
?
Sep 29, 2018 21:12
|
|

|
1UZ swap the runner. Fits perfectly with enough room for a blower in there too. Comedy option- 1KD swap. I would suggest 1VD swap, but those bastards are so drat big they dont fit in the engine bay of a 100 series properly.
|
|
#
?
Sep 30, 2018 15:55
|
|
|
Ferremit posted:1UZ swap the runner. Fits perfectly with enough room for a blower in there too. You sure failed at typing 1GZ a whole bunch of times
|
|
#
?
Sep 30, 2018 16:39
|
|


|
Powershift posted:You sure failed at typing 1GZ a whole bunch of times 1UZ is a truck motor, a 1GZ is a car motor. The vehicle in question is a SUV.
|
|
#
?
Sep 30, 2018 16:42
|
|
|
3UR-FE, but the supercharged middle east edition
|
|
#
?
Sep 30, 2018 16:53
|
|


|
Fermented Tinal posted:1UZ is a truck motor, a 1GZ is a car motor. The vehicle in question is a SUV. Yeah, but https://www.youtube.com/watch?v=aRneIRzMzsk
|
|
#
?
Sep 30, 2018 16:56
|
|
|
Fermented Tinal posted:1UZ is a truck motor, a 1GZ is a car motor. The vehicle in question is a SUV. 1UZ was never in a truck, that was the 2UZ.
|
|
#
?
Sep 30, 2018 20:10
|
|

|
Wrar posted:1UZ was never in a truck, that was the 2UZ. Oh, I forgot there's more than one.
|
|
#
?
Sep 30, 2018 20:26
|
|
|
yea post more about the civic and all the cars
|
|
#
?
Oct 1, 2018 23:16
|
|

|
Nodoze posted:yea post more about the civic and all the cars Agreed. Loved your previous thread as well.
|
|
#
?
Oct 2, 2018 14:37
|
|


|
 It's got that lowrider pipe-y sound as well as the v-12 scream. I love it. It's got that lowrider pipe-y sound as well as the v-12 scream. I love it.
|
|
#
?
Oct 3, 2018 05:43
|
|


|
So, starting from the top with the Civic. After having the Z06 for a while, I figured that having a comfortable, reliable and powerful car wasn't as fun as having something literally falling apart at the seams and desperately in need of attention, so I picked up a 95 EK Civic with the 125HP d16Y4 engine. I bought it off a short order cook who had been driving it without functional hydraulic brakes, using the handbrake to stop at intersections, on four tires down to the canvas. I was promised new bumpers after this caused the car to slide out and rub up against a guard rail a day before it was sold. Naturally no bumpers or tail light ever arrived and I'm pretty sure he ended up losing his license due to his next car not having functional floors. Some of how messy it is is better visible in these photos that I found lying around on harddrive. As to be seen, no panel or interior piece is straight or undamaged.   Anyway, since the car had about a dozen critical mechanical problems I got started on the majors. Brake hoses were busted and the discs looked like this  So I picked a new set of discs and pads up, flaring wrenched the new hoses on and cleaned up the wheel hub some  Thankfully the CV joints had just been replaced but whoever did it did a poo poo job so I flushed all the grease on the back of the hubs off.  Rebuilt the brakes as they were siezed in the housings. Thankfully this turned out to just be from dirt and a lack of hydraulic fluid - flushing the system and putting the brakes back in got them working perfectly again. Rear drums didn't need any attention as their hoses were fine, just the fronts had leaked out. Also found that nearly all of the castle nuts had missing split pins so picked up a variety pack of cheapo stainless pins and nailed most of the car back together. Best part - half of the castle nuts did have a broken off split pin in them from where somebody had evidently impact gunned the nut off with the pin still through it. -- Since the battery wasn't earthed properly, the positive leads corroded and shittily shimmed, I made a new negative line out of 32mm double shielded marine wire, crimped tinned lugs onto the two positive lines, replaced the battery and tried to get a battery tie-down that would fit the Civic's tiny, tall battery. Sadly nothing seemed to fit the Civic without earthing out on the hood so I ground down the threads of the hold down bars and tried to find a spare sitting around that would work. i used wood wood is good  -- Left side's electronics (indicator, park light, etc) weren't working. I noticed that the fender liner was gone so I took off the left fender to get a better look underneath   gently caress fender liners are there for a reason, bogans Hosed down the terminals for a few minutes with a heavy dose of contact cleaner then rasped them with a hand file. Checked with multimeter and they started firing up, so I replaced the shorted out bulbs with new ones and indicating existed again. -- Car didn't want to fire nicely, had hesitation under throttle and was generally bitchy. Plugs needed to be changed, for starters.  Cleaned air sensor and throttle body, where were both caked in soot. Air filter had been freshly done so one less thing to worry about. Cracked the valve cover and the rockers were covered with lovely filth but the cam seemed fine, so I put the lid back on - at least internally the car seemed to be fine. The oil wasn't  The oil was actually so bad, that after driving the car from Hamilton to the Bay of Plenty later (about 150km), I changed the oil a second time because all of the poo poo that came off the lifters from the car getting warmed up. Anyway, with the intake and oil cleaned up the car seemed to want to spin the wheels with all the ferocity of a 4 cylinder grandma car and it lost the weird 'stumbling' idle. -- While doing the oil I also drained and filled the transmission. Took the car for a drive and about 30 seconds down the road it immediately started pouring smoke from underneath. Fire extinguishered the underside to find out that the transmission had leaked rear end all over the hell. Whoever had done the CVs hadn't bothered to re-install the half shafts nicely and smashed the poo poo out of the seal tensioner - with the new more viscous / fresh gear oil it wasn't holding tight enough around the shaft. Took off the old half shaft, smacked a new one in with a fat socket and a piece of wood and that seemed to do the job.  this thing sucks More to come Spades fucked around with this message at 08:11 on Oct 3, 2018 |
|
#
?
Oct 3, 2018 08:08
|
|
|
Part of the point of buying the Civic was to get used to restoring cars as I've got a long-pushed-aside 1973 Holden HQ wagon project back at Dad's which I eventually want to restore. To this end I did a lot of body and interior work which wasn't exactly necessary for a racecar build but was fun to do anyway. Start by stripping out the interior - carpet smelled hilariously foul and the car was full of trash.  Dry iced off the sound deadening.    Started building something which I affectionately dub the munt mountain  -- Decided to start the panelbeating process off by taking care of the guards since they were already off the car to fix the electronics. Slapped some guidecoat on them to show up the dents and pounded them out with a rubber hammer, followed by some heat shrinking and filler and then high build primer. While I was at it I took stock of the cracked front and rear bumpers - they were repairable but covered with shattered/crackled paint.   Put some tensioning clamps on the bumpers then used a combination of fibreglassing tape, super glue and araldite epoxy glue to fix the cracks on both sides of the bumpers and get rid of the drift stitch bullshit. Also, Non-Type R EK Civics have a pair of plastic pop-off 'bump strips' on the corners of their bumpers - the idea I guess being that if you rubbed a car you could replace the strips rather than the whole bumper. On this car every one of them was held on with zipties, having fulfilled it purpose long ago, and I didn't want to spend any more money on bumpers or replacement bits so I decide to bond them into the bumper and paint them body color. You need to use a special kind of bumper filler for this - it has a flex agent in it that prevents it from cracking which is vital for floppy bumpers like these.  Sanded back and put a dose of high build primer on to fill in some parts on the bumpers   One more pass of filler and then a final pass of primer  Bit of detail view - not bad for a race car  While I was doing this, the chop shop owner where I had the car stored at the time decided that the district didn't have enough noise complaints    fair enough bra -- With the panel work taken care of, the big places for attention were on the body - which was covered in hail dents. A little panelbeating trick I picked up when working on flat surfaces is to use a paint pen to draw a cross across the dent - then sand over it. The sandpaper won't remove the deep part of the dent so you can more easily fill it.    got anymore dents bro? Primed the dent work up  -- Before getting any more paint down on the outside I needed to remove the towball and the rust that its reverse-zinced (that is now a thing) torque spreaders had bought to the car. Fun fact: The towing capacity of a 125hp Honda Civic is 7 pounds   I would later go on to fill the holes with weld-in plates, but you don't get to see my welds you dont want to it would be like that scene in raiders just with welds -- Got the car dressed in a full coat of primer and put the first blast of paint down.  I had options when painting the car - I could use a high gloss iso-free 2k single stage paint (lasts ages but looks semigloss at best), a 1k acrylic with a 2k non-iso clear coat (best finish), or a 2k epoxy paint (less gloss, very tough). on the other hand you shouldnt use boat paint on a car so i used boat paint. why?  boat (Dad built that - it's a hydroplane running a period correct weird-rear end Chevrolet sub-smallblock which was only produced for 2 years back in the 50s. The paint on the deck is actually the leftover paint from this car!) It came out very well, but sadly the priming work on the hood wasn't thick enough and the work marks showed through terribly - had to sand back the hood and reprime for a second go.   Dust floating around the workshop aside the finishes came out alright     At the time I went to put down the last coat of paint, the jackass who worked as a painter at the chop shop (for about a week until he got fired for spraying a customer car with the paint gun set @150psi and promptly giving it a nice astroturf finish) stole the high quality thinners that I bought and I had to use some shithouse ones from the local NZ Autozone equivalent, supercheap auto - these laid down gritty and terrible paint for the final coat but thankfully it had settled enough when the paint dried that the finish didn't hold too much orange peel. You can see the worst of it here -  Also painted the inside of the car. It turned black. Not much to say is there?   With all that crap taken care of, reassembled the car - will cover over some of the other bits in another post. 
|
|
#
?
Oct 3, 2018 08:57
|
|
|
Non-project log note, but after having finished building the civic I was curious to see how much the weight reduction had affected the acceleration. I can safely say that removing 50lb from the car turned it into the KING OF SPEED https://www.youtube.com/watch?v=MKbfscOzRE8 10 seconds to 100kph with a 2.5k quick slip puts it ... pretty much exactly in line with factory timing expectations, but let's pretend this is the Altezza and lost 50% of its horsepower since being built I tried to do the same video in the Corvette for comparison, but I ended up doing 200kph by accident then just about crashed into a ditch so basically don't gently caress around and try to drive a manual supercar without any hands on the steering wheel
|
|
#
?
Oct 4, 2018 01:13
|
|
|
That respray job looks really good. I have a 92 Civic with hail rash and rust out the wazoo that could probably do with a million hours of bodywork too. Are there long term consequences to "boat paint?"
|
|
#
?
Oct 4, 2018 03:40
|
|
|
Seat Safety Switch posted:That respray job looks really good. I have a 92 Civic with hail rash and rust out the wazoo that could probably do with a million hours of bodywork too. Honestly the photos at the top of the page are from a week when the car was sold, a little over a year from when I painted it, and there wasn't any sign of paint fade or anything - I'd say the main difference is boat paints are single stage so you're not going to get a "deep" finish with them (no clear coat). I've done a couple of cars I don't care about getting a perfect finish on with it and haven't had any trouble. The main downside of boat paint is that being a short oil alkyd enamel you've got to give it about a week between coats and you can't paint over it with an acrylic paint or it'll lift and curdle. I'd also suggest you put a very heavy coat on the gas cap area as it takes about 6 months before the paint will be resistant to petrol.
|
|
#
?
Oct 4, 2018 04:02
|
|
|
Spades posted:a period correct weird-rear end Chevrolet sub-smallblock which was only produced for 2 years back in the 50s I assume you're referring to the 265 in '55 and '56 that was notable for not having an oil filter? They're normal small blocks other than that. Oh yeah and they had the starter attaching to the bellhousing, not the block. But you don't seem to have a bellhousing there. Probably mounted to the rear plate? Also, those heads look late-model; look at the accessory mounting holes.
|
|
#
?
Oct 4, 2018 10:04
|
|

|
Raluek posted:I assume you're referring to the 265 in '55 and '56 that was notable for not having an oil filter? They're normal small blocks other than that. Oh yeah and they had the starter attaching to the bellhousing, not the block. But you don't seem to have a bellhousing there. Probably mounted to the rear plate? Also, those heads look late-model; look at the accessory mounting holes. Chewed up my terminology pretty bad on that one I think - yeah, should be the 265. Period correct in this is case is just the rules of the class - boats need to be running a 5.7 or smaller engine from the 60s or earlier, though there isn't a restriction on heads, headers or intakes I don't think, just stroke/bore/block. Smaller engines get a performance handicap adjustment which is why he went with the tiny displacement one.
|
|
#
?
Oct 4, 2018 21:45
|
|
|
More on the story of the Civic - Pretty much every EK eventually has its armrests collapse under the weight of elbows as the plastic isn't thick enough, leaving fairly miserable holes to rest your arms on in the car. Most people just buy new doorcards but as the rule goes this just means you're delaying the problem happening on those too, so I decide to fix the issue. You can see the original rests here. Left side has obvious disintegrated while the right has cracked but not fallen apart yet. Popped all the factory eye rivets out of the door cards after removing them from the car, tore the old crappy cloth off and started stripping the foam left behind from the original coverings. Used some prepsol and paint thinner to remove all of the old glue.  I used some of dad's boat-grade epoxy combined with some medium weight fibreglassing cloth to drop-sheathe the outside of the two armrests, ripped up the surface with a file and drilled holes to ensure good adhesion. Used some heavy duty reinforcing twill across the hole in the broken on to ensure it doesn't break up again. Came back and filled the air holes in the epoxy later as I didn't have any vacuum sacks at home to do the leeching properly.  Cattes decided to chill in a basket on the boat trailer while I was doing this.  I set an epoxy cup on fire by creating too hot a brew. dont do this ever.  Since we were out of chop I used some long strand fibreglass body filler to fill big of sag across the hole in the armrest, sanded it back, sheathed the armrests front and rear again and then put a final floatcoat of epoxy on to ensure a thick enough surface finish  Hosed down the armrests with some cheap crappy spray putty - didn't have any high build primer at home. Finish doesn't need to be perfect as these will be getting upholstered anyway.  I originally had planned to carbon fibre wrap the armrests, but for a $500 car it seemed like a bit ostentatious to have flowcoated carbon fibre armrests so I grabbed some leftover marine vinyl and go going with the whole heat and glue dance. If any of you want to do this yourselves in future you should be also put a layer of insulating foam between the vinyl and the armrest - it hides any imperfections like creases in the finish on the vinyl and means you don't need to work the vinyl as hard to get it to sit nicely, but we'd already used the foam at the time and I think it turned out okay anyway. and well use upholstery clips instead of vice grips that just goes without saying  After stretching and gluing the skins on I spraypainted them with the same vinyl spray as the rest to more closely match the color of the door card.  Used a riveting mandrill to punch new holes into the armrests then slipped on them back into the holes in the door cards, used some RTV to stick them down in place of the old ring rivets and remounted them. Not the worst finish for an afternoon using up a bunch of boat part scraps.   -- Also while I was picking up upholstering glue, I saw this happen in my rear view mirror -   Teenager without a driver's license was "trying to drift" and ended up plowing through a construction site. Lucky everyone was on smoko at the time on the other side of the building or there would have been a half dozen dudes killed. A few days later when the doors were about to go back on the car, I test drove this   It was ... okay, I guess. Turbo lag at low RPM just like most turbocharged cars and a broken air conditioning system. It was a lot more nervous at speed than the Corvette and slower around town due to the lack of low end pedal response, though in a dead heat on a motorway or something, I could tell it would be good deal faster. Seems like not so long ago it was the European cars that turned well and the American ones that were only good in a straight line? Spades fucked around with this message at 06:47 on Oct 7, 2018 |
|
#
?
Oct 7, 2018 00:20
|
|
|
Random note - tracking any car is basically possible, but tracking on Grandma-spec shocks and sway bars will lead to some hilarious bodyroll (courtesy of the track marshall's video cameras):  
|
|
#
?
Oct 7, 2018 02:18
|
|
|
Nice job on the door cards. There are so many EKs with collapsed armrests.
|
|
#
?
Oct 7, 2018 04:47
|
|
|
 This showed up finally, so I might yet eventually get started properly on the Corvette's lunch plan.
|
|
#
?
Oct 8, 2018 07:01
|
|
|
So starting to get out of the catch up on the EK and into some actual new stuff that happened since the last thread - Needed two sets of wheels for the car, so - First set was a set of steel wheels for the track, 14 inches to ensure stock alignment and ride. Came with a pair of dry rotted tires that were at least good enough to confirm that the car didn't have a steering misalignment too. Bashed them with a wire fuzzer attachment, primered, silver epoxy, done - not much to say for these ones     Then got the road wheels started. Wanted a 15 or more in alloy - ideally a Honda 'fat five'. Turns out those aren't so easy to find but I found a workable alternative - Suzuki Swift base model wheels look similar to fat fives, but come with a smaller bore and are, usefully, 6.5 inches wide so they can take up to about a 215 tire. Picked up a set of curbed up and wrecked looking ones and took them to the local fabrication place to lathe the centers out (Suzuki centre bore is something like 15mm smaller than Honda).  Threw a bunch of high quality finishing filler (Evercoat Rage Ultra) to fill in the curbing damage   Primed up  Then threw some gloss white on.   Actually a pretty good finish for a quick job - the new DeVilbiss spraygun is a ton better than your average cheapo HVLP. Like you can see the wheels came with centre caps, but they were Suzuki branded which'd look a bit derp, so I disc grinded the caps flat, primed them up, and figured I might as well try to be fancy and put Honda logos on them. I looked at the internet and Honda logos actually cost money, so I took some of the chintzy carbon fibre vinyl wrap that I had lying around and decided to exacto them out instead. Later also went over them with the fingernail scissors to remove all the fuzz and general ugliness but this poo poo was free watta you want also Cutting boards in pink cost 1/20th of what the tradition green costs you and makes me feel more like my dad with his complete disregard of using 'gendered' products like this.      Looking alright in natural light  
|
|
#
?
Oct 10, 2018 02:07
|
|
|
Friend decided they wanted a car to fix up, and without any idea how to do actually do anything, I decided to take it upon myself to see what I could help with. They chose poorly  It has a bosuzoku pipe. I guess that's something somebody would think is cool  So, no carpet, filthy seats, cracked interior, rusted boot, water trapped under sound deadening, some shitheel bogged over some of the rust and the aim is to fix most of it. I think it has a blown headgasket too so that's good. It also has the furiously powerful 1G-E engine making like 80hp so it's a speed king! Immediate thing we did was clean up the front guards because of their rust levels. They won't be getting final painted for a long time since the plan is to also have a Bosuzoku style shark nose front. Also lightly filled the side strip channels with some carbon fibre filler because smooth sides are in the plan. Not completely smoothed yet as I needed to pick up a can of lighter filler for that purpose. Pitting has meant that even a light coat of epoxy primer wasn't enough to insulate the metal so a second pass of de-rusting is in the works.  Last weekend I started clearing the rust and water-trapping tar out of the back of the car.  You'll notice the strip of cheap lovely bog there - I poked it with a screwdriver and  Nice work jackhole So we're going be cutting up an old Honda Civic hood to provide donor metal to make a new boot brace, fun Spades fucked around with this message at 20:59 on Oct 16, 2018 |
|
#
?
Oct 16, 2018 20:57
|
|
|
Got some basic welding and fitting done on the rear end of the Cressida this weekend - Car's had numerous rear impacts and plenty of internal and internal rust has shown up as a result.   Covered with three coats of 2K epoxy primer. The entire shed now smells like dicks.   Next step will be to start body filler therapy, finish sanding back and re-prime for completion. Body section and doors will come soon as well but the boot in this car had the worst rust by far so it's good timing to take care of it early.
|
|
#
?
Oct 21, 2018 22:09
|
|
|
Had some more progress on the Cressida - finally gotten the interior stripped out and painted. Weren't going for a clean finish this time round so the paint is a big gristly, but it'll do for rust prevention. Total weight of interior sound deadening was 30kg. Like drat. Floor pan stripped out - had a ton of surface rust so to clean out all the pitting required a lot of twisted knot brush.  Sprayed two passes / one whole can of rust remover through the floor pan.  Primed up - used a heavy coat of epoxy primer to dissuade rust coming back  Blacked out.   Going to start laying the carpet once the new sound deadening supplies show up. -- Pulled the crossflow because the car barely idled and chuffed like a bastard - had about a half centremetre of soot all the way through the intake and throttle body.  Removed the rust from the headers and heatpainted them.  Decided to clean the intake manifolds up a bit.    Ran about half a can of throttle body cleaner through the throttle body before it started to get unstuck. Blade was being help open courtesy of the amount of crap in it. Also wiped down the throttle arm with a ton of dry lube so it now slides rather than squeals through its axis.  Interesting completely mechanical idle control valve - seems like these are a piece of transitional tech before IACV got made. 
Spades fucked around with this message at 12:05 on Nov 13, 2018 |
|
#
?
Nov 13, 2018 08:32
|
|
|
Picked out the headliner material for the Cressida. We're going with Zebra print. Relocated the battery to the boot and added a new isolator box to the front of the car to join to the old posi leads. in the future it wont be taped on   The jackass who owned the car before didn't know how to jack so all the jack points were curled over. Did my best with a fat cold chisel to straight them out a little and mostly made a mess of things.   -- The car needs a new catch can since the PCV was contributing much to the filthy intake, so I drilled a hole in Sapporo can (easiest source for a steel can) and set it up to drain. Dunno who drinks this stuff  -- Also was getting tired of the Corvette getting stone chips while on backroads so decided to have my first try of vinyl wrapping car parts. I had none of the tools required for this so I invented a method of doing it. Put a rectangle on the car with plenty of water behind it  Draw over it with a marker pen  Cut it out and push it back on with a few extra bits of grit from doing this in a dusty garage  To be honest it could have come out a lot worse. I'll eventually get the car repainted by somebody who cares more than GM's peel-o-matic paint robots. 
|
|
#
?
Nov 13, 2018 08:39
|
|
|

|
| # ? Jun 10, 2024 12:53 |
|
|
Nice progress! Spades posted:The jackass who owned the car before didn't know how to jack so all the jack points were curled over. Did my best with a fat cold chisel to straight them out a little and mostly made a mess of things. Only thing I would have recommended here was to use a big rear end crescent wrench on it and try to bend them back in place. But that's hindsight for you.
|
|
#
?
Nov 13, 2018 14:15
|
|