


|
 Pthighs I have some new orders for you, I want you to send at least one Stug with HE ammo remaining to go assist the breach of the Abbey walls. Basically get it into position where the assault will be asap as those poor bastards are going to need all the help they will get. Pthighs I have some new orders for you, I want you to send at least one Stug with HE ammo remaining to go assist the breach of the Abbey walls. Basically get it into position where the assault will be asap as those poor bastards are going to need all the help they will get.
|
 #
?
Feb 26, 2019 15:24
#
?
Feb 26, 2019 15:24
|
|


|

|
| # ? May 4, 2024 03:53 |
|
|
Orders - StuG Battery Move StuG 2 and 3 as indicated. 2 should stop facing the eventual breach point of dublish's platoon. 3 should be prepared to suppress any enemies shooting from the higher floors of the main abbey building. 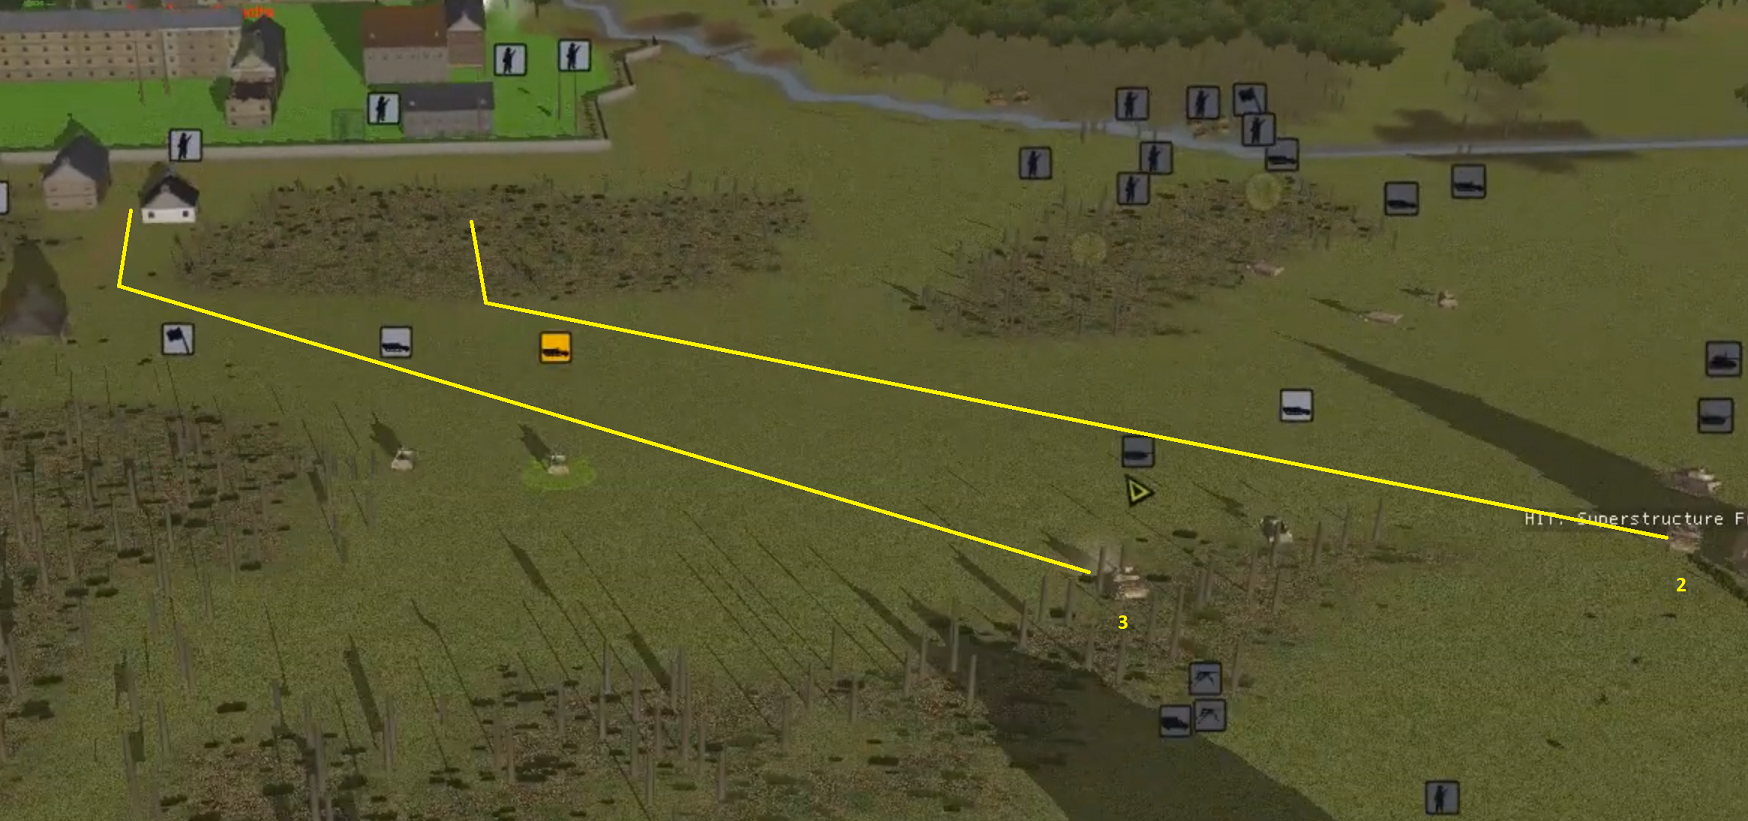 StuG 1 (southern StuG) - Stay put and engage any enemies that come into view in their backfield. pthighs fucked around with this message at 21:51 on Feb 27, 2019 |
|
#
?
Feb 27, 2019 07:16
|
|

|
Planning ahead Alright, so I believe we have 11 armoured vehicles in the field next turn? They might get a few more showing up, but barring major developments on the tank front, It's time to use numbers set up a knockout blow. We may lose a few to fighter-bombers and a few more in the fighting, but even in the worst case scenario if we only have a few tanks and they have none, that's enough to bring our infantry onto the objectives. Thoughts? Jaguars! fucked around with this message at 12:27 on Feb 27, 2019 |
|
#
?
Feb 27, 2019 12:25
|
|


|
This turn we will have to see how the Tank duel and taking out the AT gun goes but yeah after this I think we can afford to start being much more aggressive with the tanks. All tanks make sure to have unbutton orders. Pthighs From reading the infantry order it looks like they are planning a breach at the start of next turn so I want your Stug pressed right up against the wall south of that house to give instant fire support. Imo the suggested breach point is suicidal as half the abbey can see it but we do what we can. The dark brown woods are very heavy woods and impassable to vehicles.  Basically something like this (orange line) Dublish can we get some confirmation on breach points so we can provide support. ---------------------- Koolkevz I think thanks to the houses two of your tanks cant see very much at all so pushing them forward a bit, (can be staggered and not immediate) would help enormously. Right now only your westernmost tank is engaging the shermans and the others likely cant see them. 
Saros fucked around with this message at 13:38 on Feb 27, 2019 |
|
#
?
Feb 27, 2019 12:50
|
|

|
Frang Lucky I didn't make a banner, when you think about it  Frang Platoon remain in position and shoot the hell out of that MG team that they can see, along with the halftrack you highlighted in the turn video. The Frang 1 track, which contains the other team of 1st squad, moves up and bails everyone out to reform the squad as a single full unit. Again, grab as much 8mm as they can carry. The other three halftracks of Pipes Platoon move into the area around the box and lay fire onto the abbey, prioritising areas of known contact. Pipes 1, Pipes 2B and Pipes 3B lay fire into the spotted infantry and their building, shifting around as necessary to get line of sight. If Pipes 3B cannot gain line of sight then they are to abandon their building and move into the woods again. Pipes 2A and Pipes Lead move into the forward woods to assemble for the breaching operation. Pipes 3A waits until the enemy infantry is suppressed and then runs into the two story building. From there they are to slow move upstairs with the hide command on and attempt to spot enemy infantry in the compound and on the ground floor. At discretion, if no significant enemy resistance exists in the compound during minute three, Pipes 1 may assemble against the wall in the tiles on either side of the planned breech. 9.4 HMG in the northernmost house is to move to share positions with the MG firing at the mortars, which may continue.
|
|
#
?
Feb 27, 2019 15:52
|
|
|
Saros posted:Dublish can we get some confirmation on breach points so we can provide support. Primary breach will be in the northeast, where my 3. Squad is headed. Bagpipe platoon will be moving into the building on the other side of the wall. I'm planning to put a secondary breach in the southwest corner, to get my platoon in between the wall and the south buildings so we have a covered route deeper into the abbey. I expect enemy resistance to be coming from the contacts in the buildings in the center of the abbey. If you can keep those center buildings suppressed, we should be good.
|
|
#
?
Feb 27, 2019 16:09
|
|


|
If you can indicate the points on the map it would be great, i'm planning to put tanks on top of any breach points so when the guys go through any Ami's shooting at them will take immediate return fire from 75mm HE. I just need my tank commanders to know exactly where to place the tanks so when you breach they can support.
|
|
#
?
Feb 27, 2019 16:28
|
|
|
Saros posted:If you can indicate the points on the map it would be great, i'm planning to put tanks on top of any breach points so when the guys go through any Ami's shooting at them will take immediate return fire from 75mm HE. I just need my tank commanders to know exactly where to place the tanks so when you breach they can support. Sure, gimme a couple hours. EDIT:  I should have a squad at the building on our side of the east wall pretty soon if you want holes opened in the middle of the east wall. That, plus anything you can put on the orange line you drew in your post, should be able to keep the central buildings suppressed for my pioneers to get in with satchel charges and grenades. dublish fucked around with this message at 17:56 on Feb 27, 2019 |
|
#
?
Feb 27, 2019 16:32
|
|
|
just linked my post from the other day to the orders spreadsheet, hope it's clear enough for the purpose (HMG stays, everybody else retreats but grab the LMG in the forest if one of you can)
|
|
#
?
Feb 27, 2019 21:25
|
|
|
Crossposting from Discord for DSM. Turns 32-34. https://www.youtube.com/watch?v=h5lULspe8Ec
|
|
#
?
Mar 1, 2019 17:48
|
|
|
Here's a picture as well:
dublish fucked around with this message at 19:58 on Mar 1, 2019 |
|
#
?
Mar 1, 2019 17:55
|
|
|
 Kompanie HQ: NEW FIRE MISSIONCompany HQ is to call in a new fire mission from both of 9. Company's on-map mortars. Target: Area, just north of Hamlet. The new mission should cover roughly the same area as the current off-map mortar mission. Mission: Heavy Duration: Long Delay: Immediate 2. and 3. Platoons:  oystertoadfish, get your command moving. It feels like we're entering the endgame, and I want to give you the opportunity to do something other than soak up casualties. You'll be attacking the Hamlet from the northeast. Use your vehicles to get your platoon as far south along the highway as you safely can before disembarking. When you cross the hedge to the southeast of the woods, you'll have to use satchel charges. glynnenstein, it's time to hit that hedgerow as hard as you can. It will be our base of fire for the final attack on the North Bridge and Hamlet.
|
|
#
?
Mar 1, 2019 19:52
|
|
|
9 co orders Let's take our objective and be done with this. Frang Shoot. Send a team towards the hamlet and and prevent retreat from hamlet. Keep clear of mortar fire mission. Bagpipes Enter abbey proper once breach happens. Set up in the nearest house. It will be our strongpoint. Malick Take out the enemies you see. Recover your MG. Your main task is to prevent enemy reinforcements entering abbey grounds from south. Dublish Blow a hole for Bagpipes. Then help out Saros wherever possible. Keep up masking fires until Bagpipes is inside abbey and in cover. Weapons platoon Fire remaining 75mm at nearest enemy contacts. Relocate if necessary. HMG keep shooting at contacts in the north building. Mortars fire on Dublish's mission. All halftracks will engage enemy. Keep shooting while we breach.
|
|
#
?
Mar 1, 2019 20:06
|
|

|
  HQ Team: HQ Team will MOVE to the abbey wall. 1. Squad, 2. Squad: 2. Squad A Team will QUICK to the southeast corner of the abbey wall and BREACH, then QUICK into the first floor of the nearest building on the other side of the wall. 1. Squad and 2. Squad B Team will QUICK to positions near the planned breach and PAUSE long enough for the breach to be made (I'm guessing 30 seconds, DSM may need to change this based on how quickly 2.A goes). Then, they will QUICK through the breach into the buildings on the other side of the wall. 2.B should get to the second floor of the nearest buildings, and 1. Squad should get to the second floor of the second building. Once inside the buildings, all teams should TARGET any enemy infantry they can see, or any strong contacts if nothing is visible. Please keep these squads in the narrow area between the buildings and the abbey wall! There are doors on the south side of those buildings, and I don't want anybody wandering into the open courtyard! 3. Squad, 4. Squad: 3. Squad B Team will BREACH the wall at their current position, QUICK south to the StuG, and BREACH the wall there as well, then FAST into the first floor of the building nearby. The team should then TARGET any enemy infantry they can seem, or strong contacts if nothing is visible. 4. Squad B Team will QUICK to the second floor of the building by the abbey wall, and TARGET any enemy infantry contacts. 4. Squad A Team will QUICK to the abbey wall and follow it north to the building, where it will BREACH the wall and open a field of fire for any infantry in the building. 4.A should then FAST to the first floor of the building.
|
|
#
?
Mar 1, 2019 20:40
|
|
|
Dublish it's very likely that the buildings may not have doors in the right places for you to occupy the buildings without running around the sides in the open and getting slaughtered. You should breach the buildings as well if there are no doors you can enter while remaining in cover. TANKER ORDERS: Pthighs; see the post above this one, I want your stugs to support the central breaches. Good luck. Koolkevz; Advance! I'll leave dealing with the final Sherman to your discretion but I want you up with the infantry and putting fire on the allied positions to your south. Get them supressed and routing as the arty starts to come in. PzIV south orders! All unbuttoned now and forever.  Have these two guys move up quick hugging the treeline and lay fire on the gatehouse and American squads in the trees. Engage enemy AT assets if they are spotted as a priority. Please space the movement out a fair bit chronologically in case of mines so that the second one has a chance to be ordered to stop.  Drive quick around this wood while shouting apologies for the friendly fire. Once there lay fire on allied contacts in the abbey area. If something dangerous like a bazooka pops up engage it. Drive quick around this wood while shouting apologies for the friendly fire. Once there lay fire on allied contacts in the abbey area. If something dangerous like a bazooka pops up engage it.
|
|
#
?
Mar 1, 2019 21:30
|
|
|
Saros posted:Dublish it's very likely that the buildings may not have doors in the right places for you to occupy the buildings without running around the sides in the open and getting slaughtered. You should breach the buildings as well if there are no doors you can enter while remaining in cover. Fair enough. There are doors on the south side of the south buildings, but we've seen people ignore good doors to run into the open. I haven't looked at the building for bagpipes.
|
|
#
?
Mar 1, 2019 22:44
|
|
|
Saros posted:
Frang Platoon, Target Brief
|
|
#
?
Mar 2, 2019 00:44
|
|
|
9th Company, 3rd Platoon Blue platoon Stay put and put fire on the units across the river. Green HQ Quick to a position to engage units in the guardhouse. Try and fix the panic in the blue platoon. Red platoon Retrieve the MG that fell on the road and put fire on the foxholes across the river. Purple platoon Quick to a position along the purple line and target the south bridge. If anything tries to move across the bridge I want it dead. I'm not sure if the tank that's coming can run over and destroy the MG but I want to pick in up before it gets here.
|
|
#
?
Mar 2, 2019 01:05
|
|
|
FRAY POSTED THIS EARLIER BUT HERE'S THE REAL UNCENSORED TURN https://www.youtube.com/watch?v=h5lULspe8Ec And end of turn shots!     
|
|
#
?
Mar 2, 2019 02:25
|
|

|
 Commander's Halftrack:  Move down to the location indicated, face the bridge and target any signs of movement. Armoured Group Wipe out that last sherman ASAP. Jaguars! fucked around with this message at 11:33 on Mar 2, 2019 |
|
#
?
Mar 2, 2019 11:26
|
|
|
Orders are due Monday March 4 at 8PM EST.
|
|
#
?
Mar 3, 2019 06:52
|
|
|
dublish posted:You'll be attacking the Hamlet from the northeast. Use your vehicles to get your platoon as far south along the highway as you safely can before disembarking. When you cross the hedge to the southeast of the woods, you'll have to use satchel charges. ok then. what i'm seeing on the screenshot provided above by dublish is that my troops are still milling around trying to get in their trucks, and the HMG is still doing what it's been doing. i don't know how long it will take the trucks to fill up, but i'll try not to plan too far ahead. i'm going to guess at a good/safe spot to unload the trucks, please let me know if this is not safe and/or good. then i'll consider the forest cleared and move toward the hedge, placing orders to blow it so i can have some of my forces clear the railyard and set up base of fire, and others go down to the hedgerow at the end of dublish's pink arrow. for now i'm going to simply attempt to send my troops into reasonable places, i don't really know which of my squads will be functional or not. as such, my orders are the following: - as soon as each truck is loaded, move it along the BLUE arrow, then disgorge the troops. - after unloading, leave the squads split but designate the two weakest squads as Group Red and the two strongest as Group Pink. - Group Red heads along the RED arrow to occupy the railyard. hopefully we get a better bearing on the allied contact there. - Group Pink heads along the PINK arrow to take possession of the hedgerow, hopefully with covering fire. - Pink and Orange's rough locations of hedge breaching are indicated by scribbles on the map in the appropriate color at the end of their arrows. EDIT: oh, and even at this point i feel like the HMG should keep doing what it's doing, hence the STAY 'command' i'm assuming all of this has been cleared by glynn so go QUICK through the forest and to the hedge that needs to get blown up. details of the orange and pink movements will follow after the next three minutes, i hope. i'll see if i have enough men left to split squads and i'll try to widen my spacing once i'm across the forest and through the hedgerow  i recognize that this 'plan' isn't really of very high quality and i'm hoping to do better once they get out of the trucks and we find out who's got what. please let me know if i should end the arrows at different spots. i'm hoping to have time to adjust pictures tomorrow and i'll be able to make posts at the least.
|
|
#
?
Mar 4, 2019 06:17
|
|
|
Frang Orders Easy bit first  Reserve MGs move up into Frang Platoon positions and deploy. Swap halftrack and truck drivers around until we have the maximum number of crewed halftracks and use them to support. Obtain fire superiority over enemy positions in the Abbey and any enemy movement down the road, focusing on the Abbey. If you adjudge superiority is obtained begin walking elements of Frang Platoon into the woods currently occupied by Pipes Platoon. Across the turn provide maximum fire support onto exposed enemy positions from Frang Platoon, Company MGs, Pipes Platoon remnants, Halftracks and anyone else who can get something even approximating a line of sight. If nobody else has orders for it this turn then I'm taking command of it. Every spare halftrack, every unregarded XO team, every truck driver with nothing to do is to get line of sight and shoot some bloody yankees. Fire position if you can't see, if you can't see anything to fire position at then move. First Stage - Breach  1st Squad move to be able to shoot through the breach at the bottom floor of the house beyond, just in case. 2nd Squad A and 3rd Squad B storm the house! No prisoners! Platoon and 2nd Squad B move up to support with fire over the wall. 3rd Squad A (in the building) run back upstairs and continue to deliver fire. Move to the second stage after the house is stormed. Second Stage - Exploitation  First squad through the breach as well! If everyone in the first breach team died, occupy their old positions on the ground floor. If, by some miracle, they're still combat effective proceed to the second floor and shoot from there. Do lots of shooting. This is the turn lads. If we get this right, with speed and fury and so much 8mm Mauser in the air that it looks like a fireworks display we can break American morale completely this turn.
|
|
#
?
Mar 4, 2019 22:54
|
|
|
Orders - StuG Battery StuG 2 & 3: Stay buttoned up. Stay put and provide fire support for northern breachers. If any enemy units in the abbey are visible and not suppressed, TARGET BRIEFLY for 30 seconds. If not, allow automatic engagement. As soon as infantry are through the beaches: Move forward into the nearest breach, continue target orders as in Turn 1.  StuG 1 (southern StuG): Stay put and fire on anything that becomes visible in the enemy backfield. pthighs fucked around with this message at 01:32 on Mar 5, 2019 |
|
#
?
Mar 4, 2019 23:45
|
|
|
Northern panzers All tanks are to unbutton. The two western most panzers are to use QUICK to move up alongside the friendly infantry to their front and to lay down supporting fire on any spotted allied contacts or known allied contact positions. The two eastern panzers are to move forward as a team using QUICK to get to a position where they can both see that last sherman they need to move together to provide two targets for the enemy sherman and then are to engage and destroy the last sherman tank.
|
|
#
?
Mar 5, 2019 00:40
|
|
|
Pioneers 3rd Platoon Orders  Stop the movement of this poor 2nd Squad Team and redirect them to the nearby truck. Board it and ACQUIRE a bunch of relevant ammo. They will appreciate some rest. The HMG HQ should spend some time TARGET BREIFLY on the hedge being assaulted below. Time it so that it precedes the attack reasonably, probably 1st and/or 2nd minute? The rest of the time can be left to targets of opportunity.  HIDE this poor 2nd Squad Team so they can recover from being raked with MG fire. If they keep taking area target fire, you may crawl them out of the building if you judge it useful. They can always sneak back in later to get the MGs off the dead.  QUICK The 1st Squad into the hedge in front of the building. It's risky position but I need them to TARGET BREIFLY as much of the hedge as indicated to suppress it for the assault. FAST the platoon HQ into the woods, lagging behind the assault to provide leadership. QUICK 3rd and 4th Squads to a coherent jumping off point. Then, bound teams forward at QUICK or FAST at your judgement and fire on the hedge in an assault to take the hedge. They may BLAST the hedge if necessary to destroy the enemy but be mindful of where this opens sightlines to other enemy positions.
|
|
#
?
Mar 5, 2019 01:04
|
|


|
24 hour extension.
|
|
#
?
Mar 5, 2019 03:36
|
|
|
Ed: double post
|
|
#
?
Mar 5, 2019 03:37
|
|
|
Best of luck on your assault lads, I'll be up there in an hour with 
|
|
#
?
Mar 5, 2019 20:43
|
|
|
Jaguars! posted:Best of luck on your assault lads, I'll be up there in an hour with If this goes wrong I expect to see you filling the gaps for the next assault attempt. Your pistol is probably more useful in FIBUA than our Kar 98Ks.
|
|
#
?
Mar 5, 2019 22:05
|
|
|
The American have begun to pull back along their entire perimeter! Your pioneers blast through the walls of the great Abbey only to find the US infantry fleeing across the stream towards Le Neufborg. The highways are now clear, opening up lines of advance and communication with 1st SS Panzer. The German armored spearheads begin to drive deep towards Avranches. The defense of l'Abbaye Blanche ends in a German win. The main thread is now open to players. There will be a new match before long. https://forums.somethingawful.com/showthread.php?threadid=3879665
|
|
#
?
Mar 6, 2019 02:33
|
|
|
FrangibleCover posted:If this goes wrong I expect to see you filling the gaps for the next assault attempt. Your pistol is probably more useful in FIBUA than our Kar 98Ks. Oh ye of little faith!  Let me be the first to say that the team did an amazing job. It's hard to single anyone out really, everyone played in good faith and to the best of their abilities and several players stepped up to extra responsibilities admirably. Highlights for me were seeing a company actually advancing by bounds - I've never seen that in the half a dozen goon games I've played; and the 'Holy poo poo the plan might actually work' moment when the Americans began to pull back from the ATG hedgehog. Many thanks to the American side for some very persistent and tenacious defending too. Jaguars! fucked around with this message at 03:30 on Mar 6, 2019 |
|
#
?
Mar 6, 2019 03:12
|
|
|
Best executed goon game I've seen yet. Props to Fray for a well conceived system, props to our leadership, and props to DSM for the excellent videos.
|
|
#
?
Mar 6, 2019 04:06
|
|
|
Thanks everyone, this was a lot of fun! I'd like to give a shoutout to DSM for excellent videos. His format should become the standard. One overhead shot with NO CLICKING OR CAMERA MOVEMENT for the entire turn, then one shot for full minute for each area of interest, then whatever is especially interesting, then a quick inspection of all friendly forces in order even if they didn't do anything at end of the video. I don't own the game and have to glean all information from videos. This gives me by far the best shot at it. Thanks also to Frang, Mcbagpipes, Malick and Dublish for sticking with me during the game. Our team play worked very nicely. Thanks to Jaguars for giving me enough room to be me. Appreciate it, man. And to Fray for running this thing. It was a good scenario and inputter system seems to work out really well. This thing wouldn't have happened without you.
|
|
#
?
Mar 6, 2019 07:38
|
|
|

|
| # ? May 4, 2024 03:53 |
|
|
Superb game guys, I really enjoyed it. On to the next one! Special thanks to Hob for consistently giving me orders that matched what I wanted to do anyway, and to Fray and DSM for doing all the actual work.
|
|
#
?
Mar 6, 2019 12:45
|
|