


|
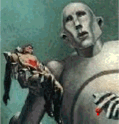
This is a prop for a TF2 map I'll never finish. I think I'm starting to get the style down at least screenshot is in HLMV so it's kind of blurry i guess  
Fish Ladder Theory fucked around with this message at 11:40 on Jun 21, 2008 |
 #
?
Jun 21, 2008 11:32
#
?
Jun 21, 2008 11:32
|
|


|

|
| # ? May 15, 2024 04:36 |
|
|
This may be old hat to you guys who are experienced at lighting, but for those of us who don't know much about it I found this to be a pretty good rundown of light itself. It doesn't actually go into detail about lighting a scene or anything like that but it does give a really good rundown of different types and effects of light. It seems equally well suited reading for 3D as it does for photography.
|
|
#
?
Jun 21, 2008 18:27
|
|


|
^ It's in the OP  . Found it really useful when I started lighting. . Found it really useful when I started lighting.
|
|
#
?
Jun 22, 2008 04:45
|
|

|
Oops sorry, must have missed it. It's an awesome read even though I'm nowhere near lighting yet ")
|
|
#
?
Jun 22, 2008 04:51
|
|
|
Something I found recently which could be put in to the OP was a wikipedia type page on Mental Ray. Specifically MR Physical Sun and Sky. Whenever I was using it the colours were being washed out but the effects looked great. This page teaches you how to fix it, it basically involves the gamma and fixing it, as well as adjusting a few other settings. Site: http://toi.bk.tudelft.nl/toi-pedia/index.php?title=Mental_Ray_Physical_Sky_tutorial
|
|
#
?
Jun 22, 2008 13:58
|
|

|
Correct gamma workflow for physical accuracy was one of the weirdest/hardest things for me to wrap my head around. I'll find a link to post here in a bit.
|
|
#
?
Jun 22, 2008 21:18
|
|

|
oops, nevermind. Bantaras fucked around with this message at 05:22 on Jun 28, 2008 |
|
#
?
Jun 24, 2008 05:50
|
|
|
I've been working on this model in my spare time at work  and the face after a crash course about skintone from a friend 
|
|
#
?
Jun 24, 2008 20:29
|
|

|
AlphaMole posted:I've been working on this model in my spare time at work I really like how that texture is looking :3 I'm planning on doing a bunch of DS-spec characters soon for fun/portfolio but I've never done super-low poly work before - any tips?
|
|
#
?
Jun 24, 2008 21:10
|
|

|
First thing you want to do is make sure you know what texture resolutions to use. On the game I worked on a prop would normally have a maximum of 64x64 with 16 colours. On some better props you can use 256 colours. Index these down with photoshop, so the first thing you'll notice is it can be a bitch to get the texture looking nice. Say if you're making a prop you'd normally be allowed like 200 triangles or something. Characters more like 1k depending on how many you have on screen.
|
|
#
?
Jun 24, 2008 22:55
|
|

|
Been plugging away at learning modelling. I posted a head model waay back in the old thread but never updated - I ended up giving up on the head for now and doing a rather lovely office. Nothing worth posting, but a good ground to learn some more skills. I'm now working on my first real complete piece, a post-apocalyptic scene that's not really very apocalyptic yet. Comments appreciated. 
|
|
#
?
Jun 25, 2008 13:49
|
|
|
Haha awesome, reminds me of fallout! You need a retro TV sitting on a chair with rabbit ear antennae.
|
|
#
?
Jun 25, 2008 14:41
|
|

|
That scene is neat, what is the area of focus the scene? The table? or the cityscape to the right? You can add in some elements to help frame things a little better, when i get home I'll do a few sketches to show what I mean.... Just waiting for SAG to sink/slow down the visual effects and film industry. 90% of SAG members are people that don't do meaningful work on a regular basis [ie. Waiters, baristas, etc], and typically will vote for a strike because it doesn't impact them since they don't work for a living in that industry.  Thats what happens when you allow anyone to join into a union who doesn't actually work in that field. Thats what happens when you allow anyone to join into a union who doesn't actually work in that field.
Big K of Justice fucked around with this message at 22:28 on Jun 25, 2008 |
|
#
?
Jun 25, 2008 18:49
|
|


|
Continuing work on my scene - can't get a good layout of the cityscape yet. I may have underestimated just how much work there is to be done... BigKOfJustice - I'm... undecided. My original plan was to have the blast crater be the focus in the right hand corner of the scene, although my current city layout doesn't show that. Still planning on going that route I think, although I wanted the chair/table to be a focus as well, and I don't want them fighting for the viewer's eye. Comments/crits welcome as always. 
Useless fucked around with this message at 23:04 on Jun 25, 2008 |
|
#
?
Jun 25, 2008 22:57
|
|
|
That looks really cool. My crit is that the interior looks awfully intact considering the building was bombed and has been exposed to the weather for who knows how long (particuarly the broom, but maybe someone is supposed to be still going in there?)
oldyogurt fucked around with this message at 23:49 on Jun 25, 2008 |
|
#
?
Jun 25, 2008 23:46
|
|

|
The broom's a low-poly stand-in until I get around to modeling the high-poly version. Still undecided as to the best way to do the bristles - is splines the best method? I was afraid it'd end up being absurdly high-poly and kill my old workhorse of a machine. As for the weathered look, I suppose I should have explained - I'm going for a "next day" type situation - lots of dirt, dust and debris but still fresh destruction - perhaps some smoke in the far horizion of fires still burning. The chair and table will eventually have bionoculars and a radio - signs the chair is a lookout for any hope of a rescue effort. I'm also thinking about adding a helicopter in the background to indicate an admittedly weak rescue attempt going on. Will update soon with a new render.
|
|
#
?
Jun 26, 2008 08:45
|
|
|
Useless - That is looking really good at the moment. I do like the layout of the city in the second render rather than the first, as it does leave the scene open for additional points of interest, which is what I'm sure you intended. I do prefer the dawn/late afternoon lighting displayed in the first render, however, and I think that that lighting and colour tone will highlight dark smoke in the distance, as well as strengthening the feelings of loneliness/depression that one may have when in a post apocalyptic situation. Also, whether or not you decide to add a blast crater as another point of interest or not, the eye is still drawn first to the interesting foreground elements of the chair and table, so I would make those your main focus. And as for the broom, have you considered possibly using the Hair simulator in whatever program you're using? Just my thoughts and suggestions.
|
|
#
?
Jun 26, 2008 13:28
|
|

|
quote:Don�t waste time on elaborate packaging. All you need is a marker, and an easy to read typeface. This was one thing in the OP or second post that I thought deserved some discussion. One of the things that I've always felt, and has always been pounded into me is the quality of the reel submitted needs to feel very professional. Now this doesn't mean you need to have thermal pressed DVDs with an incredibly detailed and overworked identity logo. But simply writing your name and contact info in sharpie on a DVD really doesnt cut it. I've spoken with several reel reviewers that kind of shocked me when they said anything with handwritten DVD labels would get trashed almost immediately and they'd often only look at the work on a lark.
|
|
#
?
Jun 26, 2008 15:47
|
|

|
Though I don't work in an HR dept. I think the general idea was to emphasize CONTENT over packaging. Lots of reels have pretty packaging but little quality content. I think that was the point the OP was trying to make. The opposite is better overall (better content and little packaging) but anything to improve the presentation of your work is always good. This isn't about how great your graphic design is . . . it is all about the 3d content. Useless: Great work. Curious to know how you are going to handle the dust and debris etc.
|
|
#
?
Jun 26, 2008 19:41
|
|


|
treeboy posted:This was one thing in the OP or second post that I thought deserved some discussion. One of the things that I've always felt, and has always been pounded into me is the quality of the reel submitted needs to feel very professional. Now this doesn't mean you need to have thermal pressed DVDs with an incredibly detailed and overworked identity logo. But simply writing your name and contact info in sharpie on a DVD really doesnt cut it. I've spoken with several reel reviewers that kind of shocked me when they said anything with handwritten DVD labels would get trashed almost immediately and they'd often only look at the work on a lark. I don't know what companies those reel reviewers work for. Things with major studios, goes in this order: 1. Resume review 2. Sorted 3. Reviewed 4. Sorted 5. Contact if needed 6. Interviewed 7. Sorted 8. Ignored, interviewed again or hired. My only requirement is the reel to be legible. I've seen blank dvd's that had no contact information on it, or on the reel for that matter. Of course you have a problem with huge cooperations where some HR peons and recruiters wade through the chaff and that individual may have his or her own ideas on what makes a good reel, only to have someone in production review it and go what the gently caress is this poo poo? I'll put it another way, if someone applies with ILM, DD, Weta, R+H, PIXAR, Disney, etc. On their resume, no one is going to give a poo poo about labels. Personally, after seeing thousands of reels shuffle through here, the more fancy the presentation, the more lovely the reel. This is almost an absolute 99 times out of 100.
|
|
#
?
Jun 26, 2008 21:51
|
|
|
Quick question: How can I modify my mesh slightly without Max killing my UVs. I have Preserve uvs ticked but it doesn't seem to do anything. As soon as i click on Editable mesh it seems to stop using my uvs altogether.
|
|
#
?
Jun 26, 2008 22:02
|
|

|
I think you have to right click on your Editable Mesh and collapse all, that allows you to edit the mesh without killing your UV's. Just add a Unwrap UVW Modifier back on after you are done. At least that's how it works with Editable Polys, I assume it would be the same for a mesh.
|
|
#
?
Jun 26, 2008 22:58
|
|
|
Ah, that did it, Thanks. It actually is an editable poly Im just getting the terms mixed up.
|
|
#
?
Jun 26, 2008 23:03
|
|
|
No problem. When I first started unwrapping stuff, I had that issue too, of how to edit the model without having to start the goddamn soul crushing unwrap process again.
|
|
#
?
Jun 27, 2008 02:37
|
|
|
 With any luck this will be my first real finished model. Its a sorta improvised wooden car. Hoping to get it into some game or other when its done. this is the original (very rough -still getting the hang of using a wacom) sketch: 
|
|
#
?
Jun 27, 2008 03:20
|
|
|
Awwwww . . . Crazybump isn't free anymore!! 
|
|
#
?
Jun 27, 2008 03:50
|
|
|
I know, it sucks doesn't it? I might buy it properly, its such a dead useful program.
|
|
#
?
Jun 27, 2008 04:23
|
|
|
BigKOfJustice posted:Personally, after seeing thousands of reels shuffle through here, the more fancy the presentation, the more lovely the reel. This is almost an absolute 99 times out of 100. i guess this surprises me as well. At least personally i'd think it would speak more towards people that go the little bit extra to make sure their whole package works and looks good. However I will defer to your experience on the matter. I'll just try and make sure I'm that 1 in 100
|
|
#
?
Jun 27, 2008 06:18
|
|
|
Did a little more on this. It's at about 4k trinagles now, Thats reasonable for a modern game engine right? Im pretty sure i have the structure nailed down now so its mostly a matter of finishing the uvw mapping, adding a bunch of crap and giving it some kind of interior. Any critiques/ suggestions would be great.
|
|
#
?
Jun 27, 2008 07:03
|
|
|
Kuato posted:Did a little more on this. It's at about 4k trinagles now, Thats reasonable for a modern game engine right? Im pretty sure i have the structure nailed down now so its mostly a matter of finishing the uvw mapping, adding a bunch of crap and giving it some kind of interior. Any critiques/ suggestions would be great. Lookin' good, but there's no reason the "three ropes" thing should actually be three individual ropes. Learn to cheat it with a texture and some implied definition in the model and save yourself valuable polys!
|
|
#
?
Jun 27, 2008 08:03
|
|

|
Here's another WIP of the character I'm working on.  I just started texturing this guy and he's looking rather action figure-y at the moment. Gonna try dirtying him up a bit. 7700 tris right now, but I'm gonna try optimizing the head.
|
|
#
?
Jun 27, 2008 09:36
|
|
|
Kuato posted:Did a little more on this. It's at about 4k trinagles now, Thats reasonable for a modern game engine right? Im pretty sure i have the structure nailed down now so its mostly a matter of finishing the uvw mapping, adding a bunch of crap and giving it some kind of interior. Any critiques/ suggestions would be great. ugh my post about this got eaten. 4k is fine for a vehicle, low by modern standards, but then again you didn't build it with normal maps or anything in mind so I figured this is more of a get your feet wet type thing than a "lets make AAA assets on my first go" kind of thing. post wires, don't show off the textured model with a rendered AO pass, what size texture are you planning on using? The ropes around the boiler are ridiculously dense, should probably be a band with ropes painted on instead, if they're still renderable splines their tri-count isn't being added into the triangle counter in Max because Max is crap. You've got weird smoothing on the wheels, they're too small, and your wheel-wells are so form-fitting I bet this can't even steer. Add some thickness to the exhaust pipes, and for the interior you can merge all the interior bits into a point, so the end of the pipe's cross section looks like this: code:why is the shovel floating? find a way to attach it. Are the doors supposed to open? Because you didn't model them so they can.
|
|
#
?
Jun 27, 2008 16:58
|
|
|
   First of all, thanks for the helpful post. I've changed the pipes round as you recommended and I'm in the process of fixing the wheels. The textures are one thing I'm not so sure about right now they are on two 1024x1024 images and one 512 which seems way excessive. I can probably shrink it all down quite a lot but I'm nor sure what kind of size I should be aiming for.
|
|
#
?
Jun 27, 2008 18:40
|
|
|
I picked up a pack of plasticine clay from the corner store today for fun, and even though I suck at using the stuff, inspiration struck while I was messing around with it. So I started a superhero bust, but for some reason I keep trying to use the controls for the spore creature creator and keep messing up (like left click rotate)  
change my name fucked around with this message at 03:36 on Jun 28, 2008 |
|
#
?
Jun 28, 2008 00:55
|
|


|
 (click for the video) Welp. This was the piece I was animating for the class project, and as expected, it didnt get anywhere near finished. Even more depressing is the fact that it was the most polished so far. Hopefully by the time the school opens again in two weeks, all the sequences will have rendered out without glitches or falling over halfway. Oh and the lecturer earns bonus points for having to animate one entire segment because he wasnt keeping an eye on what that student was doing (e.g. nothing at all) and it needed to be completed somehow since that was the opening sequence, and avoiding using Motionbuilder entirely because it was slowing his work down. After spending 3 months forcing us to use it. He also helped rig the dog. And I discovered with two weeks of animation left that the floor contacts were crammed up to the elbows and no one knew how to reorient them.
Synthbuttrange fucked around with this message at 09:03 on Jun 28, 2008 |
|
#
?
Jun 28, 2008 08:59
|
|


|
change my name posted:I picked up a pack of plasticine clay from the corner store today for fun, and even though I suck at using the stuff, inspiration struck while I was messing around with it. So I started a superhero bust, but for some reason I keep trying to use the controls for the spore creature creator and keep messing up (like left click rotate) Also does anyone know of any good tutorials for making human mouths in zbrush? I have absolutely no clue how to go about doing it
|
|
#
?
Jun 29, 2008 23:49
|
|
|
Is there an easy way to make something low poly from something extremely high poly? I want to know because I have a model I made in the days before I knew of poly economy, and it is in excess of 30000 polys. There is a cylindrical part, and I want to reduce the amount of sides. Is there something i can use that selects alternate edges/verts? Or will I have to delete them all manually?
|
|
#
?
Jun 30, 2008 00:42
|
|
|
change my name posted:Also does anyone know of any good tutorials for making human mouths in zbrush? I have absolutely no clue how to go about doing it How have you created this? Did you start from a low level mesh and subdivided your way up? Or did you just start with a high poly blob and just carved away? If you did the first, you could extrude a mouth inwards and work off that. Otherwise, just sculpt a mouth and retopologize it, and add the extra geometry in an external program. Fiddling around with actual low poly work in Zbrush is a bit of a pain for me.
|
|
#
?
Jun 30, 2008 01:29
|
|
|
In 3ds max you can apply the optimize modifier, but it will royally gently caress up your topology.
|
|
#
?
Jun 30, 2008 02:01
|
|
|

|
| # ? May 15, 2024 04:36 |
|
|
SynthOrange posted:How have you created this? Did you start from a low level mesh and subdivided your way up? Or did you just start with a high poly blob and just carved away? If you did the first, you could extrude a mouth inwards and work off that. Otherwise, just sculpt a mouth and retopologize it, and add the extra geometry in an external program. Fiddling around with actual low poly work in Zbrush is a bit of a pain for me. I blocked the basics out in zspheres, then used the low poly for the basic shape and worked my way up on the higher detail levels
|
|
#
?
Jun 30, 2008 02:41
|
|