


|
Odddzy posted:I know it's been said again and again that UV mapping is hell but I would greatly appreceate some help. Could some of you pitch some good tutorials or tips to make better projections? I'm currently working on unwrapping the train I showed but unfortunately I think my technique is really too slow, ideas anyone? What is your technique?
|
 #
?
Nov 7, 2008 18:00
#
?
Nov 7, 2008 18:00
|
|


|

|
| # ? May 16, 2024 17:28 |
|
|
I've started building some outdoor scenes for product renderings, and I can't seem to figure out what the hell is going on with my water. The actual water object is a plain box primitive. I've narrowed it down to being something in the reflection, but I can't seem to figure out what. It's got a bump and falloffs in the reflection and refraction slots, so nothing particularly fancy. I'm using an hdri as an environment background, and a vraySky for my gi environment. I'm still trying some other things, but I'd appreciate any insight on this. Max2008+vray1.5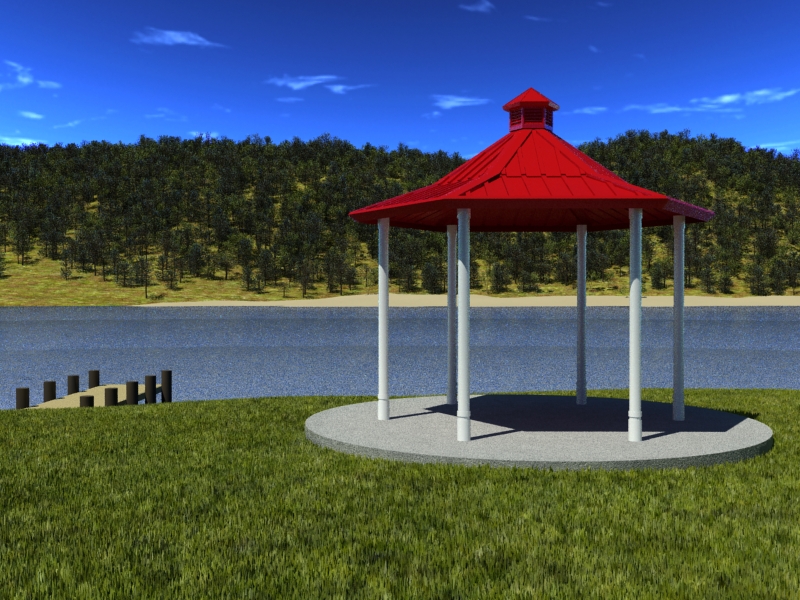 Click here for the full 800x600 image. edit: Oh gently caress me nevermind. I was using an existing environment I had, which i conveniently forgot to delete a vrayPlane out of which had a reflective white material on it, and was coplanar with the top face of my water. Haha yeah that looks a tad better. Also: ~2.2 billion polys in the trees, which of course is obscene overkill for that distance. I loving love vrayProxies. 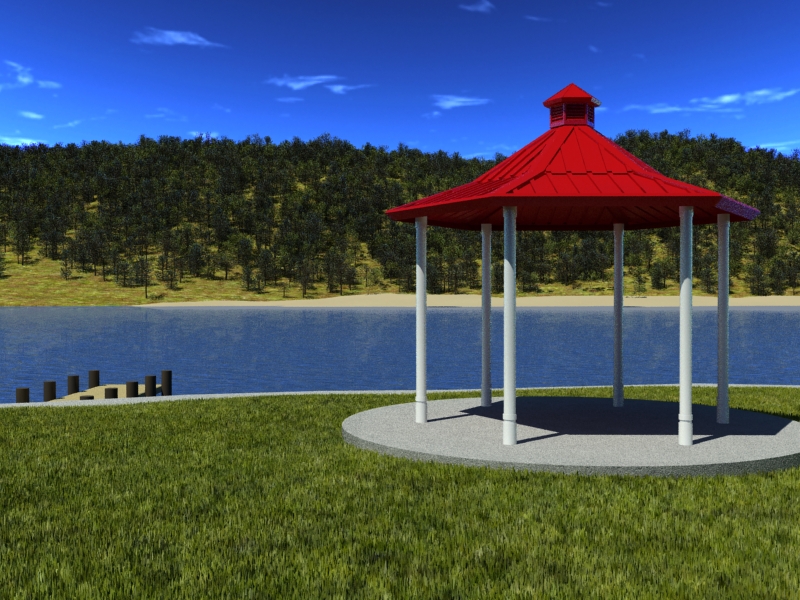 Click here for the full 800x600 image. Handiklap fucked around with this message at 21:46 on Nov 7, 2008 |
|
#
?
Nov 7, 2008 21:30
|
|

|
BonoMan posted:What is your technique? Well i don't know if it's a technique per se but it's just that I have a hard time figuring out where to put seams in cylinders and what kind of projections should be avoided and so on.
|
|
#
?
Nov 7, 2008 23:08
|
|
|
I'm working on some very low-res models for a handheld game prototype being developed in my AR class. For the game, I need to texture four different kinds of planets representing different states of life/vegetation. I'm running into a couple of glitches, though. -I'm building procedural shaders in Maya and trying to convert them to 128x128 PNG file textures, but there's always a weird line going across the outputted texture. Before conversion, after conversion. -I'm using a NURBS sphere to preview the texture, and then after converting the texture to PNG I convert the planet to a polygon sphere of 108 triangles (tessellation method: count). The poles of the planet always wind up looking pinched. Before tessellation, after tessellation. UVs post-tesselation. Any ideas?
|
|
#
?
Nov 7, 2008 23:44
|
|

|
GFBeach posted:I'm working on some very low-res models for a handheld game prototype being developed in my AR class. For the game, I need to texture four different kinds of planets representing different states of life/vegetation. I'm running into a couple of glitches, though. Why in god's name are you using that workflow? Wouldn't it be easier to just build a regular polygon sphere and unwrap it properly, and then create an actual texture for it? I don't know enough about Maya to help debug the texture rendering issue or to know how it converts NURBS uvs to polygon uvs, but your workflow is pretty crap. made a poly sphere and unwrap it and paint a texture on it. This shouldn't take more than an hour or two for the first one and even less time for the others. edit: looking at your uvs post-tesselation it's obvious that the poles are triangle fans and that in the UVs the triangles for the fan are not sharing any edges, which is why they're not blending seamlessly across the edge. Sigma-X fucked around with this message at 00:55 on Nov 8, 2008 |
|
#
?
Nov 8, 2008 00:53
|
|
|
Odddzy posted:Well i don't know if it's a technique per se but it's just that I have a hard time figuring out where to put seams in cylinders and what kind of projections should be avoided and so on. Use simple UV projections for simpler "primitive" like objects. For example a globe would obviously get a spherical UV projection and a coke can would get a cylindrical projection and so on and so on. If you are UVing complex objects like characters, this method will not work. Instead you should "unwrap" the UVs using either the UV tools in your software package OR (preferrably) a 3rd party UV unwrapper. My choices are UVlayout or Roadkill. Roadkill is free and does an excellent job on lower poly stuff. There are also others like chuggnuts for Max and packages like Silo and Modo have their own auto-unwrapping functions. UVLayout is probably the most famous because as far as I know it is the most capable. Personally I prefer these solutions to trying to unwrap in max or maya but inevitably you do need to tweak the UV maps so knowing how to move, sew, and stitch UVs in either package is very useful. I read recently that Maxon's Bodypaint now has UV editing functionality as well. These UVlayout tutorial videos may help you wrap your mind around it.
|
|
#
?
Nov 8, 2008 01:14
|
|


|
Sigma-X posted:Why in god's name are you using that workflow? Wouldn't it be easier to just build a regular polygon sphere and unwrap it properly, and then create an actual texture for it? I used that workflow at first because it seemed like a decent idea at the time.  I've since then created simple sphere primitives (versus converting the NURB spheres) and projected the same procedural shaders on them. I'm not noticing any pinching at the poles, though that one line is still getting burned into the texture. I've since then created simple sphere primitives (versus converting the NURB spheres) and projected the same procedural shaders on them. I'm not noticing any pinching at the poles, though that one line is still getting burned into the texture.
|
|
#
?
Nov 8, 2008 01:15
|
|
|
Havent posted anything in awhile, so I thought I would post my most recent side project. Click here for the full 1303x744 image.
|
|
#
?
Nov 8, 2008 02:49
|
|
|
Thats pretty loving good man, really good attention to detail. One thing bugging me though - did you duplicate layer/blur/soft light in photoshop or something similar? It makes it look nicer as far as colours popping, but it starts to loose the grit that would make it look like a photo. Very very minor crit though. (and more to do with personal taste)
|
|
#
?
Nov 8, 2008 07:05
|
|

|
That's an awesome render TouchTone I love the crispness and the light quality in there Here's a character I started today for fun and practice. At the moment I'm getting into messing with proportions and charicaturing a little bit. Everything I draw or sculpt seems to end up stupidly oversized. It's supposed to be a Troll of some sort I guess. Sorry about the darkness, I can't be stuffed rendering it out again. MAX for the basemesh, Zbrush sculpt, ouput displacement maps and rendered in Max. 
|
|
#
?
Nov 8, 2008 08:59
|
|

|
^^^ Badass. One thing I like about displacement in Max is how easy it is to use. Where are his eyes? Rendered in mental ray I assume? Looks like a Harryhausen character to me for some reason. My only real critique is that you might want to give the fingernails/toenails more definition and work more on the skin shader. TouchToneDialing: Was that max/vray? Amazing render.
|
|
#
?
Nov 8, 2008 22:04
|
|
|
Cheers mate Yeah I forgot to put eyes in. It's rendered in vray with no skin shader used. Just a small amount of relection value and low gloss. It was actually rendered out monochrome and then I decided to slap a skin colouring over it in photoshop to see what it looked like. I probably won't work on it anymore as it was just a diversion for yesterday, I'm supposed to be working on my showreel 
|
|
#
?
Nov 8, 2008 23:28
|
|
|
cubicle gangster posted:One thing bugging me though - did you duplicate layer/blur/soft light in photoshop or something similar? It makes it look nicer as far as colours popping, but it starts to loose the grit that would make it look like a photo. Very very minor crit though. (and more to do with personal taste) Its the back area with the black vase right? I tried to do subtle depth of field thing in photoshop with a Zdepth map but it didn't really work out, iv had the same comment from other people. Makes that area almost look like one of those 80's glamour shots. What do you normally do? Sigma 6: Ya its max and vray
|
|
#
?
Nov 8, 2008 23:29
|
|
|
I was internetting around at work last week and ran across a couple interesting posts. If you have done any amount of work in Sketchup, or are at least familiar with the typical output of Sketchup users, this will also be of interest to you: http://www.sketchucation.com/forums/scf/viewtopic.php?f=81&t=12513 http://www.sketchucation.com/forums/scf/viewtopic.php?f=81&t=10549 With all of the community-developed addons, there's not a whole lot of obvious features left for Google to implement.
|
|
#
?
Nov 11, 2008 17:29
|
|

|
I don't know the fix but that looks like the outputted texture is burning in the pre low polygon model UVs or something. I don't know how you're even doing what you're doing in Maya, never done it, but is there a way to turn off uvs in the texture or something. Im guessing there's an option for it so when it exports you can put it in photoshop and add extra detail to it too.
|
|
#
?
Nov 12, 2008 15:29
|
|

|
I'm a complete beginner to 3d studio max and I was wondering if somebody here could help me solve a problem I am having with modelling a pop can. I have managed to figure out everything except how to cut the hole at the top where you drink from into the cylinder. I made a spline in the shape of the hole and tried applying boolean settings to try and make it all one shape but it doesn't seem to work. I also can't figure out how to give my spline a face (cap holes doesn't fill it in properly).
|
|
#
?
Nov 13, 2008 05:41
|
|
|
Pictures help, as well as the sort of modelling method you're using.
|
|
#
?
Nov 13, 2008 08:19
|
|


|
I am just using 3dsmax.
|
|
#
?
Nov 13, 2008 16:29
|
|
|
Cornlight posted:I am just using 3dsmax. I don't use 3DSMax, but I'm assuming that yeah it's because your hole object doesn't have caps. That usually fucks up boolean operations. You could find a way to fill the hole or select the top of the can and remove faces where the hole is supposed to be and reshape from there. Maya has a "fill hole" command where you select an edge that is part of the hole and it fills it. Look for something similar?
|
|
#
?
Nov 13, 2008 16:43
|
|
|
BonoMan posted:I don't use 3DSMax, but I'm assuming that yeah it's because your hole object doesn't have caps. That usually fucks up boolean operations. You could find a way to fill the hole or select the top of the can and remove faces where the hole is supposed to be and reshape from there. I tried using a modifier called "cap holes" but it didn't fill it properly. It only filled in the areas made by the two arched lines. Sorry if my explanations suck but I am really just getting into it and I don't really know what I am doing. 
|
|
#
?
Nov 13, 2008 16:58
|
|
|
Cornlight posted:I tried using a modifier called "cap holes" but it didn't fill it properly. It only filled in the areas made by the two arched lines. Sorry if my explanations suck but I am really just getting into it and I don't really know what I am doing. first off, you've got a lot to do before this becomes a soda can, it's just a cylinder right now ") If you want to cut the hole by treating this as a boolean, you're going to need to convert your spline object into a solid mesh. The easiest way to do this is to convert it to an editable poly, and use the cap holes, bridge, and polygon creation tools. I believe you can toss a face extrude modifier on that current mesh (without the cap holes) to cap it properly.
|
|
#
?
Nov 13, 2008 17:15
|
|
|
Sigma-X posted:first off, you've got a lot to do before this becomes a soda can, it's just a cylinder right now I know how to modify the cylinder to become the pop can, but I keep starting the model over because I get frustrated at not being able to make that hole, lol. Doesn't bridging only work on faces and not lines? And what are the polygon creation tools you are referring to? Edit: I don't really want to ruin the thread with my dumb stuff. If somebody could help me over AIM or MSN I would really appreciate it AIM: notnotnotnottom MSN: cattleonagrassyknoll@hotmail.com Cornlight fucked around with this message at 17:35 on Nov 13, 2008 |
|
#
?
Nov 13, 2008 17:23
|
|
|
http://www.chaosgroup.com/forums/vbulletin/showthread.php?t=43650 Click here for the full 932x1100 image. This is how it's done, gentlemen. (sorry, forumlink is for registered vray users only)
|
|
#
?
Nov 13, 2008 18:49
|
|
|
Zuliban is a natural. Everything I've seen from him over the years is executed fantastically. I'd love to pick apart one of his scenes. For those without Chaosgroup forum access, the rest of the images from the link: Click here for the full 885x1000 image.    Click here for the full 1200x900 image.  Click here for the full 700x407 image.  Click here for the full 800x464 image. 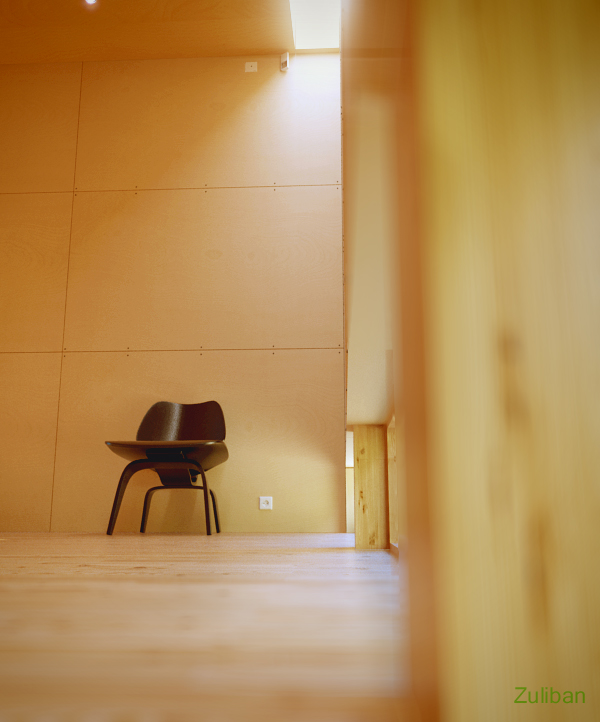 Click here for the full 600x722 image. 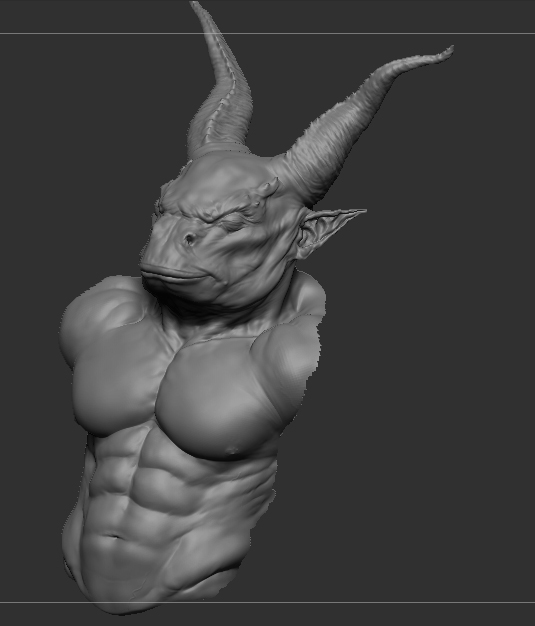 Click here for the full 535x626 image.  Click here for the full 932x1100 image. 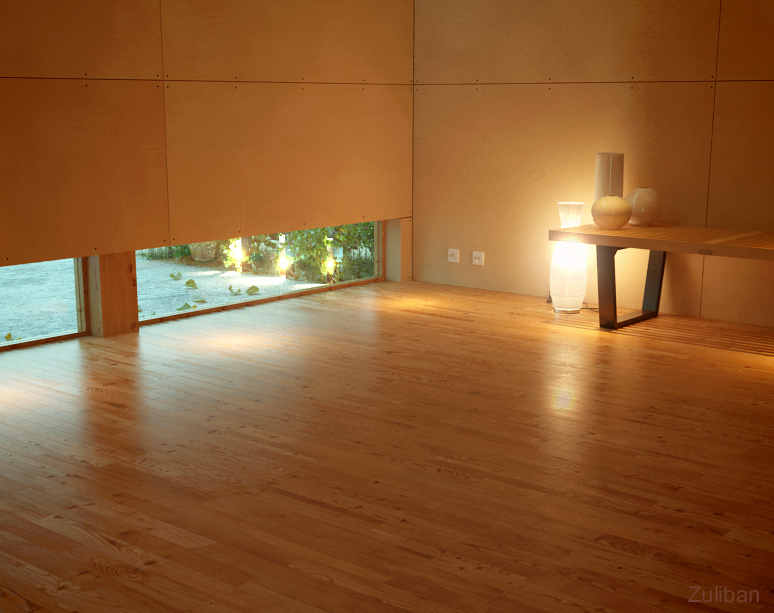 Click here for the full 774x613 image. 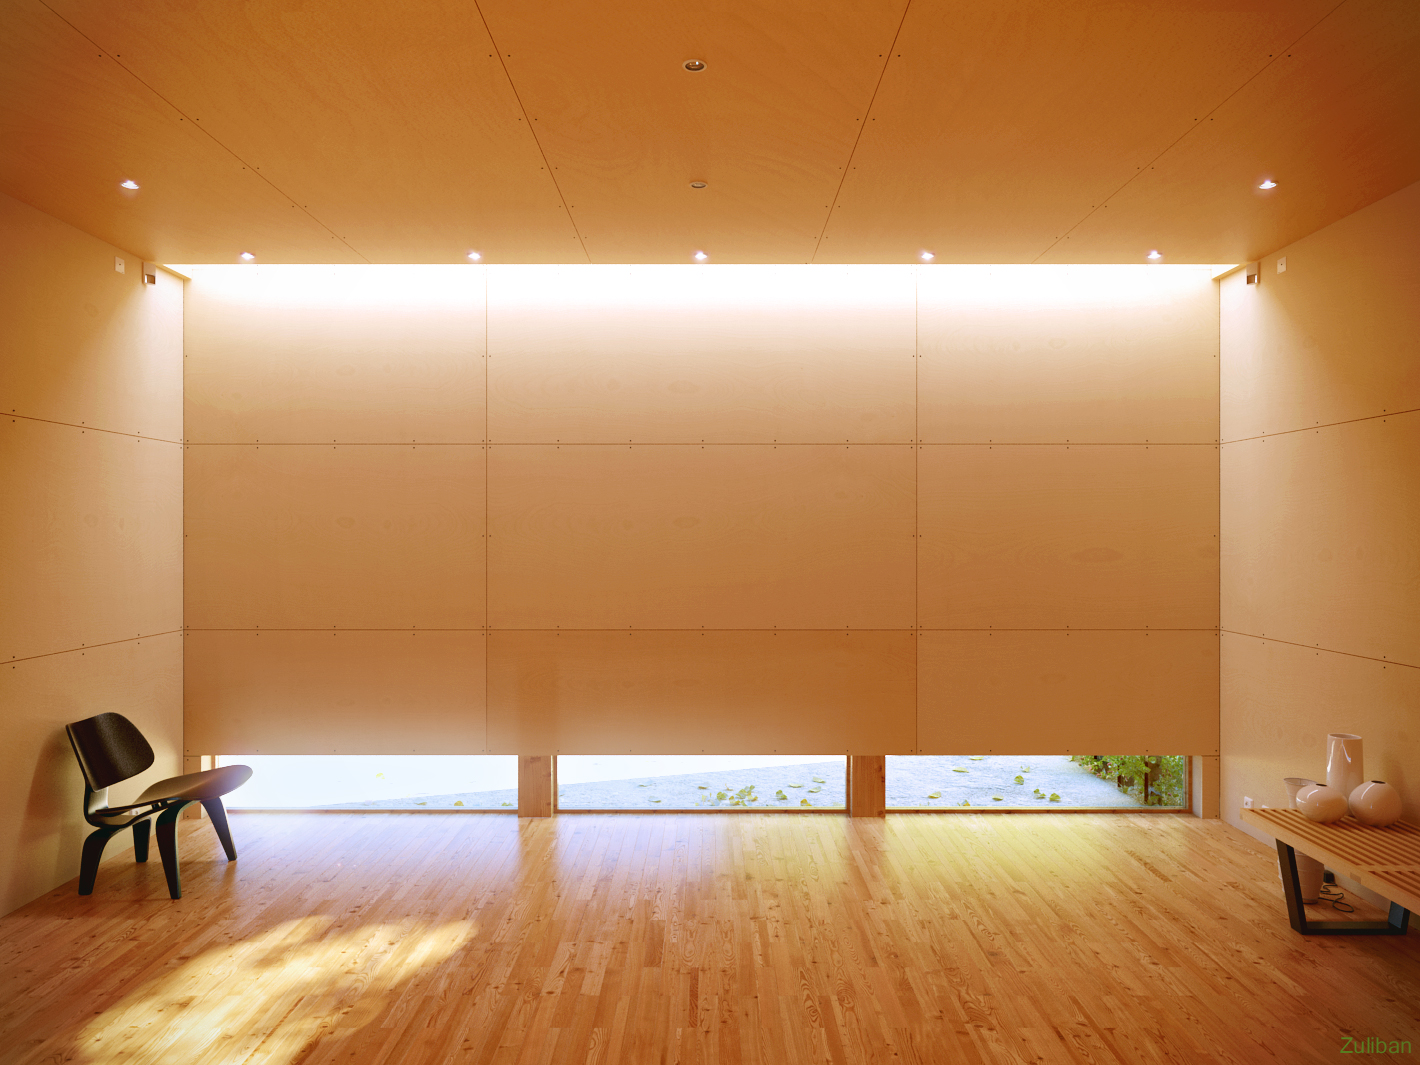 Click here for the full 1420x1065 image.  Click here for the full 848x1000 image.
|
|
#
?
Nov 13, 2008 19:17
|
|
|
I must say, those are rather good. Here is my very first attempt at my own renderman shader: 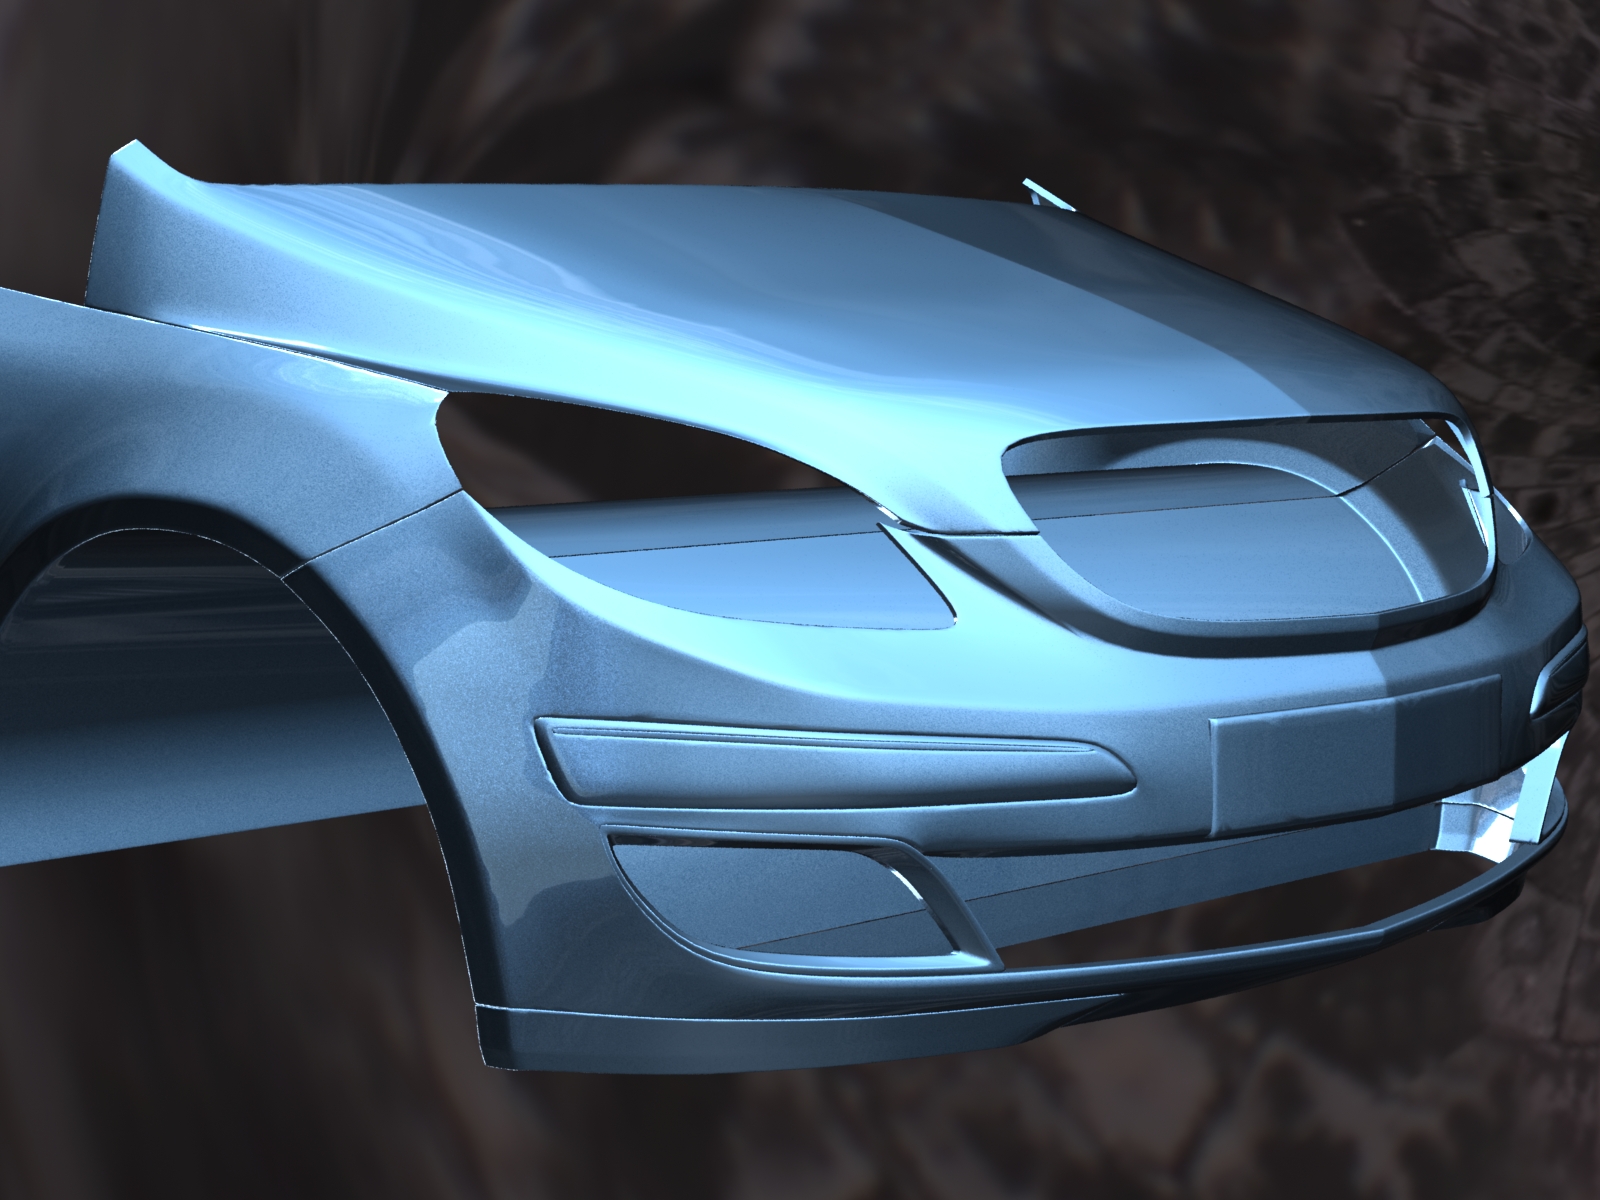 Click here for the full 1600x1200 image. I'm proud.
|
|
#
?
Nov 13, 2008 23:06
|
|

|
Cornlight posted:I know how to modify the cylinder to become the pop can, but I keep starting the model over because I get frustrated at not being able to make that hole, lol. Doesn't bridging only work on faces and not lines? And what are the polygon creation tools you are referring to? Pull up the Tutorials and start off from basic modelling is all I can say. As for what's going wrong with your model, it's that it's a solid block. Just booleaning away that little tab will not make an opening into the hollow interior, it'll create a depression on the surface.
|
|
#
?
Nov 14, 2008 03:09
|
|
|
SynthOrange posted:Pull up the Tutorials and start off from basic modelling is all I can say. I actually figured it out myself now. The problem was that I didn't weld some of the the lines on the spline I made. After I did that the boolean thing worked no problem.
|
|
#
?
Nov 14, 2008 04:55
|
|
|
Typing up notes from today's Autodesk 2009 event in Carlsbad CA. Would anyone like me to post them? . . . or is that a stupid question?
|
|
#
?
Nov 14, 2008 10:17
|
|
|
So I modeled and textured my very first weapon. the goal was to stay under 3000 tris and I have 2935. I could optimize a bit more actually. 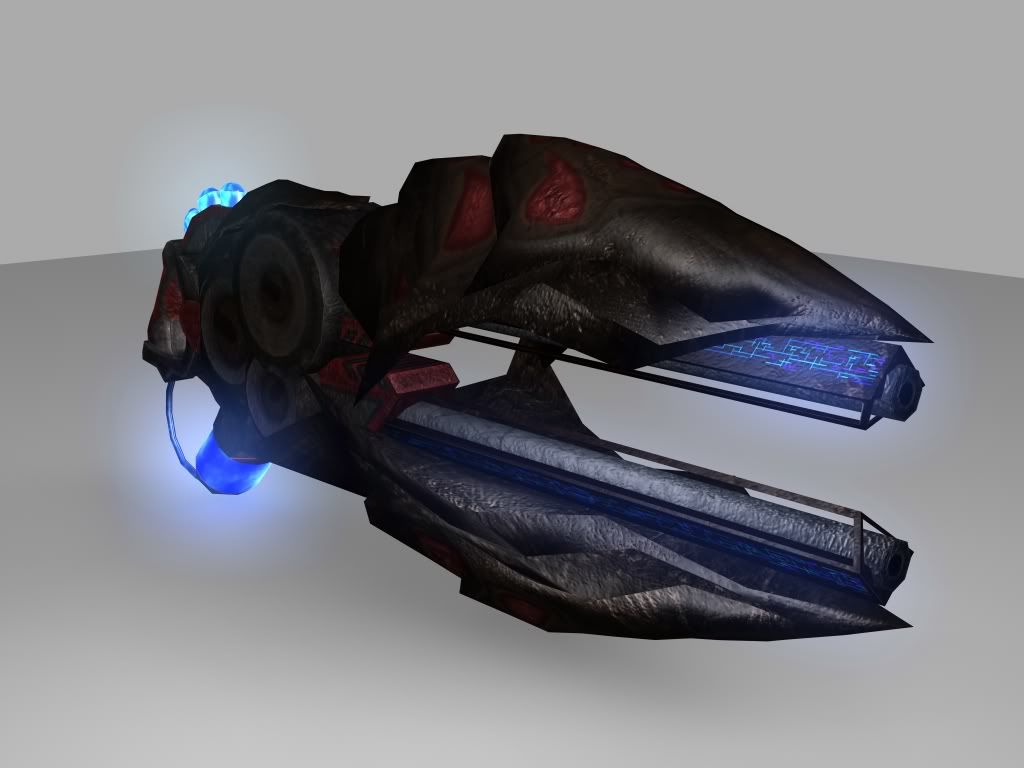 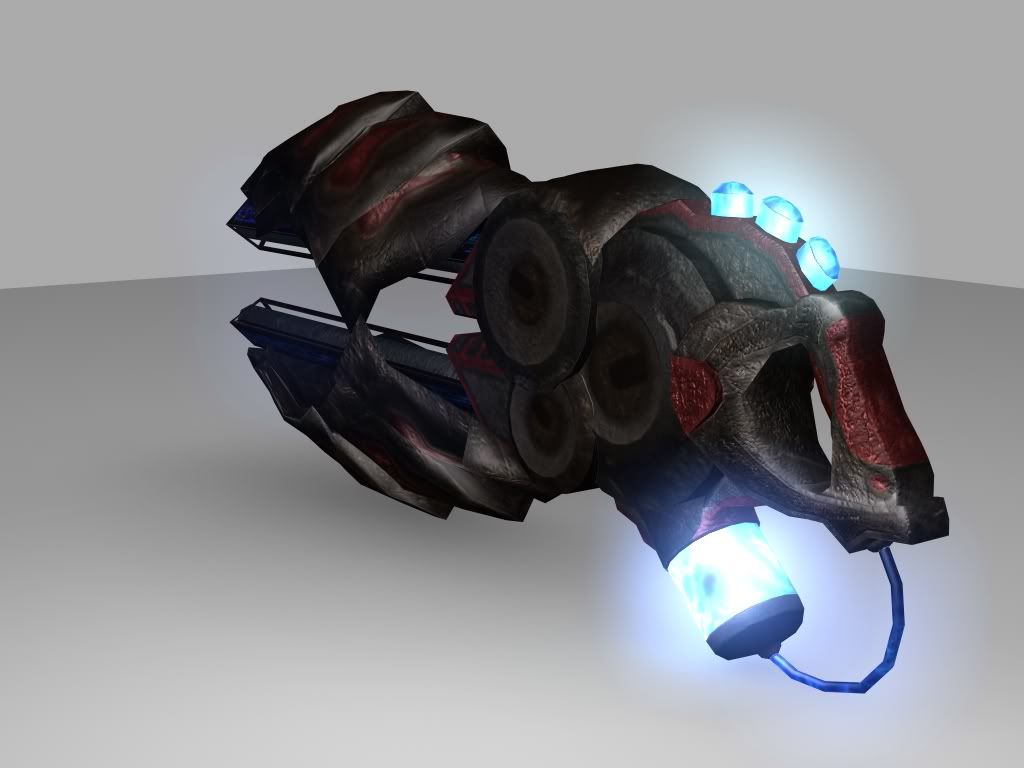 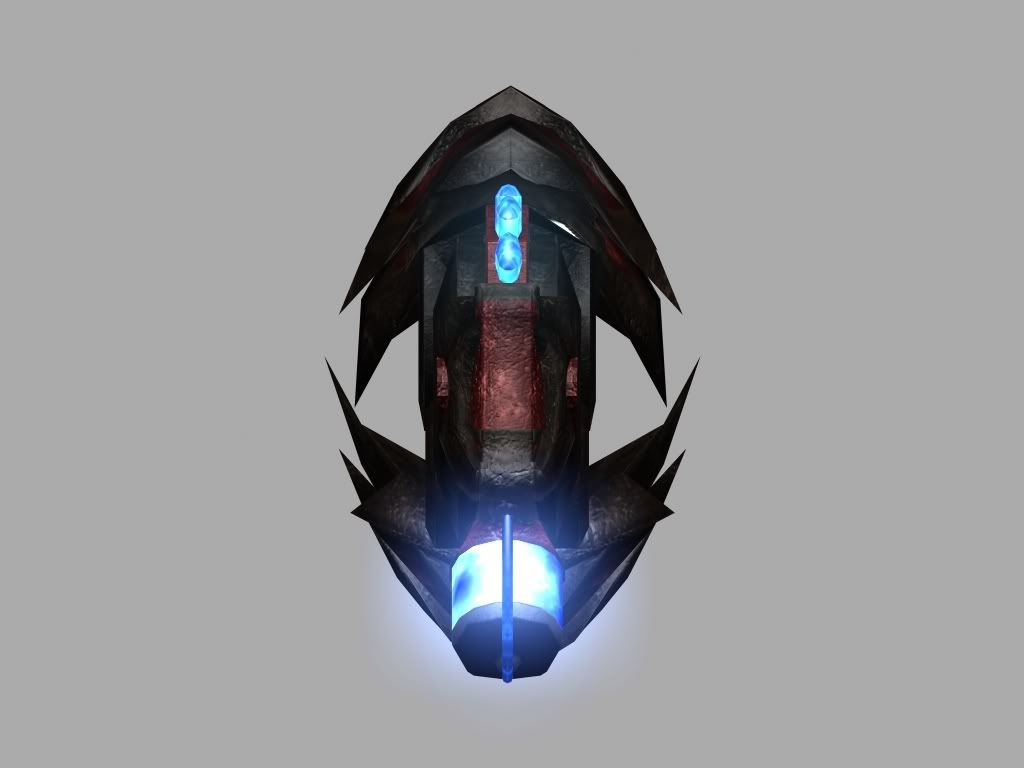 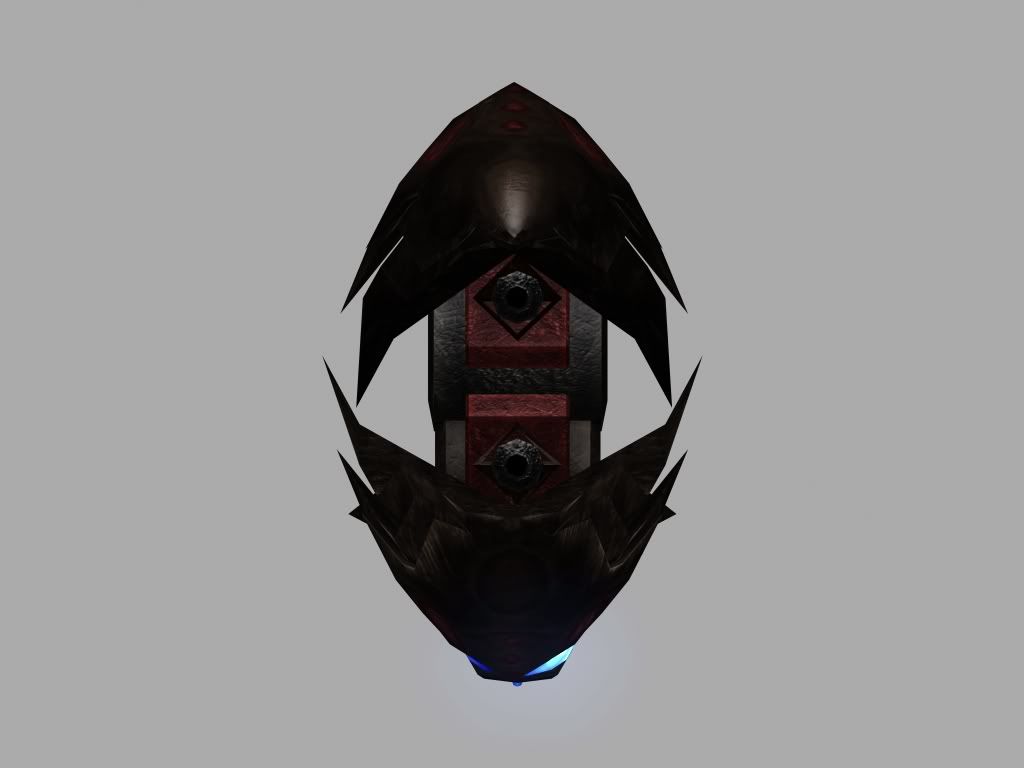 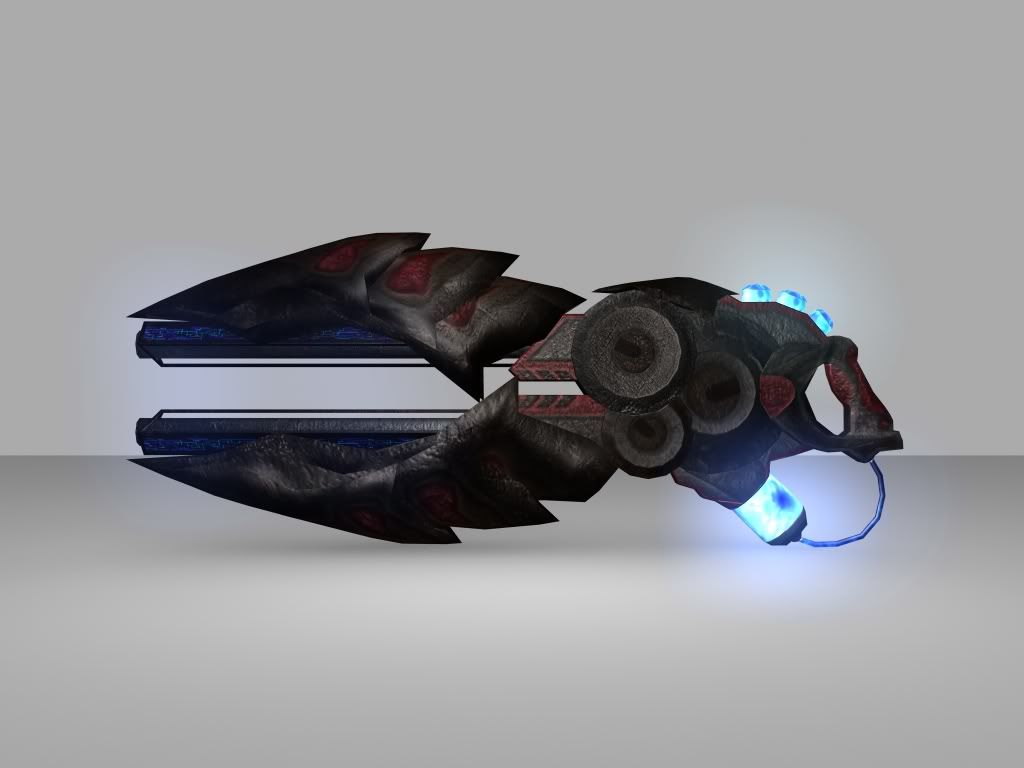 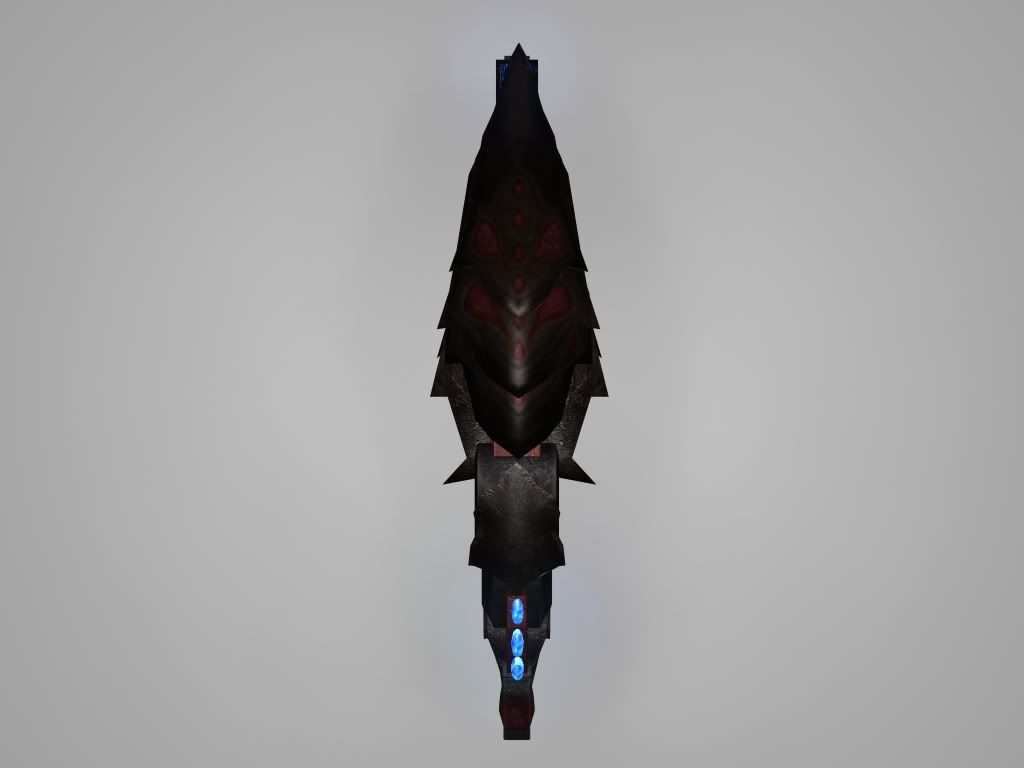 Regarding the texture, I am getting good reactions from my fellow students, but I am not happy with it. What do you guys think?
|
|
#
?
Nov 14, 2008 10:49
|
|
|
It's definitely a little dark and murky, glowing blue bits aside. It's hard to make out features on it.
|
|
#
?
Nov 14, 2008 11:40
|
|
|
I agree with SynthOrange. Lighter values, more hue variety and try making more than one type of metal. Preferrably different metals with varying bump, reflection and spec. Think about how a real gun has multiple types of metal and plastic. Here are the notes for Motionbuilder 2009 Autodesk 2009 Launch Event Carlsbad CA Nov 13th Sheraton Hotel (Autodesk recommends DELL laptops M6400 and M4400) Motionbuilder 2009 - Improved asset transport through the .fbx file format - Ragdoll physics can be combined with rigid dynamics (characters falling and breaking walls for example) New ragdoll -> approximation -> activate collision with rigid body (wall) -> physics solver (gravity) - Characters can interact with each other through constraints (each character can push/pull the other - double solve) - Imports cameras via FBX and allows you to setup shots in the story(board) tab. This is great for previz and supports transitions (crossfade etc) between shots. - Quicktime 7 or greater supports FBX and allows you to jump to different cameras/shots using a hotkey. QT will also show other FBX info such as: 1. FBX file info / stats 2. show skeleton / rig 3. show lights etc etc Being able to jump to different shots in the QT file quickly is great for previz / camera setup - Character definition tab allows for creation of �control rig� using Fullbody IK / Human IK. - Can create new effectors which control rig can �reach� towards (or reach towards the average of multiple effectors) - Expert mode for relative transform - FBX plugin exists for XSI but soon full integration will exist - Motionbuilder interpolation now used in Maya 2009 animation layers Shall I continue and post notes for Mudbox 2009, Maya 2009, Max 2009 and Toxic 2009? I don't want to clutter up the thread with info you could most likely get from Autodesk's site anyways. Most of the stuff you will probably figure out if you use the package or check out the preview videos posted for the 2009 products. However if you guys are getting anything valuable from my notes I will be more than happy to keep posting them. I even saw the famous "toad demo" for Mudbox 2009 today. They bragged about how the Mudbox 2009 demo was more popular than Carmen Elektra's appearance at SIGGRAPH . . . (I should hope so!!!  ) )
|
|
#
?
Nov 14, 2008 14:17
|
|
|
More stuff about XSI 2009 please.
|
|
#
?
Nov 14, 2008 14:33
|
|
|
Cornlight posted:I am just using 3dsmax. I've got a similar question involving a pop can in 3Ds Max. My can is already made, but I'm trying to animate it crushing. I've converted it to an editable mesh, or polygon (I'm at work and can't check right now) . I have auto key enabled, which perfectly keyframes the actual movements of the pop can (Lifting and rotating) My problem is I want to animate the mesh points because I'm moving them to crush the can. The mesh points don't seem to be reacting to me setting keyframes for them though. What can I do to animate the deformation of this shape? I want to push some parts in, pull others out, squish it's height, and basically go from a full pop can to one that looks as it if were crushed in someones hand.
|
|
#
?
Nov 14, 2008 14:38
|
|

|
ACanofPepsi posted:I've got a similar question involving a pop can in 3Ds Max. A stack with Edit Mesh at the top can't have animated subobjects, so I'd assume that the Editable Mesh object is restricted this way too. Edit Poly (and Editable Poly objects) can have animated subobjects, though using morph targets would be a bit easier to control than keyframes for individual vertices and such.
|
|
#
?
Nov 14, 2008 16:03
|
|
|
Handiklap posted:A stack with Edit Mesh at the top can't have animated subobjects, so I'd assume that the Editable Mesh object is restricted this way too. Edit Poly (and Editable Poly objects) can have animated subobjects, though using morph targets would be a bit easier to control than keyframes for individual vertices and such. This is great, hopefully I can get this working correctly today. Thanks for the help. http://update.multiverse.net/wiki/index.php/Creating_Morph_Animations_with_3ds_Max I found this article relating to using Morph, but do you know of anything else I might like to read about the topic?
|
|
#
?
Nov 14, 2008 16:29
|
|
|
ACanofPepsi posted:I've got a similar question involving a pop can in 3Ds Max. Look into morph targets - you can blend between multiple targets and use them additively (IE, make one bulge in spot A, and another that crinkles in spot B, and blend to both of them by 100% to bulge and crinkle). Morph targets are a good thing to learn about for animating faces and such, too. LiquidFusion posted:So I modeled and textured my very first weapon. Good for a student, but has tremendous room for improvement pretty much everywhere. Your noisy normal doesn't make sense and looks really bad - you didn't build any high poly geometry and you didn't make a proper heightmap etching features in - you really don't need a normal map. This thing shouldn't look pitted like that, it looks like its supposed to be metal. You aren't defining your materials well. I can't tell what it's made out of - with pitting like that it seems more like concrete. The red stuff is just a color swap, it doesn't read as a different material. Everything overall is too dark. The spec is softly diffused like plastic, even though I doubt this is a plastic gun. The color scheme is kind of awkward - bright blue and too dark a red. You might want to shift the blue towards a purple a bit if you're sold on red and blue. The color balance of the weapon is kind of wonky - move some blue to the front. Post a wireframe because that looks really low-poly for 3k triangles. My guess is that the cable on the back has an 8-sided cross section, which is about half of what it should have. Posting the unwrap is not a bad idea, either, along with the texture size.
|
|
#
?
Nov 14, 2008 17:36
|
|
|
ACanofPepsi posted:This is great, hopefully I can get this working correctly today. Thanks for the help. I suggest you get in the habit of using editable poly vs editable mesh. Also consider crushing the can with an animated lattice/FFD modifier. You can select individual verts and put a FFD modifier on that and then animate the FFD. Alternatively you can use FFD to shape your morph targets if you don't want to animate the FFD. SynthOrange: I brought up XSI 2009 and specifically asked how it fit in Autodesk's "pipeline" or what demographic it is pointing to vs Maya or Max. The answer was less than fantastic. The guy waffled a bit and basically cited the anymosity between Max and Maya users and said after a few years that was waning. After a few years XSI users will start feeling less angry and everyone will be happy with Autodesk's "buffet style" offering of 3d options. This is what I call dodging the question. The truth is they wanted to take down one of their main competitors and they wanted the tech. They wholly admitted to wanting facerobot, and the "real time" capabilities XSI offered. I imagined there was a lot more they acquired they're not talking about. I would LOVE to see mental ray's implementation in XSI across the board for autodesk's products. Mray was always fastest in XSI (love that render preview) because softimage was the first package Mray was available for. EDIT: As part of the Max2009 demo they showed how they could easily "roundtrip" the morph targets between Mudbox and Max. So you can easily sculpt anatomy for a flexing leg as an example and then send it back as a morph target even after the leg had been rigged and animated. EDIT 2: Minority Report GUI anyone? sigma 6 fucked around with this message at 20:16 on Nov 16, 2008 |
|
#
?
Nov 15, 2008 01:02
|
|
|
Weapon? Where's the dude holding that, some sci-fi thing without an guy to carry it is largely out of context. Not bad as an exercise.
|
|
#
?
Nov 16, 2008 22:11
|
|


|
Why does absolutely every vray render look like it's from the same artist? That turns me off to it - big time. I have never touched it because of this, seems like a point and click to render kind of whizzy wig bullshit. I never hear of it being used in the industry. Am I right? Or am I totally wrong?
|
|
#
?
Nov 16, 2008 22:56
|
|

|

|
| # ? May 16, 2024 17:28 |
|
|
Practically everyone in architectural viz uses it.
|
|
#
?
Nov 16, 2008 23:28
|
|