


|
Slung Blade posted:You could probably get your work into a local art show too Jovial. It's pretty awesome stuff. Thanks! I'll have my stuff at an artisan fair next month, and it'll be the first time I'll have my stuff physically on display for the public. We'll see how that goes. ")
|
 #
?
Nov 12, 2008 14:44
#
?
Nov 12, 2008 14:44
|
|


|

|
| # ? May 26, 2024 23:35 |
|
|
michigan jack posted:Chances are this is the result of gross abuse on my part. I have used this a hell of a lot since I got it and on big jobs that it's not meant for. Right now it is cutting through card material with ease and there has been a lot of use since it was sharpened last (which was actually the first time). I'm guessing that what I was doing was bringing the bottom corner (heel) down on something intentionally. Also, it may have impacted on some bullets (relatively soft copper coated lead) that were in a chunk of log that was being chopped. It could have been poorly tempered, and I'm not ruling that out. I'm thinking that I should run with the idea that it is properly tempered because I assume the fix would be more difficult than if it were just soft. Also, the well-tempered fix seems like it would also solve the poorly tempered fix. Assuming it is properly hard steel, what are my options? (keeping in mind that the head is fixed to the handle for good.) Maybe some kind of light pounding with a hammer made of really soft material like pure lead on a semi soft surface like the end of a piece of 4x4/log? Who sharpened it? Which of these best describes the edge when you look at it from the top? 
|
|
#
?
Nov 12, 2008 17:44
|
|


|
Slung Blade posted:Who sharpened it? Also in this vein, what was it sharpened with; a big rear end grinding wheel, a wetstone, lasers, a knife sharpening kit?
|
|
#
?
Nov 12, 2008 22:20
|
|

|
My dad sharpened it and I'm assuming he used a whetstone. I would trust him with sharpening anything and using the right tool for the right job. When I first got it, it had a razor edge on it which drew blood from a few people who examined it. I would say that the bevel is straight and maybe ever-so-slightly convex (but this could be an optical illusion). If I do try to flatten it out, any tips?
|
|
#
?
Nov 12, 2008 23:25
|
|
|
Convex is what you want, straight is ok, but not as good. Most axes are meant to take abuse, so they use a convex or fat edge. The hollow ground concave edges are sharp as hell, but they'll wear out really fast, there's not enough material there to support itself under heavy use for long. Whetstone sharpened is also good, if he used a grinding wheel or something that would introduce a lot of heat to the metal. So it sounds like it was sharpened correctly, which is great. Now, to straighten it, this may be tough. Do you have a workbench with a vise? If you have any round bar at hand, can you make some jaw covers for the vise? Two bars on one side, and one bar on the other gives a V shaped "press" you can use to push the bowed out side in while holding the base still. It allows you to make precise adjustments and you can see the edge through the whole process. If not, you'll need a very flat surface that is massive and hard. You should try to find a fairly soft hammer, and practice a bit before you swing, it's pretty easy to put a big divot in the surface of the axe if you hit it at the wrong angle. Slung Blade fucked around with this message at 00:52 on Nov 13, 2008 |
|
#
?
Nov 13, 2008 00:02
|
|
|
Something like this? Where the ax blade comes in from the top and the bars are used to press the deformities back into place with the bars?
|
|
#
?
Nov 13, 2008 01:52
|
|
|
michigan jack posted:Something like this? Where the ax blade comes in from the top and the bars are used to press the deformities back into place with the bars? More like this:  I'm not much of a draftsman, sorry. Day 6, lab day 5. Flat groove welds. 6010 1/8th root, 1 pass each of 7018 1/8th filler and cap. Wasn't really sure what to expect going into this one. I think I did pretty good for my first time trying it though. 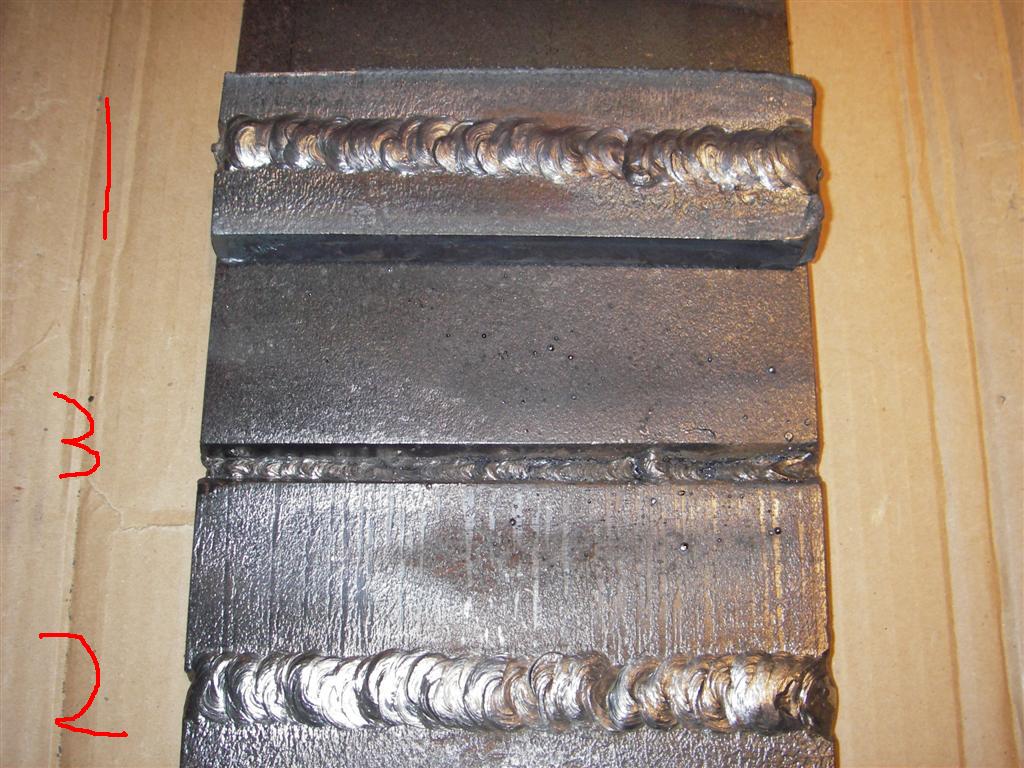 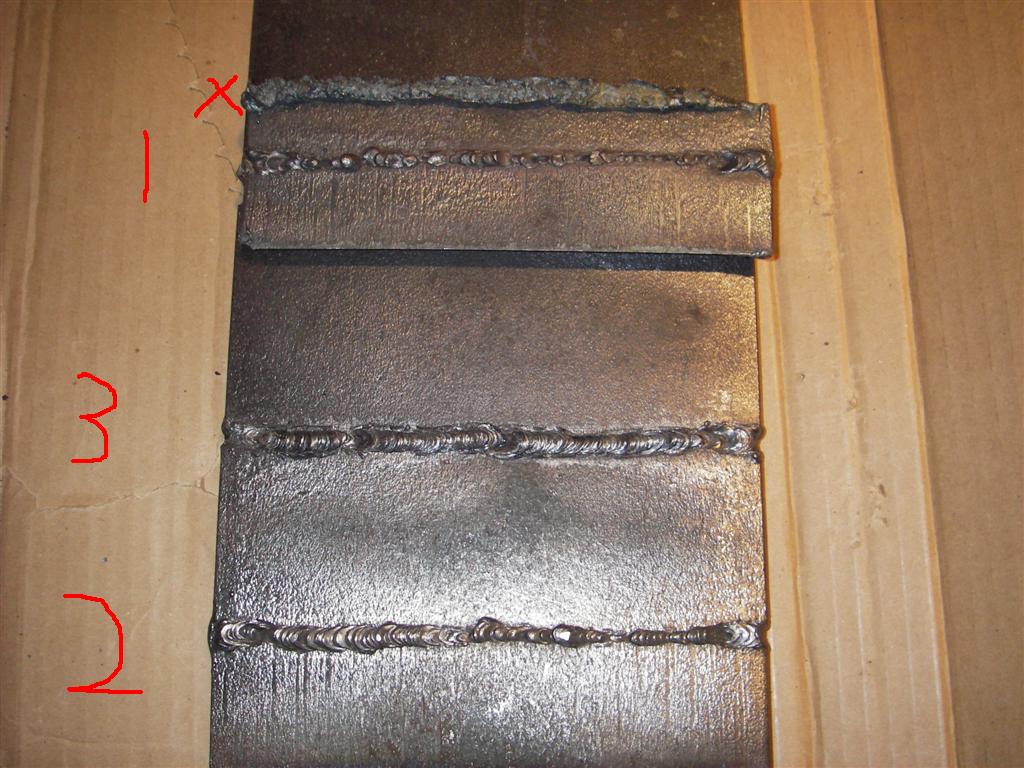 I kinda hosed up my root pass on #3 there with a bad tie in. #2's root isn't bad at the start, but I think I sped up towards the end and didn't let the 6010 burn in there well enough. #1 is pretty bad, but it was my first try and the plate warped on me when I tacked it and I didn't notice in time, so they're on different levels, that really screwed me up. The caps need more heat and a tighter weave, but I think the amount of material is about right. What do you think guys?
|
|
#
?
Nov 13, 2008 07:52
|
|
|
Slung Blade posted:What do you think guys? I think you need to work on your fit up. That gap looks way too tight.
|
|
#
?
Nov 13, 2008 08:47
|
|
|
SmokeyXIII posted:I think you need to work on your fit up. That gap looks way too tight. Maintaining a uniform keyhole size is also imperative. The right heat, and good fit up will make this easier, but your manipulation is also very important. Speaking of manipulation, are you using a whip or a U shape? BTW, what size lands and gaps does the teacher have you using, also what position? Oh, and speaking of welding school, I'll be finished Thursday of next week. I get to sit through OSHA training today and tomorrow.
|
|
#
?
Nov 13, 2008 13:36
|
|

|
I'm using a whip for the root pass. The gap is supposed to be 1/8th. What exactly do you mean by land? The height of the gap where the root goes in? If so, that should be 1/8th as well.
|
|
#
?
Nov 13, 2008 17:13
|
|
|
The land would be dimension "C" in the below diagram. Give a U shape whipping motion a shot, I find it easier to control the heat/keyhole size that way. It's sort of like a whip, but instead of whipping in the gap, you are whipping on either side of the metal. You control the heat by the speed you move at, and the size of the U shape. Sometimes, based on how the keyhole reacts, I may use both a U manipulation, and a standard whip.
|
|
#
?
Nov 13, 2008 21:07
|
|
|
Yeah, our land is just 1/8th tall. We don't have any U shaped grooves, we just use OA torches on radiographs to cut the bevels, so they're just plain straight lines.
|
|
#
?
Nov 13, 2008 22:47
|
|
|
You need a special machine that mills the steel for a U or J shaped groove, so they are not common. The reason a U or J shape groove is used in some circumstances is to produce a joint of the same strength that uses less weld metal. Less weld metal also means a smaller HAZ (Heat affected zone.) If the joint can be accessed from both sides, sometimes they use will a double V groove or U groove, which uses even less weld metal.
|
|
#
?
Nov 13, 2008 23:19
|
|
|
dv6speed posted:You need a special machine that mills the steel for a U or J shaped groove, so they are not common. The reason a U or J shape groove is used in some circumstances is to produce a joint of the same strength that uses less weld metal. Less weld metal also means a smaller HAZ (Heat affected zone.) Manually gouging U grooves is also quite common. I had to do it for those big vessels I posted earlier. 32' diameter 2 1/2" wall thickness. I passed a 2G tig test on 6" sch 80. I feel pretty good about it. I always forget to take pictures when i'm welding i get so excited to move on to my next weld. TIG is very fun, but slow. Filling the sch 80 took me 4 hours I would bet. Slung Blade posted:I'm using a whip for the root pass. And yeah, it's supposed to be 1/8" which means you should always be able to stick a welding rod through the gap. Keep in mind that when you tack your plates together that they will shrink which closes the gap so you have to account for that before hand by making it a c-hair wider than 1/8".
|
|
#
?
Nov 14, 2008 13:08
|
|
|
I did some work on that table this weekend. I drew a pile of options that I could do for the top rectangle and the leaves I made to fill it, but my parents (whom the table is going to) decided they just wanted something really simple.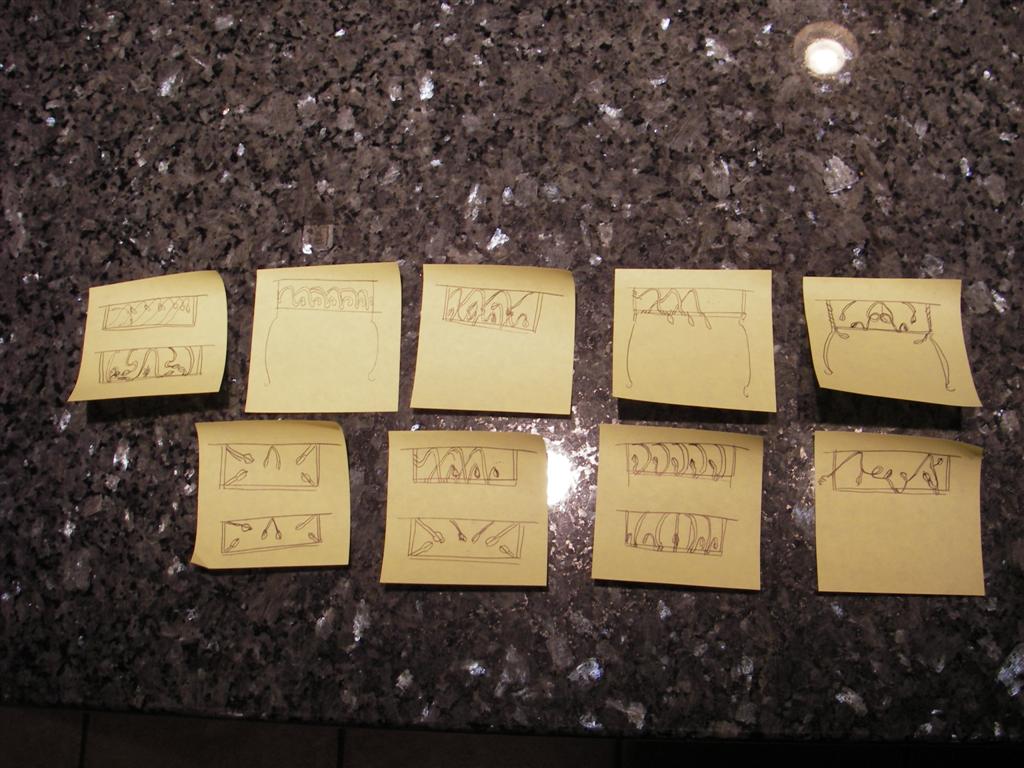 I like the one on the top right, personally. Wraps and coils and all kinds of neat stuff. But this is what they chose.  Also, I cut the scrolls on the feet, and leveled it out. One leg was slightly askew, so I fixed that as well. This week, it's going to the sandblasters and then I will paint it.
|
|
#
?
Nov 17, 2008 02:18
|
|
|
I think I can get into a welding course this summer. My father's interested in welding too.  Also, it turns out that the sweet old man we all have for a neighbor? Well, turns out in my case the dude was a machinist, and supposedly he still has a lathe in his garage. I am 100% sure if I ask him he'll teach me, and I'll probably end up with some decent cheese or something too. He's a really nice old grandfatherly italian dude.
|
|
#
?
Nov 18, 2008 18:44
|
|

|
That's awesome man, my dad sometimes helps me out when I'm at the forge, but not very often. I wish he'd come weld with me sometime. What process were you going to try?
|
|
#
?
Nov 19, 2008 00:00
|
|
|
Does anyone have any advice on drilling angled holes through a piece of stainless steel? I need to drill a series of holes equidistant, and all at the same angle (45 degrees in this case). I can't seem to get the bit to not wander (i'm using a pillar drill, and metalworking bits), is there a technique or a solution to this?
|
|
#
?
Nov 19, 2008 00:10
|
|
|
You can take a piece of wood or metal that is cut at a 45 degree angle, so the drill bit is entering at a 90 degree angle and not wander, but going through your work piece at a 45 degree angle. You'll have to either clamp, glue, or weld the block onto your work piece.
AbsentMindedWelder fucked around with this message at 00:52 on Nov 19, 2008 |
|
#
?
Nov 19, 2008 00:26
|
|
|
Slung Blade posted:That's awesome man, my dad sometimes helps me out when I'm at the forge, but not very often. I wish he'd come weld with me sometime. He's keen on oxyacetylene welding, because the equipment's pretty cheap. I'm thinking more MIG or SMAW. I've got some projects in mind that are essentially sheet metal fabrication, for which it seems MIG would be nice, but it really seems like SMAW is the jack of all trades. He's not so keen on spending the cash on a nice Miller. edit: I kinda think he likes oxy-acetyl welding because he's kinda cheap. I'm not so keen on it, it seems like it's been largely replaced by SMAW. Paul MaudDib fucked around with this message at 03:11 on Nov 19, 2008 |
|
#
?
Nov 19, 2008 03:07
|
|
|
What size sheet metal? With SMAW your base metal thickness can't be thinner then the electrode diameter. This means you are limited to 3/32", maybe 1/16" if you can find any electrodes that small. You can weld sheetmetal with o/a welding and a little patience. If you want to to arc, then it'd be MIG or TIG.
|
|
#
?
Nov 19, 2008 11:37
|
|
|
dv6speed posted:What size sheet metal? With SMAW your base metal thickness can't be thinner then the electrode diameter. This means you are limited to 3/32", maybe 1/16" if you can find any electrodes that small. This won't be an immediate project, I'm not stupid enough to think that I could jump into a project that huge. But, someday I'd love to make pulsejet engines for model aircraft, which will need some pretty decent stainless. 16-14 gauge for some of the stronger sections, I would guess. Interesting, I didn't know that SMAW had that limitation. Are there any such limitations on MIG? How big would be needed to do some stainless that thick? It seems like that would be a stretch for a MIG setup's power, since I know stainless conducts heat better.
|
|
#
?
Nov 19, 2008 20:27
|
|
|
If you are going to be doing alot of small and specialized work like that, you'll want to start thinking about a TIG machine. You can weld all the metals like stainless or aluminum very nicely, and work on very small parts. It will do larger stuff too, and a good TIG machine will work as an SMAW power source as well. (Both TIG and stick use constant current power sources) That being said, stainless and aluminum can be done with MIG as well, but TIG does a better job with it. That all being said, a machine that does TIG/SMAW is much much more versatile then a MIG machine. The only major downside is it takes longer to lay down your weld metal, but you're not running a business so that shouldn't be an issue. AbsentMindedWelder fucked around with this message at 20:59 on Nov 19, 2008 |
|
#
?
Nov 19, 2008 20:56
|
|
|
dv6speed posted:TIG This. In addition, make sure it's AC. You need AC TIG to do aluminum welds effectively. DC TIG works on steel and stainless steel though.
|
|
#
?
Nov 19, 2008 21:40
|
|
|
Slung Blade posted:You need AC TIG to do aluminum welds effectively.
|
|
#
?
Nov 19, 2008 21:55
|
|
|
I'm currently halfway through "Modern Welding" by Althouse, Turnquist, Bowditch and Bowditch. Great book, but one small problem. They talk about good fitup before welding and mention "tack welding" but never tell you how to do it. There's a bit on spot welding with FCAW or GMAW that they say can also be used for tack welding, but they've been talking about tacking since O/A in chapter 5. Is a tack weld just "melt a pool and stop?" If not, how do you tack weld with O/A? I've had the money to get an O/A and a FCAW/GMAW rig for a bit now, but don't have any place to put it nor fabricate. I'm going to be doing some silver soldering this week with MAPP, though, so at least I can make SOMETHING with metal. Note: It's good to finally know that there's no difference in technique between soldering and brazing, just the filler metal used and temperature to which the base metal is raised.
|
|
#
?
Nov 23, 2008 08:11
|
|


|
It depends if there's a gap or not. If not, then yeah, just start welding as you would normally, but stop after you get a puddle started and the two pieces are barely joined. If there's a gap, I don't know how these pros do it, but when I tack weld with OA, I just lay the filler rod across the gap I need to tack (provided it's big enough) and melt it all. I pre-heat the sides first though, then stick the filler in there and let it melt just as the base metal reaches temperature. The timing can be tricky... TIG would probably be the same way, not sure, never done it. With arc, same kind of idea, start on one side of the gap, and try to build up a tiny bridge to the other side. Smokey, dv6, how do you guys do it?
|
|
#
?
Nov 23, 2008 09:17
|
|
|
Pretty cool thread here, but not enough casting stuff. Me and my mate used to do a lot of bronze casting with pretty dodgy furnace setup (concreted flowerpot and hairdryer for air). The casting was done by lost wax with a colloidal silica investment, you can use plaster but its a bitch to get dry enough, at is more brittle. The stuff we did was artistic stuff. All this makes me feel like getting back into it all. I'll try and get some pictures off my friend of the process to post here.
|
|
#
?
Nov 23, 2008 14:47
|
|
|
Well, how to tack weld all depends on the joint configuration, the welding process being used, how strong the tack weld needs to be, and if the tack weld will be part of the final weldment or if it will be remelted when doing the final weld. In short there's no one single way to do it. In industry, tack welds are covered by a WPS (Welding Procedure Specification) just like a normal weld. That being said, for most of the stuff I'd assume you'd be working with, anyway you can get the pieces to stick together should do the trick. When using O/A or TIG, you may or may not need filler metal. If you will be welding over or grinding out the tack welds as you approach them, you want to make them small as possible. If you weld over a tack weld, make sure that it gets properly melted and fused to the final weld. Keep in mind the purpose of the tack weld is to hold the weldment together in the proper configuration for final welding. When you weld, the heat in the metal causes distortion. You want to make sure the tack welds are strong enough that they don't break under the forces caused by distortion. I'm not sure if that answers your questions or not, so feel free to ask more. babyeatingpsychopath posted:I'm going to be doing some silver soldering this week with MAPP, though, so at least I can make SOMETHING with metal. There is a difference between silver bearing solder, and silver brazing alloy. Most people who say "silver solder" really mean silver brazing. True silver solder is a low temp alloy that is typically used for soldering electronic parts. Any alloy that melts below 800F is solder. Any alloy that melts above 800F is brazing. Now there is a difference between "brazing" and "braze welding". Both, however, are done at temps above 800F. Brazing works just like soldering, because both use capillary action to distribute the alloy. This is why a very tight fit up is required to make strong joints. Braze welding however, does NOT use capillary action. It works more like normal fusion welding as far as laying down a weld bead goes, except you are not melting the base metal. Braze welding and brazing use different alloys. Alloys that come in a coil or spool like solder are usually for brazing. Alloys that come in a rod form, are usually used for braze welding. AbsentMindedWelder fucked around with this message at 15:03 on Nov 23, 2008 |
|
#
?
Nov 23, 2008 14:49
|
|
|
Simpo posted:Pretty cool thread here, but not enough casting stuff. I started working on building a new crucible furnace for melting iron, so some details about that will soon follow. Oh by the way, I finished welding school this past Thursday.
|
|
#
?
Nov 23, 2008 14:51
|
|
|
Congratulations on finishing your course dv6! Regarding tack welds, it's important to remember that while the weld will cause dimensional distortion, the tack welds themselves can also cause the join to pull or shift and you will have to take that into account before you make your tack. For doing the TIG pipe I want a 5/32" gap, so what I do is shove a 5/32" rod in there and then wiggle it just a little so its a sloppy 5/32". After you put the first tack on it should have snugged back up to be a nice 5/32". If you're working on plate keep in mind that the tack welds can pull your fit up off of square. So check fit up after each tack, at least till you're experienced enough to trust what you've done, since the fit up is basically the most important part of being able to produce good welds. I'm testing tomorrow for my carbon steel, and chrome TIG tickets. Doing a 2" XXH pipe in a 6G. I'm looking forward to it, but admittedly I haven't been practicing enough because a certain video game had a certain expansion and a certain welder is a giant nerd.
|
|
#
?
Nov 23, 2008 20:00
|
|
|
Way to go Dv6, you told me the other day, but that's still a great achievement. I finally finished that table I've been working on. I wirewheeled and zircon disked the poo poo out of it to clean it all up. Then I put some really thin black paint on it, like 6:1 black paint to thinner ratio. Sanded that with a sponge after it dried. Finally, I put 4 layers of clearcoat on it. I think it turned out pretty good, what do you guys think?  I was also playing around with something new, iron roses. The holidays are coming, and it never hurts to get used to making these, the ladies seem to like them. First effort: 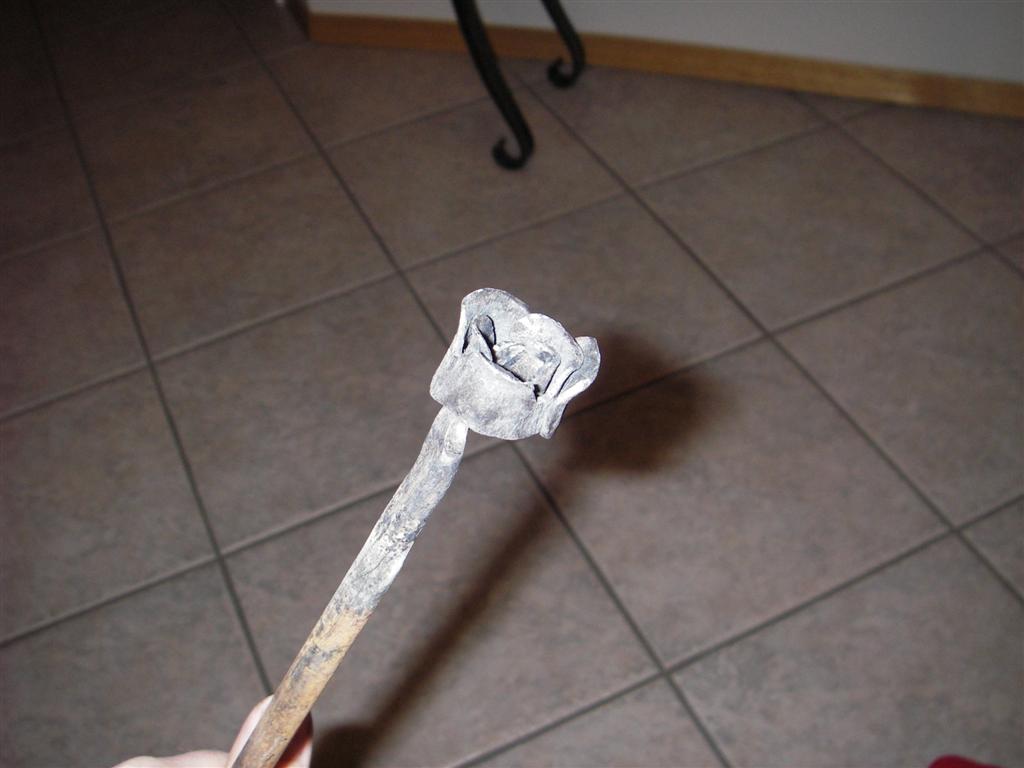 Pretty lovely. Second effort: 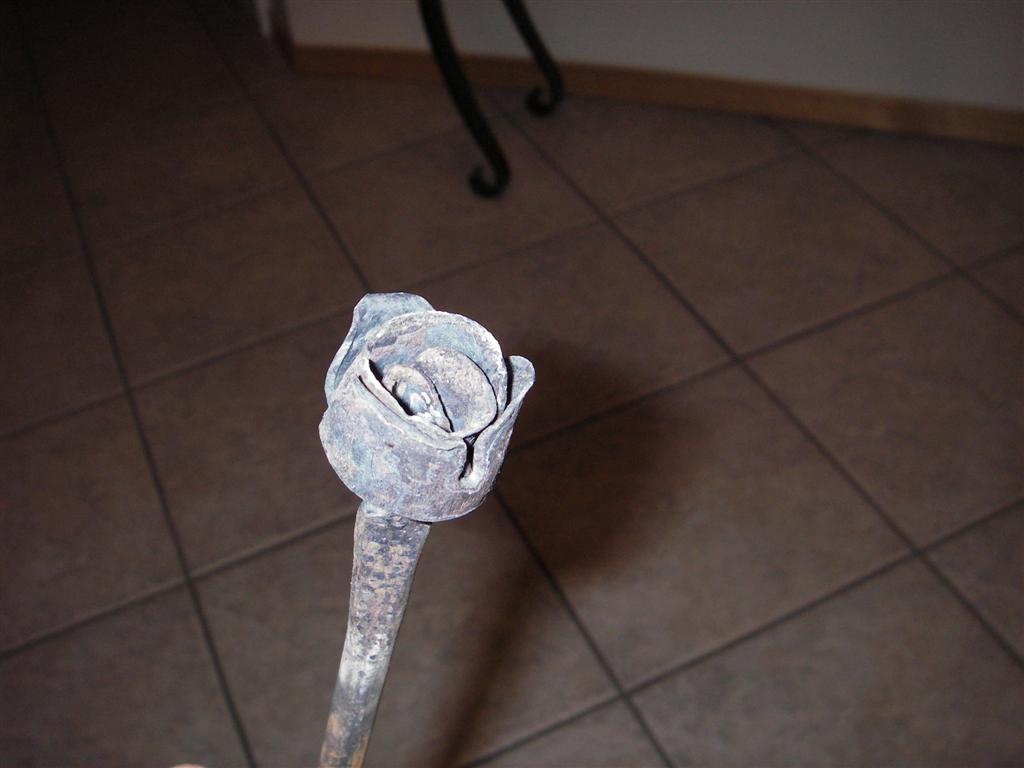 Not bad. I'm going to make as many as I can next weekend.
|
|
#
?
Nov 24, 2008 02:09
|
|
|
Very nice work there. So tell me, how do you make an iron rose?
|
|
#
?
Nov 24, 2008 02:13
|
|
|
dv6speed posted:Very nice work there. First, you take about 6-8 inches of 3/8" or 1/4" round bar and flatten it out just a bit. It should be about 1/2" an inch wide where you flatten it. It will be roughly 10-12 inches long once you're done. Then, you need a fuller. I finished this thing today as well, but I didn't take a new picture:  One side I ground and filed round, the other side sharp. To do the roses, you need the round. Take the hot bar that you just flattened and put some notches in it at a slightly random distance, not more than an inch, not less than 1/2". Knock it down to half way through the bar. After you have something that looks like a really huge, blunt saw, use a hammer with a really pronounced crown or a rounding hammer if you have one, and spread the petals out, make them thin at the top. Use a lot of heat, this thin poo poo will cool off really fast. After that, start rolling the stem on your anvil to bunch it all up. Feel free to use a few light hammer blows if you get some bad kinks in it. Once you have the bud, use some pliers (I used some 3 dollar powerfist pliers I ground the teeth off of) to bend the tops of the petals over so it looks like a flower. More on the outside petals, less on the inside ones. Pretty simple, really. Edit: now I just need to figure out an effective way to clean them... Slung Blade fucked around with this message at 02:45 on Nov 24, 2008 |
|
#
?
Nov 24, 2008 02:42
|
|
|
Slung Blade posted:Edit: now I just need to figure out an effective way to clean them... Acid! I don't actually have any advice on how to do it, or what kind. But it would probably be the best bet. SmokeyXIII fucked around with this message at 22:24 on Nov 24, 2008 |
|
#
?
Nov 24, 2008 22:20
|
|
|
SmokeyXIII posted:I'm testing tomorrow for my carbon steel, and chrome TIG tickets. Doing a 2" XXH pipe in a 6G. I'm looking forward to it, but admittedly I haven't been practicing enough because a certain video game had a certain expansion and a certain welder is a giant nerd.
|
|
#
?
Nov 24, 2008 22:39
|
|
|
dv6speed posted:So how did you do today? Great! Probably the nicest TIG root I've ever put in, and the chrome stick fill and cap looked pretty sweet too. Funny thing though, the instructor had to leave mid class, so I have to go back in the morning for the bend test. I'm very very confident it will bend cleanly. The other guys started welding stainless and it looks like it will be fun to do. It really just melts in like butter when it's going well. The "when it's going well" is the real trick I think. Anywho I'll have to update you again tomorrow!
|
|
#
?
Nov 25, 2008 03:57
|
|
|
I passed! but just barely. There was some porosity in the cap. Turns out 9018 is a bit notorious for that and you have to be really careful with your arc length. The cap looked really nice and everything but holy jeez was it close to failing. Dumb porosity. Anyways, I'm a Chrome TIG welder now.
|
|
#
?
Nov 26, 2008 02:35
|
|
|
Congrats Smokey
|
|
#
?
Nov 26, 2008 07:26
|
|
|

|
| # ? May 26, 2024 23:35 |
|
|
Awesome news SmokeyXIII! Welding stainless steel pipe should be fun... I hear it's quite a challenge. Which of course, is why pipe welders in the food and dairy industry makes tons of $$$.
|
|
#
?
Nov 27, 2008 02:05
|
|