


|
Small grinding questions: Can I safely switch the direction of the grinding wheel? It's a tiny grinder and I have worn one edge much more than the other. I'm using this grinder if it matters: http://www.harborfreight.com/cpi/ctaf/displayitem.taf?Itemnumber=43533 Also on this grinder I am going through the fiber wheel fast, and got a replacement set of wheels http://www.harborfreight.com/cpi/ctaf/displayitem.taf?Itemnumber=43758 Is the fiber wheel something I am likely to find by itself? Or is that grinder just too small to get replacement wheels anywhere but at Harbor Freight?
|
 #
?
Nov 28, 2008 05:33
#
?
Nov 28, 2008 05:33
|
|

 EVERYTHING I SAY ABOUT JAPAN OR LIVING IN JAPAN IS COMPLETELY WRONG, BUT YOU BETTER BELIEVE I'LL
  ABOUT IT.
|

|
| # ? May 11, 2024 12:23 |
|
|
I'd be hesitant to say yes. Does the wheel have a manufacturer's sticker that tells you what direction it's supposed to spin? What speed do you run it at? It says it's adjustable. Can you move the grinding wheel and the guards to the other side of the motor?
|
|
#
?
Nov 28, 2008 08:36
|
|


|
kapalama posted:Can I safely switch the direction of the grinding wheel? It's a tiny grinder and I have worn one edge much more than the other. Grinding wheels do wear with use, sometimes unevenly, which can be a problem. You can use a tool called a "wheel dresser" to clean up and true the grinding wheel. Note this type of wheel dresser will only work for bench grinders. The wheel dresser will also remove metal impregnations from the wheel if some bonehead uses your poo poo with the wrong type of metal.  kapalama posted:Is the fiber wheel something I am likely to find by itself? Or is that grinder just too small to get replacement wheels anywhere but at Harbor Freight?
|
|
#
?
Nov 28, 2008 14:36
|
|

|
Grainger has everything but you'll pay for it. MSC has a lot of stuff.
|
|
#
?
Nov 28, 2008 15:25
|
|

|
3" grinding wheel, for the amount of effort you'd put into even constantly reversing the wheel as it gets worn on one side you could get a n 8" grinding wheel that will last much longer and for which wheels are very cheap and readily available. An 8" grinder that has two wheels on it already should only cost you about $50 <it will not be an excellent one at that price, but will likely 'feel' better then the results your getting from your 3" now> replacement 8" wheels will cost you about the same ammount as those replacement 3" ones.
|
|
#
?
Nov 28, 2008 21:54
|
|

|
Linux Assassin posted:3" grinding wheel, for the amount of effort you'd put into even constantly reversing the wheel as it gets worn on one side you could get a n 8" grinding wheel that will last much longer and for which wheels are very cheap and readily available. An 8" grinder that has two wheels on it already should only cost you about $50 <it will not be an excellent one at that price, but will likely 'feel' better then the results your getting from your 3" now> I know you are right, but where I am staying right now, the 'management'does not like big equipment. If there was a change in management, and I could get an 8 incher, where could I find a fiber wheel, like I linked above, but sized as an 8"? I have not seen fiber wheels at Home Depot.
|
|
#
?
Nov 29, 2008 03:34
|
|
|
kapalama posted:I know you are right, but where I am staying right now, the 'management'does not like big equipment. http://www.harborfreight.com/cpi/ctaf/displayitem.taf?Itemnumber=39406
|
|
#
?
Nov 29, 2008 05:13
|
|
|
Great thread! Very neat stuff. I'm actually in the process of converting my charcoal gingery furnace to a propane fired furnace. Charcoal, coal etc. are fun and cheap, but man is it ever a pain in the rear end. (This coincidentally mirrors my move to kegging the beer I make. Bottles are nice, but I just want delicious beer.) I'm using the "Reil Burner" design, hopefully it will put out the BTU's to make aluminum melt, and be able to forge steel... Now I just need an anvil. Anyone know where to pickup an antique 150-200 pounder in the MD/WV/PA area?
|
|
#
?
Nov 29, 2008 06:06
|
|
|
Hu Fa Ted posted:I'm using the "Reil Burner" design, hopefully it will put out the BTU's to make aluminum melt, and be able to forge steel The Reil burner will melt aluminum, however whenever you are using propane, the size of the furnace and the efficiency of the refractory are key. You can find calculators that based on the orifice size of the burner and the PSI of the propane how many BTU's it is putting out, assuming a neutrally adjusted flame. You can also find numbers on how many BTU's it takes to melt X pounds of aluminum in a given time frame. The missing number you'd need to do some hardcore calculations would be the refractory heat loss coefficient, which if you have a homemade refractory, would be impossible to come up with. In any event, calculating the burner BTU's will still give you a rough idea of what you can do with it. Homemade refractory is nice and cheap, but I have to admit, an efficient furnace made with commercial materials of known quality and properties, in the long run will have cheaper TCO (total coast of ownership) with the increased fuel savings. Hu Fa Ted posted:Anyone know where to pickup an antique 150-200 pounder in the MD/WV/PA area?
|
|
#
?
Nov 29, 2008 15:11
|
|
|
kapalama posted:Small grinding questions: Remember that if you grind aluminum and then steel it is possible to create an explosion. I believe the heat gets under the aluminum which gets covered by steel shavings causing pressure to build up or something. We learned it in class when we were doing millwrighting.
|
|
#
?
Nov 29, 2008 18:36
|
|
|
Well actually it's not that going from aluminum to steel on the same wheel that is a problem so much as most grinding wheels are only meant for one type of metal. You are never supposed to use wheels meant for ferrous metals on aluminum, period. The problem is that the aluminum is too soft and impregnates itself onto the wheel, which creates hot spots that the wheel can't handle. These hotspots are what causes wheel explosions. You use wheels meant for ferrous metal on ferrous metal only. You use wheels meant for aluminum on aluminum only. So and and so forth. You don't need to switch metals on the same wheel to blow it up, just use the wrong metal on the wrong wheel and viola! There are a few wheels out there that will work on multiple metals, but they would be labeled as such, and I haven't seen one with my own eyes yet.
|
|
#
?
Nov 29, 2008 18:44
|
|
|
Are there actually wheels made for grinding aluminum? (I have never used a grinding wheel on aluminum, just a file. And it clogs the file so fast.) Actually come to think of this question, are there files made for aluminum?
|
|
#
?
Nov 29, 2008 21:32
|
|
|
I do a little medieval armor work if people are interested in that. Work mostly with 14-16 gauge stainless steel, usually cold. Going forward I'm gonna be attempting to do some bits in spring steel, which means heat treating 4130 mild and opens a whole new can of worms.
|
|
#
?
Nov 29, 2008 23:11
|
|

|
kapalama posted:Are there actually wheels made for grinding aluminum? (I have never used a grinding wheel on aluminum, just a file. And it clogs the file so fast.) Yeah of course. They're either finer, or coarser than a typical wheel/file to prevent the aluminum from getting caught up in it. I can't remember which it is, but I have a feeling it's more fine.
|
|
#
?
Nov 29, 2008 23:38
|
|
|
SmokeyXIII posted:They're either finer, or coarser than a typical wheel/file to prevent the aluminum from getting caught up in it. I can't remember which it is, but I have a feeling it's more fine. kapalama posted:Actually come to think of this question, are there files made for aluminum? Stormtrooper posted:I do a little medieval armor work if people are interested in that.
|
|
#
?
Nov 30, 2008 00:22
|
|
|
Stormtrooper posted:I do a little medieval armor work if people are interested in that. Work mostly with 14-16 gauge stainless steel, usually cold. Going forward I'm gonna be attempting to do some bits in spring steel, which means heat treating 4130 mild and opens a whole new can of worms. Absolutely man, always interested. Post away! I made 2 more roses today, these ones actually have leaves. lovely leaves, but the roses are easily the best ones I've made so far. Images to follow as soon as waffle comes back 
|
|
#
?
Nov 30, 2008 04:27
|
|
|
Made some non-commissioned art. Unless somebody buys it from me in the next two weeks, I'll have this on display at a local artisan fair, along with the rest of my stuff: Tree of Life: 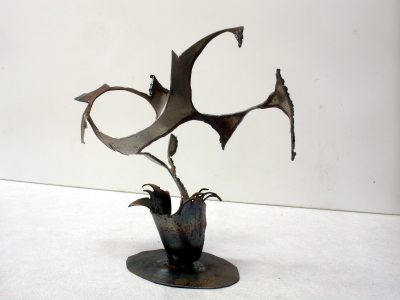 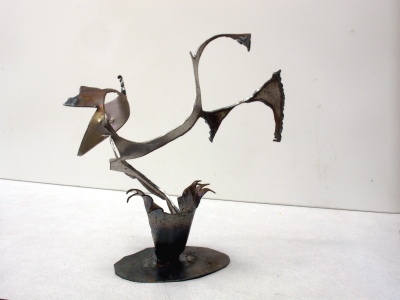
|
|
#
?
Nov 30, 2008 04:34
|
|

|
That's awesome Jovial. Are you going to make a tree of death out of wire to sit next to it? That might be kinda neat. I'm going to use tiny pic, I hope that's ok. Can't find anything against that.  
|
|
#
?
Nov 30, 2008 05:30
|
|
|
Slung Blade posted:Are you going to make a tree of death out of wire to sit next to it? That might be kinda neat. Oh. That is a good idea. Roses look great, by the way.
|
|
#
?
Nov 30, 2008 05:34
|
|
|
dv6speed posted:How big is your furnace, and what refractory does it use? It's a standard Gingery charcoal furnace. Instead of a five gallon bucket, (which in our time is made out of unobtanium) I used a five gallon shrimp boiler. Fairly ugly and I'm not terribly attached to it. I used Bentonite and Fireclay in the proportions that Gingery suggested. It works well, but man is burning with BBQ charcoal nasty. Hardwood charcoal is better, and easier to deal with and junk coal is just downright out. Not only all of these points, but I have a well ventilated shop and it'd be nicer to work in there than outside. I will put together a nice safety area... I was thinking either a sandbox or a huge chunk of plate steel around the pouring area. dv6speed posted:The Reil burner will melt aluminum, however whenever you are using propane, the size of the furnace and the efficiency of the refractory are key. Excellent points, like I said I'm not terribly attached to it, but it seemed to work well... I also figured if it wasn't efficient enough to melt AL I'd use it for forging. I've been thinking of welding up a nice forge/foundry furnace and lining it with Kaowool and ITC-100/200. dv6speed posted:Place an ad up on craigslist saying you want an anvil. That's how I found mine. http://www.anvilfire.com/FAQs/RR-rail_anvils.htm That was a head slapper. I can't believe I didn't think of it. I've been using my RR track and hating every second of it, believing it was the best I had for now. I even have an antique post vise that would work ferpectly.
|
|
#
?
Nov 30, 2008 15:52
|
|
|
Hu Fa Ted posted:It's a standard Gingery charcoal furnace. Hu Fa Ted posted:I've been thinking of welding up a nice forge/foundry furnace and lining it with Kaowool and ITC-100/200. Even if the kaowool doesn't shrivel on you (which is what ceramic blankets do when exposed to too high a temperature), not using a hotface will severely decrease the useful life of the furnace/forge. Hu Fa Ted posted:I also figured if it wasn't efficient enough to melt AL I'd use it for forging. The efficiency doesn't have anything to do with the burner, but the insulating ability of your refractory. Kaowool, with a thin hot face, and a coating of ITC100 is very efficient. Also keep in mind to get peak efficiency, you need to have the furnace properly sized for the crucible you plan to work with.
|
|
#
?
Nov 30, 2008 17:09
|
|
|
I got my smithy/metal-workshop mostly finished. It was actually finished a while ago, but I never took the final pictures.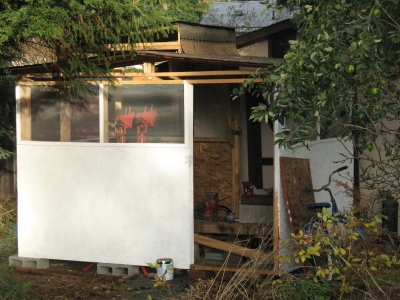 And now the entire roof is up, and much of the outside is painted. I haven't gotten all the windows screened up yet, and I still need to line the interior with sheet metal to keep it from burning down if any rogue sparks get away from my work.  Here's a shot of my welding area, viewed from the entrance of the smithy. My welding "table" is actually three chunks of 4" square tubing that are pressed against each other (I'll weld the tubes together eventually) on top of some cinder blocks.  Here's a shot of the welding work space from behind my welding chair. I plan to do some reconfiguring of the space eventually, but everything seems to work well at the moment. All of my tools are within reach, and I'm protected against the elements. It's a fine workspace.
|
|
#
?
Nov 30, 2008 17:17
|
|
|
jovial_cynic, Got a ventilation system in there?
|
|
#
?
Nov 30, 2008 17:58
|
|
|
dv6speed posted:jovial_cynic, Does open air count? The walls are only 4' high, and then it's wide open with screen. The roof is open on the sides as well, allowing any rising smoke to escape. And that entrance doesn't currently have a door, but when it does, it'll just be a screen door.
|
|
#
?
Nov 30, 2008 18:01
|
|
|
jovial_cynic posted:Does open air count?
|
|
#
?
Nov 30, 2008 18:12
|
|
|
I dipped my roses in vinegar overnight, they're actually bubbling away this morning. The bottom of the glass is covered in scale flakes too. Hopefully I can just use a steel brush and go over the petals by hand to clean them up in a few hours. I like your shop Jovial, but yeah, get a fire extinguisher. Or a big bucket of water or something.
|
|
#
?
Nov 30, 2008 18:46
|
|
|
dv6speed posted:A fire extinguisher would be a fantastic idea too. Oh, I have one there. ")
|
|
#
?
Nov 30, 2008 22:50
|
|
|
Been a while since i last posted itt. My next project will be smithing a knife out of a shotgun barrel. It is twelve gauge, and about ten inches long. Any suggestions on what to do? I have never forge welded something this big.
|
|
#
?
Dec 1, 2008 00:59
|
|


|
Why forge weld it at all? Why not cut it down the middle and make 2 knives?
|
|
#
?
Dec 1, 2008 03:51
|
|
|
Slung Blade posted:Why forge weld it at all? Why not cut it down the middle and make 2 knives? Shotgun barrels are very very thin.
|
|
#
?
Dec 1, 2008 03:58
|
|
|
dv6speed posted:I know of it, but I'm not familiar with it. How big of a crucible does it hold? dv6speed posted:If you are going to be building a furnace you will have to put a hot face of non-insulating castable refractory over the kaowool. If you don't, even with the ITC100 coating, it will shrivel up like a raisin when you take the furnace to metal melting temps, especially if you want to melt anything besides aluminum, which trust me, you will want to do. This is also true for a forge that you may want to do forge welding in. Can you recommend a good castable refractory for this application? I want to be safe of course, but not bust the bank. So far the most money I have made from my hobbies has been stupid poo poo like, "hey could you plasma cut OPS into a piece of 1/4" steel shoot it and weld a base on it". I'm sure as time goes by I'll acquire a clientele, but for now most of this is just experimentation and pure loving joy.
|
|
#
?
Dec 1, 2008 07:01
|
|
|
Ok, here's a bit about my dabbling in armor. First off I just want to say that I'm an amateur. There are real professionals out there who create true art. My work is at the level of "functioning". Anyway, here's a couple pieces that may be interesting. I'll write a little about what everything is the techniques employed to make 'em. Click for bigger pictures. First is a helmet called a bascinet. This was popular throughout the 14th century. Depending on region and decade, you'll find different types of visors attached. A type you are probably familiar with is the "pig face" - the one with the big cone "nose". My rendition has a barred visor because I use it for sport combat. One of my next projects will be building a solid visor (the visors are swappable without tools - can be done in the field). Right now it has a short chainmaille 'aventail' as a test. I picked up a full size stainless link-welded one that'll be attached soon to complete the look. This is my 3rd attempt at the bascinet. This one has the most "correct" shape. The helm is built from two top halves and a lower skirt, so 3 pieces total, welded together. Typically I would do the rough forming of the halves myself manually with a hammer, but this particular helm was built to withstand a beating, so the top halves are 12 gauge stainless steel (~0.1 inches thick) - it was formed with a die press and then fine tuned by hand. The most skilled armorers can take a single steel disc and form it into a bascinet with essentially only a hammer and a heat source.  This is your basic greathelm, most popular in the 13th century through early 14th. This one is modeled after a later period helm. Often, this helm was actually worn over a tight fitting bascinet (without visor) or steel skullcap, particularly for jousting. Two top halves and two bottom segments, and a top cap. Entirely held together with rivets.  These are arms in the 14th century style. The forearm part is called a vambrace. It has two halves attached with a hinge and secured shut with a strap and buckle. The central elbow section is called a couter. These were made in two halves because I'm a cheater. Next time I'll raise 'em out of a single piece. The upper arm section is called the rerebrace. Both ends have a rolled edge. The inset picture shows them in the closed position. All the buckles are hand made.  Next are the legs, again in a 14th century style. These are 3/4 legs, that is they don't cover the lower shin. I have armor for the shin as well (greaves) but it is not pictured and is a separate piece. Similar design to the arms. Nice centerline crease.  This is a corazzine - body armor in a style originating in the late 14th century and early 15th. It is aluminum (again, a concession for sport combat) covered with velvet. In the medieval times, body armor was often covered in silk or velvet as a sign of wealth, and to prevent rust. Presents a typical robust-chested figure that was quite stylish both in armor and clothing of the period.  And finally, just for fun, some sabatons. Articulated in a way similar to the arms and legs above. Made out of 20 gauge stainless steel (~0.0375 inch). Brass rivets and red leather strapping for that high class look. Inset is a demonstration of the range of motion.  That's about it. I made most of these pieces within the last year, but I've been working with armor for a good 5 years (not steadily unfortunately), and there are a lot of lesser versions of the above pieces. I'm happy to talk about materials, tools, and techniques, etc, just ask. I also have in-progress pictures of many of these pieces. Some words about my next goal. It is interesting to note that most historical armor barring specialty pieces was actually quite thin, in the 18-20 gauge range (0.0375-0.05 inches). In addition, modern steel is an entirely different animal than what they had back then. A close approximation is actually wrought iron, a material that no longer sees use today, at least in general. Fun fact: a lot of medieval armor of poor or moderate quality was melted down and turned into fences and who knows what else, after it became obsolete. My work pictured above is all stainless steel with an average gauge of 16 (0.0625 inch). This means that while its form may be somewhat accurate, materially, it shares few similarities. Therefore, the cutting edge of modern armor is focused on spring steel. This is steel that has been tempered/hardened/heat treated. This process allows the usage of thinner (and thereby more accurate) material without sacrificing protective ability. 20 gauge spring steel will not dent under heavy blows, while 20 gauge regular mild steel can be easily deformed with one hand. The problem with heat treating is you need at least a basic knowledge of working with heat and the facilities to do it, and this presents a significant barrier to entry. But, nonetheless, I have a big sheet of 4130 steel sitting in my shop waiting to be turned into armor. I've got access to a little home-built foundry that I hope I can use to do the heat treating, but my knowledge in this area is dreadfully limited. We'll see how it goes. Your thoughts are welcome. Stormtrooper fucked around with this message at 09:42 on Dec 1, 2008 |
|
#
?
Dec 1, 2008 08:33
|
|
|
Stormtrooper, That is some nice work. I know almost nothing about working with and forming sheet metal, except for welding it. I'd love to know some more info about your tools and techniques. I don't plan on making armor, but sheet metal is drat useful stuff. Hu Fa Ted posted:I want to move up to the ceramic crucibles though. I'm not real impressed with the concept though (of the Gingery style pot furnace), I think it would behoove me to move to a foundry that allowed for horizontal insertion and removal of the crucible. I haven't lost an eyebrow yet but gottdamn does that poo poo ever get hot. I forget what which page, but somewhere in this thread I posted a link to the place I purchased my crucible. They have pretty good prices. I personally don't recommend horizontal crucible insertion. That makes it impossible to add metal, drop in flux, etc. It also complicates furnace construction. You want a round furnace to promote even heating, and higher efficiency. I also think withdrawing the crucible is not as safe due to the type of tongs you'd have to use. Hu Fa Ted posted:Can you recommend a good castable refractory for this application? I want to be safe of course, but not bust the bank. I bought a 55lb bag of Versaflow 60 Plus from my local HWR distributer (about a 30 mile drive for me) for something in the order of $33 something + PA sales tax. I also bought my Inswool blanket from HWR as well. If you don't have a distributor within driving distances there are some companies on the internet, such as Ellis custom knife works, Budget casting supply, anvilfire, etc that sell some HWR products, but with a significant mark up price. I'm not sure if HWR themselves will ship their products or not. AbsentMindedWelder fucked around with this message at 17:11 on Dec 1, 2008 |
|
#
?
Dec 1, 2008 17:07
|
|
|
I did a little blacksmithing this past weekend. I made a leaf keychain. The picture is a little fuzzy but you get the idea. It has a paste wax finish to prevent rust. The wax is liberally applied when the steel is hot enough to melt it, and then buffed with a waxy paper towel.  The other thing I attempted to make this weekend was a failure, so we won't talk about that.
|
|
#
?
Dec 4, 2008 05:07
|
|
|
If anyone has any machining type question id be more than happy to indulge you. I am a manufacturing engineer specializing in machining design and processing. I also do a fair amount of work with industrial brazing applications. I noticed there were a lot of machinists in here, but id be happy to answer your more technical questions, or whatever you'd like. Im also pretty drat handy with both manual machines as well as CNC machines. pocketpencil fucked around with this message at 07:36 on Dec 7, 2008 |
|
#
?
Dec 7, 2008 07:28
|
|
|
I've got a quick question, fellas. Today I needed something a bit less powerful than my oxy/acetylene torch for small scale work so I went and picked up a Bernzomatic JTH7 hosed torch assembly and, since it was only a dollar more than standard size, a disposable Fat Boy canister of MAPP gas. Upon arriving home and reading the labels/accompanying paperwork ran into this gem on the can: "Use only with torches designed for MAPP gas that does not utilize a hose." WTF? This is thoroughly confusing considering I have seen this product packaged with the new trigger-lit hosed torch assembly they are using to phase out the JTH7. The valve on top of the canister looks standard. I don't know what they would be referencing or why a MAPP torch (hose or not) would not be compatible with a disposable MAPP tank of the same brand. Any ideas? Is it a non-issue or should I just go out and buy a couple of standard sized canisters in the interest of not blowing poo poo up?
|
|
#
?
Dec 7, 2008 19:54
|
|

|
Welcome to the thread man, always glad to have some more machinists. Dv6 and a few others asked for a step-by-step of the rose making process, and I put it up last week, but it's not very visual. So I tried to take some photos yesterday. I took the technique from anvilfire, http://www.anvilfire.com/iForge/tutor/mills_rose/index.htm but the pictures there are awful Start with 3/8th rod about this long.  Flatten out the end.   Use a fuller or a dullish hardy tool.  Knock notches into the rod with the fuller, go at least 1/2 way through.  Flatten out the petals. I usually do this on the horn with a rounding hammer.  Bend the petals 90' to make them perpendicular with the "stalk". Start turning them. I do this on the face of the anvil with a pair of ground-smooth needle nose pliers. The initial roll can be difficult to start, so sometimes I use a cross peen hammer in the L shaped shoulder where the horn meets the anvil body.  Notice how loose the bending is? it can be quite difficult to get a nice tight turning of the petals with just pliers. So, once that's done I heat it back up and use light blows of the hammer to pack it and tighten it up. Twist it in the direction of the twist you put in the petals, so you always end on the trailing edge of the outside petal when you complete a circle. If your flower is slightly oblong, you can fix it now. This is much tighter and neater.   Heat it up again and splay out the petals. This takes a long time, I'm lucky if I can do 1 or 2 petals per heat. This thin stuff cools off very quickly.  I like to the thin down the stalk, put a leaf on it, and bend it so it looks a little more organic. The 3/8th rod is way too thick for a stalk anyway. Bend it in half and wrap the leaf around the stalk. You can put a point on the end if you want to stick it in that flower arrangement foam stuff or whichever.  If you have any questions, please ask.
|
|
#
?
Dec 7, 2008 20:01
|
|
|
TantricPenguin posted:"Use only with torches designed for MAPP gas that does not utilize a hose." As long as the torch is made for MAPP gas, I think it'll be fine. I would probably test it outside first tho, just to be on the safe side.
|
|
#
?
Dec 7, 2008 21:16
|
|
|
dv6speed posted:I would probably test it outside first tho, just to be on the safe side. Done and done. (I manned up after my initial post and just went out back to test.) All is good. In a day or two I'll post pics of what I'm working on.
|
|
#
?
Dec 7, 2008 22:48
|
|
|

|
| # ? May 11, 2024 12:23 |
|
|
dv6speed posted:I personally wouldn't be concerned. MAPP gas is MAPP gas, and no matter what size cylinder it's in, it'll have the same pressures and valve/threads. I think the reason is there are idiots out there who will hook anything up to anything.
|
|
#
?
Dec 10, 2008 06:35
|
|