


|
 hay guys acetylene is the same thing as natural gas rite? hay guys acetylene is the same thing as natural gas rite?Glad you were careful TantricPenguin, how did that thing you were working on turn out? We need more pictures in this thread from someone other than me.
|
 #
?
Dec 10, 2008 18:49
#
?
Dec 10, 2008 18:49
|
|


|

|
| # ? May 11, 2024 06:58 |
|
|
Slung Blade posted:We need more pictures in this thread from someone other than me. OK! Three recent figurines I'm particularly proud of: Three Wishes:  Cuddly Alien:  Going Up: 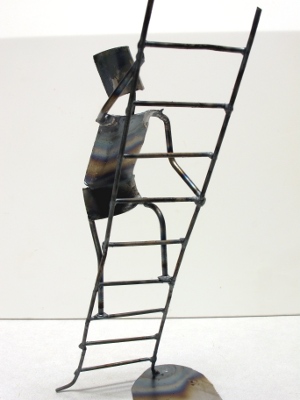
|
|
#
?
Dec 10, 2008 18:53
|
|

|
Slung Blade posted:
Not too well, actually. I was going to try sand casting some brooches (since I can't afford a centrifugal caster for lost-wax) but because the roomie that was supposed to help me and I were fighting and I only have two hands I couldn't keep the metal hot enough to get past the sprues before it cooled. So I started screwing around making freeform ingots by pouring molten bronze into a bucket of water and think I may be able to do something with that. I'll see if I can't whip something up and get some pictures posted this weekend. Jovial Cynic: The alien is adorable! I've got the clockwork brontosaurus you did in August displayed proudly on my dresser. It was a gift from my boyfriend, who commissioned it from you.  Dinosaur + welded steel = best birthday present ever. Dinosaur + welded steel = best birthday present ever.
|
|
#
?
Dec 10, 2008 20:43
|
|

|
I started a blog to document progress with my machine shop as well as promote my business. On the site is some tips for metal working and I will be posting links to information I find interesting, cool projects, and whatever I like related to machining. http://kylesmachineshop.blogspot.com/
|
|
#
?
Dec 10, 2008 23:35
|
|

|
RealKyleH posted:I started a blog to document progress with my machine shop as well as promote my business. On the site is some tips for metal working and I will be posting links to information I find interesting, cool projects, and whatever I like related to machining. Very nice. i think you NEED a 6 axis milling center personally before you can call it a machine shop!
|
|
#
?
Dec 11, 2008 01:26
|
|
|
pocketpencil posted:Very nice. i think you NEED a 6 axis milling center personally before you can call it a machine shop! My 5 axis is a 3 axis with a ball endmill and the words "close enough."
|
|
#
?
Dec 11, 2008 02:29
|
|
|
Haha, i hear ya. There really has only been 2 or 3 applications ive run into where a 6 axis was absolutely necessary. Everything else can be done on 5 axis.
|
|
#
?
Dec 12, 2008 01:41
|
|
|
Ehn, that's what files and dremels are for.
|
|
#
?
Dec 12, 2008 17:38
|
|
|
pocketpencil posted:Haha, i hear ya. There really has only been 2 or 3 applications ive run into where a 6 axis was absolutely necessary. Everything else can be done on 5 axis. haha I know of plenty of times when a 5axis is necessary but have yet to use a 5xais machine much less a 6 axis. What is the 4-6th axis you're using anyway? A rotary head and a tilting spindle?
|
|
#
?
Dec 14, 2008 04:50
|
|
|
Depends on the machine ( got 2 different types) -one is a rotary chuck (4th) rotary table (5th) and a gimbling table( gimbles in y-axis)(6th) -another one does all except table rotation on the spindle head. So basically the tool can rotate and cut at and angle relative to the z axis. The only time ive even seen a 6th axis HAD to be used was an integrated turbofan blade. This was where the blades were all one piece along with the central mounting hub. There were some spots where only the 6thn axis could get to it. Also, it was made of a superalloy so tool loads were really goofy in some spots without the 6th axis. It was a 36 hour cut, with no re-fixturing available due to the tolerances involved.
|
|
#
?
Dec 14, 2008 17:20
|
|
|
Could someone explain what all 6 axis would be?
|
|
#
?
Dec 15, 2008 06:06
|
|
|
The first three are simple if its a milling machine, first two on a lathe. After that you get some options. I have very little experience outside of theI guess you could call the primary axis On a milling machine: X is left to right for the table along a ball/lead screw Y is Front to Back for the table Z is up and down but there are different ways to do it. You can move the table up and down like on a knee mill. You can move the spindle up and down like on a knee mill, or you could move the whole head up and down like on a machining center. Past that you have rotary tables  Rotary/indexing heads 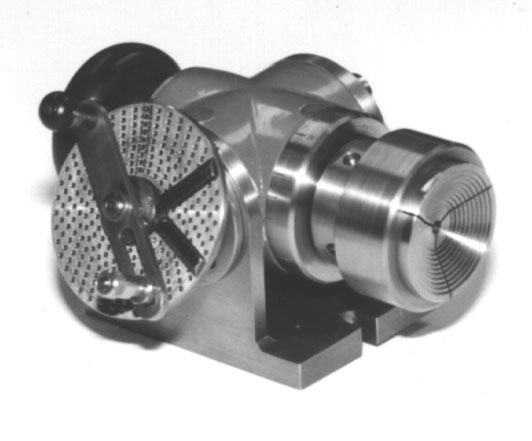 5 Axis machines where the sindle/head tilts in various directions: 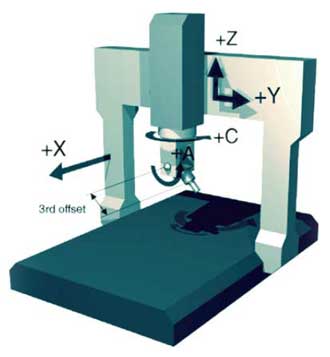 That's a milling machine setup. I have been into machining for two years and I don't even know what a gimbling table is. What is that? I think a pallet changer may count as an axis but I am not sure. For a basic lathe you have 2 axes. Z and X. Z is left to right, X if front to back (like removing material) AnomalousBoners fucked around with this message at 06:22 on Dec 15, 2008 |
|
#
?
Dec 15, 2008 06:17
|
|
|
dv6speed posted:Not that I know of, you use regular files, you just have to clean them out more often with a file brush. "Stormtrooper posted:*neat armor* I've got the plans and the materials to build: http://www.crankorgan.com/brute.htm My original intent was to run it as a manual mill. Maybe I'll do that next week. I need to "make stuff" to feel good. So I tend to make stuff pretty frequently. Tonight it was making aluminum headgaskets for my moped. (I'll let you guess what the aluminum came from...) I also made base gaskets... but those were fiber, and don't belong being discussed in a metalwork thread.
|
|
#
?
Dec 15, 2008 06:43
|
|

|
pocketpencil posted:Depends on the machine ( got 2 different types) I can see how you could articulate the rotary device along all 3 axis, but you can get equivalent motion using just the tilt and rotation, while simplifying the setup and increasing rigidity and repeatability. Nowadays, at least according to HAAS, they combine the rotary chuck and table into one item, since for most fixturing, a trunnion table 4/5th axis combined device is able to machine 5 sides of a part and depending on tooling and clearance, some of the underside. I suppose you could also articulate the mill head in addition to the trunnion table, but that's such a weird bastard setup that most CNC software systems aren't even able to adequately program for it. I can see how on something really bizarre like those new GE turbofan blade assemblies would you need to be able to rotate the part through that many axis in order to profile the backs of the blades properly. And given the retardedly low machinability of almost all superalloys like waspalloy or haspalloy, 36 hours of machine time seems about right for that much material removal. God that block must have cost a loving fortune. Nerobro posted:I've got the plans and the materials to build: http://www.crankorgan.com/brute.htm My original intent was to run it as a manual mill. Maybe I'll do that next week. Oh god, please don't build anything using aluminum as a structural component if you're doing more than doing CNC etching and milling of PCBs and other really light duty stuff like that. Good rule of thumb is if you can flex a 6 foot section of it enough to notice, it's a lovely material to use as the basis of your milling machine. While those extruded aluminum channel rods are great for a quick and dirty setup, they'll be about as accurate as an echa-sketch and a patient 5 year old. I might be a bit of a fanatic about this, but I play with CNC machines for fun at school, and there is really a hugely complex and detailed science and techniques behind building a proper tool. Just for shits and giggles, I'll walk through how I'd build my own mini-mill. 1) Use grey cast iron for pretty much everything structural. The table, base, guides and ways (the parts the rub together when the table moves on an axis), and head assembly would all be made out of grey cast iron blocks. 2) Machine all the parts in a CNC mill, or if one is unavailable a manual mill with a backlash eliminator and a digital readout. 3) Use a surface grinder and a set of master's tool squares to make sure that everything is flat, square, parallel and true. 4) Use a big loving surface plate and dial height gauge to make sure that everything is all flat and kosher. 5) Buy pre-ground ball bearing drive screws and nuts, way easier to spend the cash and get top notch quality than try and halfass it myself and end up with a table that moves non-uniformly. 6) Use dowel pins for the drive screws and nuts to insure that the table is driven in a way that's perfectly parallel with the ways, otherwise it'll bind and do odd poo poo. This is just off the top of my head, but the major things to look for is squareness (if you don't have a granite surface plate or know a place you can use theirs at, don't expect your mill to cut poo poo on a straight line or anything close to 90 degrees. Next is rigidity, if you can bend it, those motors you're using to move the table around probably can too, and will if you gently caress it up or press too hard. Attention to detail is critical, a tiny fuckup, like a few thousandths of an inch (impossible to see outside of certain circumstances, like holding a steel rule up to a block and looking for light) can cause consistent or even non-reproducible errors in anything you try to do later. This means that little circuit you tried to make will end up having either bad traces, or holes that won't line up with the ICs. Methylethylaldehyde fucked around with this message at 13:10 on Dec 15, 2008 |
|
#
?
Dec 15, 2008 12:54
|
|

|
Since I bought all the parts before I knew better, there's no reason not to try. There's no reason to expect better than .005 from it, as that's the runout on a dremmel anyway. ;-) One of the major points of that mill, is to be built using basic handtools. Throw out your CNC wishes and break out the files, hacksaw, and scrapers. That's "almost" what I'm doing. I at least have a bandsaw to start with. Using threaded rod instead of ballscrews is a 100:1 price ratio. The question of the day is, is threaded rod less accurate over 9" travel than the slop in the dremel's bearing? Also fine threads (relatively.. they're 1/4-20) are more or less self locking. That makes the hold torque of the steppers less critical, or means I could leave the handwheels alone while making a cut. And the other side of things, is I won't be the first to build one. They're seem to work pretty well. You're using a cutter at high speed, so the forces aren't all that great. We'll see how it turns out. :-) ... and I do have access to a granite plate. We shall see what kind of parts it will turn out. Nobody who's built them has posted anything describing what sort of real accuracy they get. (as in, they've never said what the part looks like when measured out beyond using a micrometer. Without comparing flat sides to a surface plate who knows how straight it is) That will be fun to find out. Nerobro fucked around with this message at 20:55 on Dec 15, 2008 |
|
#
?
Dec 15, 2008 19:53
|
|
|
Nerobro posted:Since I bought all the parts before I knew better, there's no reason not to try. There's no reason to expect better than .005 from it, as that's the runout on a dremmel anyway. ;-) If it's just for fun type thing, yeah, I can see how real accuracy wouldn't be too much of an issue. One trick for the threaded rod is to buy a die set that includes that thread type, and use it to insure the threads are at least formed properly. The threaded rod you get at home despot and poo poo is rolled, and it can be a bit of a bastard to use sometimes thanks to non-uniform thread height, depth and spacing. Chase the threads out with your $20 in tooling and the rod will work a lot better. Same with the nuts, better to be sure the mass produced stuff you bought is exactly to spec, plus the tools never really go bad, and you need to start your collection of stuff eventually. Apparently this little mill includes pretty much every trick I know to get more accuracy out of the system without needing really special tools to do so. This is good. Aside from the obvious lack of rigidity or ability to use it like I use a normal CNC mill, it's a pretty neat little project to get set up in a week or two.
|
|
#
?
Dec 15, 2008 20:43
|
|
|
My threaded rod didn't come from mcmaster. Not that I really trust it. I'll definitely take a die to it, I hadn't thought of the thread form being screwy. Given I buy good taps.. that could be a bit of a bind.
|
|
#
?
Dec 15, 2008 21:03
|
|
|
Nerobro posted:My threaded rod didn't come from mcmaster. Not that I really trust it. I'll definitely take a die to it, I hadn't thought of the thread form being screwy. Given I buy good taps.. that could be a bit of a bind. They're shipped bulk, and they're made on a worn out machine in china someplace that cranks them out by the metric asston. They're probably banged around enough during shipping that they've got oblong sections of thread or mashed over thread crests. I've had threaded rods that wouldn't go over the really lose nuts you buy from home depot, even after chasing out the threads with a good tap. The rod I bought was so bad that I ended up having to use a nut to physically straighten the threads before the die would do more than chew the entire rod up. And I was using the rod to make a hanging shelf for the underside of my desk, not a precision tool. Methylethylaldehyde fucked around with this message at 21:43 on Dec 15, 2008 |
|
#
?
Dec 15, 2008 21:40
|
|
|
RealKyleH posted:
Its a wacky setup where the table is mounted on what looks like a ball bearing. It can rotate 360 degrees and tilt up to around 65 degrees while indexed to any of the 360 degrees of rotation. If you are familiar with how a rocket motor moves, it is somewhat like that. However, these machines are VERY uncommon and only work for very specific applications (fan blades etc.) As for the block of superalloy, the guy told me it cost around 50k for a 3'x3' billet, because not only was it superalloy, but it has an unusually high level of Rhenium in it. No clue what it was, this was some defense application that would require high hot hardness of the material. From what i saw solid carbide end mills were lasting about 35 seconds before failure. In an ideal case, you wouldn't want to go this way because rigidity can be a hassle, but sometimes there really isn't a choice. EDIT: cast iron is also a great vibration dampening material. I would however be cautious of making everything REALLY heavy. you can get to a point where your machine no longer becomes effective/accurate if its too heavy for the motors and control system you are using. But as was mentioned before. MAKE drat SURE EVERYTHING IS LEVEL/STRAIGHT. I CANT STRESS THIS ENOUGH. ive got applications that i work on where being out of level by a ten thousandth of an inch will literally make it impossible for my machinists to hit tolerances. pocketpencil fucked around with this message at 06:10 on Dec 16, 2008 |
|
#
?
Dec 16, 2008 05:51
|
|
|
Cleaned and painted some roses last night.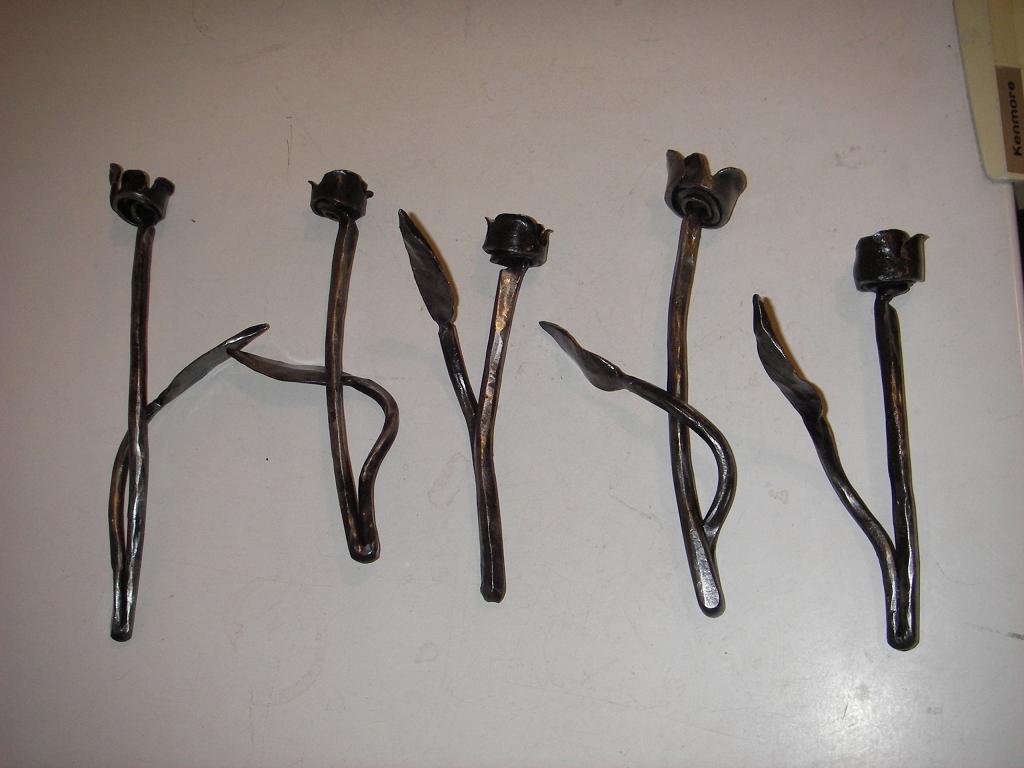 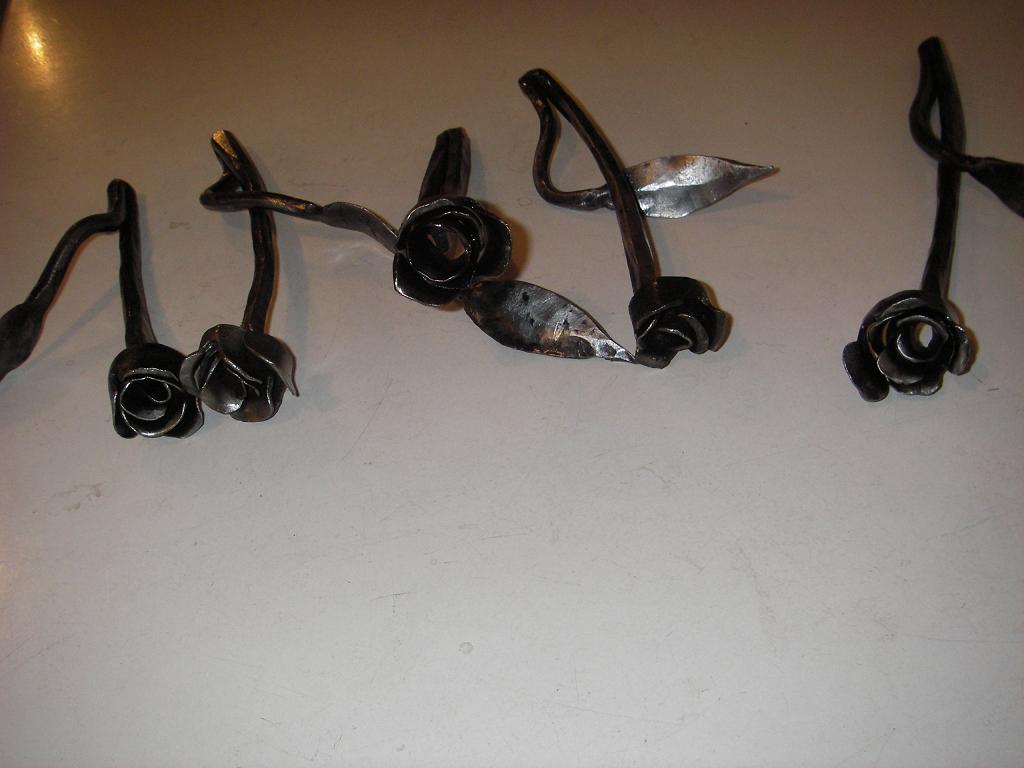 There's a bit of rust in the centre, but there's not much I can do about that. I don't have any brushes capable of getting in there to clean it out.  Plus you can't see it unless the flash illuminates it.
|
|
#
?
Dec 19, 2008 07:28
|
|
|
Slung Blade posted:Cleaned and painted some roses last night. You were not joking, those are drat awesome! So, those for a special someone?
|
|
#
?
Dec 19, 2008 07:31
|
|
|
Vegetarian posted:You were not joking, those are drat awesome! So, those for a special someone? Unfortunately not. I made them for a friend at work. I made the mistake of taking pictures to my job. 4 guys were all "ooooo can you make me some for christmas?" Which is fine, I like making these things. 
|
|
#
?
Dec 19, 2008 07:57
|
|
|
Got my lathe wired up and chuck on. Need some hydraulic fluid and of course everything is closed until Monday so no parts made yet.
|
|
#
?
Dec 20, 2008 02:20
|
|
|
Nice roses there SlungBlade! An update to my search for a welding job after school: I am scheduled to start working at a place that works on rail cars the first week of January. It's pretty much maintenance and repair. Yay! I'll finally have money... not having worked since March, I almost forget what money is. But more importantly, I have been accepted as a shipyard welding apprentice and will start that gig in April. I'm very excited about this. It's a fantastic educational opportunity, gives me 30 college credits, and is the absolute top pay rate I can get as a new, inexperienced professional welder in this area. The other nice thing is that even tho it's a state approved apprentice program, I get my journeyman papers in 3 years instead of the normal 4.
|
|
#
?
Dec 21, 2008 16:58
|
|

|
What is your opinion on 115v welders? I'm not talking about low amp knock-off brands, but welders such as this and this. I know they are pretty weak but Are they powerful enough at all for home use? I might try building things like metal furniture and banisters. Have any of you tried spray transfer? I use it a lot at my new job and it's an amazing process. I love making a neat, fat bead that I could only otherwise make with several passes. It makes so much heat that the first time I did it I melted off plastic lens cover!
|
|
#
?
Dec 22, 2008 07:52
|
|
|
Bigos posted:What is your opinion on 115v welders? I'm not talking about low amp knock-off brands, but welders such as this and this. I know they are pretty weak but Are they powerful enough at all for home use? I might try building things like metal furniture and banisters. Haha I did that once on a job test. Melted the lens right to the helmet and I had to get a new helmet. Those machines are okay, though I would never get one personally. If all you intend to do is small stuff around the house then yeah I suppose it will work for you but I have a feeling that sometime in the life of the machine there will be a job you can't do with it. And that's the sort of thing I would personally take into consideration when buying a machine. I want the first machine I buy to also be my last. Spray transfer is neato. I've only done it in school, and on the job a few times so I'm not too experienced with it. I've been doing a lot of TIG lately though and while it's nice its also a pain in the rear end. The tool crib will only issue 3 tungsten at a time so I have to go back in the middle of the day to get them resharpened. Which sometimes takes a few hours due to the distance I have to go, and then the distance they have to go combined with their lack of motivation makes it a slow process. But that's why they pay me by the hour.
|
|
#
?
Dec 22, 2008 08:53
|
|
|
I don't know what your situation is, but if it's at all possible to get a 220v outlet installed you need to do that. The most important tool to a welder is electricity. BTW, if you're in the market for a wire feed welder, Miller is just about to come out with a new machine called the Millermatic 211. It looks to be a real nice machine for home or light industrial use. It works on both 110v and 220v circuits, and has all the bells and whistles you'd ever need. I've used spray transfer before with gas shielded flux core at school. I expect to be using it alot more at the shipyard. It's definitely a high production rate process. You can't get your head too close, and I remember wishing to myself that I had aluminized welding gloves. What sort of place do you work at Bigos? SmokeyXIII, they don't let you grind your own tungsten? Do you ever have problems with the tool room guys doing a bad sharpening job?
|
|
#
?
Dec 22, 2008 15:59
|
|
|
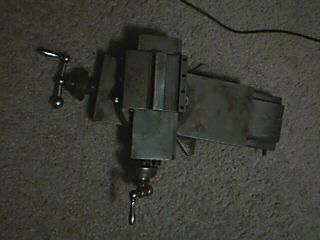  What you're looking at is the tool traveller for a bench lathe. It's my neighbor's, he was teaching me how to use it, and the screw that clamps the turret of the traveller and prevents it from rotating the tool holder has stripped its threads. I literally cannot find what holds it in. I want to pull the entire turret off to drill and retap the holder, but I can't figure out how the loving turret comes off the traveller. Is there any more or less "standard" design for these? It's an ancient tank of a lathe, labelled "Hayden Machinery, Wallingford, Conn" and "Cataract Bench Lathe, Hardinge Bros, Elmira NY" edit: It looks like this, except with the name plates, not repainted, and a 3-jaw chuck. Belts running through the table, which is metal instead of wood like the pic, with an ancient 230v AC motor powered by an electric motor-generator setup he rigged to convert it from 110v. I don't know why his house doesn't burn down, there's no way that poo poo meets code.  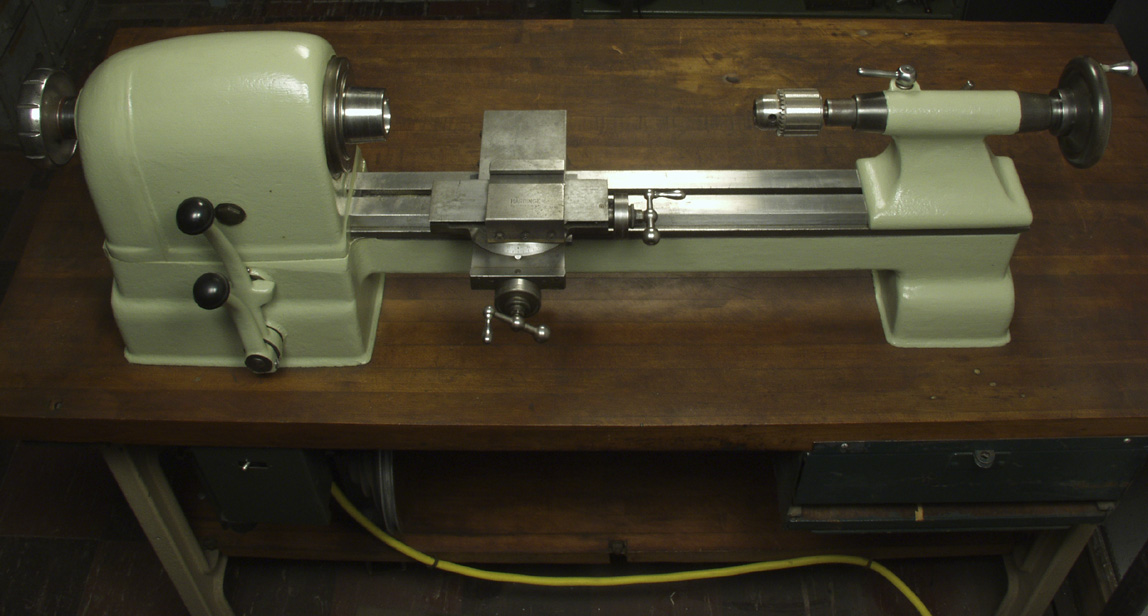 Click here for the full 1148x616 image.  Click here for the full 669x616 image. edit2: pardon my mspaint, my neighbor is 82 or thereabouts, so I'm probably using the wrong terms for things. This is how he showed me, red is the forward-back traverse, orange is the turret traverse, so rotation, yellow is the side-to-side traverse, green is the baseplate for the tool holder, blue is a crazy tool-holder-holding clamp he worked up to fit in that little slot, indigo is the tool holder, purple is the tool. I need to figure out a way to get the yellow and above away from the orange and the orange away from the red (or possibly just the orange away from the red, I'm not sure how it fits inside) so we can get this thing to come apart. We spent an hour unscrewing screws and none of them made this thing fall apart. 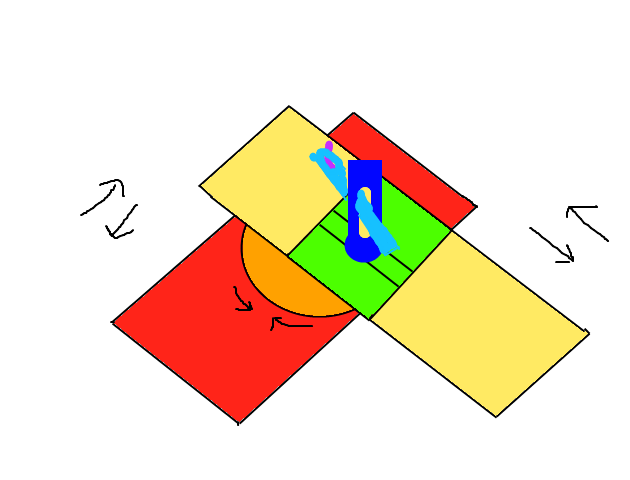 Click here for the full 630x480 image. Paul MaudDib fucked around with this message at 21:47 on Dec 22, 2008 |
|
#
?
Dec 22, 2008 20:57
|
|

|
dv6speed posted:SmokeyXIII, they don't let you grind your own tungsten? Do you ever have problems with the tool room guys doing a bad sharpening job? Nope, they take it to a machine shop and do a frickin sweet job. It just takes a long time.
|
|
#
?
Dec 22, 2008 23:53
|
|
|
SmokeyXIII posted:Nope, they take it to a machine shop and do a frickin sweet job. It just takes a long time. That must get expensive. Why don't they just put a grinder with a grinding jig and say put here and grind your own?
|
|
#
?
Dec 23, 2008 00:50
|
|
|
RealKyleH posted:That must get expensive. Why don't they just put a grinder with a grinding jig and say put here and grind your own? Because they have a machine shop on site. They want the best quality work possible, and so they get the tungsten ground up very very nice. That's the only thing I can think of. Also it's a cost plus job... Maybe that helps to explain their mentality.
|
|
#
?
Dec 23, 2008 01:44
|
|
|
Paul MaudDib posted:
The red is the cross slide, the orange and yellow is the compound rest called the compound. The blues are the tool and toll holder. On that type of setup the little loop thing that holders the tool and tool holder has a screw on top. You loosen that screw and the he loop part as well as tool and tool holder should slide right out of that green part. I've never had to take the compound rest off of the cross slide which is what it sounds like you're trying to do. It sounds like you want to change the angle the compound is at so you can cut a taper and or feed threads with the compound. You should be able to simply loosen (but not remove) two set screws/cap head bolts to loosen the compound so it can move around. If it is not moving it probably has coolant or grease or chips stuck in there. Try giving it a tap with a soft blow hammer. I may have misunderstood what youre trying to do though, let me know if I did. AnomalousBoners fucked around with this message at 02:37 on Dec 23, 2008 |
|
#
?
Dec 23, 2008 02:34
|
|
|
RealKyleH posted:The red is the cross slide, the orange and yellow is the compound rest called the compound. The blues are the tool and toll holder. On that type of setup the little loop thing that holders the tool and tool holder has a screw on top. You loosen that screw and the he loop part as well as tool and tool holder should slide right out of that green part. I've never had to take the compound rest off of the cross slide which is what it sounds like you're trying to do.  v vI'm trying to seperate the compound from the cross-slide, because the screw that clamps the orange rotating part of the compound down has stripped, so we need to get the turret off to drill and tap a new hole. 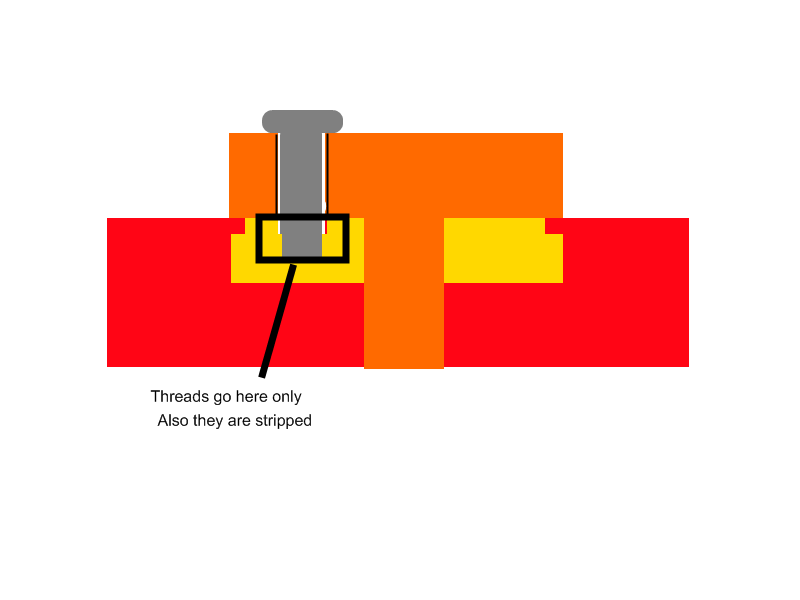 Click here for the full 800x600 image. In this drawing, the cross slide is red, the compound orange, the rolly bit inside is yellow. This is the best idea I have of how it works internally - there's a lower roller thing in the cross slide that I can see rolling around and that the screw clamps into. I need to get the compound (orange bit) off, because the screw doesn't thread into the compound - only the yellow rolly bit underneath. I suppose if worse comes to worst I can always thread the compound too, but I'm sure there's a reason it's like that. edit: I think the compound (orange) passes through the yellow and goes all the way through the cross slide. Updated. Paul MaudDib fucked around with this message at 06:14 on Dec 23, 2008 |
|
#
?
Dec 23, 2008 06:06
|
|
|
MMK so right now the compound is loose making your lathe useless because you cant tighten down the bolt, correct?
|
|
#
?
Dec 23, 2008 06:16
|
|
|
RealKyleH posted:MMK so right now the compound is loose making your lathe useless because you cant tighten down the bolt, correct? Yes, correct. Except for when my neighbor took a wedge and tried to hammer the compound off the cross slide, that jammed it up for a bit 
|
|
#
?
Dec 23, 2008 06:23
|
|
|
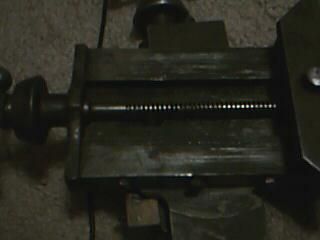
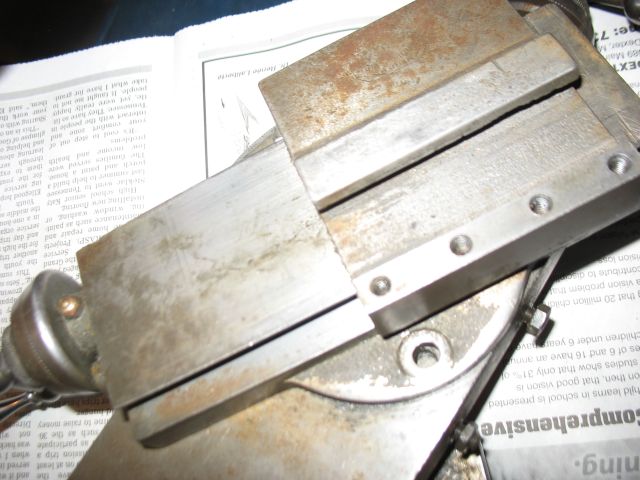 Click here for the full 640x480 image. The hole is the closest one in this pic, ignore the slot for the loop on the top. ") 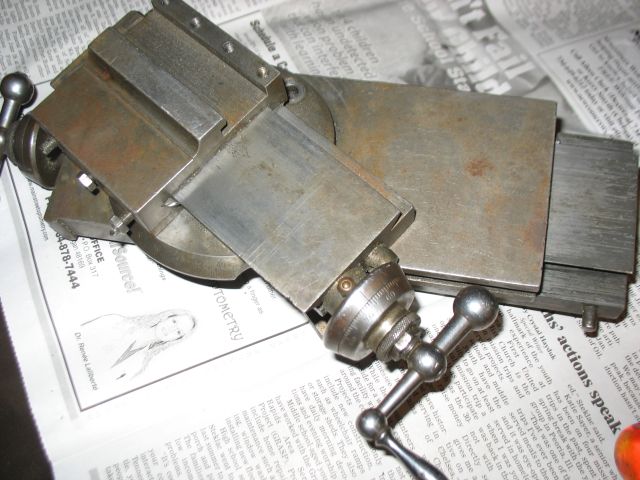 Click here for the full 640x480 image. The offending hole is in the bottom of the compound - it's that part with the bevelled edge, near the back of the pic. Just a view to let you know what the gently caress I'm talking about, because I suck at technical language.  Click here for the full 640x480 image. And here's a view of the bottom, in case it helps. The compound goes all the way through. It's not the hole at the front, it's a barely-visible circle a little farther back. Paul MaudDib fucked around with this message at 06:49 on Dec 23, 2008 |
|
#
?
Dec 23, 2008 06:44
|
|
|
dv6speed posted:I don't know what your situation is, but if it's at all possible to get a 220v outlet installed you need to do that. The most important tool to a welder is electricity. From all of your comments, I won't get one of those welders. I'll save for a better one or use a 220v stick machine. Better that than not having enough power. I used to work for a waste disposal company. I had to cut rusty bottoms out of dumpster and weld on new floors. It was very messy work. No amount of dumping would get all of the garbage out, so I was always working around syringes, rotten food, and used cooking grease. As you can imagine, tt was very difficult to weld and I had to clean the metal very thoroughly. But it was my first job so I could put up with it while I learned. Now I've moved to greener pastures! I work for a company that makes industrial air compressors. I'm not certified to weld the piping but I can do the fitting and weld other components like the frames. That's where I use the spray transfer. It's only short, one pass fillets so my hand doesn't get too hot like it did in school. I'm really happy I have this. You can only improve yourself so much when all you weld is a garbage can. I have a question about pulse. I understand that the micro-pauses cool the puddle and allow it to weld on thin material in all positions, but if short circuit transfer also has many stops and restarts, than shouldn't short circuit transfer work just as well as pulse?
|
|
#
?
Dec 23, 2008 21:23
|
|
|
Not sure what your budget is, but if you are looking for a good 220v stick welder, you can get a new Hobart Stickmate AC/DC from tractor supply for $470. Click here for link.Bigos posted:I have a question about pulse. I understand that the micro-pauses cool the puddle and allow it to weld on thin material in all positions, but if short circuit transfer also has many stops and restarts, than shouldn't short circuit transfer work just as well as pulse? Well, I've never used pulse, and am by no means an expert on the topic. However, I can tell you that short circuit and pulse certainly have very distinct differences. From what I understand, the main advantage of pulsed over short circuit is much less spatter, better penetration, and less risk of cold laps. Lincoln Electric posted:In simple terms, pulsed MIG is a non-contact transfer method between the electrode and the weld puddle. This means that at no time does the electrode ever touch the puddle. This is accomplished through high-speed manipulation of the electrical output of the welding machine. It is designed to be a spatterless process that will run at a lower heat input than spray or globular transfer methods. You can read the full Lincoln Electric article here, it's quite interesting. AbsentMindedWelder fucked around with this message at 23:45 on Dec 23, 2008 |
|
#
?
Dec 23, 2008 23:25
|
|
|
Paul MaudDib posted:Compound problems Ok now that I fully understand your problem, I am not sure how to help...sorry. Try Practical Machinist, Home Shop Machinist or CNC Zone forums. You may want to use some of the terminology and way of describing why you want to remove the compound as I used to avoid being asked the same questions twice. On a side note I bought these: http://www.harborfreight.com/cpi/ctaf/displayitem.taf?Itemnumber=39931 @ HF for 20% off today. I ordered their half inch set online already and it's on its way. I have it sitting on top of a 3/8 AR5 Carbide tool bit as a spacer. Cuts stainless steel pretty good. I took a maximum of .75 on the diameter of some 300 stainless at 600 RPM with no coolant feeding like 3 per rev. Not a heavy cut nor a fast one but I just got my lathe working. I love that I can use industry standard tooling so i can replace whatever crap carbide they us when they wear out with proper tooling with a proper chip breaker.
|
|
#
?
Dec 23, 2008 23:51
|
|
|

|
| # ? May 11, 2024 06:58 |
|
|
Wow, I spent the last several days reading this thread, and I think I found me a new hobby! I have no idea what kind of furnace or forge I am going to try anything with, but that won't be for a while anyway. Lots of homework before I get around to actually doing anything. Thanks for all of the wonderful pictures and how-tos that you all have posted, they are really helpful in deciding if this is something that is over my head or not. Hopefully this thread stays open long enough for me to show you my terrible forays into smithing and casting.
|
|
#
?
Dec 24, 2008 00:16
|
|