|
quote:If anyone has questions for me about the project, please feel free to ask and I'll answer them tomorrow. (I'm off to sleep now) How big was your team? How did you plan the whole thing? What was the biggest difficulty your team had to face? How long did one frame take to render? What programs did your team use for the whole animation? Any interesting anecdotes that might be fun to share with us? I hope you can answer these without falling under the NDA, if so, I can try and find other questions to ask away. :P
|
 #
?
Dec 14, 2008 01:34
#
?
Dec 14, 2008 01:34
|
|

|

|
| # ? May 13, 2024 22:21 |
|
|
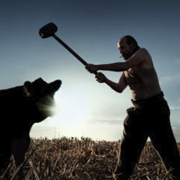
Odddzy's questions answered! How big was your team? The core team consisted of about 10 people- 3 leads, 4 experienced all-rounders and 3 juniors. Sometimes we'd get some additional help in- For example, a couple extra people dropped in during the modeling phase to help create all the character models. How did you plan the whole thing? The animation was broken into 11 scenes, each containing anywhere between one to twelve shots. Each scene was assigned to a person based on difficulty and complexity of the scene. That person was then responsible for rendering all the passes for that scene, spotting glitches and fixing them, etc. Animation was a mix of mocap and keyframe. The director storyboarded everything, and choreographed the fights after the boards were approved. For the mocap we typically hire gymnasts or professional fighters depending on the character we're capturing for. My favourite mocap performer on this project was the 'fall-down' guy- basically he came in for a day to do all the death and impact moves, which involved him throwing himself to the ground over and over for a full day in many creative ways! He could really sell the way a moving body crumples after a death blow, it was like watching a half-life 2 ragdoll. What was the biggest difficulty your team had to face? Scene number one was a monster- it was the first scene worked on and one of the last finished. In the video I linked, scene one is the tracking shot over a battlefield littered with bodies. In that video the shot cuts away, but it is actually one 1200-frame long continuous shot- all the way from the severed head on a pike to zooming into the hero's eye. There's so much geometry in the scene that some passes would need 16gig of ram to render, and if memory serves there ended up being about 70-75 passes in total. Scene one was assigned to me to render, but everyone on the team worked on some part of it and we're all really happy with how it turned out ") How long did one frame take to render? Accounting for all the various passes, I think the average frame time worked out around 20-40minutes a frame. Shots with lots of FX would be higher, maybe around 60minutes once you factor in various Afterburn and FumeFX passes. What programs did your team use for the whole animation? 3ds max 9 64bit and Vray for rendering, and the usual assortment of FX plugins such as Afterburn, FumeFx, Particle Flow tools box 1, and HairFX for hair / eyebrows / eyelashes. Keyframe animation was done in biped, and mocap data goes through MotionBuilder before it can be dumped onto biped. Comping was done in AfterEffects. I'm slowly trying to convince the powers that be to move to Fusion. One day I'll have node-based comping again! One day... (I learned comping in Shake) Any interesting anecdotes that might be fun to share with us? I guess one of the more unusual aspects of the project was how violent the clients wanted it. This lead to some funny feedback, such as "Can we get another severed arm in the foreground there?" and "Can we have the severed head on a stump ooze blood from the eyeballs?" The goriest scene we did isn't in the edit they released, either! I can't describe what it is until Bioware include it in a public trailer, suffice to say it's fun to watch people's reaction to it
|
|
#
?
Dec 14, 2008 15:02
|
|


|
bigredbutton posted:Odddzy's questions answered! Thanks! I'm really grateful for your time spent on these answers! :P
|
|
#
?
Dec 14, 2008 17:12
|
|
|
bigredbutton posted:There's so much geometry in the scene that some passes would need 16gig of ram to render, and if memory serves there ended up being about 70-75 passes in total. Is that 70-75 passes for one scene or one shot? Either way, I'd love to know how that breaks down. I use Vray every day, but not anywhere close to this scale. The complexity of a project like this is fascinating in how it diverges from our own workflow.
|
|
#
?
Dec 14, 2008 17:58
|
|

|
High-res copy found! http://www.gametrailers.com/player/43598.html DefMech posted:Is that 70-75 passes for one scene or one shot? Either way, I'd love to know how that breaks down. I use Vray every day, but not anywhere close to this scale. The complexity of a project like this is fascinating in how it diverges from our own workflow. All those passes were for one very long shot. I pulled the archive for the project this morning, and it looks like I over-estimated the number of layers in the shot- the total was actually around 61 Here's a list of all the passes. This shot was rendered with 'fake' GI, where you render a Diffuse Filter pass (no light/shadow), a Diffuse Pass (Key light and shadows), and an Ambient Occlusion pass then comp them together. This saves render time in cases where you don't need true GI but want a similar look. S01_BG_Ambient_Occlusion S01_BG_BasicLayers_Precomp S01_BG_Bodies_Ambient_Occlusion S01_BG_Bodies_Diff S01_BG_Bodies_Shadow S01_BG_Diffuse S01_BG_Diffuse_Filter S01_BG_Haze S01_BG_Haze_NoMatte S01_BG_Normals S01_BG_PreComp S01_BG_Reflection_Filter S01_BG_Specular S01_BG_Velocity S01_BG_WireColour S01_BG_Zdepth S01_BG-Carnage_Pass_AmbientOcclusion S01_BG-Carnage_Pass_Diffuse S01_BG-Carnage_Pass_DiffuseFilter S01_BG-Carnage_Pass_ReflectionFilter S01_BG-Carnage_Pass_WireColour S01_BG-Carnage_Pass_Zdepth S01_Carnage S01_DynamicLighting_FireA S01_DynamicLighting_FireB S01_FG_Head+Flowers_AmbientOcclusion S01_FG_Head+Flowers_Diffuse S01_FG_Head+Flowers_DiffuseFilter S01_FG_Head+Flowers_ReflectionFilter S01_FG_Head+Flowers_Velocity S01_FG_Head+Flowers_WireColour S01_FG_Head+Flowers_Zdepth S01_FlagFix S01_FlowerPreComp_Input S01_FlowerPreComp_Output S01_FX_BloodDrip_Flower S01_FX_Embers S01_FX_Fog_CameraPath S01_FX_Fog_CloseUp S01_FX_Fog_Midground S01_FX_Fog_Distant S01_FX_Fog_Distant_NoMatte S01_FX_Fire_A S01_FX_Fire_B S01_FX_Smoke S01_FX_Sparks_A S01_FX_Sparks_B S01_FX_Steam S01_Hero_AmbientOcclusion S01_Hero_Diffuse S01_Hero_Diffuse_Filter S01_Hero_Reflection_Filter S01_Hero_Shadow S01_Hero_Velocity S01_Hero_WireColour S01_Hero_Zdepth S01_Horizon S01_Horizon_Zdepth S01_Mountains S01_Mountains_Zdepth S01_Skydome I found something else that might be of interest to you as well- here's a GIF I made a while back that shows the compositing progression for a shot from Sacred 2:  Sacred 2 was much less complex than DragonAge, (the core team was only 4 people), but I hope it gives you an idea of how the various passes are layered up.
|
|
#
?
Dec 15, 2008 00:53
|
|
|
bigredbutton, how did you go about doing motion blur? edit: oh im guessing thats what the velocity pass is?
|
|
#
?
Dec 15, 2008 01:49
|
|

|
You guess correctly! The velocity pass is fed into the Reelsmart MotionBlur plugin for After Effects, which blurs the various parts of the image in the correct direction. One or two shots used Vray's 3D motion blur when the post-blur looked wack, but the render hit is too much to use it on all shots 
|
|
#
?
Dec 15, 2008 04:02
|
|
|
oh cool, im using ReelSmart too on a current production. What exactly is your method? We're pretty much doing straight colour mattes for the characters and props to fix the bleeding that can happen and control blur amounts. I'm finding we get a good result with it, but it can cause artifacting and aliasing. did you have similar problems?
|
|
#
?
Dec 15, 2008 04:12
|
|
|
For shots with mostly side-to-side movement (XZ, Z being up), we use the vrayWireColour render element and a wire colour randomiser script created by a friend of mine: http://www.scriptspot.com/3ds-max/random-wire-color Reelsmart has an easy time keeping track of the nice big solid blocks of colour you get with a WireColour pass. For example, this works well on characters when their arm passes in front of their body. If the colour is the same for the whole character, Reelsmart would lose track of the arm in the above example. Here's an example, again from Sacred 2:  Click here for the full 1280x720 image. For shots with mostly depth-based movement (XY,Y being depth), we usually have to fall back to using the VrayVelocity render element. We usually try the wirecolour method first, as it takes alot longer to setup and use velocity passes. This rockin' tutorial for max8 explains the process, and is applicable to the latest versions of max: http://www.revisionfx.com/support/faqs/motion_vector_FAQs/motion_vectors/#3d%20Max%208 Just use Vray's Velocity element instead of Max's, and the 'Max velocity in last frame' Vray element value is the same thing as 'Maximum velocity' when the tutorial refers to it. Good luck! If you have trouble following the tute, let me know and I'll try and dig up some examples of velocity passes we've done from our archive.
|
|
#
?
Dec 15, 2008 06:47
|
|
|
heh, umm, were actually in maya 2008. I'll look into it and see if theres anything equivocal thats in mental ray or the maya render. thanks heaps for the writeup
|
|
#
?
Dec 15, 2008 07:00
|
|
|
bigredbutton: Thanks for all the info. I had always read 3d motionblur was MUCH better than post but I always wondered how it could be faked if 3d motion blur was impossible. That list of passes is pretty impressive. I had never even heard of a "wirecolor" pass before. BTW - it looks like "Delgo" has finally been released. I think a few goons have been working on it (?) This article does not paint a very pretty picture. Also, here is yet ANOTHER VFX reel / portfolio / social networking site: The inspiration room. sigma 6 fucked around with this message at 05:01 on Dec 16, 2008 |
|
#
?
Dec 16, 2008 04:53
|
|


|
I just finished my first semester in the animation program here at MATC in madison, wi. We've started learning texturing and bump maps and have been working on this troll head. The model is my teacher's. Here are some quick renders:     I want to get into the video game field, specifically concept art. I'm really excited about next semester as we'll start working more on organic models instead of just mechanical stuff.
|
|
#
?
Dec 16, 2008 06:26
|
|
|
Wow, everything in this thread is awesome. I just finished my final (group) project for the first animation/CG course I've ever taken. We had about a month to put together a short animation. I did all of the modelling except for the porch set and all of the textures and lighting, so any feedback on those parts would be awesome in spite of the youtube compression. Also, sorry about the annoying sound. http://www.youtube.com/watch?v=pmYLILTmtCQ
|
|
#
?
Dec 16, 2008 07:05
|
|

|
sigma 6 posted:bigredbutton: Thanks for all the info. I had always read 3d motionblur was MUCH better than post but I always wondered how it could be faked if 3d motion blur was impossible. That list of passes is pretty impressive. I had never even heard of a "wirecolor" pass before. To be fair, that movie doesn't look amazing. It should have done better than that but the movie does look a bit... game CGI ish. Like the quality of CGI you'd find in the intro to a fantasy game.
|
|
#
?
Dec 16, 2008 09:44
|
|

|
Here are some still shots from my junior project, where a king fights a wood dummy and loses. Ill finish it next semester. The king's texture is just a placeholder and I need to fix the contours, but the final look will be pretty much that.  (This one isn't an actual shot) I also have a question. I was planning to use this as part of my demo reel in the future but I was told that employers look down upon cell shading. Is this true? I can see how it could affect me if I was going for a modeling/texturing job, but would this apply to me if I want to be an animator?
|
|
#
?
Dec 16, 2008 12:30
|
|
|
This is just an educated guess but it seems to me that non toon shaded stuff is preferrable because you have a better idea of what the light is doing thanks to better gradients. Better lighting/shading = easier to see the animation. Even a lambert or blinn shader with no color or texturing lets you see the animation better than toon shading (which is limited by the levels of gradient you give it). When I took animation classes, the teacher asked us not to spend ANY time on texturing or materials so everyone's animations would be easier to see and on an even playing field. Also - it wasn't the animator's job to do that stuff anyways. I am also curious to hear what the experts in the thread have to say about it. Kirby posted:
The forums haven't been updated for me past the first day. They have the same videos since the beginning (I don't see Vickery's anywhere). What browser are you using? I tried using firefox but couldn't check the cache very easily. sigma 6 fucked around with this message at 04:34 on Dec 18, 2008 |
|
#
?
Dec 17, 2008 22:36
|
|
 i thought they would atleast try some fancy encoding or something.
|
double post . . . sorry.
|
|
#
?
Dec 18, 2008 04:33
|
|
|
hmm, thats weird. im using firefox on osx and its peachy. all of the masterclasses have been available to me since the first day http://forums.thegnomonworkshop.com/forumdisplay.php?f=57 maybe try clearing your cache. this is what ive been using to save trawling through my cache.
|
|
#
?
Dec 18, 2008 04:55
|
|
|
VERY weird. When I clicked on your link it gave me this message:quote:...you do not have permission to access this page. This could be due to one of several reasons: Yet when I go to the main forum page I can clearly see about a dozen videos posted. Hrm . . . I wonder if they blocked me from seeing more because I logged in at home and at school. It clearly states in the FAQ they will you out for using multiple IPs. I wonder if those dozen videos are free to ANY gnomon forum member. Very very strange. Thanks for the firefox plugin. Looks pretty handy. The banner at the top reads Gnomon Live Rebroadcast Event (only 10) vs The Master Classes. http://www.thegnomonworkshop.com/includes/gw_live/gw_live_rebroadcast_08.php Looks like I may have signed up for the wrong event.  sigma 6 fucked around with this message at 07:27 on Dec 18, 2008 |
|
#
?
Dec 18, 2008 05:17
|
|
|
Me on Page 15 posted:thats what i thought too, but the playback of the gnomon workshops is actually a different thing. theyre just happening in the same week. 
|
|
#
?
Dec 18, 2008 07:23
|
|
|
^^^ So these AREN'T two separate events?? This is very confusing the way they have this set up. It doesn't make much sense to run them simultaneously to me unless they are the same workshop split in two or something. I tried to PM you but you don't accept PMs. Could really use some help with this and I don't want to clutter up the thread. The plugin DOES work so THANK YOU!! EDIT: Nevermind. Thanks for the help. VVV They can be pretty hit and miss. The Meats Meiers intro to Zbrush 3 is especially good IMHO. VVV sigma 6 fucked around with this message at 22:04 on Dec 18, 2008 |
|
#
?
Dec 18, 2008 07:35
|
|
|
After watching a few of the Gnomon DVDs I've come to the conclusion that the majority of them suck. I was watching one on production character modeling and he basically skipped 30% of the beginning process and imported a bust and male body and traced it around to make armor and accessories that covered the whole body. I don't have no male body and head to work off of >:[
|
|
|
#
?
Dec 18, 2008 21:45
|
|
|
Akaikami posted:After watching a few of the Gnomon DVDs I've come to the conclusion that the majority of them suck. I was watching one on production character modeling and he basically skipped 30% of the beginning process and imported a bust and male body and traced it around to make armor and accessories that covered the whole body. Zbrush comes with ztools of basemeshes to work on. Plus theres these: http://gnomonology.com/prod/19?sort=lowestPrice&kw= if you need a generic human male to begin your work on, why bother making one every time? "Production" character modelling is as much about speed as it is quality.
|
|
#
?
Dec 18, 2008 23:50
|
|
|
Rigging the helmet ring was a little awkward because the shoulders, torso, inner shoulders and ring all need to effect one another but keep the control. So this pose was to test to see if he could maneuver his hand/shoulder to pull the ring to one side while keeping the inner-shoulders offset. Next up: Animation tests and to re-write the story (in my head) before modelling locations. Being unemployed sucks. 
|
|
#
?
Dec 19, 2008 00:45
|
|

|
On the plus side, you have plenty of time to 'work on your showreel'* *last 5 months for me.
|
|
#
?
Dec 19, 2008 09:29
|
|


|
this was my final project for the first semester of animation. It's a rube goldberg contraption. I'm really happy with how it turned out, but there's plenty of stuff that could use some work. For some reason youtube likes making video darker than it actually is... http://www.youtube.com/watch?v=rCVw...player_embedded
|
|
#
?
Dec 20, 2008 21:44
|
|
|
tuna: I am curious about the spacesuit and how you rigged it. Was the suit connected to the gray shirt underneath it? Did you create one mesh with folds or deal with cloth sim? Can we see a wireframe? I can't imagine weighting that would have been much fun.
|
|
#
?
Dec 20, 2008 22:34
|
|
|
The grey suit parts are separately weighted objects, the neck/shoulders area of grey have a few different deformers on it so I can animate it separately to the actual suit/ring. The folds are just displacement that I made in ZB, which I'll drive with a tension map in certain areas like the hips. The blue valves are just objects pinned to clusters on the mesh, and the actual mesh is quite low-rez and weighting was actually really simple. I can't take any wires at the moment because Vista completely died on me so I need to reinstall it which will probably take about a day
|
|
#
?
Dec 20, 2008 23:18
|
|
|
Heintje posted:w00t I got accepted for an internship at SideFX in Toronto, I start in Feb! e: This is not the post you are looking for. Travakian fucked around with this message at 06:00 on Feb 24, 2011 |
|
#
?
Dec 23, 2008 08:27
|
|

|
Feels weird to be back, theres been so much good work posted recently. It's been ages since I did any cg, i've been working on music. But I got some of that done, so I made an image to make sure I still knew how to. Just under 4 days work total. 2 for the building, one for the landscaping, and the just under was spent lighting it. Included s&h and wireframes. 
|
|
#
?
Dec 23, 2008 14:55
|
|

|
It's great to have you back. I've really missed me and my skills being made to feel completely inadequate whenever I visit this thread.
|
|
#
?
Dec 23, 2008 16:54
|
|
|
I'll get my coat.... Also, It's not particularly flashy, but I was playing around with particle flow for the rest of the day and I made this  I wanted to see what would happen when I had 120,000 particles spinning around and motion blur turned on. glows done in PS.
|
|
#
?
Dec 23, 2008 18:15
|
|
|
Finally found some time over vacation to try out ZBrush again. It's so drat fun. Working in this program makes me want to pick up clay again: I'm not really sure where to go with this guy now. The topology is complete rear end because I just sculpted him from a single sphere, but I still wanna see how he comes out if I create a low poly version. Working on this alien has made me realize that I really need to get over my fear of high-poly work and just dive into it. There's no excuse anymore. My Tchar'zanek model has been asking on a weekly basis for some high-poly love, and it's about time he gets his wish.
|
|
#
?
Dec 24, 2008 18:28
|
|

|
Hazed_blue posted:Finally found some time over vacation to try out ZBrush again. It's so drat fun. Working in this program makes me want to pick up clay again: Assy topology is a good excuse to get into Zbrush's retopology tools.
|
|
#
?
Dec 25, 2008 15:14
|
|
|
Hey, new guy in the thread. I'm working on a new music video in the style of Autechre's video for Gantz Graf. The way the guy made that video is quite different from how I'm trying to make mine, though (he used an After Effects trick to convert the audio into keyframes apparently). Rather than use AE - which I have little skill with - I'm trying to use a plug-in to convert MIDI data into keyframed actions because I'm using a song of my own to sync to. So I export the song into MIDI from Reason, and then... It seems like this plugin for Maya will do the trick the best. Some people on the CG forums say they prefer to use some custom script to do MIDI stuff for them but it seems so cumbersome to use something that doesn't have an actual GUI so I went with this. If there's some far superior program I dunno about then please tell me. Anyway, the plugin basically works like this: it takes each instrument track and then picks out each note that is played throughout the song, and then you link "behaviors" to the notes and it renders the keyframes out. This screenshot sort of explains it better than I could:  (No, I'm not actually making an ABBA video, that's the website's demo) Anyway, my problem comes up with setting up behaviors. How do I load clips or poses when I use the [...] button? I have very minimal animation experience (mostly working with textures) so I don't really know the terminology or how to apply it into Maya. Do blend shapes, for example, count as poses? I'm pretty familiar with the rest of the functions such as the "offset" and "sus/rel" controls but the part with actually loading animations into the behavior has me stumped. This might be pretty obvious to someone else though. Thanks in advance for any advice!
|
|
#
?
Dec 25, 2008 20:49
|
|

|
No relation to helping your midi concerns, but I was talking to a VFX guy about the Gantz Graf video; he was adamant that it was all keyframed. Can't remember why or where he heard that, but he was ADAMANT. There you go.
|
|
#
?
Dec 26, 2008 04:46
|
|

|
Thought I would just pimp out my CG podcast (mostly 3d related). No new epsiodes in over a year because I got a life and university has been annoying but there are 36 episodes and some are actually interesting especially the interviews which I tried to keep as timeless as possible, not sure if I succeded. the site is http://www.cgcast.com I recommend the interviews with: Leigh Van Der Byl - Pro CG texture artist - Episode 6 Robert Chang - Wise man and a very good artist - Episode 7 Leo Teo - Founder of CGTalk - Episode 8 Peter Draper - Great resource to the community - Episode 20 Neil Blevins - Artist who works at Pixar* - Episode 32 *Neil does not represent the views of pixar in the interview just his views. Check out the other episodes if you'd like, maybe some day I'll get the ball rolling again.
|
|
#
?
Dec 27, 2008 02:44
|
|


|
SynthOrange posted:It's great to have you back. I've really missed me and my skills being made to feel completely inadequate whenever I visit this thread. Hahah - I had to laugh at that one. S'funny cuz it's true. Cubicle gangster: when are you gonna make a walkthrough or some kind of write up on how you accomplish your ultra realism? I think I speak for a lot of goons when I say it would be most appreciated. I know before you said it was kind of a random work-flow with a lot of tweaking here and there but drat man, please try! Mister Anarchy: Thanks man! Now I have something interesting to listen to on my flight back home from the holidays. SpecialAgentCooper: Love the username/avatar. Just rewatched Twin Peaks recently with my GF. It looks like what you are trying to do is similar to what a friend of mine was trying to do in 3dstudio Max a few years ago. He gave up because he said Max had really crappy Midi tools and completely switched packages to Houdini. Recently he has taught a few classes and written a book on Houdini and audio. I am not sure he can help since you are using Maya but I can pass on questions if you would like. He is a musician who has gotten into 3d through audio and animation and how each can drive the other. Also, I have seen videos very similar to that Autechre vid but not that one in particular. Would really to know how he turned notes into keyframes in AFX. It seems to me most of the work along these lines would be done with at least some scripting. Hazed_blue: I specifically always start in zbrush with a basemesh (with UVs) to avoid that problem, but I wholly agree with SynthOrange here. Zbrush's retopo tools might be slightly clunky but better than most out there. Ooooookaaaaay . . . after a long struggle with whether or not to go cintiq vs tablet PC I am very seriously considering buying a cintiq 12UX. Does anyone here have one? How do you like it? Are the cables too cumbersome? Any calibration problems? How do you travel with it (what kind of case)? Edit: Almost done with the modeling but I couldn't resist throwing some default materials on:  
sigma 6 fucked around with this message at 09:55 on Dec 27, 2008 |
|
#
?
Dec 27, 2008 09:38
|
|
|
sigma 6 posted:SpecialAgentCooper: Love the username/avatar. Just rewatched Twin Peaks recently with my GF. According to some guy on the Youtube thread, here's a fairly detailed and plausible explanation behind the making of Gantz Graf - I don't know AFX very well so I dunno exactly how legit it all is but it made sense in my head: "Alex used Lightwave for the 3D work and barely using a little animation for some parts (I thing the part where the sonic wave booms out and maybe the camera rotation but otherwise this was achieved through a lot of patience), then he put his 3D models into After Effects along with the song and used the 'convert audio waveform to Keyframes key' to get the points where to change the frames and have the graphics react to the music. In AE he used alpha channels to cut up the models into strips." That make any sense?? Anyway, regarding my own project, I have no issues with the actual MIDI conversion or anything. I just can't figure out how to take different animations in the timeline and make them particular poses or clips. Do I set something like a blend shape? Or is it some weird thing I have to do in the connection editor to save a pose as a particular selectable thing? ps thanks for the avatar compliments! Actually, I'm working on a short TP-inspired game, but it's in Java and not 3D.
|
|
#
?
Dec 28, 2008 20:42
|
|
|

|
| # ? May 13, 2024 22:21 |
|
|
SpecialAgentCooper posted:...I just can't figure out how to take different animations in the timeline and make them particular poses or clips. Do I set something like a blend shape? Or is it some weird thing I have to do in the connection editor to save a pose as a particular selectable thing? I haven't tried that midi plugin, but from looking at the docs it seems you need to set up all the things you want animated as trax clips. So basically you create the characters/animations you want for each note just straight up on the timeline, then save each one as a pose or animation clip. You can put and connect pretty much anything you want to a trax clip, so for instance if you want to trigger a bunch of blendshapes by the music it shouldn't be too complicated, just create a different clips for the blendshape node with the sliders at different values etc. There are some pretty good Trax tutorials in the Maya help. Look for "Nonlinear animation" in the "Getting Started" section. Parts 5 and 6 of the plugin docs seems to explain how the saved trax clips are then triggered and blended by the plugin: http://www.parismav.com/tech/miditools/documentation.html#5 Flex Mentallo fucked around with this message at 20:39 on Dec 29, 2008 |
|
#
?
Dec 29, 2008 20:33
|
|