

|
jackpot posted:Also keep in mind you often don't want the effect over the whole photo; in my opinion IsaacNewton's dog is much improved by the sharpening, but he'd be better off masking out the trees and snow because now they've lost their softness. Yep, I mentioned in the image you should mask to taste. I almost never apply an adjustment layer to the entire image.
|
 #
?
Feb 3, 2009 23:40
#
?
Feb 3, 2009 23:40
|
|


|

|
| # ? May 16, 2024 18:27 |
|
|
I have a question that doesn't really apply to either photography or post-processing, but 1) I don't want to muck up the forum by making a new thread for such a small question and 2) I doubt anybody knows more about RGB vs CMYK than the people posting here. So: I have an image with only green, white, and black in it, nothing else (arty photo manip basically). It's in RGB and I need to convert it to CMYK for printing, but the green hue I used is too bright so the color conversion dials it down a bit to a duller blue-ish green. This is a bit annoying but I kind of expected it, whatever. But when it gets "converted", will the color I see in Photoshop match whatever color is on the printed copy? Because when I save the same image as a jpeg, it appears as a horribly bright neon green, much brighter than the one in Photoshop. So which one is closest to the print color? Am I missing something really blatantly obvious? Is there a way to get something close the original color in CMYK? For reference, the color I originally used was #009900. I'm not really sure what to expect from what I print, especially since I can't afford a crazy monitor calibration setup. Again, sorry if this question doesn't really fit in with the general discussion/impressive tutorials, but I thought somebody here would understand my problem best.
|
|
#
?
Feb 4, 2009 15:08
|
|

|
^ It all depends on how you have your system and workflow calibrated. Without that no one can guess what it will look like printed. I mean if your monitor isn't calibrated you don't even know if you are seeing the color you think you want, much less what it will look like when you send it to print.Toupee posted:Stolen from here Those descriptions are kind of needlessly complicated. The only ones I use on a regular basis when retouching are: Color - I use this a lot on Hue/Saturation adjustment layers. It lets you just change the color without affecting density. Saturation/Hue modes are similar. It just narrows the scope of your adjustment, ie. if you want to take the orange out of someones skin tone without affecting the tonality. Luminosity - Lets you change the density and contrast without affecting the color or saturation. This is extremely useful on curves adjustments (especially now with the targeted adjustment tool) because you can gently caress with the curve a lot to get whatever contrast you want without sending your color into LSD territory.
|
|
#
?
Feb 4, 2009 19:40
|
|


|
SpecialAgentCooper posted:I have a question that doesn't really apply to either photography or post-processing, but 1) I don't want to muck up the forum by making a new thread for such a small question and 2) I doubt anybody knows more about RGB vs CMYK than the people posting here. So: If your monitor isn't calibrated you really won't know what the image will look like printed. Though a lot of times when I need to pop a red in cymk for print I'll have the red part masked and saved as an alpha channel then after I've done my conversions for print I'll load the mask and use a selective color adjustment layer. You won't get exact but you can boost it a bit. You can save the adjustment layers to load later which is helpful if you end up doing multiple versions.
|
|
#
?
Feb 5, 2009 02:17
|
|
|
I can't say I know much about post-processing, but I do know that I love digital grain. Here's my super basic Lightroom method for getting lots of it without washing out your image: Greyscale your RAW image.  Click here for the full 800x536 image.  Exaggerate the contrast with the Curves menu. We're aiming for the highlights to look alright but the blacks to be totally clipped.   Click here for the full 800x536 image.  Reclaim all that lost data with the Fill Light function.  The result: (I hate the composition on this image but it was a good example for this)  Click here for the full 800x536 image. 
duck pond fucked around with this message at 05:54 on Feb 6, 2009 |
|
#
?
Feb 6, 2009 05:50
|
|
|
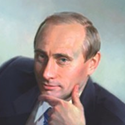
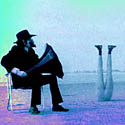
Is there any way to get the effect of a 35mm camera with a digital picture in Photoshop? Terry Richardson     I know he uses film but wondering if you can get that kind of effect with digital. Juergen Teller 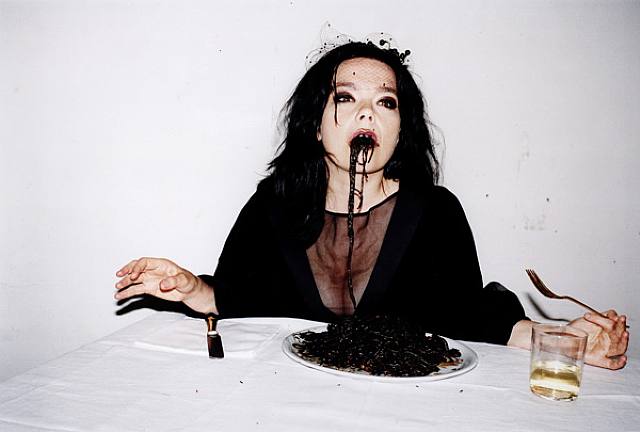    I think this person uses a digital camera.   
|
|
#
?
Feb 6, 2009 07:03
|
|
|
Just mimic the color palette of whatever film you like. Lightroom gives you such a ridiculous amount of control over color it is pretty easy to get that look, assuming you can recognize what it is you are going for.
|
|
#
?
Feb 6, 2009 07:22
|
|
|
I've found using the vignette and messing around with the Vibrance and Saturation (i.e., turning them down) while upping contrast in Lightroom goes a long way toward creating the feel of film. Just keeping it real simple. There's also a lot of harsh on-camera flash being used in Richardson and Teller's pictures, as well. Holding the camera in portrait mode can exaggerate this by creating a slight but distinct horizontal shadow.
|
|
#
?
Feb 6, 2009 07:28
|
|
|
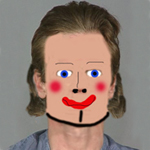
Can one of you wizards of post-processing tell me what kind of work people to do make these sorts of pictures? I am guessing they first choose a piece of artwork, figure out what kind of lighting they want for the model to have her fit in, then shoot the model on a plain background, layer her in, add some filter/masking effects, voila, finished photo?  Click here for the full 552x864 image.
|
|
#
?
Feb 8, 2009 17:20
|
|
|
RangerScum posted:Can one of you wizards of post-processing tell me what kind of work people to do make these sorts of pictures? I am guessing they first choose a piece of artwork, figure out what kind of lighting they want for the model to have her fit in, then shoot the model on a plain background, layer her in, add some filter/masking effects, voila, finished photo? thats a painting.
|
|
#
?
Feb 8, 2009 20:11
|
|


|
johnasavoia posted:thats a painting. Are you sure? Check out some of the photos on this page: http://www.modelmayhem.com/pics.php?id=99 You think those are all paintings? Some are pretty obvious overlays, however others are really impressive. Others: http://www.modelmayhem.com/pics.php?id=330337 http://www.modelmayhem.com/pics.php?id=100075 (NWS Pictures) RangerScum fucked around with this message at 22:44 on Feb 8, 2009 |
|
#
?
Feb 8, 2009 22:25
|
|
|
There's little point to putting a digital painting on modelmayhem.
|
|
#
?
Feb 8, 2009 22:46
|
|

|
evil_bunnY posted:There's little point to putting a digital painting on modelmayhem. They can be paintings that use photos of models as sources. Guys like Frank Frazetta do that.
|
|
#
?
Feb 8, 2009 22:49
|
|

|
I keep hearing people refer to a "topaz" something in reference to post-processing. What is it?
|
|
#
?
Feb 9, 2009 01:55
|
|
|
Say Lah Vee posted:I keep hearing people refer to a "topaz" something in reference to post-processing. What is it? Topaz Adjust, probably. http://www.topazlabs.com/topazlabs/03products/topaz_adjust/ I don't like a lot of what comes out after being ran through it, but some people swear by it. edit: I suppose when used in moderation it does have some decent results, but as you can see by those examples, some of that is just horribly over processed. PREYING MANTITS fucked around with this message at 03:36 on Feb 9, 2009 |
|
#
?
Feb 9, 2009 03:29
|
|
|
diarrhea for girls posted:Topaz Adjust, probably. The effect does look pretty cool, but I do think at a certain point you really shouldn't call it a photograph anymore.
|
|
#
?
Feb 9, 2009 03:46
|
|
|
While perhaps not technically a painting in the common use of the word, it is neither a photograph. Probably there was originally a photograph of a woman that has been heavily altered, painted over, cloned, dodged, burned, comped and otherwise edited into what you see there. I can tell you with 100% certainty that the vast majority of that image has been rendered and then painted over, including parts of the woman. If you want to know how to achieve the look of that image, look past photography as it had little to do with the look.
|
|
#
?
Feb 9, 2009 04:31
|
|
|
 I tend to think photography is a pretty broad medium, you can't just lump poo poo you don't like in with painting. I tend to think photography is a pretty broad medium, you can't just lump poo poo you don't like in with painting.edit: sorry that was kind of snarky... Before photography was invented all painters did was poo poo like portraits and other boring commissions. After photography, they all lost their jobs. A lot of people thought photography had killed painting, but what it really did was free painters to do whatever the gently caress they wanted. Look at the Western tradition in painting... it is pretty boring up until photography is invented, then there is a massive explosion in different kinds of work starting with the birth of modernism (Cubism/Picasso). Now basically anything that someone says is a painting is a painting regardless of whether it even hangs on a wall or uses paint. Same poo poo is happening to photography right now because of digital capture. brad industry fucked around with this message at 06:00 on Feb 9, 2009 |
|
#
?
Feb 9, 2009 04:43
|
|
|
brad industry posted:
We can call it a "paintograph"
|
|
#
?
Feb 9, 2009 05:21
|
|
|
brad industry posted:
I prefer the term digital illustration thankyouvermuch, and yes that covers the piece I did where I photoshopped george bush's head onto a monkey eating its own poo poo.
|
|
#
?
Feb 9, 2009 05:54
|
|
|
diarrhea for girls posted:Topaz Adjust, probably. So this is jsut another method of doing HDRs? Or is this even considered HDR
|
|
#
?
Feb 9, 2009 08:19
|
|
|
diarrhea for girls posted:Topaz Adjust, probably. Dear god, that is an awful POS. It is like every lovely, overblown HDR made by a 14yo TO THE MAXXX
|
|
#
?
Feb 9, 2009 08:50
|
|

|
brad industry posted:Before photography was invented all painters did was poo poo like portraits and other boring commissions. After photography, they all lost their jobs. A lot of people thought photography had killed painting, but what it really did was free painters to do whatever the gently caress they wanted. Look at the Western tradition in painting... it is pretty boring up until photography is invented, then there is a massive explosion in different kinds of work starting with the birth of modernism (Cubism/Picasso). Now basically anything that someone says is a painting is a painting regardless of whether it even hangs on a wall or uses paint. If anybody is at all interested in any of this then make sure to read Susan Sontag's essays On Photography.
|
|
#
?
Feb 9, 2009 12:21
|
|

|
cLin posted:So this is jsut another method of doing HDRs? Or is this even considered HDR What Topaz Adjust does is tone mapping, and a lot of people label tone mapped images as HDRs. Strictly speaking, a HDR image is just an image that has a higher dynamic range than what the camera can capture/what the monitor can display/what the printer can print. In order to get an image that's actually viewable/printable, you need to convert the higher range of image data to some smaller, usable range, and that's often done by tone mapping. Taking a single, low dynamic range photo and applying tone mapping just gives you a tone mapped image, not a HDR image. http://en.wikipedia.org/wiki/Tone_mapping Sebastian Flyte fucked around with this message at 12:36 on Feb 9, 2009 |
|
#
?
Feb 9, 2009 12:34
|
|
|
brad industry posted:Before photography was invented all painters did was poo poo like portraits and other boring commissions. After photography, they all lost their jobs. A lot of people thought photography had killed painting, but what it really did was free painters to do whatever the gently caress they wanted. Look at the Western tradition in painting... it is pretty boring up until photography is invented, then there is a massive explosion in different kinds of work starting with the birth of modernism (Cubism/Picasso). Now basically anything that someone says is a painting is a painting regardless of whether it even hangs on a wall or uses paint. This is an interesting theory, but there was a hell of a lot going on in the world beside the introduction of photography to that spurred Modernism, and Modernism applied to a lot of things beside painting.
|
|
#
?
Feb 9, 2009 21:56
|
|
|
I was doing a bit of work in PS after browsing this thread and decided that my Filter menu was WAY too cluttered. I have several filters that do mostly the same thing (Not exactly) and would like to put them in the same sub menu. I also have some filters that are confusingly worded. Is there a way I can reorganize how the filter menu is laid out in PS just the way one would customize the start menu? I asked uncle google, but he wasn't too much help. Sorry if this is asked all the time, but I can't seem to see a better thread for this.
|
|
#
?
Feb 10, 2009 20:10
|
|
|
Even just a list of obsolete filters and adjustments in photoshop to avoid...
|
|
#
?
Feb 11, 2009 19:36
|
|
|
I think I should really look more into post-processing with my photos. It seems that everyone today uses them. And I guess they're not always necessary, but they sure do help a lot. I was wondering if you guys had suggestions for what I could do for an image like this  Click here for the full 1000x669 image. Something about it just doesn't seem right, like it could be better. I mean, I guess cropping it a little and rotating it to make the horizon more level would help. But I'm really not sure what else I should do with it. This version also looks a little dark to me. I do have a slightly fixed up version somewhere, but I don't know where I put it.
|
|
#
?
Feb 12, 2009 10:45
|
|

|
While I'm not 100% sure that this is the thread for general 'make my picture better' postings, I'll bite. I would mask the buffalo as best I can... and sharpen the buffalo, and see if I could color correct the background. That's 3 big steps, but check the previous posts. Check the sharpen one - then mask the other areas and fix the color by playing with either the tone curve or color masks. I'll leave it to others to be more specific or come up with better ideas.
|
|
#
?
Feb 12, 2009 14:21
|
|
|
What is everyone's method of ensuring that their printed photos look as close as possible to the on-screen version? I've been having huge issues getting this to work. My monitor is on all default settings, as is my printer. I've tried using Adobe Gamma but no matter how many times I go through the wizard or the manual process it simply makes things look worse -- not 'I'm just not used to it' worse, but genuinely worse. Some photos come out of my printer far too warm and others come out far too cool. I brought everything to my local Kinko's and I experience all of the same problems. My photos look beautiful on my monitor, but so far from my intentions on paper. Not to mention I have an interview where I must display my portfolio in just a few days  . .
|
|
#
?
Feb 16, 2009 03:58
|
|
|
Use a hardware calibrator on your monitor and have custom ICC profiles made for your printer. Anything else is just blindly guessing. All my devices are calibrated and I can go from screen to perfect print in 1-2 proofs. If you aren't anal like me it's basically WYSIWYG. brad industry fucked around with this message at 04:06 on Feb 16, 2009 |
|
#
?
Feb 16, 2009 04:03
|
|
|
Good Sir posted:I brought everything to my local Kinko's and I experience all of the same problems. They don't do color managed printing. No ICC profiles, nothing... It's the technical equivalent of taking an ink jet out of the box and using it. It may be laser, and it may be cheap but they are not some place you should be going to for prints if you are concerned about quality.
|
|
#
?
Feb 16, 2009 15:43
|
|
|
KennyG posted:They don't do color managed printing. No ICC profiles, nothing... It's the technical equivalent of taking an ink jet out of the box and using it. It may be laser, and it may be cheap but they are not some place you should be going to for prints if you are concerned about quality. What sort of places would you recommend? Is Wal-Mart any good?
|
|
#
?
Feb 16, 2009 20:27
|
|
|
Good Sir posted:What sort of places would you recommend? Is Wal-Mart any good?
|
|
#
?
Feb 16, 2009 20:28
|
|

|
germskr posted:Please tell me that was trolling. Please. I was being half sarcastic but where I live the only options seem to be Kinko's, Staples, Wal-Mart, or buying your own printer, which I've done, but I need prints larger than 8.5x11.
|
|
#
?
Feb 16, 2009 20:30
|
|
|
Then your answer is TehIntarwebs. Have your prints delivered by mail. Walmart is fine for Mom's photos of the soccer game, but if you are worried about your color, you will have to send your stuff off to be printed. I live in an area with only a select few more options (namely a major university) but their prices are so outlandish if you aren't in a class, that anything over 4x6 I send off to mpix or adorama.
|
|
#
?
Feb 16, 2009 20:34
|
|
|
^^^ I'm too slow. Ever thought of sending your prints away to be printed? It is kind of a pain in transit as sometimes prints come damaged but that's a risk I'd rather take than having to deal with lovely local places.
|
|
#
?
Feb 16, 2009 20:34
|
|
|
Go to a pro lab. Often they will proof it for you or you can bring in a sample for them to match. If you don't do that they will at the very least give you the ICC profiles for their devices so you can soft-proof at home. Or buy your own printer and calibrate it.
|
|
#
?
Feb 16, 2009 21:15
|
|
|
If you live near a Costco, they apparently run printers that are ICC calibrated and such. http://www.drycreekphoto.com/icc/ has a bunch of profiles and guides
|
|
#
?
Feb 17, 2009 05:31
|
|

|

|
| # ? May 16, 2024 18:27 |
|
|
Nice tip, that website is awesome.
|
|
#
?
Feb 17, 2009 06:21
|
|