

|
Speaking of LAB color, I highly recommend this book: http://bit.ly/SNrFi
|
 #
?
Mar 4, 2009 22:57
#
?
Mar 4, 2009 22:57
|
|


|

|
| # ? May 16, 2024 17:43 |
|
|
brad industry posted:Speaking of LAB color, I highly recommend this book: http://www.ledet.com/margulis/articles.html The stuff he does with masking in chapter 9. Holy crap.
|
|
#
?
Mar 5, 2009 17:18
|
|
|
brad industry posted:Speaking of LAB color, I highly recommend this book: Yep, this book is pretty incredible.
|
|
#
?
Mar 5, 2009 19:42
|
|
|
'spose this is the best place to ask this: I need to move my lightroom hard disk to another computer, where it will have a different drive letter. How would I go about this so I don't lose all the metadata / LR processing info (I didn't make XMPs so I presume everything is in the LR catalog)? I'm assuming if I just copy the catalog, lightroom is going to think all the files are missing... Windows, BTW.
|
|
#
?
Mar 5, 2009 22:55
|
|
|
Thanks Brad and quazi, I just ordered that book based on the preview chapters quazi linked to. I haven't played around much with LAB but it the magical things he does in it sells it on me.
|
|
#
?
Mar 5, 2009 23:00
|
|

|
evensevenone posted:'spose this is the best place to ask this: No it won't. Just open the catalog file and you should be good to go. You might need to tell LR to look at the new drive letter but it's not going to have to rebuild the catalog or anything like that. You won't lose anything.
|
|
#
?
Mar 5, 2009 23:28
|
|
|
brad industry posted:No it won't. Just open the catalog file and you should be good to go. You might need to tell LR to look at the new drive letter but it's not going to have to rebuild the catalog or anything like that. You won't lose anything. LR is pretty awesome, isn't it. You have to seriously screw around with your file structure to get it confused, else it just gets on with the job without you noticing
|
|
#
?
Mar 6, 2009 03:15
|
|

|
And if you want to move stuff you just add the target directory and move it with LR.
|
|
#
?
Mar 6, 2009 08:40
|
|

|
Does post-proc include organization? I'm having a hard time understanding the mentality to organizing, naming, trimming, exporting, folder locations, etc etc. that's key to not moving like a turtle when I'm editing photos. Right now I'm name the photo batch when I import [Month-Day-Year][Title][#] and move it into folder that also contains catalog. I flag rejects, edit->select rejects and delete off of disk. This part is bad, but I export it into a seperate folder on Desktop as jpegs and upload to flickr. Then I flag the ones that are good enough to print. porcellus fucked around with this message at 10:35 on Mar 7, 2009 |
|
#
?
Mar 7, 2009 10:31
|
|
|
porcellus posted:Does post-proc include organization? I'm having a hard time understanding the mentality to organizing, naming, trimming, exporting, folder locations, etc etc. that's key to not moving like a turtle when I'm editing photos. Absolutely, file management is part of post-processing. You can get a Lightroom plugin to directly export your photos to Flickr. That'll save you a couple of steps. You don't have to export any JPGs anywhere to do it. Keep your files in RAW and let the plugin do the work. Also, I recommend you change your naming convention to year-month-day (eg 20090307 or 2009-03-07). It'll help you later, as you can sort them by name and they'll automatically be sorted by date too. You won't have to be in LR or any other program to quickly find what you want. Lightroom can automatically rename everything to this convention if you tell it to.
|
|
#
?
Mar 7, 2009 15:11
|
|

|
That's really useful, thanks. That naming scheme makes sense now in a macro-micro kind of way. I just realized my naming scheme would organize alphabetically to months, no matter the year either!
|
|
#
?
Mar 7, 2009 20:51
|
|
|
What's the best way of emulating a particular film's colorspace in Photoshop? I've been looking to reduce the "digital" look of my photos lately but I have no idea how to approach that problem other than actually shooting film.
|
|
#
?
Mar 8, 2009 02:30
|
|

|
The Fomo posted:What's the best way of emulating a particular film's colorspace in Photoshop? I've been looking to reduce the "digital" look of my photos lately but I have no idea how to approach that problem other than actually shooting film. If you have Lightroom, then there are some excellent, easy to use and free presets for film. (Don't know about PS, sorry)
|
|
#
?
Mar 8, 2009 02:44
|
|
|
spog posted:If you have Lightroom, then there are some excellent, easy to use and free presets for film.
|
|
#
?
Mar 8, 2009 03:16
|
|
|
The Fomo posted:I do have Lightroom 2, where can I find these presets? http://www.presetsheaven.com/ I've been playing with the Black and White ones and they are very impressive (the autotone versions give the most dramatic matching) Download them to your desktop, then open LR and go to the Develop module. Right-click on the left column somewhere and import presets.
|
|
#
?
Mar 8, 2009 03:43
|
|
|
I did some post-processing on friend's holiday photos. Mostly for practice. The originals are .jpg:s shot with a point'n'shoot. Original:  Post-processed:  The processing consisted of blending layers with different exposure adjustment together (-2 -1 0 ans +1), noise ninja and sharpening a'la poopinmymouth. Thank you for the great tutorial! It was what got me started on more intensive processing than playing with the sliders in Lightroom. Is there something you would have done differently?
|
|
#
?
Mar 8, 2009 18:32
|
|

|
DoLittle posted:I did some post-processing on friend's holiday photos. Mostly for practice. The originals are .jpg:s shot with a point'n'shoot. The sky looks alright, but I would have left them looking like black people, not silverish washed out shiny people. I think you went overboard on the people themselves.
|
|
#
?
Mar 9, 2009 02:32
|
|


|
DoLittle posted:I did some post-processing on friend's holiday photos. Mostly for practice. The originals are .jpg:s shot with a point'n'shoot. Yeah compare the skintones with the people on the left to the people on the right. It's quite different. I'd see what I could do to minimize it- I can see it is just due to the natural light as it is still apparent in the original.
|
|
#
?
Mar 9, 2009 03:32
|
|
|
DoLittle posted:I did some post-processing on friend's holiday photos. Mostly for practice. The originals are .jpg:s shot with a point'n'shoot. Made me think of this video 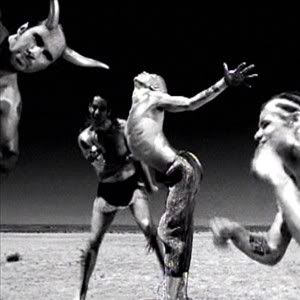
|
|
#
?
Mar 9, 2009 03:51
|
|

|
ConfusedUs posted:The sky looks alright, but I would have left them looking like black people, not silverish washed out shiny people. I think you went overboard on the people themselves. RangerScum posted:Yeah compare the skintones with the people on the left to the people on the right. It's quite different. I'd see what I could do to minimize it- I can see it is just due to the natural light as it is still apparent in the original. Zoowick posted:Made me think of this video Thank you for the comments! It's always good that someone tells you when the work you've done is crap. In real life most people are too polite to do so. Perhaps this one would be more balanced:  I haven't (yet) done anything to minimize the left-right difference in skin tones that RangerScum suggested. DoLittle fucked around with this message at 09:13 on Mar 9, 2009 |
|
#
?
Mar 9, 2009 08:22
|
|
|
KefkaFloyd posted probably one of the best to-the-point explanations of color profiles that I've come across. It's quite poignant considering its exactly what I'm doing in class this semester. Our school lab uses a set of xrite tools, some of which are several years old, but it's a full display/print/capture device suite that I wish I had the extra cash around for. We've covered profiling the Blad CFV backs with different light sources, Betterlight scanbacks (which totally sucks), and he had us so far as bring in our most off the wall inkjet art paper we could find to profile on our aging Epson R1800's (which was totally fun). Our class has our own specific logins for the mac lab with monitor profiles that we created for the task of making sure everything works together. It's all very cool, and REALLY important. A good color management lesson is needed for so many hacks out there that have NO idea and NO control on any of their images. I get so uneasy editing at home now, and I've been bringing everything to school, just take a quick glance at work on the school's machines to confirm that stuff looks the way it should.
|
|
#
?
Mar 9, 2009 16:01
|
|
|
Myshra posted:Betterlight scanbacks (which totally sucks)
|
|
#
?
Mar 9, 2009 16:18
|
|
|
Betterlights have a lot of querks, I guess all of those querks come out in a communal student lab environment. If your camera isn't clean, any random piece of floating dust appears as a strange line artifact. They can be very difficult to profile, we had a hard time with them. Our regular 4x5 student cameras are all signed out to a really big large format class this semester, the studio class is having to scrape the bottom of the barrel for equipment. We ended up having to use this like 30yr old Kardon 4x5 that was completely terrible to use as a profiling setup. The lights we used aren't stupid brand new, and so issues with bulb age intensity show up loud and clear on a test chart over a 2 to 4 minute scan. The addendum was more so about the whole process of profiling the Betterlight. For still life photography, it's truely incredible the detail you can get with it. Enough derail though... What brands of hardware to some of our working photogs use for color management? Do you also use a print specto setup?
|
|
#
?
Mar 9, 2009 16:36
|
|
|
Myshra posted:What brands of hardware to some of our working photogs use for color management? Do you also use a print specto setup? Print profiling's pretty much X-Rite or bust. ColorMunki or i1, take your pick. Or some of their older strip-reading units if you don't mind paying through the nose for repairs that won't last. Don't you dare waste your money on the Spyder3Print/Spyder3Studio/PrintFix Pro. That thing is the biggest, stupidest pile of poo poo anyone has ever made for print profiling. (Well, I take that back, Monaco's scanner-based solution was worse. But it also didn't pretend to be professional quality.) Not a big advocate of buying a spectro if you're using a recent-gen professional printer, though. The Epsons are basically stable for the life of the printer (so their canned profiles work fine for most people, assuming you stick with Epson media), the HPs profile themselves (albeit sometimes poorly), and the Canons calibrate themselves to remain in a usable state. Molten Llama fucked around with this message at 18:39 on Mar 9, 2009 |
|
#
?
Mar 9, 2009 18:36
|
|
|
The Fomo posted:What's the best way of emulating a particular film's colorspace in Photoshop? I've been looking to reduce the "digital" look of my photos lately but I have no idea how to approach that problem other than actually shooting film. There are no shortcuts, don't bother with presets. The best way to do it is in your RAW processor. You are just going to have to spend a lot of time in the H/S/L dialog, but of course this requires that you can recognize what it is you like about whatever film you are trying to recreate. Subtle split toning also goes a long way. Molten Llama posted:Print profiling's pretty much X-Rite or bust. I agree that those X-Rites are pretty much the standard, that is what I used and it did a beautiful job on the 70ish papers I profiled. I disagree that the canned profiles are any good though, calibrating for your specific setup makes a MASSIVE difference. If you are happy with the canned profiles then don't bother obviously, but I encourage everyone to get a custom profile for whatever paper you most commonly use. This all depends on how picky you are with your prints. I wouldn't recommend anyone actually buy a spectro. If you only use a handful of papers there are plenty of places you can send out a target to that will do it for you for cheap (~$20ish). If you are going to calibrate a ton of papers then rent one for a day and churn them out.
|
|
#
?
Mar 9, 2009 20:08
|
|
|
brad industry posted:I wouldn't recommend anyone actually buy a spectro. If you only use a handful of papers there are plenty of places you can send out a target to that will do it for you for cheap (~$20ish). If you are going to calibrate a ton of papers then rent one for a day and churn them out. It's these no bullshit, gems of common sense that I love about this thread... Any recommendations of companies who rent, or will do the reading for you? I live within 30 min driving from NYC.
|
|
#
?
Mar 9, 2009 21:27
|
|
|
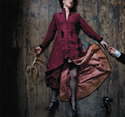
Zoowick posted:David Hill I really enjoy David Hill, but I'm not sure what techniques he uses to gain the effect he goes for. Any pointers?
|
|
#
?
Mar 9, 2009 23:11
|
|
|
Cyberbob posted:I really enjoy David Hill, but I'm not sure what techniques he uses to gain the effect he goes for. Any pointers? I remember seeing a few Flickr thread on folks figuring out how to get the "David Hill" effect. Might want to start there.
|
|
#
?
Mar 9, 2009 23:20
|
|

|
Avoid anything involving the high pass filter. PLEASE. You will not find Dave Hill there.
|
|
#
?
Mar 10, 2009 00:40
|
|

|
Cyberbob posted:I really enjoy David Hill, but I'm not sure what techniques he uses to gain the effect he goes for. Any pointers? Best I could come up with http://limeliteimages.wordpress.com/2007/10/30/dave-hill-tutorial/
|
|
#
?
Mar 10, 2009 01:29
|
|
|
The thing you have to remember is that Dave Hill is carefully lighting his images with whatever processing he does in mind from the beginning. He's not just slapping some sliders around in LR or PS.
|
|
#
?
Mar 10, 2009 02:01
|
|
|
Does anyone know how good of a job Lightroom does with finding files? I'm planning on doing a rather large backup and it would be pretty rad if it was able to figure out that my files went to a harddrive.
|
|
#
?
Mar 10, 2009 03:26
|
|
|
brad industry posted:The thing you have to remember is that Dave Hill is carefully lighting his images with whatever processing he does in mind from the beginning. He's not just slapping some sliders around in LR or PS. Definitely, he's got some videos on his website and some of them show the insane amount of lights he uses on his shoots. He is what I'm striving for as far as lighting goes.
|
|
#
?
Mar 10, 2009 05:00
|
|
|
The key to the Dave Hill style is 360 wrap around lighting. Then he simply tone maps/dodges & burns/jacks up shadow detail and brings down the highlights. The 360 degree lighting is key to not creating haloing when you're bringing that level of detail out in an image. Actually, Scott Kelby had a nice little write up on the style recently; http://www.scottkelby.com/blog/2009/archives/2946
|
|
#
?
Mar 10, 2009 06:34
|
|
|
Hot Cops posted:Does anyone know how good of a job Lightroom does with finding files? I'm planning on doing a rather large backup and it would be pretty rad if it was able to figure out that my files went to a harddrive. It does it spectacularly well. I routinely swap my catalog file from place to place and it happily finds the right folders, regardless of the change in drive letter or location. I've only confused it once (split a folder into two, then moved the catalog to an unsplit copy) and even then, I think there was a way around it.
|
|
#
?
Mar 10, 2009 07:57
|
|
|
I actually had 2 hard drives fail recently and the only thing I was not able to recover was the actual Lightroom catalog file. I just re-imported my files into a new catalog and all my info was intact, even though the files were on a new drive and I was basically starting from scratch. Lightroom rules.
|
|
#
?
Mar 10, 2009 08:41
|
|
|
The only things you lost are your history, virtual copies, and snapshots (I think).
|
|
#
?
Mar 10, 2009 14:54
|
|
|
spog posted:http://www.presetsheaven.com/
|
|
#
?
Mar 12, 2009 01:41
|
|

|
Not to get back on the whole "print profile" argument thing, but for work everything is always for offset printing, so I really have no idea how RGB printing works. If I get an RGB printer profile from my printer, what am I supposed to do with it? Is there a good tutorial explaining in a step-by-step manner what I'm supposed to do to correct photos for an RGB printer? I'm wanting to do some printing, but I really don't want to have to order thousands of copies like you would with an offset printer.
|
|
#
?
Mar 12, 2009 02:03
|
|

|
|
| # ? May 16, 2024 17:43 |
|
|
In the PS print dialog you basically just select "Let Photoshop Manage Color", pick the appropriate ICC profile from the drop down list, and hit "Print". The driver dialog comes up, you select the correct media type (luster/glossy/matte), turn off all color management, then send it to the printer.
|
|
#
?
Mar 12, 2009 02:17
|
|