


|
Ok. I'm having some trouble with stick welding. What causes porosity? I'm trying to weld some 1/4" steel plates together, and I'm grinding it down to keep it looking good, but I'm noticing that some of the areas have terribly porous sections, which isn't any good, since I'm welding something up that's supposed to hold water. Tips? Ideas?
|
 #
?
Feb 18, 2009 02:30
#
?
Feb 18, 2009 02:30
|
|


|

|
| # ? May 25, 2024 07:25 |
|
|
What electrodes are you using? There are a number of things that can cause porosity. Porosity is the result of gases not having sufficient time to escape before the puddle solidifies. Things to look for: -incorrect electrode angles -excessively long or short arc length -welding current too high or too low -travel speed too fast -base metal covered with oil, grease, moisture etc. -wet, unclean, very old, or damaged electrodes.
|
|
#
?
Feb 18, 2009 03:03
|
|

|
dv6speed posted:What electrodes are you using? E6013 from Home Depot. I've spent hours trying to figure this thing out, and I think I've come to the end of my wits. I keep grinding out the porous section, weld it back up, and I end up with another porous section... Ugh. Bleah.
|
|
#
?
Feb 18, 2009 04:10
|
|
|
6013 is really, really finicky. Can you get some 6011 or 6010 from HD?
|
|
#
?
Feb 18, 2009 04:11
|
|


|
I'm doing a remodel on a welding shop at the local community college. Why do they always keep all their rods in a heater? I thought that was only for a certain kind of rod. If I buy welding rods, do I also have to get a heater? Also, I used my wirefeed welder to weld up some 1/8" steel; the "bead" looked OK, but only seemed to stick to one piece of metal at a time. I eventually turned the feed speed down to 1 or 2 (recommended 3-5) and the heat up to 3 (recommended 2) and finally got a weld pool and a bead that goes all the way into both pieces of metal. Is this just one of those things where the only thing that will teach me is practise, or could I have looked it up in some book?
|
|
#
?
Feb 18, 2009 04:16
|
|


|
Slung Blade posted:6013 is really, really finicky. Oh, probably. But I decided to abandon this project and refund the client his money back. I must have spent hours and hours on this thing... :: sigh :: I'll have to wait until I have some more practice on stick before I agree to do any commissioned art with it.
|
|
#
?
Feb 18, 2009 04:39
|
|
|
babyeatingpsychopath posted:I'm doing a remodel on a welding shop at the local community college. Why do they always keep all their rods in a heater? I thought that was only for a certain kind of rod. The ones in the heater are low-hydrogen electrodes, the heat keeps moisture out of them. Usually this is just rod like 7018, but there's no harm in keeping other types of rod in there too. Moisture is almost always bad in electrodes, with a few exceptions. You don't need a heater unless you want to use rods like 7018. As for the MIG question, I'm not really sure, I've never done much of it. But probably yes, practice is pretty much the best way to figure things out, that or a course.
|
|
#
?
Feb 18, 2009 04:52
|
|
|
jovial_cynic posted:Oh, probably. But I decided to abandon this project and refund the client his money back. I must have spent hours and hours on this thing... I tried to use 6013 for some things too, and I just couldn't get it to work before. If I remember what dv6 told me (correct me if I'm wrong here), for 6013 to be used, the base metal has to be really, really clean. Honestly I hate that loving rod. You would certainly have better luck with a more forgiving electrode.
|
|
#
?
Feb 18, 2009 04:56
|
|
|
Slung Blade posted:You would certainly have better luck with a more forgiving electrode. Good to know. I'll keep that in mind. Does that rod have a specific purpose, or is it just generally a bad rod?
|
|
#
?
Feb 18, 2009 05:22
|
|
|
It's just a general purpose rod, no specific usage. 6013 is a bastard as far as I'm concerned, and can be replaced with 6010 or 6011 with better results in the hands of amateurs like me. Maybe the welding gurus will disagree. I'm sure they use it to great effect in lots of situations.
|
|
#
?
Feb 18, 2009 22:07
|
|
|
If 6013 is used properly it will make a very nice looking bead very similar to 7018. As far as strength is concerned it's the same as 6010/6011. The main advantage of it is that it works with AC unlike normal 7018, and that it has less penetration then 6011 so can be used with thinner metal. It also can run on DC Electrode negative which is also useful on thinner metal. If your metal thickness is 1/8" or thicker then 6011 will do everything you need for the most part as far as the home metal shop is concerned. If you have a DC welder then 7018 is a nice addition too. They really don't use 6013 in industry. If 6010/6011, 7018, or 7024 don't do it, then they use MIG/FCAW or TIG. babyeatingpsychopath posted:I'm doing a remodel on a welding shop at the local community college. Why do they always keep all their rods in a heater? I thought that was only for a certain kind of rod. You don't need a rod oven unless you want to do code quality welding (doubtful) or you want to store large amounts of 7018 for extended periods of time (months). babyeatingpsychopath posted:Also, I used my wirefeed welder to weld up some 1/8" steel; the "bead" looked OK, but only seemed to stick to one piece of metal at a time. I eventually turned the feed speed down to 1 or 2 (recommended 3-5) and the heat up to 3 (recommended 2) and finally got a weld pool and a bead that goes all the way into both pieces of metal. With MIG/FCAW experience will teach you the relationship between heat (volts) and wire feed speed (inches per minute) and how to adjust it based on what the puddle is doing. That being said there are charts that list base metal thickness, wire diameter, and the recommended volt/ipm is. Now your machine has some number system instead of volts/ipm dials. Finding out the ipm is easy. You hold the trigger for 6 seconds, measure the wire that came out, then multiply by 10. This is a good trick to know because dials aren't always accurate or the same from machine to machine. So if you know for X application you want X ipm, you can always use that trick to set the exact ipm you want. After you have that, you can run some beads and then adjust your heat (volts) as necessary. AbsentMindedWelder fucked around with this message at 03:02 on Feb 19, 2009 |
|
#
?
Feb 19, 2009 02:59
|
|
|
Glad I was linked to this thread. I've always wanted to try welding, not so much as a career path but something I can do so I can make modifications on cars, motorcycles, bicycles and other crap I want to make fast. I picked up a welding book, and I've been scouring the internet in search of advice. I read this thread and I have to say that it's been immensely helpful, more so than other forums I've read, some of which seem to have conflicting information regarding welding. The only consistent bit of information I can find is that for people who want to learn how to weld, the first thing you need to do is get an oxy-acetylene setup because it's the best way to learn the absolute basics before you move on. I plan on picking up a decent used/new Victor or Lincoln setup once I find a place with a garage or a yard. The books and information presented all say good things about the processes, but I haven't yet found one that says "Oh, you're looking to do [X]? Stick with this process." I know the basic differences between GMAW, GTAW, and SMAW. I guess the best question to ask is "If I'm looking to piss around with cars, trailers, engine mounts, etc., what is the best process to concentrate on?" MIG appears to be the easiest to learn (although supposedly the hardest to get a truly handsome and strong weld out of due to cold starts and other things) while TIG appears to have a ridiculous learning curve but gives you incredible control and makes your welds look stunning. Stick looks great for doing rugged repairs in less-than-ideal situations since it doesn't need any gas or extremely clean metal to work with, but I can't realistically see myself using stick for fabrication due to slag and spatter issues. In short, I'm looking for some veterans' advice: For those of you in the motorsports and "things that move" categories, what process do you find yourself using most? Which one could you live without? If you could do it all over again, where would you start? Thanks in advance.
|
|
#
?
Feb 22, 2009 01:35
|
|


|
Ripoff, You will definitely want a torch. As far as what you'll be dealing with however, (moving objects) you will definitely want some sort of arc welding process. Which one depends on how much money you want to spend. If you could only have 1 welding machine you'd want TIG. The reason I say that is it's only a matter of time till you'll want to weld up stainless and aluminum. If you don't mind spending money however, start out with a MIG then add a TIG unit later. MIG will be useful for stuff like welding exhaust pipes or sheet metal for body work Stick welding will be next to useless for what you'll be doing, except for perhaps stuff like welding jigs up to aid in your fabrication. (When you get a good TIG machine, you'll have the ability to do stick welding with it too since both TIG and stick use constant current power supplies.) Because you'll be working on moving objects that can potentially hurt people, no matter which process(es) you use, you will want to practice your rear end off and spend alot of time educating yourself about preforming the welding process and the metallurgy behind the materials you'll be working with.
|
|
#
?
Feb 22, 2009 02:01
|
|
|
dv6speed posted:Because you'll be working on moving objects that can potentially hurt people, no matter which process(es) you use, you will want to practice your rear end off and spend alot of time educating yourself about preforming the welding process and the metallurgy behind the materials you'll be working with. Exactly what I was planning to do. Unfortunately all the local welding classes are full for this semester but this summer I'm going to try to get in on some night welding classes to get the pros to teach me and look things over. I'm also looking to buy a machine so I can practice my rear end off.
|
|
#
?
Feb 22, 2009 02:23
|
|
|
If you do go with TIG, and I agree with dv6 in that you should, make sure it will do AC and DC. DC is great for steel and stainless, but it will not do aluminium. You need the AC to break up the oxide that forms on exposed aluminium in mere seconds after it's been cleaned.
|
|
#
?
Feb 22, 2009 07:07
|
|
|
Just to let you guys know, technically you can weld Aluminum with a DC current but it's generally only good for thicker materials since you need to use a high current to break through the oxide layer. As a hobbyist I would advise a 220v MIG welder for the types of things you're talking about doing. The only thing you'll really need to be careful of is if you start doing roll cages. You'll have to make sure you get good tie ins as you get around your pipes to ensure a solid weld. TIG is probably the best way to go for roll cages but for the other things you're talking about MIG will save you the headache of learning to actually weld to get anything done. SMAW isn't really as dirty of a process as all the books make it out to be. I've made countless Xray quality welds with the process. It can be as dirty or as clean as you make it. If you want to take the time to make it a clean weld then it will be a clean weld. Today I did my first Stainless Steel TIG weld. I used 309L on a 6" SCH40 carbon steel pipe and to be honest with you it was a lot easier than I thought it would be. But maybe that's because of my previous TIG training. The only real difference was the set up time building the purge dams and all that.
|
|
#
?
Feb 24, 2009 02:48
|
|
|
Zquargon posted:After a little bit more tinkering around, I think I have the right idea going now, and you are right, a light grip does make things a bit easier As far as the angle I'm holding my workpiece at, it is a little bit higher than parallel to the face of the anvil. It may be a wrong height, but it's a comfortable stress free height. The anvil itself is a little bit lower than my knuckles when I left my arm hang at my side. I tried to draw a taper on the horn, but I didn't have as much control as I wanted, and the noise was a bit much. Wow, I forgot all about this thread for far too long. It's good to be back. Zquargon, glad to hear you're getting a start in the field. Blacksmithing is absurdly rewarding once you get the basics down. For tapering a point, it might be best to start out attempting a square point (you may already be doing this). You'll want to set the hot tip so it's right at the edge furthest from you on the anvil face. The horn does let you draw/taper things a bit faster, but it's also a lot less stable and it's best to do as much on the face as possible when you're starting out, since it's a good solid platform. The hammer face should be coming down at an angle slightly toward you, so that the lowest point of the blow is almost hitting the edge of the anvil, but your metal is in between the two (hitting the edge of the anvil with your hammer face is a good way to gently caress up both of them). Just give it a few nice whacks, turn it 90 degrees, and do it again. Lather, rinse, repeat. A loose hammer grip is best, you want your thumb and forefinger to form an O around the handle, and you're really just picking it up, letting it drop, and aiming. You give the hammer a bit of acceleration on the way down, but one well-aimed medium blow is worth three sloppy heavy blows 9 times out of 10. Again, you may already know this stuff, but it's things I wish I'd been told just starting out. If you run your thumb along the back of the hammer handle you will get more control, but you will also be absorbing the hammer's rebound with your bones, leading to future injury and preventing you from using that rebound to help carry the hammer back up to the top of the swing. I'll sometimes put my thumb back there when I'm working with really tiny stuff or surface finishing, but it's almost never a good idea. You'll gently caress up a bunch in the beginning, just like all of us did, but if you practice the basic techniques enough, you'll get a good handle on the mechanics of moving the metal around, and then it's just a matter of scaling and combination. Welcome to the club. Edit: watch all the videos you can. It's really the best way to learn if you can't hang out in a shop 2 days a week like I did Dongsmith fucked around with this message at 03:27 on Feb 26, 2009 |
|
#
?
Feb 26, 2009 03:22
|
|


|
Dongsmith posted:Wow, I forgot all about this thread for far too long. It's good to be back. Post some pictures dammit. It's -20C outside and I haven't had the time to go out there during the weekends. Seconding the part about the thumb on the back of the hammer. That's a great way to give yourself tennis elbow.
|
|
#
?
Feb 26, 2009 07:16
|
|
|
Heh thanks for the pointers, and I am glad to say that I never considered doing the thumb on the back of the hammer bit. So far it has been a crapload of fun, and I expect it'll only get better. I've got a few other forums that are leading me along the beginner's path as well, so no worries about a lack of videos and pointers. Haven't been able to get out and do much lately though, stupid work, interferes with my fun... Zquargon fucked around with this message at 21:27 on Feb 26, 2009 |
|
#
?
Feb 26, 2009 07:35
|
|
|
Slung Blade posted:Post some pictures dammit. It's -20C outside and I haven't had the time to go out there during the weekends.
|
|
#
?
Feb 26, 2009 08:04
|
|
|
On one of the other message boards I frequent, they've got a pretty nifty recipe for a finish to use on your workpiece when you are done with it, and it's really easy to make yourself. The recipe is outlined in this video: http://www.youtube.com/watch?v=bcndMLZV7hs&feature=channel_page I made myself a huge batch of the stuff last night, and I happened to remember my camera when I started, so here is a pictorial version of the recipe for y'all! Ingredients (for this sized batch): 3lbs beeswax 1 gallon can of Boiled Linseed Oil 2 1-quart cans of turpentine Those were the only size cans of the oil and turpentine they had at my local home improvement store, your mileage may vary. I only used one quart of linseed oil, so if you can get that, you're golden. Equipment: 1 hotplate (or make your own like I did) 1 pot to be sacrificed to the Blacksmithing gods, because you don't want to cook with this thing ever again. ... I bet you guys were expecting the pictures about now, eh? I am actually sharing this on another forum as well, so I kept all the pictures on flickr so I didn't have to figure out how to get both forum softwares to display my pics how I wanted 'em. No, it is not lazy, it is effecient... Oh hush. Here is the link to the set, which has instructions and commentary for each step. http://www.flickr.com/photos/34975971@N06/sets/72157614867908097/ Enjoy!
|
|
#
?
Mar 8, 2009 03:11
|
|
|
That's cool stuff, and that guy's youtube channel has some pretty interesting stuff on it too. So has anyone been able to make anything lately? It's been too drat cold and windy here for me to go outside for long periods.
|
|
#
?
Mar 8, 2009 07:33
|
|
|
Slung Blade posted:That's cool stuff, and that guy's youtube channel has some pretty interesting stuff on it too.
|
|
#
?
Mar 8, 2009 17:47
|
|
|
I know next to nothing about metal fabrication and have a question. I figured that with the wealth of knowledge on here, someone should at least be able to point me in the right direction. Where could I order order a brushed piece of metal, approximately 16"x16"x1/8," with a 15x15 square grid on it (preferably thin black lines). The piece of metal would also ideally have rounded corners. Are there any places online that will take a cad file and create a custom piece of metal like that on the cheap?
|
|
#
?
Mar 9, 2009 22:28
|
|

|
gce posted:Where could I order order a brushed piece of metal gce posted:approximately 16"x16"x1/8," with a 15x15 square grid on it (preferably thin black lines) gce posted:Are there any places online that will take a cad file and create a custom piece of metal gce posted:on the cheap? http://www.emachineshop.com/ Might be able to help you out. If you give us some more details, myself or someone else here might be able to help you out as well.
|
|
#
?
Mar 10, 2009 01:09
|
|
|
dv6speed posted:What do you mean by brushed? dv6speed posted:Do the lines have to be cut into the metal or just painted on? dv6speed posted:Cheap? Nope. Of course, that depends on your definition of cheap. Thanks for that link, I'll check it out.
|
|
#
?
Mar 10, 2009 01:39
|
|
|
gce posted:I know next to nothing about metal fabrication and have a question. I figured that with the wealth of knowledge on here, someone should at least be able to point me in the right direction. http://www.quickshipmetals.com/304-stainless-steel/34food-grade-stainless-steel-sheet-024.html will get you close. Do the measurements have to be exact? You should become buddies with a metalworker in your town. And the painted-on grid may be hard; the same people who cut steel probably won't be the same people who can paint with any sort of precision on it. Painting it yourself may be the best option.
|
|
#
?
Mar 10, 2009 02:40
|
|

|
I'll ask my boss if I can take home a piece of 1/8" steel for ya. It'd be normal carbon steel, so you'd have to deal with the "brushed" look, the grid lines, and finishing the metal so it doesn't rust yourself (IE clear coat of paint). But, I can cut it to size and give it rounded corners.
|
|
#
?
Mar 12, 2009 02:37
|
|
|
I was finally able to get outside, +16C today in the sun, so I was able to wear nothing but shorts and a t-shirt. It was loving great. I worked some more on that speedbag mount, no pictures, I was too busy and there's not much to show anyway. I was re-doing one of the primary curves on the bracket and just welding a whole lot. And chipping tools and stuff out of the ice that's built up in my work area. I hope to get out again tomorrow and finish the welds, if I get done I will take a picture or two. Then I grilled some steaks and enjoyed some wine. Tis a good life I live.
|
|
#
?
Mar 15, 2009 03:59
|
|
|
Do those of you that have an open air shop do anything to cover your anvil when not in use or otherwise protect it from the rain? I am also starting to look around for a drill press. I haven't decided if I want to go for new or used. Any pointers or things I should watch for?
|
|
#
?
Mar 16, 2009 05:40
|
|
|
I built a box out of spruce to cover my anvil, then I stained it with some outdoor grade stain. The bottom is open, so moisture still gets in, but the area I live in is so dry it rarely matters. The worst thing that happened is some frost formed on the anvil in little spots and created tiny little rust dots on the face. It looked like it had chicken pox. A quick brush up with a sanding sponge took it all off though. I would recommend covering it with a tarp, some heavy canvas, or something waterproof. Hell, even an up-ended rubbermaid bin would work well.
|
|
#
?
Mar 16, 2009 14:46
|
|
|
Why not coat it in WD40?
|
|
#
?
Mar 16, 2009 15:39
|
|

|
RealKyleH posted:Why not coat it in WD40? Because it would burn as soon as I touched a red hot iron bar to it.
|
|
#
?
Mar 16, 2009 17:54
|
|
|
Slung Blade posted:Because it would burn as soon as I touched a red hot iron bar to it. That makes it exciting. We use this oil called corrosion cracker to remove a part of a trombone slide that is usually pretty much welded to the trombone because it collects all the moisture and crap people spit into their horns. When we remove the part, we have to heat the tube up to get the solder to flow and put some oil in there to bust up all the crud. The person removing the tube with you gets tube pulling pliers and a rawhide hammer and goes to town smacking the pliers to get the tube out while you use acetylene to heat it, and when it finally comes out the oil ignites in a big green fireball. It is awesome every time.
|
|
#
?
Mar 16, 2009 21:21
|
|
|
Brekelefuw posted:....and when it finally comes out the oil ignites in a big green fireball. It is awesome every time. I want to see a video of this. In other news, I have been sealing my worktable with the beeswax goop that I made a while back. It works insanely well, the wood I used sucks that stuff up like mad. It does have one unintended side effect though... I seem to have attracted the notice of every bee in a mile radius. All they seem to be doing though is eating or carrying away all the excess wax that the wood didn't soak up, leaving the table pretty smooth. I hope that the other stuff in the mix doesn't hurt them...
|
|
#
?
Mar 17, 2009 06:06
|
|
|
I posted this in my welding thread in SA-Mart, but I figured I'd post here, since this is quite a departure from my normal welded figurines: ---  I've always liked this Picasso sketch of Don Quixote and his sidekick, trotting through fields with windmills in the distance. There's something otherworldly about it that, in a few strokes, captures insanity, loneliness, friendship, struggle... all in one image. But mostly insanity, given the actual story of Don Quixote. My old boss wanted me to weld up something that resembled Don Quixote, and last Christmas, I got around to making a welded replica of the Picasso: 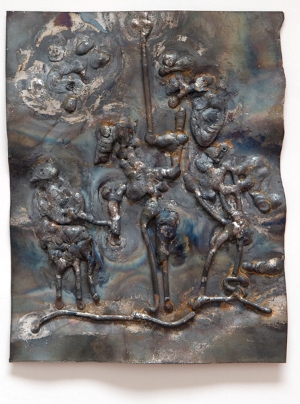 It's a welded relief sculpture, which ends up being a work of art (mine), based on a work of art (Picasso's), based on a work of art (Cervantes'). This is an example of multi-tiered inspiration.
|
|
#
?
Mar 17, 2009 19:50
|
|
|
Beautiful.
|
|
#
?
Mar 17, 2009 22:38
|
|
|
jovial_cynic posted:I am THE MAN at welded artwork!
|
|
#
?
Mar 17, 2009 23:06
|
|
|
thanks, guys. I've been told by a few people that see everything that I bring in to mail out to clients that the Quixote piece is the best thing I've done so far, and that I should consider making more welded relief sculptures, but larger. That one in the picture is basically life-size.
|
|
#
?
Mar 18, 2009 19:26
|
|
|

|
| # ? May 25, 2024 07:25 |
|
|
Believe it or not, Monday's xkcd is semi-related: http://xkcd.com/556/
|
|
#
?
Mar 19, 2009 01:33
|
|