

|
dakana posted:Also remember that other parts of of "pop" are appropriate aperture selection, sharpening methods, lighting (and time of day), and lens quality. Yeah...im using 40D with 17-55mm f/2.8....i usually shoot 5.6 and under. I guess it has to do with the lighting mainly....but i am not sure why but seems lens has lost alittle sharpness and contrast? Hard to replicate results and compare to previous.
|
 #
?
Mar 20, 2009 00:58
#
?
Mar 20, 2009 00:58
|
|

|

|
| # ? May 16, 2024 17:57 |
|
|
Tez posted:Yeah...im using 40D with 17-55mm f/2.8....i usually shoot 5.6 and under. I guess it has to do with the lighting mainly....but i am not sure why but seems lens has lost alittle sharpness and contrast? Hard to replicate results and compare to previous. Both sharpness and contrast can be affected by a ton of factors, especially if you're shooting outside. The light and time of day outside, the haze in the air, focus, aperture, shutter speed, ISO speed, filters, lens flare, raw conversion...
|
|
#
?
Mar 20, 2009 01:02
|
|
|
Does anyone know how to make photos look like these? http://www.smh.com.au/interactive/2009/world/australians-in-afghanistan/index.html I just find them amazing and wish I could recreate that look. I have lightroom available to me... Also, what focal length would most of these be taken with? I've been tossing up for a while as to whether or not I should be an ultra wide lens as I currently only have 28mm, 50mm, 70-400mm lenses...
|
|
#
?
Mar 20, 2009 01:08
|
|

|
Womens Jeans posted:Does anyone know how to make photos look like these? What exactly is it about these photos you want to replicate? Quite a few of them are great news photos but I'm not really seeing any particularly standout about the processing- indeed, as news photos they are probably undergoing very limited editing.
|
|
#
?
Mar 20, 2009 01:32
|
|
|
TsarAleksi posted:What exactly is it about these photos you want to replicate? Quite a few of them are great news photos but I'm not really seeing any particularly standout about the processing- indeed, as news photos they are probably undergoing very limited editing. The skies seem to be very well exposed. Normally one would expect blown-out skies in sunny weather, but everything is under control, range-wise.
|
|
#
?
Mar 20, 2009 01:40
|
|

|
Shoot in angular light (ie early morning, late afternoon) and keep the sun behind you. Blue skies all over the place.
|
|
#
?
Mar 20, 2009 01:42
|
|
|
TsarAleksi posted:Shoot in angular light (ie early morning, late afternoon) and keep the sun behind you. Blue skies all over the place. Ah, good call. Long shadows all over the place in those photos.
|
|
#
?
Mar 20, 2009 01:46
|
|
|
Yep, and you can see where the shadows go really black-- there is no light coming from the other direction. In many respects its hard to find better light. ninja edit: unless for some reason you have to shoot the other way.
|
|
#
?
Mar 20, 2009 01:49
|
|
|
In the ones where the sky would have been blown out, he wisely got up on top of something and excluded the sky from the shot.
|
|
#
?
Mar 20, 2009 01:53
|
|
|
TsarAleksi posted:What exactly is it about these photos you want to replicate? Quite a few of them are great news photos but I'm not really seeing any particularly standout about the processing- indeed, as news photos they are probably undergoing very limited editing. I guess I just really like how everything looks so well exposed, and everything is so clear and clean...sharp and crisp perhaps...so most of it is just shooting in early morning/late afternoon, with the sun behind him?
|
|
#
?
Mar 20, 2009 07:42
|
|
|
Womens Jeans posted:I guess I just really like how everything looks so well exposed, and everything is so clear and clean...sharp and crisp perhaps...so most of it is just shooting in early morning/late afternoon, with the sun behind him?
|
|
#
?
Mar 20, 2009 07:59
|
|


|
pwn posted:Yes. drat that's easy :P
|
|
#
?
Mar 20, 2009 08:01
|
|
|
Bleh, why did they make the reporter sound like he's talking through a radio or something. Just sounds cheesy.
|
|
#
?
Mar 20, 2009 09:00
|
|

|
Ringo R posted:Bleh, why did they make the reporter sound like he's talking through a radio or something. Just sounds cheesy. It sounds to me like he is making field reports into whatever he's recording the conversations / interviews with. It's not like they have high-end recording gear just laying around Afghanistan. Women's Jeans posted:drat that's easy :P
|
|
#
?
Mar 20, 2009 12:32
|
|
|
I was going to post some how-tos and jazz using examples from yesterday's shoot. I have came to the conclusion that I am horrible at explaining on Something Awful internet chat forums. My tutorial would read like this: - Dodge her face a little, not too much. - Move that slider up +15. If it looks stupid don't do it. If anyone is interested, I can give you tutorials and funky secrets via Skype. Search Dan Driediger.
|
|
#
?
Mar 20, 2009 17:29
|
|

|
blake_sw posted:My tutorial would read like this:
|
|
#
?
Mar 21, 2009 04:53
|
|
|
 Quick animation of a typical edit of mine. First parts are editing the back plate, then pulling in the subject. Normally I wouldn't composite, but the light sources were so hard to match that it was actually easier to do it this way in this case. 1. Original photo of background, brought in from lightroom. It's been color balanced, the red shifted to have no orange and be a true red, and some constrast adjustments, bringing the clipped whites around the light back with the highlight recovery slider. CA was removed with my 50mm preset. 2. Distortion removed with the free transform and lens distortion filter. 3. Left half duplicated to right half for symmetry, but using a mask to disguise the middle bits so you don't get a Rorschach effect giving it away. 4. Tire tracks removed using an earlier shot background plate (car ran right in front of me with wet tires) 5. Blue lens flare removed from bottom and top. (very subtle but would be visible in a print) Second parts are bringing her in, masking her out, color balancing the main light, then color balancing the edges. I normally use the photo filter adjustment layers with masks to color balance. 6. Bring in the layer with her in it (notice how I'm in there holding the light stand. I couldn't get an assistant so I was using the 10 second timer and holding the light. I would have needed a HEAVY duty C-stand with a super strong boom to hold this light in this position) 7. Mask away the background using the magic lasso to start, then using a soft 50% opaque brush for the hair and boa to do careful masking. 8. Color balance her main light source. 9. Color balance the "fringe" where the light is leaking around from the fluorescent tube. 10. Final fixes on her fly away hairs, removing the last bit of orange. 11. Desaturate ground layer to hide the dual light sources. I needed the ground here to show her shadow and anchor her down, but had to remove the color giving away the composite job. 12. High pass desaturate sharpen layer. 13. Hide wrinkles and add body using healing brush and overlay layers (this was done under all the color correcting layers, but I did it last. It's non destructive but didn't have as much to do with the final image as all the color sources. In this image, every layer has a mask. Final image: 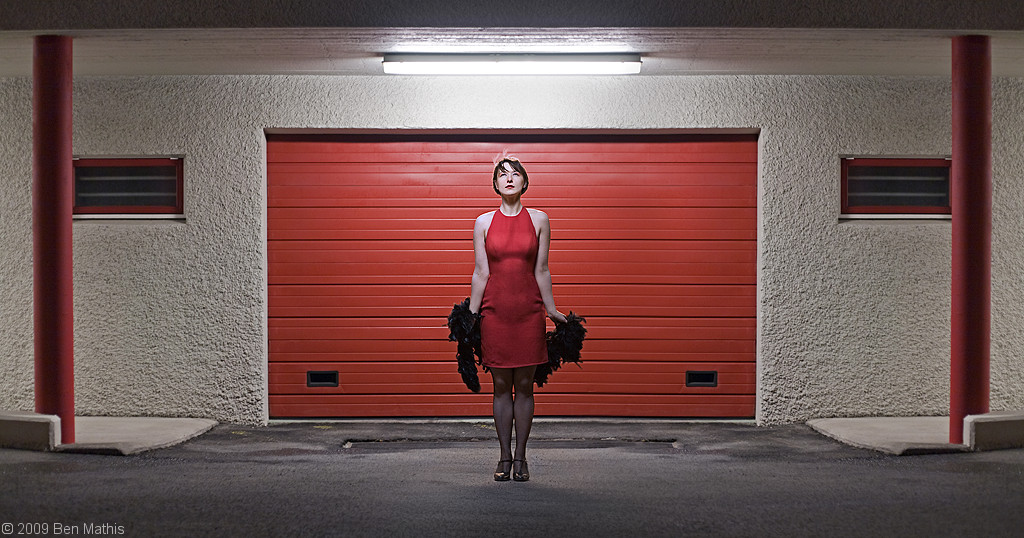
poopinmymouth fucked around with this message at 23:09 on Mar 29, 2009 |
|
#
?
Mar 29, 2009 22:59
|
|

|
I'm becoming a really big fan of using Portraiture to skin smooth, and then a reasonable (not overdone) amount of Topaz Adjust's "photo pop" or "clarity" setting. Both on different layers, opacity adjusted. This is done after messing with the raw and heal brushing out the subject's flaws. Eventually I'll put a high pass layer on, and final I do a layer of a fully desaturated version of the photo at a low opacity. This mutes the color vibrance just a tad, I find it makes the pictures look more natural. Examples of this process:  
|
|
#
?
Mar 30, 2009 02:36
|
|

|
I tried your steps above and got this. What did you set for your layer's opacity? Left is original, right is altered. Any critiques? I didn't use the photo pop setting that much, started looking too...vibrant. Click here for the full 800x533 image.
|
|
#
?
Mar 30, 2009 08:54
|
|
|
That's too 'fat girl angle' for me, but maybe I'm just conservative.
|
|
#
?
Mar 30, 2009 10:18
|
|
|
Umm, I meant the processing. It's just the first "people" shot I found in lightroom which could use some work. The layer which I used clarity on just seems to make the hair strands highlighted by the sun seem to pop out even more so I think I'm going to tone it down.
|
|
#
?
Mar 30, 2009 17:06
|
|
|
cLin posted:Umm, I meant the processing. It's just the first "people" shot I found in lightroom which could use some work. The layer which I used clarity on just seems to make the hair strands highlighted by the sun seem to pop out even more so I think I'm going to tone it down. But like I said, I might be conservative in that respect.
|
|
#
?
Mar 30, 2009 18:16
|
|
|
For portraits, just remove any glaring blemishes instead of nuking the entire face with the healing brush. Also, instead of desaturating the ENTIRE photo, use the Select > Colour Range tool with Colour Balance to reduce your reds (or your blues and magentas for extremities).
|
|
#
?
Mar 30, 2009 18:23
|
|
|
Xabi posted:Me too. I said 'fat girl angle' in that the processing is too extreme for my taste, and therefore it's about as honest/true to reality as a photo taken from the 'fat girl angle'. That makes sense. Do you think it's because of how "creamy" I made the skin? I'm attempting to go for realism moreso then what magazine/playboy does to their models so I would rather leave a blemish or two if it makes it look more believable. Hot Cops posted:For portraits, just remove any glaring blemishes instead of nuking the entire face with the healing brush. Also, instead of desaturating the ENTIRE photo, use the Select > Colour Range tool with Colour Balance to reduce your reds (or your blues and magentas for extremities). That's going to be hard for me since I'm a bit colorblind. For obvious glaring color issues, I can spot really quickly and adjust it but for subtle details just go right over my head. Also, I was just followed the guy's tutorial above me, even though it looked like I ran through the entire face with the healing brush.
|
|
#
?
Mar 30, 2009 18:50
|
|
|
All of those examples look way too plasticy/fake.
|
|
#
?
Mar 30, 2009 19:01
|
|

|
Hot Cops posted:For portraits, just remove any glaring blemishes instead of nuking the entire face with the healing brush. Also, instead of desaturating the ENTIRE photo, use the Select > Colour Range tool with Colour Balance to reduce your reds (or your blues and magentas for extremities). This is actually a huge tip for concert photos. Often, you'll get a photo where the face is all blotchy and blown-out because there's a bright red light or purple light or whatever shining right on the performers face. Desaturate the colour a wee bit and suddenly you gain a ton of detail. I've saved many photos this way. This is fantastic for venues with strong red lighting or LED lighting which often blows out highlights in one colour or another. It's important to desaturate overly strong colours if you're posting a photo to somewhere like Facebook where the server recompresses the photo to poo poo because when you crank up the compression and resize the photo, it makes blown-out coloured highlights look even worse.
|
|
#
?
Mar 30, 2009 19:04
|
|
|
Open a HSL layer, click the color selector, click and hold the color you want to change on the image, and drag forward or back until it looks good. Mask as necessary.
|
|
#
?
Mar 30, 2009 19:13
|
|
|
does anyone else feel that there's a fine line between getting rid of blemishes, and getting rid of skin features? the dude in the glasses seems to have a couple of freckles... it's one thing to knock off a few pimples which are temporary, but I feel like you're getting rid of some of the actual person... if you have to get rid of skin features to make a portrait "good", well, you're probably not doing it right ")
|
|
#
?
Mar 30, 2009 19:49
|
|

|
The way I do it is use the patch tool at 200% to remove blemishes but this is time consuming and probably not worth it for snapshot type stuff. I tend to only process 1-2 photos from a shoot and I'm anal so I don't care about the time investment. The upside is it doesn't make your subjects look like mannequins or aliens. edit: since I have this image open anyways... her right cheek and neck needed to be cleaned up.  \/ oh I know brad industry fucked around with this message at 20:33 on Mar 30, 2009 |
|
#
?
Mar 30, 2009 19:51
|
|
|
My conclusion has also been that removing blemishes manually works a lot better than any kind of filter. Has anyone here used Silver Efex Pro for black and white conversion? Any opinions on it other than price? edit: brad that gif is really creepy
|
|
#
?
Mar 30, 2009 20:03
|
|
|
Also, I've found that using the clone stamp at a low opacity (~30% ish) works wonders for areas with large pores or other things that you'd normally completely annihilate with the healing brush.
|
|
#
?
Mar 30, 2009 20:31
|
|
|
Still going to profess my love for dodge & burn!
|
|
#
?
Mar 30, 2009 20:39
|
|
|
In the spirit of animated gifs... I tend not to do too much retouching of blemishes - ideally I try to only fix problems I caused (like the weird shadow pattern on her chin and her eyes being too dark). She also, for some reason, decided she didn't like those earrings very much, and decided this as we were reviewing the images and I was about to burn the CD (hence the horrible 5-minute clone job). This was a shoot where the MUA did most of the heavy lifting though, this girl really doesn't have very good skin.
|
|
#
?
Mar 31, 2009 05:53
|
|


|
cLin posted:I tried your steps above and got this. What did you set for your layer's opacity? Left is original, right is altered. Any critiques? I didn't use the photo pop setting that much, started looking too...vibrant. I usually just make it into one layer. I don't generally leave any of the blemished layer beneath. It looks like this image wouldn't be the best to begin with, it's very unexposed and the skin tones are too red. Guitarchitect posted:does anyone else feel that there's a fine line between getting rid of blemishes, and getting rid of skin features? the dude in the glasses seems to have a couple of freckles... it's one thing to knock off a few pimples which are temporary, but I feel like you're getting rid of some of the actual person... if you have to get rid of skin features to make a portrait "good", well, you're probably not doing it right I agree, I would never get rid of freckles or moles, unless they requested it. In that pic, he actually had some acne on his cheek and asked that I remove it. FYI: I agree, the pics above do look a bit too fake. I think I overdid it in those examples. Generally I wouldn't do it so greatly. Here's a better example in a more natural environment. First, I cropped the pic. Then, I did basically what I described above: heal brush, Portraiture, and an opaque Topaz Adjust layer. I know people hate Topaz adjust, but I think if you do it tastefully you can really bring out some fantastic clarity. For the image below, it really made the flowers come alive. Once I sharpened it with high pass filter, around 40% opacity, I duplicate the whole thing and desaturate it. I then make this layer around 10%. I find it mutes the color tones just slightly, and for this photo I wanted to take SOME of the vibrance out of the flowers in order to draw more attention onto the subject. It gives the photo a softer look, which works for the whole composition. 
|
|
#
?
Mar 31, 2009 09:39
|
|
|
I always retouch skin manually on a separate blank layer. Then I adjust the opacity of the layer to let some detail back into the retouched areas. This avoids the plastic look that I hate.
|
|
#
?
Mar 31, 2009 12:29
|
|


|
Man, you need to stop desaturating your stuff. His skin tone looks FAR better in the original.
|
|
#
?
Mar 31, 2009 15:42
|
|
|
Does flickr change the color space of your images? I just switched back to shooting raw and I'm noticing that the images that I upload to flickr don't look nearly as vibrant as they do in PS.
|
|
#
?
Mar 31, 2009 19:34
|
|
|
SoundMonkey posted:In the spirit of animated gifs... One thing that bothers me about this is that you left the shadow of the earrings in so it looks like she has some weird mark on her neck. Otherwise good job.
|
|
#
?
Mar 31, 2009 19:39
|
|


|
GrAviTy84 posted:Does flickr change the color space of your images? I just switched back to shooting raw and I'm noticing that the images that I upload to flickr don't look nearly as vibrant as they do in PS. I don't think flickr touches your uploads, but not all browsers are guaranteed to properly display anything but sRGB. Whatever you're working with, convert (don't assign) it to sRGB before saving for web use. I've accidentally uploaded AdobeRGB shots to flickr, and under firefox the reds are noticeably hosed up. Side note, while raw has no inherent color space I know at least Pentax raw files contain a flag or something telling their raw conversion software which colorspace to dump, as set on-camera. You can override that behavior with the raw converter software. Remy Marathe fucked around with this message at 23:17 on Mar 31, 2009 |
|
#
?
Mar 31, 2009 23:14
|
|


|

|
| # ? May 16, 2024 17:57 |
|
|
Kazy posted:One thing that bothers me about this is that you left the shadow of the earrings in so it looks like she has some weird mark on her neck. Otherwise good job. God drat, you're right. Well this was from a few months ago, so I guess nobody else noticed 
|
|
#
?
Apr 1, 2009 01:39
|
|