
|
Corla Plankun posted:Why don't you ask your neighbors?
|
 #
?
Mar 17, 2009 16:45
#
?
Mar 17, 2009 16:45
|
|


|

|
| # ? May 13, 2024 10:25 |
|
|
Ivan Drago posted:That was actually my first thought and it's a good idea, I just never see them out and about. The ones on either side of us have unfortunately both died in the last six months or so (many elderly people on my block), and the ones across the street are rarely home. I've made it a point to ask them next time I see them, but in the meantime I thought I could throw something down on the lawn to keep it in check. I may just call TruGreen and have them spray. Seems like what most people would do. Eh, you can do what TruGreen does for much cheaper if you care to save money.
|
|
#
?
Mar 17, 2009 21:04
|
|

|
Groan... So I still haven't managed to locate the blockage in the line to get hot water back in the sink. Now I'm replacing the lights in the kitchen, and the "boxes" for the lights are hacked out of the lathe and there are strange looking fragmented metal mounting points inside. They seem like they were once secure, but are no longer up to their job. I need to replace them, but I'm not sure an "old work" replacement box will be adequate for the ceiling, nor whether they'll work well in a non-drywall ceiling. That, and I don't know the best way to cut the appropriately shaped hole. What kind of tool do I use for that?
|
|
#
?
Mar 18, 2009 03:33
|
|

|
Local Yokel posted:Groan... If we're on the same page, then these will do what you need. The brackets attach to the joists. The easist way to cut the hole is with a Rotozip. If you don't have one, a drywall jab saw will cut lathe pretty easily.
|
|
#
?
Mar 18, 2009 14:40
|
|

|
Richard Noggin posted:If we're on the same page, then these will do what you need. The brackets attach to the joists. The easist way to cut the hole is with a Rotozip. If you don't have one, a drywall jab saw will cut lathe pretty easily. I justify doing these projects by rewarding myself with tools, so looks like I get to pick up a Rotozip this week. I have no access to this ceiling from above (the next story is completely finished. I assume there's no easy way to mount this to the joists without a big opening from above or below? The lights are only a few pounds, though I would enjoy the secure mounting with those metal arms. Hmmm.
|
|
#
?
Mar 18, 2009 15:50
|
|
|
Local Yokel posted:I justify doing these projects by rewarding myself with tools, so looks like I get to pick up a Rotozip this week. I have no access to this ceiling from above (the next story is completely finished. I assume there's no easy way to mount this to the joists without a big opening from above or below? The lights are only a few pounds, though I would enjoy the secure mounting with those metal arms. Hmmm. Depends. I was able to install one in a 4" hole in the ceiling with a small screw gun. Took some swearing and sweating, but I did it. I don't have tiny arms/hands either. The brackets I used had a metal tooth on each end that gripped the joist while I screwed it in.
|
|
#
?
Mar 18, 2009 16:31
|
|
|
I've got an Ikea faucet http://www.ikea.com/ca/en/catalog/products/00085042 And I'm wondering if this is a design flaw or an installation flaw. The instructions advised me to hand tighten the clamping screw underneath the countertop as opposed to using a wrench to really tighten the sucker up. The problem is that after prolonged use the core of the column shifts. When that shifts, the center between hot/cold shift with it and my perspective of hot/cold is messed up til I shift the core column over a bit to compensate. I fix this by retightening the screw underneath, but it's annoying as hell.
|
|
#
?
Mar 18, 2009 19:35
|
|
|
If it's anything like faucets I've worked with, there's a plastic nut that screws over the assembly on the bottom. They say to hand tighten to avoid cracking the sink, especially something like a porcelain sink. If you've got something like stainless steel, or a solid surface countertop, you can get away with tightening it more. If there's any thickness to the media the hole is drilled through, you could put some loc-tite into the hole that the faucet comes through. I'd be hesitant to use something stronger, because the faucet will need to come out someday, whether it's five years or twenty. If you're dedicated to the set up, you could use an epoxy, and make sure it's super straight. That or etch a zero degree line right on the center of the column, but that wouldn't satisfy me.
|
|
#
?
Mar 18, 2009 23:26
|
|
|
Ok, I was going to give those old work boxes a go, but I've run into a hitch. These are the existing boxes, which are in pretty rough shape. I can't figure out how to get these out of the ceiling. 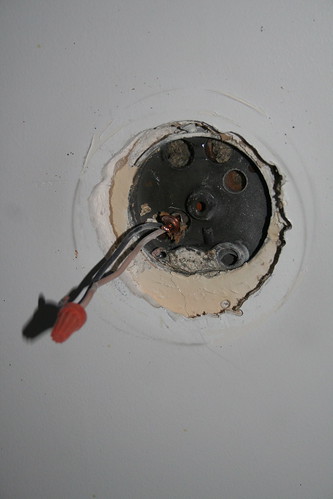 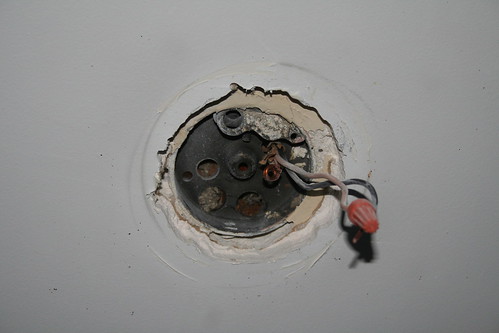 I've tried getting around the box with the rotozip, but I don't think that'll work. I'm stuck unless I can get this thing out, or manage to make it functional again.
|
|
#
?
Mar 19, 2009 02:16
|
|
|
I'm going to be cutting out some rectangles out of 1/2" thick plywood using a borrowed table saw. I'm reading up on safety and avoiding kickback. Apparently for making against the grain cuts, you're not supposed to use the normal fence. Why is it? What will happen if I make the crosscuts using the same technique as ripcuts? What does using attachments to the miter slots instead of the ripfence accomplish? If the wood is more difficult to cut across the grain, how does using a miter gauge fix the problem? Why are cuts against the grain special, when for doing a very simple task like cutting rectangles requires equal amounts of both types of cuts?
Dominoes fucked around with this message at 08:59 on Mar 19, 2009 |
|
#
?
Mar 19, 2009 08:46
|
|

|
I've never heard that. What the gently caress does the fence have to do with it, unless they want you to use a sled.
|
|
#
?
Mar 19, 2009 15:15
|
|


|
Local Yokel posted:Ok, I was going to give those old work boxes a go, but I've run into a hitch. Uhh, why do you even want to pull the box out in the first place? Ceiling boxes sometimes are supported with an arm that connects to the joists on either side. The box is attached to this arm through a large fixed bolt that pokes through the center hole in the box. Dominoes posted:What will happen if I make the crosscuts using the same technique as ripcuts? Half of every cut with plywood is "against the grain". The way plywood is made, every second layer they turn so that it's at a right angle to the 2 layers it's between, then they glue them all together. Doing this helps make plywood stronger and prevents warping. kid sinister fucked around with this message at 16:32 on Mar 19, 2009 |
|
#
?
Mar 19, 2009 16:28
|
|
|
Mthrboard posted:Putting your smoke detectors on a dedicated circuit is a bad idea. Most, if not all, hard-wired detectors that have a battery back-up won't beep when the power goes out, they just revert to the battery until power is restored or the battery dies. The ones I have all start beeping in unison after the power has been cut for more than about 30 seconds.
|
|
#
?
Mar 19, 2009 16:59
|
|


|
kid sinister posted:Half of every cut with plywood is "against the grain". The way plywood is made, every second layer they turn so that it's at a right angle to the 2 layers it's between, then they glue them all together. Doing this helps make plywood stronger and prevents warping. Dominoes fucked around with this message at 17:54 on Mar 19, 2009 |
|
#
?
Mar 19, 2009 17:48
|
|
|
Dominoes posted:I completely forgot about that. Is using the ripfence with plywood safe? I did some googling and it looks like the concern with using the ripfence for crosscuts is misleading: The problem is using it for narrow pieces that won't be stable against the fence, not crosscuts. You nailed it. Having a sharp blade can help prevent kickback too. If you do happen to need to make a cut like that with a narrow piece, use pieces of scrap lumber, one to hold your piece against the fence and another to push it through the blade.
|
|
#
?
Mar 19, 2009 18:01
|
|
|
I'm replacing a crappy 1950's hanging lamp with a ceiling fan. The lamp is attached to one of those electric boxes with bars that go between the joists. Unfortunately, the bars are the type that attach beneath the joist, with the drywall board over it. So in order to replace the box, I have to cut out and then repair the drywall. What are the chances that this box (currently holding a light that's 15-20 lbs) will safely hold the 31 lb fan?
|
|
#
?
Mar 19, 2009 22:42
|
|
|
chryst posted:I'm replacing a crappy 1950's hanging lamp with a ceiling fan. The lamp is attached to one of those electric boxes with bars that go between the joists. Unfortunately, the bars are the type that attach beneath the joist, with the drywall board over it. So in order to replace the box, I have to cut out and then repair the drywall. Probably pretty good. You've got sheetrock keeping the bracket from bending down. I wouldn't try hanging yourself from it, but it should hold 30 pounds.
|
|
#
?
Mar 19, 2009 23:25
|
|
|
kid sinister posted:Uhh, why do you even want to pull the box out in the first place? The current box is broken, and I can't secure a light to it. It's got one of two necessary holes for me to bolt in a new light. I want to know that it's going to be secure, and that means replacing this box. I've figured out that this is a "pancake" box, and that I probably won't have space in there for a modern box. I'm kind of stuck here, with a dim kitchen.
|
|
#
?
Mar 20, 2009 02:22
|
|
|
I'd just figure out a way to fix that box. Are the threads stripped? JB weld it or something, and if you are concerned about it falling, put a backup safety strap of some heavy duty zipties between the box and the fixture.
|
|
#
?
Mar 23, 2009 23:30
|
|
|
ease posted:I'd just figure out a way to fix that box. Are the threads stripped? JB weld it or something, and if you are concerned about it falling, put a backup safety strap of some heavy duty zipties between the box and the fixture. Actually, I managed to fix it by mounting a second box underneath it. The current box was unusable, and unfixable. The "wing" that I'd screw the bolt into was gone, and welding it back together would be a lot of heat in a place I don't want heat. I suppose JB weld may have worked, but I found something simpler. There were two layers of plaster up there though, and this was initially a problem, but became a windfall when I realized I could just go ahead and mount a second pancake box under the existing one, and still have it sit flush on my ceiling. Sweet! If you look at the photos you can see where I used a roto-zip to make an appropriately sized hole for a box, and the second layer that I couldn't get through, because there's something in there that disagrees wholeheartedly with my rotozip (at one point I pulled the zip down, and the bit was red hot). Solution:   I put three of these fixtures up, two of them were easy, I just had to find some slightly longer, but not too long bolts to get them up there, due to the extra layer of plaster and the boxes being shallow pancake boxes. The third one was the creative one, and I've got a screw going through the new box and into a stud above, so it's nice and snug and secure.
|
|
#
?
Mar 24, 2009 00:35
|
|
|
What's a good way to hide the edges on this piece of plywood I'm turning into a coffee table? It's about 3/4" thick, and you should know I have little woodworking experience and an even smaller fund to spend on nice power tools.
|
|
#
?
Mar 24, 2009 08:54
|
|
|
El Kabong posted:What's a good way to hide the edges on this piece of plywood I'm turning into a coffee table? Buy a piece of edge trim, cut it at a 45 in the corners, pre-drill the nail holes and nail it on. You should be able to easily find a nice piece of half-circle trim in 3/4". If you can't find something the same exact width, get something wider than your table top, make the top edge flush then let the bottom edge lip over where it's hidden.
|
|
#
?
Mar 24, 2009 17:43
|
|
|
Local Yokel posted:drat, I like your kitchen. We just had the same thing, old stove/hood with a new fridge. Finally got a new stove, and I think I'm going to paint our hood black to match it. Digging those dark wood cabinets with the crown molding too.
|
|
#
?
Mar 24, 2009 17:59
|
|
|
ease posted:Nice solution, sometimes the simplest things are the least obvious. Be sure to use a high temperature paint for that hood.
|
|
#
?
Mar 24, 2009 19:34
|
|
|
My apartment has a small den in which I keep my computer. Here are some shots from below the desk in the den which is attached to the wall:  That wood support thing almost entirely blocks the hole, making it annoyingly difficult to thread cables through that hole and sometimes impossible e.g. a DVI cable with a ferrite core. What would be the easiest way to cut that wood support thing to facilitate running cables? It seems to me a V-cut would be easiest, although I have zero experience in working with wood. I also don't want to weaken the support too much (although it has similar supporting wood things on two other sides). Any help would be appreciated.
|
|
#
?
Mar 25, 2009 11:38
|
|

|
If you have a power drill, pick one of these up at home depot/lowes/walmart. You might have to dissemble the desk to do it properly, but just cutting a half of hole for more clearance shouldn't affect that pieces structural integrity too much.
|
|
#
?
Mar 25, 2009 13:26
|
|
|
ease posted:If you have a power drill, pick one of these up at home depot/lowes/walmart. I love those things. Make sure you get one designed for wood and not metal.
|
|
#
?
Mar 25, 2009 19:09
|
|

|
I'd use a reciprocating saw for a cut like that. Then again, I have a steady hand...
|
|
#
?
Mar 25, 2009 22:42
|
|
|
kid sinister posted:I'd use a reciprocating saw for a cut like that. Then again, I have a steady hand... I'd use a holesaw, cause I could be lazy & not remove the piece from the wall 
|
|
#
?
Mar 26, 2009 07:52
|
|


|
ease posted:If you have a power drill, pick one of these up at home depot/lowes/walmart. Thanks, this and a keyhole saw to open up the hole (since the edge of the circular hole was pretty much at the edge of the wood piece) did the trick. Although since I couldn't remove the wood piece I made a mess of things given the awkward position I had to saw in.
|
|
#
?
Mar 27, 2009 11:01
|
|
|
ease posted:Nice solution, sometimes the simplest things are the least obvious. Thanks. The kitchen has changed a lot in the last three months. Countertops, faucet, paint, light fixtures. The cabinets were there, and we love them. Next up is the floor, and a tile backslpash. ease posted:If you have a power drill, pick one of these up at home depot/lowes/walmart. I have one of these and find many, many uses for it. How are you supposed to get the plug out when you're finished? I was sawing some old painted 3/4" plywood with it recently, and had to stop after each one and hammer the plugs out with a tiny screwdriver from the back, or splinter the thing out from the front. It was a big pain, there must be an easy and clever way to do it.
|
|
#
?
Mar 28, 2009 01:11
|
|
|
Local Yokel posted:I have one of these and find many, many uses for it. How are you supposed to get the plug out when you're finished? I was sawing some old painted 3/4" plywood with it recently, and had to stop after each one and hammer the plugs out with a tiny screwdriver from the back, or splinter the thing out from the front. It was a big pain, there must be an easy and clever way to do it. With wood, you get some 3" wood screws and drive them into the front. That pops the plug out. The other thing you can do is spin the hole saw off the arbor and hammer the plug out from the back; that's what I have to do when putting holes in metal. I do a LOT of hole sawing and nobody I work with has ever come up with a more clever way of getting metal plugs out than "spin the saw off and hammer the plug out with a screwdriver."
|
|
#
?
Mar 28, 2009 02:26
|
|

|
Ivan Drago posted:That was actually my first thought and it's a good idea, I just never see them out and about. The ones on either side of us have unfortunately both died in the last six months or so (many elderly people on my block), and the ones across the street are rarely home. I've made it a point to ask them next time I see them, but in the meantime I thought I could throw something down on the lawn to keep it in check. I may just call TruGreen and have them spray. Seems like what most people would do. I would avoid TruGreen like the plague. I've heard nothing but bad things about them; using the incorrect mix of chemicals for the lawn, spraying way too much, over-charging, ignoring requests to cancel service, etc. If you're dead set on a lawn service, look for a local company instead (and make sure they're not a subsidiary of TruGreen). Otherwise, call your local university extension office, they should be able to provide you with some good advice that's specific to your area. Buy a soil test kit, or bring a soil sample to a garden center that will test it for you, to find out the composition of your soil, and what, if any, amendments it needs to grow properly. Once you get rid of the weeds, you'll most likely have to do some over seeding to get new grass to grow. A good carpet of grass is the best weed prevention.
|
|
#
?
Mar 28, 2009 15:24
|
|

|
I posted a little while back about a kitchen sink that stopped giving me hot water. After taking it apart from below a few times without any success, I finally took it apart from above, and found the blockage in the "cartridge" part of the handle. Anyway, the block was not from corrosion or rust that had broken loose, but from some kind of foam rubber. Where could rubber have come from in the plumbing system? Is this a hint that I have something wearing out further up the system? Oh, and I just used Scotch Guard on a new couch & love seat that we just bought. I was able to cover the arms of both of them before running out. Anyone have experience with using this? I'll buy another can or two if it's going to keep things cleaner with our dog around, I'm just a little disappointed in the cost/coverage ratio.
|
|
#
?
Mar 29, 2009 04:45
|
|
|
Local Yokel posted:Where could rubber have come from in the plumbing system? Is this a hint that I have something wearing out further up the system? Rubber is a part of most cartridges, usually in the form of O-rings and washers. Did a piece of the cartridge somehow break off and get stuck inside? Do you have multi-turn valves on the feeder lines for that sink and not quarter-turn ones? Those types use a stem with a rubber washer on the end. To check that though, you'd need to turn off the all the water in your house before you take apart that valve.
|
|
#
?
Mar 29, 2009 21:40
|
|
|
We had a nice blizzard here in Kansas a few days ago. Of course my heater decides it's the perfect time to stop working well. If I leave it off for about 45 minutes and turn it back in it will blow hot or lukewarm for 15-30 minutes before blowing cool but not cold air. It's central heat/air and I went outside and cleared off the unit but that didn't help any. Any ideas before I call my landlady? Thanks! EDIT: It's fixed! $1.79 later for a new filter and 65 degrees feels too hot inside now. The old one was one of the nastiest things I've ever seen. Unclean fucked around with this message at 18:08 on Mar 30, 2009 |
|
#
?
Mar 29, 2009 21:41
|
|
|
kid sinister posted:Rubber is a part of most cartridges, usually in the form of O-rings and washers. Did a piece of the cartridge somehow break off and get stuck inside? I pulled out the intact rubber gaskets for the water lines (2), and an additional intact o ring from the seal. There was another piece of this foam rubber further back in the system as well, so I don't think it was actually part of the cartridge or faucet. The valves may make sense though. When I swapped everything out I did not replace the multi-turn valves at the time. When trying to repair the stoppage, I did replace them both with 90� turn valves, and it's good that I did, because just after turning off the mains, the hot water valve completely died on me and wouldn't come close to a good seal. That rubber washer must have disintegrated from resting for several years, and then having me start turning the valves on and off while working on my initial (new faucet) project. I guess that solves that mystery, and means it's not likely to happen again anytime soon.
|
|
#
?
Mar 30, 2009 00:08
|
|
|
Gas appliance repair question: I have a natural gas dryer left in my house by the previous owner. It's a Whirlpool LGB6000KQ1, fairly new looking. When I first tried to run it, the drum would spin and air came through the vent, but there was no heat and the ignitor did not glow. I cleaned it out and started testing sensors, and they were all fine except for the flame sensor, which showed no continuity and rattled when I moved it around. I ordered a replacement, installed it, and the dryer worked properly for about week. Now the ignitor just keeps glowing when I turn it on, and the gas valve never opens. Did my new flame sensor die after just a week, or is there anything else that could cause that behavior? Even if I had bad valve coils, it seems like the ignitor would still switch off after it gets warm enough.
|
|
#
?
Mar 30, 2009 20:07
|
|

|
gross posted:I have a natural gas dryer left in my house by the previous owner. It's a Whirlpool LGB6000KQ1, fairly new looking. Get a multimeter, grab that chart (mine was behind the main panel (the one with the dials)) and test every component that you can.
|
|
#
?
Mar 30, 2009 23:40
|
|

|

|
| # ? May 13, 2024 10:25 |
|
|
Fire Storm posted:I have a similar model, and I found that I had a bad relay. I tested EVERY loving component, all were good (according to the diagnostic chart), the drum would spin but no fire. I ran out of stuff to test, so I tried the relay. BINGO! Thanks, I didn't realize that chart was hidden in there. Hopefully the new flame sensor I bought didn't get fried by something up the line, if that's even possible.
|
|
#
?
Mar 31, 2009 04:01
|
|