


|
What's a tuit? Also, RealKyleH posted:Also post pics. I saw in one of my blacksmithing books that he cleaned files in a trough full of used battery acid. I... wouldn't recommend that though.
|
 #
?
Mar 31, 2009 02:26
#
?
Mar 31, 2009 02:26
|
|


|

|
| # ? May 25, 2024 17:27 |
|
|
One Legged Ninja posted:I've heard of putting dull files in a bucket of vinegar, or some other diluted acid, and letting them sit for a while. I don't remember which acid, though. Phosphoric, maybe. For a couple bucks for a jug of vinegar, it can't hurt to try, and it's not as if it's you don't have enough to experiment with. A common acid that used to be used to clean instruments was miriatic (sp) acid. The industry stopped using it when ultrasonic cleaners became cheaper. The acid has cyanide in it or something. Maybe that is the acid.
|
|
#
?
Mar 31, 2009 04:56
|
|
|
Ok, ok, the round tuit is for old men who work in their basement on model steam engines, got it. The only pics I have at the moment are several years old, and it's only part of what my dad, my grandfather and I have made/bought/collected over the years. First off is the 11"x5' South Bend 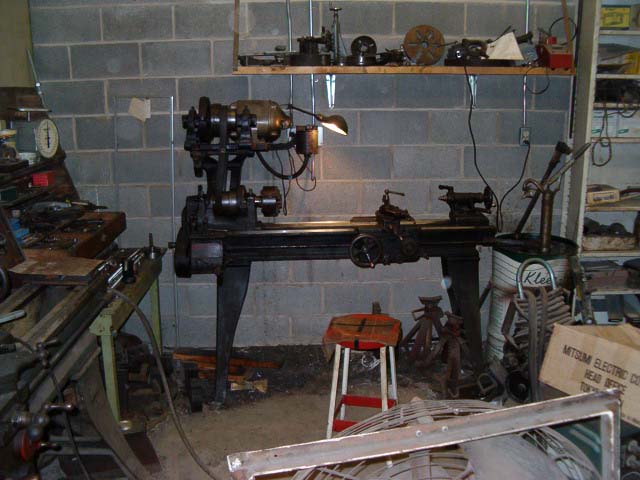 This is the only functioning lathe at the moment. And the start winding went out of it a few years ago, so you have to spin it by hand to start it. Some day I'll fix it.  That big bronze colored thing cut off of the picture on the top right is the 1/2hp motor. They sure don't build 'em like they used to. Here's the 16"x8' SB. I currently have two 3hp 3 phase motors and a 5hp 3 phase motor that I'm going to select from to mount on here. It had a small single phase motor from a craftsman table saw on it, but that burnt up years ago, and my dad never bothered to replace it. I'd like to get this running before I tear into the small lathe's motor.  We just finished moving all our equipment out of the shop upstairs, and into the basement. It's nice to be able to drive a forklift inside a building. I have to wire everything up at the new locations, but we did hook the small lathe up to make some parts. We also have to move our vertical mill out of the garage at the house, and into the shop, but there's no hurry for that. I don't have pics of the mill, but it's a Grizzly G3616. Pretty much the last picture I have right at this minute is of my portable forge and foundry. 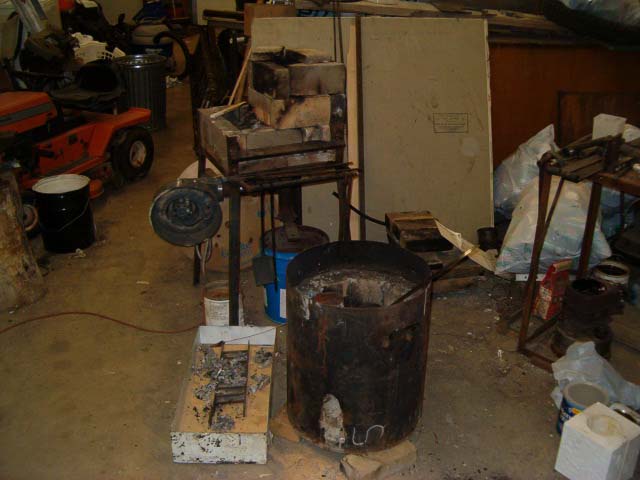 I've since mounted an oil burner on the side of the foundry, (that dirty can on the ground). I need to finish laying the firebricks, and pour refractory into the lid. I might put another nozzle in the burner, it takes a while to heat up the inside of the furnace, and when it's up to temp, it just barely keeps aluminum molten. That's all it'll handle as is. I don't think I'll ever actually melt brass in this one. The forge is, (in the picture, at least), set up as an impromptu foundry, as I tried heating the foundry with charcoal and a hair dryer, and wasn't impressed. It wasn't a particularly good design. It doesn't hold long stock well, the bricks get knocked loose from the walls, and it won't heat up large sections of steel. I still like it, though. It'll easily heat things up to welding temperature and beyond. I don't have many pictures of things I've made, because most of them would look like crap, but I did make a towel bar that turned out ok 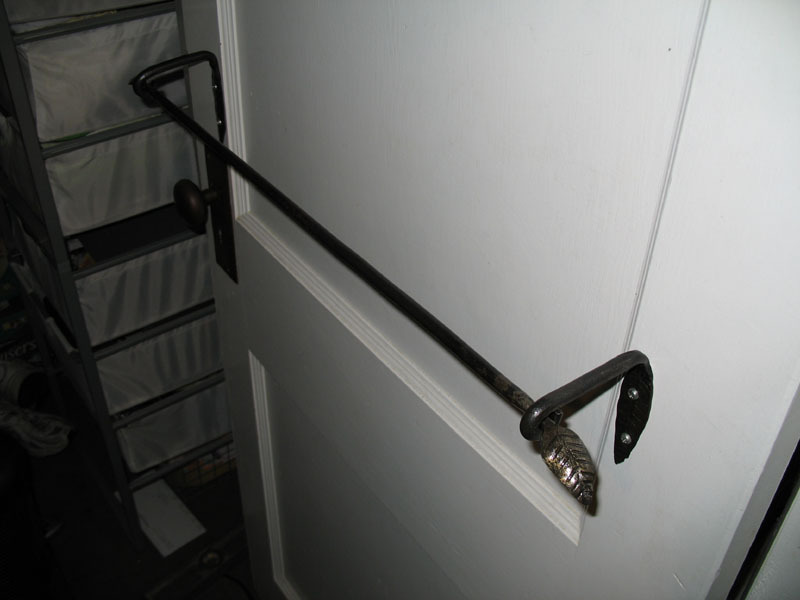 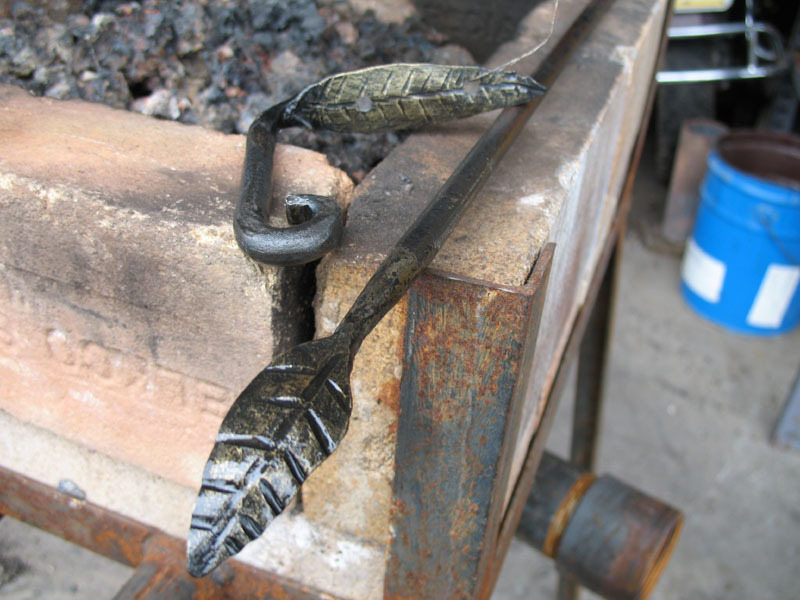 It's pretty terrible that I've had the forge and foundry for at least 5 years, and I still haven't made anything significant. I really want to get the foundry finished, and make some real castings. Ingots don't cut it. tl;dr--I have some toys. They make big pieces of metal into small pieces of metal.
|
|
#
?
Mar 31, 2009 04:56
|
|
|
Oh I get it now, "a-round tuit"  Looks like you have some nice machines there. Please post more as soon as you can, I really like your leaves.
|
|
#
?
Mar 31, 2009 05:18
|
|
|
Slung Blade posted:Oh I get it now, "a-round tuit" metal guys have a billion folksy sayings, it's always fun to learn a new one I know a guy who refers to found/scrounged materials as Obtanium
|
|
#
?
Mar 31, 2009 10:10
|
|


|
Dongsmith posted:metal guys have a billion folksy sayings, it's always fun to learn a new one This is the opposite of attractive girls which are made from unobtanium.
|
|
#
?
Mar 31, 2009 10:21
|
|

|
RealKyleH posted:This is the opposite of attractive girls which are made from unobtanium. 
|
|
#
?
Mar 31, 2009 10:56
|
|
|
I finished welding that speedbag mount today. Weather was finally nice enough to be outside again.    It will mount with the plates to the wall, and that round circle of wood will go on the U shaped part that sticks out. Tomorrow, I will paint it if the weather is nice again.
|
|
#
?
Apr 5, 2009 05:20
|
|
|
I went hunting around at garage sales and found me an actual craftsman blacksmith hammer for $4. Also, I haven't been able to find a real anvil I could afford, so I decided to pick up the crap anvil from Harbor Freight, on sale for $40.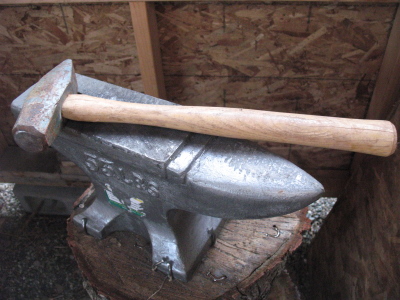 I want to make some tongs for myself right away, since the tongs I found for a couple of bucks a while back seem less than useful. 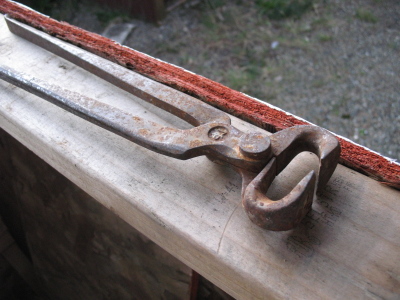 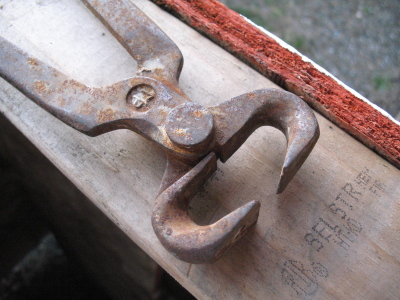 What is thing meant to grab? It doesn't have any grabbing surface area to use. It looks like it was meant to slice carrots. Any ideas? All I know is that nothing I want to put into my forge fits nicely in those tongs, so I'm probably going to make a set from some scrap rebar I have sitting around. Yes, I know rebar is terrible, but for tongs, maybe they'll be fine as a first tool.
|
|
#
?
Apr 5, 2009 05:49
|
|

|
Those are nippers. Farriers use them to cut things on hooves, I think. They can also be used to snip bits of metal off, but they're not tongs. Edit: Like these http://budnippers.com/
|
|
#
?
Apr 5, 2009 05:51
|
|
|
Slung Blade posted:Those are nippers. Farriers use them to cut things on hooves, I think. aha! Thanks! I wonder if I could convert them into tongs... although I feel that might be cheating. I really want to get a set of tongs under my belt. So far, my first and only forging attempt turned out pretty terribly. I hammered a broken round file into a knife-shaped thing, quenched it, and then accidentally snapped it in my fingers. I didn't do a good job reading and understanding the whole quenching/tempering process. Just to make sure I have it down correctly, is the following correct? 1. heat 2. pound (go back to 1 until it looks like a knife) 3. quench/cool quickly 4. grind to sharpen 5. heat 6. temper/cool slowly 7. polish
|
|
#
?
Apr 5, 2009 06:00
|
|
|
jovial_cynic posted:1. heat Nope. Quenching will make it too brittle and break, like what happened to you. Tempering it actually will make it softer and tougher, which is what you want. Heat, forge to shape. Do not quench. Rough grind it, get it as close as you can to the final shape before you polish it (don't polish it yet, though). Heat to critical temperature, quench in appropriate liquid (some steel needs oil, some can be quenched in oil). Clean it so the bare metal shows, you need to see the oxide colors. Re-heat slowly, usually people use a big thick plate that's yellow-hot and then set the blade onto it outside the forge, with the edge away from the heat. Once the oxide color that you want reaches the edge, quench it again. Then finish cleaning it and polishing it, then sharpen it on a stone or something. I've never done it, so I can't speak from experience or anything, but this is what I see in all my books. And yeah, I'm sure you could re-work those nippers into tongs. Just bend the blades out and squash the U shaped bits until the blades are flat against each other.
|
|
#
?
Apr 5, 2009 06:11
|
|
|
Slung Blade posted:Heat, forge to shape. Do not quench. Do you rough grind it while it's still hot? Or has it cooled naturally at this point?
|
|
#
?
Apr 5, 2009 06:54
|
|
|
Ideally, you could anneal it, which is heating it up and then sticking it in a bucket of sand or ashes overnight to cool very slowly. This will make grinding it easier, and you can use files on it. You can do what's called hot rasping, but I wouldn't. Just work it when it's cool to the touch, it's way easier.
|
|
#
?
Apr 5, 2009 07:14
|
|
|
Not that I've had time to do anything but read and dream wistfully about making knives and other things, but everything I have read points to grinding and filing once the metal is cool. In other news, income tax filing deadline is just around the corner so I will finally be able to get you guys some good pictures of all the random organizing and setting up my shop that I've been able to do during the odd hour or two I get away from work. I tried to anneal some of my files... I don't think it worked. I burned the poo poo out of the teeth, and those crumble away, but another file has issues cutting into the now toothless knife blank... we'll see what happens when I try to anneal the same piece twice. After all, it's not like I have a shortage of learning material. edit: Congrats on the anvil and nippers. I'm a big fan of use whatever the hell works until something better is available or comes along method. While those nippers may seem useless, they are a hell of a lot better than my abortion of tongs that I need to get pictures of. The interesting thing though, is that I almost enjoy being able to identify my own work as poo poo more than producing something that is borderline, if that makes sense. Like I know how it should be, and what I just made doesn't quite cut it. edit 2: If I may suggest rounding out the face of that hammer a little bit, it will go quite a ways to making your workpiece look better. It'll also save the face of your anvil. I have a few gouges from missed blows on my anvil because I didn't do that. They piss me off... edit 3: I should probably make a new post but whatever. Slung Blade, I'm not entirely sure what that thing is supposed to be used for. Zquargon fucked around with this message at 07:44 on Apr 5, 2009 |
|
#
?
Apr 5, 2009 07:36
|
|
|
It's a speedbag mount. Kinda like this: This is a gift for my sister though, I'll take some pictures once it's mounted to the wall. Hey Jovial, you do woodworking sometimes too right? Do you have a bench-mounted belt sander?
|
|
#
?
Apr 5, 2009 07:54
|
|
|
Slung Blade posted:Hey Jovial, you do woodworking sometimes too right? Do you have a bench-mounted belt sander? That's a negative on both counts. I mean, I nail wood together to make structures and the such, but I don't do "woodworking" in the sense of any sanding or shaping. Wood makes no sense to me. I do, however, see the benefit of owning a belt sander if I want to make knives, what with needing to see the color on the blade while I'm tempering. I've blown through my budget (welding figurine sales are down, and I only use the money from my hobbies to pay for my hobies), so it might be a little bit before I can get my hands on. Maybe I could just mount my orbital sander upside down on something.
|
|
#
?
Apr 5, 2009 15:42
|
|
|
That would work. I need a belt sander myself.
|
|
#
?
Apr 5, 2009 17:10
|
|
|
Slung Blade posted:Re-heat slowly, usually people use a big thick plate that's yellow-hot and then set the blade onto it outside the forge, with the edge away from the heat. Once the oxide color that you want reaches the edge, quench it again. FYI, this step is much easier if you just set a kitchen oven or toaster oven to the right temperature and leave the blade on a rack in there for a while. Much less of a hassle.
|
|
#
?
Apr 6, 2009 01:43
|
|
|
Slung Blade posted:It's a speedbag mount. Kinda like this: Ooooh ok, that makes a lot more sense now. I couldn't figure out what the hell a speedbag was supposed to be.
|
|
#
?
Apr 7, 2009 01:42
|
|
|
Painting complete, it's drying in the garage now. I will take a picture tomorrow once I have it mounted to the wall. Did a rose today too, mother's day is coming up and I want to make some for my grandmothers. Man, I haven't used a hammer to smith in loving ages, my callous was practically gone. I have 3 huge blisters on my hand, I used to be able to do 3 of these in a day with no skin damage. gently caress I hate winter and working outdoors.
|
|
#
?
Apr 8, 2009 08:04
|
|
|
Painted and mounted.  Broke two screws on one of the mounting plates, the hole is useless now, unfortunately. But it shouldn't matter. I think it's strong enough to hang off of.
|
|
#
?
Apr 9, 2009 04:15
|
|
|
Can anyone comment about what kind of lathe it would take to make a wedding band out of stainless steel or maybe titanium? I was shopping for bands yesterday and kind of balked at the prices ($200+) of wedding bands that I liked. I figured I could use this as an excuse to buy a lathe and make my own. Beyond the wedding band I don't plan on using it for anything in particular, it would just be a hobby machine for whatever I feel like making. I'm going to be moving a couple times in the next few years so I don't want something impossible to move. I was thinking of the harbor freight 8x12/14 or harbor freight 7x12; the only drawback of the 8x12/14 is that it's going to be a pain to move but I think it'd be significantly more capable. Either way I'd be waiting for another HF 20% off coupon.
|
|
#
?
Apr 11, 2009 17:35
|
|
|
There's a 20% coupon active right now, go to AI and click the tools thread. Used mine today to get some pulley pullers. You could use either of those to make the ring but you wont be making a whole lot else with it. You'll also be making baby cuts with them so get some carbide tooling and a cobalt drill bit set. Note: drill bits and carbide from HF is useless although I do use their 1/2" tool holders to hold decent Kennemetal inserts. For drill bits go somewhere else. Do not get the variable speed lathe as it will only make that 3/4 HP at its higher RPM settings and you'll likely be turning that at slower than 1100 RPM.
|
|
#
?
Apr 11, 2009 23:45
|
|
|
Ah, I didn't realize there was an active 20% off coupon. The only stainless or titanium I'd be doing would be for the ring. Everything else would either be aluminum or plastic (and just pretty small parts, obviously). Thanks
|
|
#
?
Apr 12, 2009 01:11
|
|
|
That sounds like a fun project. Please take some pictures once you get a lathe and set it up, I love seeing that.
|
|
#
?
Apr 12, 2009 06:47
|
|
|
dyne posted:Can anyone comment about what kind of lathe it would take to make a wedding band out of stainless steel or maybe titanium? I was shopping for bands yesterday and kind of balked at the prices ($200+) of wedding bands that I liked. I figured I could use this as an excuse to buy a lathe and make my own. Beyond the wedding band I don't plan on using it for anything in particular, it would just be a hobby machine for whatever I feel like making. Either of those should be fine, it's the tooling that's going to be the deciding point, for titanium you'll probably want a thin, solid carbide boring bar, and solid carbide turning/facing tool, both of which would probably run more than the cost of the ring itself, not to mention stock price of titanium. Stainless steel is easy, just get tooling with changeable carbide coated inserts. EDIT: Remember to get a cut off tool and bore-able collets so you don't crush the rings out of square, bore-able jaws would help with other projects too if you're going to be using softer materials like copper, brass, and aluminum.
|
|
#
?
Apr 12, 2009 20:11
|
|

|
Well, I started reading this thread when Slungblade mentioned it in the Woodworking thread. Of course I decided what I really needed was yet another hobby, so I set to work constructing a waste oil burner with a propane inlet to get the (not yet constructed or planned) furnace hot enough to vaporize and ignite the oil. Right away I ran into problems. I went to 4 stores before I even found one that carried 2 inch black steel pipe and fittings. They didn't have a steel hex plug for the back (you'll see the use of it in the link.). Nobody has 1/4" black steel pipe, and to order it they'll make me buy an entire 21 foot length. Also, the only place I found that could thread 1/4" and tap the 2" pipe quoted me 3 hours of shop time at $50 an hour. So far I've got $50 or so bucks in this burner and I don't even have all pipe parts, the hose for the oil or the hose from the propane tank, the propane tank or the oil reservoir. Theres no way in gently caress I'm paying someone $150 for a couple tap and dies. This was supposed to be a low cost easy to put together thinger, nothing ever works out like that around this crap hole though. I'm building this: http://home.comcast.net/~moya034/burner/ But I'm building it on the scale of this: http://backyardmetalcasting.com/oilburners09.html
|
|
#
?
Apr 13, 2009 23:26
|
|

|
ChaoticSeven posted:black steel pipe At that price you could buy the tools and tap/thread it yourself, it would take some elbow grease but screw paying that much. http://cgi.ebay.com/ebaymotors/EATON-COLE-BURNHAM-MANUAL-PIPE-THREAD-TOOL-KIT-3%2f8%22-1%22_W0QQitemZ140304097888QQcmdZViewItem edit: Doesn't have 1/4" or 2" but the concept is the same, if you can find the bits. Maybe that's the expensive part but I still can't see it taking 3 hours of shop time. Assuming they don't have a powered threader that can fit the bits, it takes, what, 10-15 minutes maybe to do it manually. Edit: Here's your pipe: http://www.amazon.com/Industrial-Grade-1CPK5-Nipple-Black/dp/B001NPUVSC/ref=sr_1_87?ie=UTF8&s=industrial&qid=1239665161&sr=1-87 http://www.amazon.com/Industrial-Grade-1RJR9-Nipple-Steel/dp/B001NPCAW2/ref=sr_1_734?ie=UTF8&s=industrial&qid=1239665446&sr=1-734 I searched specifically for black steel but that vendor has all different kinds. edit:VVVVV the links I posted are for nipples of appropriate sizes according to the oil burner link. landis fucked around with this message at 01:23 on Apr 14, 2009 |
|
#
?
Apr 13, 2009 23:59
|
|

|
ChaoticSeven posted:Also, the only place I found that could thread 1/4" and tap the 2" pipe quoted me 3 hours of shop time at $50 an hour. So far I've got $50 or so bucks in this burner and I don't even have all pipe parts, the hose for the oil or the hose from the propane tank, the propane tank or the oil reservoir. Theres no way in gently caress I'm paying someone $150 for a couple tap and dies. Usually you can find short lengths of threaded pipe at plumbing stores, or if you live in an appropriate area, oilfield supply stores. They're called pipe nipples. And just so you know, that moya034 is actually our very own dv6speed. Though he hasn't posted much lately 
|
|
#
?
Apr 14, 2009 01:08
|
|
|
Yeah, I went to all the plumbing stores in 3 towns. None had it, all of them said I'd have to buy the whole 21 foot length if I ordered it. None could thread pipe that small except the machine shop that quoted me $150 bucks. Although, the 21 foot length is only $25 bucks which is probably as cheap as I'm going to find it. Still have the threading and tapping problem though. I guess I screwed up sticking with the "Brute" dimensions, since I need like a 30" 1/4 pipe nipple and I could've just straight up made dv6speeds by ordering a couple parts from Grainger. Would still have had the tap and thread problem, who would have thought that'd be a bitch? Used to any little hardware store you could name did that stuff for a couple bucks. Also I don't need a 2" tap/die, only the 1/4". Which I guess needs to be labeled "NPT"?
|
|
#
?
Apr 14, 2009 01:30
|
|
|
be sure you use a pipe tap and not a straight tap, that taper is the difference between blowing up and burning oil.
|
|
#
?
Apr 14, 2009 02:04
|
|
|
Anyone up to anything interesting? I've been making roses for my grannies for mother's day. Other than that I've just been busy with the tractor.
|
|
#
?
Apr 16, 2009 04:24
|
|
|
Slung Blade posted:Anyone up to anything interesting? I've been making roses for my grannies for mother's day. Other than that I've just been busy with the tractor. I'm still working up north. Had my first Stainless tig joints xrayed the other day, they went fine so I feel good about that. I actually worked in this crazy spot the other day. Inside the coker, right at the top of the vessel. I was one of the first people inside for the shut down, we had to walk onto some I beam that was installed and bring more I beam in as cross members. It was crazy because the walls are black with coke and it was at least 100 foot drop below us into this black abyss. We were tied off of course, but when you're watching the guy next to you welding and his sparks take a good 10 seconds to hit the bottom of the vessel you know you're high up.
|
|
#
?
Apr 16, 2009 13:41
|
|
|
ChaoticSeven posted:I'm building this: Yet another person who's building my burner. (My alter ego is moya034) Honestly, I think the 2" version of that burner is overkill. How big of a furnace are you putting it in? Yes that would be 1/4" NPT tap. Grainger will have that if you can't find it anywhere. AbsentMindedWelder fucked around with this message at 18:52 on Apr 18, 2009 |
|
#
?
Apr 18, 2009 18:50
|
|

|
I don't know yet. I'm not sure what the largest furnace this burner could fire would be. What I'd actually like is one large enough to throw a transmission case in and melt all the aluminum off, let it run out through the bottom into forms and be left with all the iron/steel parts in the crucible or whatever to dump out. I could pay for the burner and furnace in a half a day and be on my way to financing other toys if I could figure out how to do that. What I decided to do instead of buying taps or paying the shop is to buy a 1/4 coupling, drill a regular hole in the 2" pipe, weld the coupling on, screw the 1/4 pipe in. Voila. Just need to find a dude who won't charge $100 for a couple minutes of welding. Going to drill and weld the oil "line" pipe into the plug too. So I have all the parts to the main body of the burner as of today. Just need to rig up a container and stand for the oil and get a hose of some sort to run to the burner.
|
|
#
?
Apr 19, 2009 02:55
|
|
|
I want to fill the holes in this sheet metal, what method do you guys think I should use? I could arc weld it maybe. Or solder it with a propane torch or something. Any ideas?
|
|
#
?
Apr 25, 2009 23:33
|
|
|
Slung Blade posted:I want to fill the holes in this sheet metal, what method do you guys think I should use? What are your plans with this? If it's automotive in nature, I'd recommend making "patch" material, drill small holes in either the patch or base material, and arc weld in the spots exposed by the holes when you lay the patch over/under the base material. Fill with your filler (bondo, solder, whatever) afterwards.
|
|
#
?
Apr 25, 2009 23:52
|
|
|
They're the sheet metal cowling for my tractor. The holes used to allow the muffler and gas cap to pass through, but as I'm converting it to run on batteries, they're no longer necessary. I just want to fill them in so it looks nicer once I get around to cleaning and painting it. That's a perfect solution Jovial, thanks. I'll go get some scrap sheet metal to practice on. What rod do you think I should use and at what current setting?
|
|
#
?
Apr 26, 2009 03:39
|
|
|

|
| # ? May 25, 2024 17:27 |
|
|
Slung Blade posted:What rod do you think I should use and at what current setting? Oh, I have no clue. I generally use oxy/acetylene, and don't generally arc weld on sheet metal, on account of blow through. But if you're just filling holes via spot welding, I imagine anything should work, as long as it isn't too thick.
|
|
#
?
Apr 26, 2009 03:46
|
|