


|
I originally came on as a generalist doing modeling/texturing/rigging for backgrounds and props. After about 6 weeks of that I was given a crack at lighting and composting one of the episodes. They liked it, so I ended up doing the lighting TD and compositing for about half of the series.
|
 #
?
Apr 7, 2009 01:42
#
?
Apr 7, 2009 01:42
|
|


|

|
| # ? May 14, 2024 23:20 |
|
|
Nice work! props for finding that king of project in Adelaide ")
|
|
#
?
Apr 7, 2009 02:22
|
|

|
Thanks for all the input on displacement/normal maps. I think I will hold off on it until the next animation. I'm too far into this project to go changing things up I think. It might be nice to have something on my second scene though with my vegetable people... I'm currently working on my last character for the first scene ") Hopefully I'll be animating in a few months. I'll probably be doing some small vignettes. Hopefully I'll be animating in a few months. I'll probably be doing some small vignettes.Also I hate texturing. I just feel like I don't get it. I can get things to look how I want with procedural type of stuff, but once I get UVs into Photoshop I blank out. dreggory posted:This was the result of a midterm assignment for the lighting and texturing class I'm taking. We were essentially given the models and told 'make something with this.' It's a good start. You could get a much more dynamic scene by showing the horizon to add depth. It feels very shallow with how you have it laid out from the top. You could do exaggerated hills with trees menacing in towards the viewer and center of the composition. I always like to think of it as in CG you have infinite ability to move the camera around, so set yourself limitations on how you view a scene. Set it up like you're setting up a traditional photo shot, or a scene from a movie. Don't be afraid to take inspiration for your scenes from movies with a good sense of ambiance and style. You don't have to copy directly, but see the way they lay everything out, and then light hits the objects. Kirby: That looks great. Any chance it will be online?
|
|
#
?
Apr 7, 2009 02:27
|
|
|
Hinchu posted:Kirby: That looks great. Any chance it will be online? yeah, apparently it is going to be on ABC iView from tomorrow; http://www.abc.net.au/tv/iview/ not sure if it has a stupid country block or not, you'll have to let me know. given the size of the production team and the budget that was given, we're all pretty proud of how it turned out.
|
|
#
?
Apr 7, 2009 02:38
|
|
|
ABC Television posted:Sorry
|
|
#
?
Apr 7, 2009 02:44
|
|
|
dang. I'll ask around about the possibility of youtubing an episode or something. If not, I'm sure I can post stills and breakdowns for you guys.
|
|
#
?
Apr 7, 2009 03:06
|
|
|
 New Oz
|
|
#
?
Apr 7, 2009 04:23
|
|
|
Odddzy posted:
Posting a quick tut on how to render a wireframe in Max. NOTE: THERE ARE MANY WAYS TO DO THIS!! This is just one I like. 1. Turn on mental ray in the render prefs. Use a default shader and make it white. Change the TYPE of material / shader to COMPOSITE.  Keep the old WHITE material as a submaterial. 2. Use a second default shader and make it black. Check on the wireframe box. You can change the thickness of the wireframe under "extended parameters -> wire size".  3. Go back to the composite white shader and drag and drop the wireframe black shader into the first composite material slot (I use copy but instance will work if you keep the wireframe shader around).  4. This is what the render will look like as is. Note that mental ray must be enabled for this composite shader trick to work. The white base will be the base layer with the black wireframe material layered on top. This will create the effect of "hidden wireframe removal" which prevents one from seeing the occluded / blocked wireframe. Otherwise all of the geometry is visible and this can be confusing to look at.  5. Here is a render with the an occlusion shader mapped to the (white) diffuse color channel. The AO samples are set to 64. I also changed the background to white and changed my wireframe thickness to .5  A popular alternative method to this is to simply save the UV ref with your texture file so your UVs show up in the render. sigma 6 fucked around with this message at 05:17 on Apr 7, 2009 |
|
#
?
Apr 7, 2009 05:13
|
|


|
Has anyone been using Unity for the Mac? They just released 2.5, and with it Windows editor support! Yay. My friend has been using it for a bit and loved it, and now that this is out, I might try to give it a go, putting something into such a robust engine would be cool.
|
|
#
?
Apr 7, 2009 05:18
|
|

|
I finally got around to uploading renders of my character animation clips from last quarter. The individual pages have more details on each clip. Project 1 - Lip Sync - Clearly the weakest of the bunch, but a decent first project. Project 2 - Laban Movement (Press) - Something about this just feels off to me, but the teacher really liked it. v  v vProject 3 - Two Characters - Animated in a hurry, and due to a resulting brain fart I forgot to make use of the facial rig's entire range of movement. Project 4 - Award-Winning Acting - We were supposed to use a sound byte from a good actor as reference. I think I got bonus points for establishing a new context rather than mimicking the original scene. I can't wrap my head around animating FK arms to save my life. My final grade in this class was an 88. Probably the hardest/most fun B I've ever earned. EDIT - Are the Youtube videos for these playing back choppy for anyone else? The source renders are 30fps H264 Quicktimes that're about 10-15 megs a pop, and those play back smoother for me than the embedded Youtube page. Ditto the FLVs pulled from the website. 
GFBeach fucked around with this message at 05:33 on Apr 7, 2009 |
|
#
?
Apr 7, 2009 05:25
|
|

|
sigma 6 posted:Posting a quick tut on how to render a wireframe in Max. NOTE: THERE ARE MANY WAYS TO DO THIS!! This is just one I like. Thanks a lot! I knew I heard about that method somewhere but I just completely forgot how to do it again.
|
|
#
?
Apr 7, 2009 05:40
|
|
|
Hey all, I thought I'd post a scene I'm working on. Textures still being worked on, but I'm happy with the look so far. Lighting still needs a few tweaks. 
|
|
#
?
Apr 7, 2009 08:05
|
|

|
Kirby posted:I don't know how many of you are in Australia, but the tv show I'd been working on for the last 8 months is finally airing! I turned on the TV and they were going on about this show coming up next. I went away to make a coffee and when I came back it was over. Ooops.
|
|
#
?
Apr 7, 2009 08:24
|
|


|
episodes are 1 minute long
|
|
#
?
Apr 7, 2009 08:29
|
|
|
Rekka posted:Has anyone been using Unity for the Mac? They just released 2.5, and with it Windows editor support! Yay. My friend has been using it for a bit and loved it, and now that this is out, I might try to give it a go, putting something into such a robust engine would be cool. I've been playing with Unity for the past two years and I can't sing its praises enough. It really is fantastic.
|
|
#
?
Apr 7, 2009 13:39
|
|

|
DefMech posted:I've been playing with Unity for the past two years and I can't sing its praises enough. It really is fantastic. Mind if I have your contact details? I'd love to hit you up with some questions at some point, or something. My email address is captaindoo@gmail.com
|
|
#
?
Apr 7, 2009 15:29
|
|
|
javi posted:Hey all, I thought I'd post a scene I'm working on. Textures still being worked on, but I'm happy with the look so far. Lighting still needs a few tweaks. For some reason this reminds me of Prague.. does your town have a real prototype?
|
|
#
?
Apr 7, 2009 22:23
|
|
|
That show looks really cool Kirby, I missed it but I'd love to see it if it was available streaming somewhere. I'm doing modeling and rigging for a pilot at the moment, it's aimed at really young kids though so it's not as cool as yours. Also possibly 23 minute episodes so the quality won't be anywhere near as good  Also, what's adelaide like for 3D job opportunities? I've kept going on Omar, those of you who have seen The Wire will hopefully be able to recognise him at this point, although the shape is not quite right. Beard will hopefully be proper hair in the future, also eyebrows and eyelashes. Doing likenesses is really difficult but I hope by trying to model recognisable faces over and over I can get better at observation and facial anatomy. 
|
|
#
?
Apr 8, 2009 11:22
|
|

|
Kirby, can you upload just one episode to youtube? It looks awesome, nice work!
|
|
#
?
Apr 8, 2009 13:14
|
|

|
About to go shoot some texture references. Specifically, I'm taking a shot of an entire bundle (25 ft^2) of cedar shingles laid flat so I can have a good set of images to randomize from. Anyone want them when I'm done? edit: Ok, so when you lay out a bundle of cedar shingles without any overlap they cover a hugenormous fuckton of square footage, so I only did about half a bundle. On the bright side I did have a good amount of sunlight so I think I can generate a specular map as well. Handiklap fucked around with this message at 15:56 on Apr 8, 2009 |
|
#
?
Apr 8, 2009 15:00
|
|

|
Kirby posted:episodes are 1 minute long I caught the first ep on iView. You guys arent sparing on any of the grotesque, are you? It looks pretty awesome.
|
|
#
?
Apr 8, 2009 15:03
|
|
|
thanks guys! luckily, there is an interactive website that's just launched, which should be international; http://www.abc.net.au/rollercoaster/figaropho/ all the episodes are on there at an OK quality. here's some nice stills. when I get some free time, I'll post some comping breakdowns. enjoy  Click here for the full 1024x576 image.  Click here for the full 1024x576 image.  Click here for the full 1024x576 image.  Click here for the full 1024x576 image.  Click here for the full 1024x576 image.  Click here for the full 1024x576 image.  Click here for the full 1024x576 image.  Click here for the full 1024x576 image.
|
|
#
?
Apr 9, 2009 01:45
|
|
|
I just watched the arachnophobia ep. It's awesome! I love the lighting/rendering style and the obvious effort that went in to comp, really looks classy. Animation is great also.
|
|
#
?
Apr 9, 2009 04:56
|
|
|
thanks dude. and in regard to your question about work in Adelaide; I'd say it's definitely a smaller community here than up the east coast of Australia. But there are some major advantages to being here. - We're pretty tight knit, so if you have talent people will recommend you, and you will always be in demand. - Rising Sun have a studio here, so there's always that opportunity to get onto huge features if that's your thing. - It's freaking cheap to live here. - the South Australian Government and the South Australian Film Corp literally throw money at us. Moreso than any other state.
|
|
#
?
Apr 9, 2009 05:28
|
|
|
Sort of the same thing back when I was in Perth. Tons of money being thrown around and a small community. Unfortunately it was desolate as all hell.
|
|
#
?
Apr 9, 2009 08:41
|
|
|
Naaah I'd say Adelaide is more boring than Perth heh. What gets me is these FFC branches that throw govt money at film projects... AND give them tax breaks. Film is really just another business, why don't they fund things like games companies seeing as that's a bigger industry now? The best reason I've heard is that films have a cultural impact worth investing in locally, since if they are shot/set locally then they reflect that area. I suppose film has also been around a while, so they have had an opportunity to dig their nails in, unionise, etc etc. And great work on lighting that stuff, it polished up really nice. Now to get my rear end to work and see how my cloth sim went.
|
|
#
?
Apr 9, 2009 13:32
|
|
|
less talking, more images.   Click here for the full 1920x1080 image. Seawater is hard to make.
|
|
#
?
Apr 9, 2009 20:50
|
|
|
^^^ Seawater is indeed very hard to make. It looks like your scale is off. The water is making the boat's scale small to me in relation to the people. Perhaps the size of the waves? Are you using the MIA shader? (arch vis) Also, the lighting on the stock photos is uniform but wrong, but you knew that already. Kirby: Amazing work. It is great to see that level of quality out of goons. EoinCannon: Do you mind if I PM you about some zbrush questions? Is anyone going to CGCON? International Log posted:less talking, more images. 
sigma 6 fucked around with this message at 22:39 on Apr 9, 2009 |
|
#
?
Apr 9, 2009 22:29
|
|
|
If those shadows weren't so black, that fruitbowl would look 10 times better. There really needs to be some bounced color in there.
|
|
#
?
Apr 10, 2009 01:44
|
|
|
I would use a larger scale procedural as an alpha for the ripples you have going now to break things up a bit more on the ocean.
|
|
#
?
Apr 10, 2009 04:50
|
|

|
sigma 6 posted:You have some major texture seam issues going on. With the banana and the pear. For a still like this you can get away with moving the seams to the back of the banana/pear. Also, as said, more bounce.
|
|
#
?
Apr 10, 2009 05:06
|
|

|
Crits plz. The benches and table are product too, but are more props than anything else as far as the vis goes. Granted, a comp I did a couple weeks ago sold some benches and tables so maybe they should be a little more visible. A little post bloom and a warming filter, but I don't know if I'm helping or hurting it's so subjective any more, especially when everyone around you is all, "Oh wow that looks awesome!!one" and you're all, "Yeah, I think it kind of looks like poo poo and I can't put my finger on it, but thanks anyway." Click here for the full 1500x1000 image.
|
|
#
?
Apr 10, 2009 13:14
|
|
|
HandiKlap: I dunno mate, I looks pretty good to me. I'm not an arch viz guy. Maybe some ambient occulsion and maybe some more interesting specular component on the roof and the concrete base could work. Sigma: Shoot, I'll answer any questions if I can. I'm testing out some lighting and rendering setups with the Omar model even though it's not finished. I'm going to try to go the full detail treatment in Zbrush and export normal maps. I may texture it if I can be stuffed unwrapping it. He looks stoned now but I still need to do the whole asymmetry and facial expression thing. 
EoinCannon fucked around with this message at 15:22 on Apr 10, 2009 |
|
#
?
Apr 10, 2009 14:43
|
|
|
BonoMan posted:You have some major texture seam issues going on. With the banana and the pear. For a still like this you can get away with moving the seams to the back of the banana/pear. Thanks guys!! Will fix the seams ASAP. Getting the bounce right is a bit more tricky. The SSS shaders need more work too.
|
|
#
?
Apr 10, 2009 15:42
|
|
|
Handiklap posted:"Yeah, I think it kind of looks like poo poo and I can't put my finger on it, but thanks anyway." Get it in an environment, white bg's kinda throw arch stuff off. Quick stuff thats not important, but there: The stone is a bit pasty - possibly add more contrast/spec to it. Theres some noise in the supports - could also add a bump of wood, assuming it is painted wood. The filleting is too uniform for wood too, it's have variation in how sharp/soft the edges are. Any bolts, screws, metal brackets in it? Doesnt matter if it only renders a few pixels worth. The benches are a bit dark, but that could be the silhouette thing. Maybe lighten up the mat and add some more reflection/something for them to reflect. The wood at the top holding the roof up is a bit pasty too, try fiddling with the texture and darkening/adding spec to it all. It's good, and would look awesome if it was in a proper scene - i'm just being pedantic cause you asked
|
|
#
?
Apr 10, 2009 17:59
|
|
|
sigma 6 posted:Thanks guys!! Whooooaa, that is WAY better than any previous renders. Well done, sir.
|
|
#
?
Apr 10, 2009 18:03
|
|

|
For my animation final. It's a drag race. This is just the model of the drag racer I made. I didn't model most of the engine. I just changed it a little. 
|
|
#
?
Apr 10, 2009 19:42
|
|
|
Can anyone recommend some good tutorials on using procedural (or even mental ray) textures/shaders in maya? In terms of dvds I know Gnomon and Digital Tutors go into them but they are more along the lines of a Maya + Photoshop pipeline, UV Mapping, or simply going into the basic UI. I'm looking more for a project where they build a texture for an object from the ground up, showing you the thought process behind each node
|
|
#
?
Apr 10, 2009 23:50
|
|

|
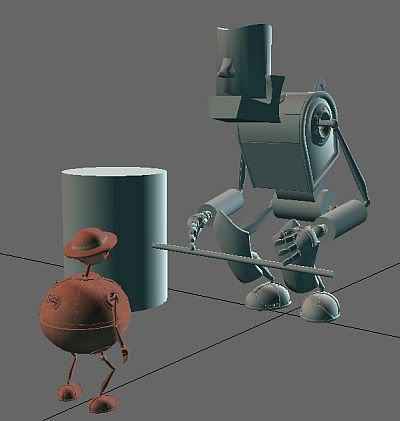
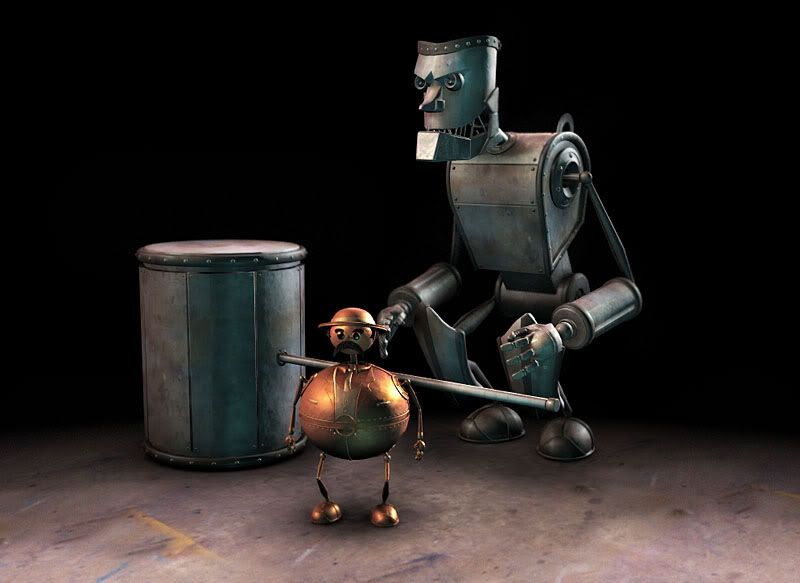 The Wind-Up Smasher is coming along. I need to finish riveting and then work on some textures. Oh and rig him.
|
|
#
?
Apr 10, 2009 23:57
|
|
|
|
| # ? May 14, 2024 23:20 |
|
|
I have a question  I'm currently working on my boot's uv maps. I've ripped all the uv's and want to get them all onto one texture map. I was wondering how to line up all the uvs so nothing overlaps. Currently i just rendered out each map individually and laid them out how I wanted in photoshop and am going back into each uv map and adjusting it individually. I hope that makes sense. edit: nevermind, I didn't realize you could attach geometry without losing your uv maps and then i can set up material id's and move them about as i wish. Wow, life just got a little bit easier. le capitan fucked around with this message at 00:23 on Apr 11, 2009 |
|
#
?
Apr 11, 2009 00:12
|
|