

|
Man_alive posted:The day was rather clear, and the light was good, I have only really had issues with the halos that are appearing on the people's heads. http://tricks.onigo.net/guides/2005/09/chromatic-aberration-step-by-step.html
|
 #
?
Apr 24, 2009 15:08
#
?
Apr 24, 2009 15:08
|
|


|

|
| # ? May 15, 2024 20:10 |
|
|
Thank you very much for this. I wasn't quire sure of what it was called, or, indeed if it had any other name than "annoying gently caress-rear end halos." Again, thank you
|
|
#
?
Apr 24, 2009 15:17
|
|

|
Hello, i'm hoping one of you may have an easy fix for this issue. When I view my pictures in Adobe Bridge the colors look great, but when I open the same picture in Photoshop CS3 the pictures lose some saturation. If I save the file and re-open in bridge, it looks great again. (i'm going through this since I just got a new PC and monitor) Here is a screenshot to illustrate: 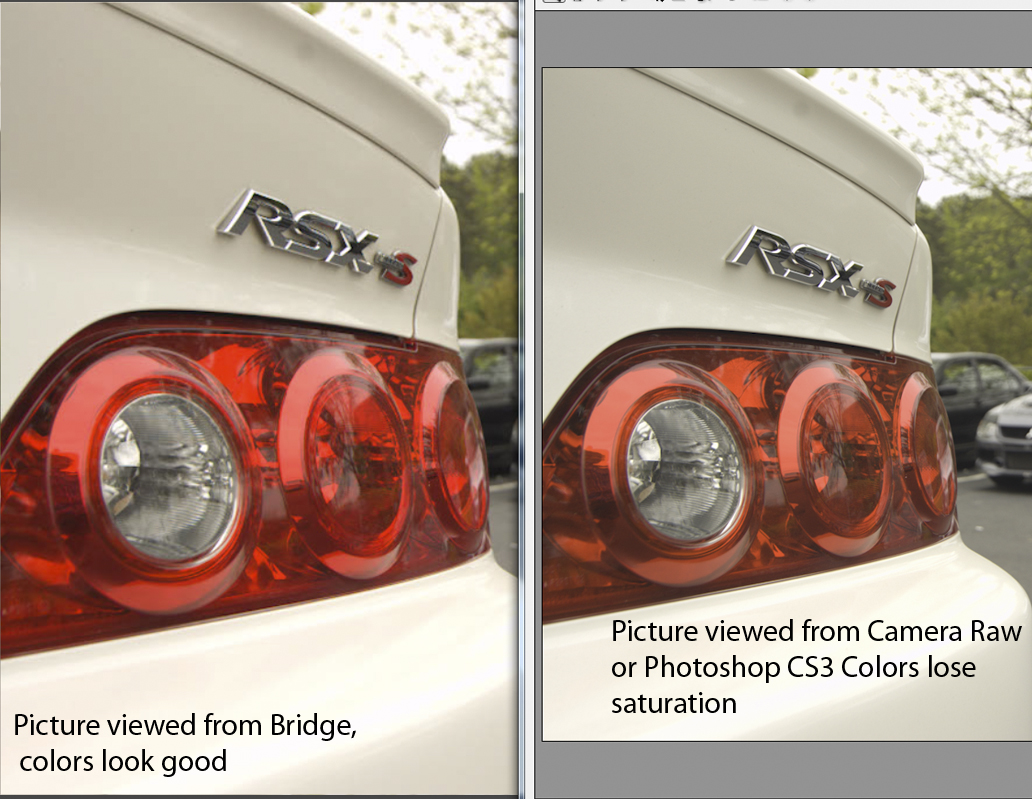 Click here for the full 1032x799 image. Bridge and photoshop both seem to be set to "North America General Purpose 2" color settings. Any help will be GREATLY appreciated!
|
|
#
?
Apr 24, 2009 19:16
|
|

|
the posted:Hello, i'm hoping one of you may have an easy fix for this issue. When I view my pictures in Adobe Bridge the colors look great, but when I open the same picture in Photoshop CS3 the pictures lose some saturation. If I save the file and re-open in bridge, it looks great again. (i'm going through this since I just got a new PC and monitor) You know that Raw has sliders that adjust the picture on import, right? It's not just zeroed out and left like it is in Bridge. To me, the picture on the right looks like it has some sharpening, maybe some exposure compensation not just saturation. Looks better to me, generally, than the one on the left.
|
|
#
?
Apr 24, 2009 19:22
|
|
|
Man_alive posted:Thank you very much for this. I wasn't quire sure of what it was called, or, indeed if it had any other name than "annoying gently caress-rear end halos." Just so you know in the future, in that light you could have stopped waaay down. Your exif shows 1/4000th at f/1.4 -- you could have gotten down to critical sharpness and least CA at around f8 or f9.
|
|
#
?
Apr 25, 2009 02:40
|
|
|
Great thread. This has shown me just how little I know about post processing and just what can be accomplished.
|
|
#
?
Apr 26, 2009 09:37
|
|
|
the posted:Hello, i'm hoping one of you may have an easy fix for this issue. When I view my pictures in Adobe Bridge the colors look great, but when I open the same picture in Photoshop CS3 the pictures lose some saturation. If I save the file and re-open in bridge, it looks great again. (i'm going through this since I just got a new PC and monitor) Are you shooting RAW + Jpeg? Sometimes image browsers use the Jpeg as a preview rather than the RAW.
|
|
#
?
Apr 26, 2009 20:49
|
|
|
This is probably the best place to ask. I have approximately 1,000 photos I would like to organize and separate by dominant color. ( ie: Google Image Search's sort by color option. ) Is there a particular program I could use that would do the trick?
|
|
#
?
Apr 26, 2009 22:20
|
|
|
the posted:Hello, i'm hoping one of you may have an easy fix for this issue. When I view my pictures in Adobe Bridge the colors look great, but when I open the same picture in Photoshop CS3 the pictures lose some saturation. If I save the file and re-open in bridge, it looks great again. (i'm going through this since I just got a new PC and monitor) Do you shoot Nikon by chance? Until recently, all the ACR presets for Nikon DSLRs were significantly different (and to many, subjectively worse) than the modes that could be selected in camera. That's because ACR can't decode the in camera settings from Nikon's proprietary NEF file format. This was what caused the thumbnails generated by Lightroom as I imported pictures to look great until I opened the image for editing, which caused the in camera preview to be replaced with an ACR rendition of the NEF file. I think this was done to encourage people to buy Nikon's image processing software that can decode the in camera settings. The latest version of ACR added a lot of new presets for Nikon cameras that produce results that are much closer to the in camera settings. I think the new presets were added in ACR 5.2 (around when CS4 was released). I don't think ACR ever had as much of a problem with other camera brands (at least not as recently as CS3), so if you aren't using Nikon it's probably something else. It could be the JPEG previews in Bridge are generated using the in camera settings while the Photoshop RAW importer is set to use different settings, but that seems unlikely since both programs are set to "North America General Purpose 2". If you zoom in to 100% in Bridge, do you get an image that looks like the smaller previews in Bridge, or does it look like what you get in Photoshop?
|
|
#
?
Apr 27, 2009 09:25
|
|
|
Canon images usually have similar issues in Photoshop ACR/Lightroom, they look snappy until they load, then you have to work to get them back to what they already looked like. I was on the edge of shooting jpeg I got so frustrated with it, then I started using Capture One instead ")
|
|
#
?
Apr 27, 2009 14:32
|
|
|
TsarAleksi posted:Canon images usually have similar issues in Photoshop ACR/Lightroom, they look snappy until they load, then you have to work to get them back to what they already looked like. I was on the edge of shooting jpeg I got so frustrated with it, then I started using Capture One instead People generally shoot raw because they don't want software making any assumptions about the white balance, gamma encoding or color space of their images. This is more of a feature than an issue.
|
|
#
?
Apr 27, 2009 17:15
|
|

|
Loinworm posted:People generally shoot raw because they don't want software making any assumptions about the white balance, gamma encoding or color space of their images. This is more of a feature than an issue. Well no crap, but if your raw converter lets you start from a base of 'decent' instead of awful, it will save you a lot of time.
|
|
#
?
Apr 27, 2009 17:34
|
|
|
TsarAleksi posted:Well no crap, but if your raw converter lets you start from a base of 'decent' instead of awful, it will save you a lot of time. It starts from a base of "don't clip anything anywhere unless it cannot be avoided." Your subjective impressions of what this looks like are far less important than the technical necessities of the process of maximizing the amount of capture data you pull into your final product, and quite frankly the ability to apply any arbitrary collection of settings to as many images as you want with a single click makes this a complete non-argument.
|
|
#
?
Apr 27, 2009 18:28
|
|
|
^^^^^^^^^^ This.TsarAleksi posted:Well no crap, but if your raw converter lets you start from a base of 'decent' instead of awful, it will save you a lot of time. s0meb0dy0 fucked around with this message at 18:31 on Apr 27, 2009 |
|
#
?
Apr 27, 2009 18:29
|
|

|
s0meb0dy0 posted:^^^^^^^^^^ This. Thats what the histogram is for, if your just glancing at the LCD on your camera thats not a good representation of what the image will look like when printed. I hardly ever look at the image with my on camera LCD and just look at the histogram.
|
|
#
?
Apr 27, 2009 18:36
|
|

|
raggedphoto posted:Thats what the histogram is for, if your just glancing at the LCD on your camera thats not a good representation of what the image will look like when printed. I hardly ever look at the image with my on camera LCD and just look at the histogram. vvvv These guys put it much better. s0meb0dy0 fucked around with this message at 18:45 on Apr 27, 2009 |
|
#
?
Apr 27, 2009 18:40
|
|
|
raggedphoto posted:Thats what the histogram is for, if your just glancing at the LCD on your camera thats not a good representation of what the image will look like when printed. I hardly ever look at the image with my on camera LCD and just look at the histogram. That's great but has nothing whatsoever to do with what he's talking about, and also many camera histogram displays are only marginally reliable as they tend to be calculated based on the gamma encoding the firmware would have applied if you were shooting JPEG and also represent an average of all channels' data. A histogram will tell you IF something is clipping. It will not tell you what or where. Specular highlights for example, should clip and you shouldn't particularly care.
|
|
#
?
Apr 27, 2009 18:40
|
|
|
The problem with the histogram though is it really doesn't say "this point is that object and that point is this object," so it's all kind of subjective on the scene you are shooting. It works well in a studio setting where you have absolute control of the lights but outdoors or with mixed lighting forget it. Also, there is no "right" histogram so again it's all subjective. Edit: beaten.
|
|
#
?
Apr 27, 2009 18:40
|
|

|
s0meb0dy0 posted:I mean when I import the photos into lightroom. If I take 10 variations of the same thing, I don't need to analyze what was captured, taking into account automatic settings and the histogram and whatnot, because I can see it straight in RAW. Sorry misunderstood, thought you where talking in camera.
|
|
#
?
Apr 27, 2009 18:45
|
|
|
raggedphoto posted:Sorry misunderstood, thought you where talking in camera.
|
|
#
?
Apr 27, 2009 18:56
|
|
|
s0meb0dy0 posted:I know this is the wrong thread, but since we are on topic here: I woefully under use the histogram in-camera. Can anyone give examples of pictures where it can be really useful? If I'm taking a picture of a sunset, I already know to dial down the exposure, does it really help to get as much as possible from a shot? Generally speaking, you want to try to get as big of a hump in the right half of the histogram as humanly possible without shoving anything off the edge. Being a very linear device, over 50% of the data captured by the sensor resides in the first couple stops of the exposure, and it is much easier to pull it all down into the shadows than it is to stretch it up into the highlights as the latter approach will create horrible posterization effects and increase the perception of noise once gamma encoded by the raw converter, as visualized by this sloppily constructed GIF which assumes five stops worth of exposure latitude.
|
|
#
?
Apr 27, 2009 19:10
|
|
|
Loinworm posted:A histogram will tell you IF something is clipping. It will not tell you what or where. Specular highlights for example, should clip and you shouldn't particularly care. I don't know about should clip because they don't have to, but they are way over to the right, yeah. I pretty much ignore what the LCD says and just watch the histogram, although that is not ideal and shooting tethered is the way to go if at all possible.
|
|
#
?
Apr 27, 2009 19:12
|
|

|
s0meb0dy0 posted:I know this is the wrong thread, but since we are on topic here: I woefully under use the histogram in-camera. Can anyone give examples of pictures where it can be really useful? If I'm taking a picture of a sunset, I already know to dial down the exposure, does it really help to get as much as possible from a shot? Depends on what you want out of the image, keep in mind that with digital you expose for the highlights and with film you expose for the shadows. If you underexpose a digital image and then push the exposure in post your more likely to end up with polarizing and noise in the shadows. That being said I check my histogram to see where the majority of the tones are and adjust from there. A sunset type of image I probably wouldn't bother to check the histogram. When I shoot weddings and sports where the light isnt changing much I dial in my exposure using the histogram before the event to make sure most of my tones are more to the right giving me more room adjust in post. In the studio I use a view camera with a leaf back tethered to a laptop, the software has a very useful histogram that I always use. Its a matter of preference I guess but I find it very helpful to know where all the tones sit in my exposures. Edit: Beaten and out done by a gif
|
|
#
?
Apr 27, 2009 19:13
|
|
|
brad industry posted:I don't know about should clip because they don't have to, but they are way over to the right, yeah. It's a little unusual to see a specular that doesn't clip in at least one or two channels unless the shot is underexposed in general.
|
|
#
?
Apr 27, 2009 19:27
|
|
|
I use the "blinky highlight" feature in the camera for checking for blown highlights. I find that even if an area is blinking, there's still a wee bit of data left that it might be recoverable in Lightroom or whatever, so as long as I can keep things from blinking, I'm usually pretty good. Of course this isn't the most technical or proper way of doing things, but it works well for me on the fly and in a hurry.
|
|
#
?
Apr 27, 2009 19:52
|
|

|
Loinworm posted:It starts from a base of "don't clip anything anywhere unless it cannot be avoided." Your subjective impressions of what this looks like are far less important than the technical necessities of the process of maximizing the amount of capture data you pull into your final product, and quite frankly the ability to apply any arbitrary collection of settings to as many images as you want with a single click makes this a complete non-argument. Your missing the point of what I'm saying in order to make a pedantic argument. My irritation with Lightroom has nothing to do with the way it renders light/dark but the color that Adobe's processor renders-- no two raw processors are going to give you exactly the same result, and it is indeed an entirely subjective thing-- Adobe's results are not "right" any more than any other converter (though Canon will tell you that DPP is the "correct" interpreter of their raw data). Notice how I didn't say that I was shooting jpeg, but that I simply switched raw converters because I prefer the way that C1 handles Canon raw files. I think you'll find that plenty of people agree with me on this point, even if they are not busy posting to the internet. edit: can't type today TsarAleksi fucked around with this message at 20:12 on Apr 27, 2009 |
|
#
?
Apr 27, 2009 20:09
|
|
|
I have a colour space conversion issue in Photoshop that's really starting to bother me. I regularly calibrate my monitor (with a Huey Pro - 6500K colour temperature and 2.2 gamma) and everything always looks quite as it should. I work in Adobe RGB in Photoshop, and proofing images against my monitor RGB gives only barely noticable differences between unproofed Adobe RGB images and proofed images. However, when I convert to sRGB, poo poo happens every time. Conversion settings are Adobe (ACE) Engine, relative colourimetric intent, and black point compensation and dither checked. Unproofed sRGBs images after conversion look pretty much exactly like the Adobe RGB versions before conversion, but when proofing against my monitor RGB, the converted sRGBs become much more saturated. And that oversaturated look is what I get when I save any sRGB and view it in a browser or other software outside of Photoshop. It's become a habit to always desaturate sRGB images by 10 to 15 before saving, because that's the only way I can get my images to look like they did in Photoshop when viewing them outside of Photoshop. But it is fairly tedious to always rework the colours a little every time I save in sRGB, and I feel it's not quite how things should work when converting from Adobe RGB to sRGB.
|
|
#
?
Apr 27, 2009 20:39
|
|
|
TsarAleksi posted:Your missing the point of what I'm saying in order to make a pedantic argument. My irritation with Lightroom has nothing to do with the way it renders light/dark but the color that Adobe's processor renders-- no two raw processors are going to give you exactly the same result, and it is indeed an entirely subjective thing-- Adobe's results are not "right" any more than any other converter (though Canon will tell you that DPP is the "correct" interpreter of their raw data). Notice how I didn't say that I was shooting jpeg, but that I simply switched raw converters because I prefer the way that C1 handles Canon raw files. I think you'll find that plenty of people agree with me on this point, even if they are not busy posting to the internet. You seem to have missed your own point when you endeavored to make it sound as though Lightroom and ACR were somehow flawed in their interpretations rather than simply stating that you personally prefer another product. I'm well aware of CaptureOne's popularity and would never dream of faulting anyone for using it, but in your case it sounds more like you simply aren't particularly familiar with what it is raw converters actually do under the hood and are just gravitating toward the one that seems to give you the most "pop" without any effort on your part regardless of the technical implications. Either that or you're just namedropping expensive poo poo you own because you think someone is going to be impressed by your extremely professional sounding anti-Adobe sentiments. Secondly, "the color that Adobe's processor renders" is nigh infinitely adjustable and you'll be hard-pressed to achieve a result (in terms of color rendering) with any vendor's conversion software that cannot be reproduced in every other's provided the operator of said software actually knows what he or she is doing and why. While the calibration panel might be a little user-unfriendly, if you honestly cannot figure out how to spend a second and a half working the Saturation and Vibrance sliders or store and recall presets to do it automatically then digital post-processing just might not be for you.
|
|
#
?
Apr 27, 2009 20:45
|
|
|
Sebastian Flyte posted:I have a colour space conversion issue in Photoshop that's really starting to bother me. I regularly calibrate my monitor (with a Huey Pro - 6500K colour temperature and 2.2 gamma) and everything always looks quite as it should. I work in Adobe RGB in Photoshop, and proofing images against my monitor RGB gives only barely noticable differences between unproofed Adobe RGB images and proofed images. OK, so you have an Adobe RGB image which you work on while proofing against Monitor RGB (I'm assuming this is for web publication) and then it's suddenly oversaturated when you turn it into sRGB. How are you actually performing the conversion?
|
|
#
?
Apr 27, 2009 20:50
|
|
|
All I said was that if you don't like the way that Adobe is rendering the raw file, look at other software that you like better. Of course you can get to the end result you're looking for with any piece of software, but it seems pointless to waste your time tinkering in one program when you can start out with a base you prefer in another. I got a free copy of C1 4LE and started playing with it on someone's advice, and liked it better, for a lot of reasons other than just the rendering, but that's beside the point. Adobe products seem to be universally used/recommended, so I feel like I might be doing someone a favor by pointing out that there are alternatives- I certainly didn't know that there were other options until they were demonstrated to me. And by snappy I meant "like I like them" not "popping." Perhaps that was a confusing choice of words.
|
|
#
?
Apr 27, 2009 20:55
|
|
|
I'd like to print and frame a photo out for my girlfriend for her birthday. She has a tiny zit in it that I know bugs her, would anybody be able to take care of this? It'd be much appreciated. If this is the wrong place I apologize. Full size image here, it's tiny but barely noticeable on her medial left upper eyelid: http://rapidshare.de/files/46928929/IMG_4329.JPG.html. Thanks again. Edit: A kind soul took care of it for me. Much love. dsh fucked around with this message at 08:50 on Apr 28, 2009 |
|
#
?
Apr 27, 2009 21:03
|
|

|
Loinworm posted:OK, so you have an Adobe RGB image which you work on while proofing against Monitor RGB (I'm assuming this is for web publication) and then it's suddenly oversaturated when you turn it into sRGB. How are you actually performing the conversion? Yep, it's for web. I'm converting to sRGB using "Convert to profile" with the "sRGB IEC61966-2.1" profile selected, and with conversion options: Adobe (ACE) Engine, relative colourimetric intent, and black point compensation and dithering both checked. And as said, it's only the monitor proofed sRGB images that are overly saturated. The proofed/unproofed Adobe RGBs and the unproofed sRGB are pretty much identical.
|
|
#
?
Apr 27, 2009 21:18
|
|
|
TsarAleksi posted:Canon images usually have similar issues in Photoshop ACR/Lightroom, they look snappy until they load, then you have to work to get them back to what they already looked like. I was on the edge of shooting jpeg I got so frustrated with it, then I started using Capture One instead Have you tried playing with the profiles in the Camera Calibration tab? They're supposed to be Adobe's reverse engineering of the Canon processing and seem to do something (although I usually just use Adobe Standard and waste lots of time doing post).
|
|
#
?
Apr 27, 2009 21:55
|
|
|
Sebastian Flyte posted:Yep, it's for web. I'm converting to sRGB using "Convert to profile" with the "sRGB IEC61966-2.1" profile selected, and with conversion options: Adobe (ACE) Engine, relative colourimetric intent, and black point compensation and dithering both checked. Are you absolutely positive that "Proof Colors" is still checked after the conversion? It's coming unchecked for me, but flicking it back gives me the match I expected.
|
|
#
?
Apr 27, 2009 22:53
|
|
|
TsarAleksi posted:Of course you can get to the end result you're looking for with any piece of software, but it seems pointless to waste your time tinkering in one program when you can start out with a base you prefer in another. Maybe, just maybe, that's why somebody made this menu. 
|
|
#
?
Apr 27, 2009 22:57
|
|
|
Loinworm posted:Are you absolutely positive that "Proof Colors" is still checked after the conversion? It's coming unchecked for me, but flicking it back gives me the match I expected. "Proof Colours" is always unchecked for me after any profile conversion or whenever loading a new image. I always have to switch it on manually.
|
|
#
?
Apr 27, 2009 23:13
|
|
|
Sebastian Flyte posted:"Proof Colours" is always unchecked for me after any profile conversion or whenever loading a new image. I always have to switch it on manually. I see the same thing you're seeing immediately following the conversion, but after turning it back on I've got a pretty good match between the Adobe RGB and sRGB images. Not exact, but good.
|
|
#
?
Apr 27, 2009 23:35
|
|
|
Sebastian Flyte posted:Yep, it's for web. I'm converting to sRGB using "Convert to profile" with the "sRGB IEC61966-2.1" profile selected, and with conversion options: Adobe (ACE) Engine, relative colourimetric intent, and black point compensation and dithering both checked. Use a perceptual transform instead of a relative CM one. Your numbers will have no relation with the Adobe RGB original but it'll look right.
|
|
#
?
Apr 28, 2009 00:08
|
|

|
holy poo poo nevermind.
|
|
#
?
Apr 28, 2009 04:15
|
|


|

|
| # ? May 15, 2024 20:10 |
|
|
Loinworm posted:It starts from a base of "don't clip anything anywhere unless it cannot be avoided." Your subjective impressions of what this looks like are far less important than the technical necessities of the process of maximizing the amount of capture data you pull into your final product, and quite frankly the ability to apply any arbitrary collection of settings to as many images as you want with a single click makes this a complete non-argument. What frustrated a lot of Lightroom users in the past was there was no OPTION to start with an image that resembled what was shown on the LCD or in the embedded JPEG preview, while Nikon Capture's NEF converter could. I came close to purchasing Nikon Capture to use as a converter because of this, even though I greatly prefer Lightroom in every other aspect. ACR's interpretation often produced significantly 'duller' images than Nikon's interpretation. At the time I was shooting nightlife events and being able to start with Nikon's interpretation in Lightroom would have saved me a lot of time and stress trying to get the pictures turned around quickly. The difference in conversion algorithms is more complex than just applying a preset saturation or vibrance boost to images rendered with ACR's profiles. The point isn't that one converter is better than another, just that they are different. They all have their pros and cons and excel in different situations. I (and many others) are much happier with Lightroom now that it can approximate the Nikon look.
|
|
#
?
Apr 28, 2009 04:17
|
|