


|
After cutting my boards I've realised a couple of them are cupped - I've been using my shooting board over a workmate (no bench yet) to plane them flat, is there anything I should be particularly aware of? So, I came across my first real roadbloack and I got pissy, threw my plane onto a pile of bin-bags and stormed out of my workshop. Now, a few days later I can see that I was being ridicolous, but I would like some advice. Unfortunately it seems that I've been a bit to overzealous with my strokes and ended up with tearout on one side of my board. There's a knot there, and tearout on one side of the board when I got it (now the other side has a little too). What's the best way to tackle this? Lastly, how often should I be honing my plane's blade?
|
 #
?
May 21, 2009 15:48
#
?
May 21, 2009 15:48
|
|


|

|
| # ? May 15, 2024 21:54 |
|
|
jagtpanther, send me an e-mail, gemorris@webmail.ncsu.edu
|
|
#
?
May 21, 2009 20:44
|
|

|
Pictures of my most recent project, a Honduran Mahogany bench, finished with a Poly/Oil Mix from Rockler. There are plenty of mistakes in it - my second attempt to hand cut dovetails - but over all i'm happy with it.  
|
|
#
?
May 21, 2009 22:29
|
|

|
Glorified Scrivener posted:Pictures of my most recent project, a Honduran Mahogany bench, finished with a Poly/Oil Mix from Rockler. There are plenty of mistakes in it - my second attempt to hand cut dovetails - but over all i'm happy with it. Looks pretty nice. Only suggestion I would make is to plan out your dovetails better, and that is from purely an aesthetic concern. Looks like you have a solid bench that will last a lifetime, this is why simple projects are so awesome to learn on, despite mistakes they almost always turn out fully functional.
|
|
#
?
May 22, 2009 00:51
|
|
|
Glorified Scrivener posted:Pictures of my most recent project, a Honduran Mahogany bench... It looks like the big brother of the stool I made when hand cutting dovetails, the only difference is I used half dovetails on the back support.
|
|
#
?
May 23, 2009 23:33
|
|

|
I have a question about staining. I am building a mantle and tiling a fireplace. The wood I am using is a poplar mantle, pine columns, and hemlock moldings since I do not have a table top router to make my own. Will these stain drastically different? How can I get them all to match? You guys will like my new shop when I get a change to upload some pictures. I look like a home-depot department with all these Ridgid products. Thanks!
|
|
#
?
May 24, 2009 19:05
|
|

|
GEMorris, ~I tried emailing you but I'm getting a bounceback every time from your SMTP server - my email address is willayerst at gmail dot com if you'd be able to give me a hand? EDIT: Today was a better day than when I lost my poo poo. I picked it all back up again and gave it another college try. The situation was there was an assload of tearout on one side of the side of my trough (for lack of a better term), and the other side had tearout from the milling process at my lumberyard. Well, I burnished the poo poo out of one of my scrapers and went to work on the less ruined side, and it's passable enough now to act as the back-piece. I have realised that 1/16 extra is a good margin for the final cut before planing, and 1/32 really doesn't give enough leeway to ensure both bits of endgrain are perfectly smooth. I made the mortise for the through-tenons on one of my sides by measuring out then giving my chisels their first workout - I stayed about 1/32 inside the line on these and then used a single-cut bastard file (I got this originally to help service my scrapers) to tidy it all up. My original plan for the above was to use a brace with a brad point bit and then use a keyhole saw to open the hole up, would that have been a better plan? I also did my first glue-up, which was a bit of a travesty initially with the clamps falling all over the place, the pieces being twisted and such - but a bit of bashing with a mallet and some creative swearing and it's glued up great. Despite being rather hit and miss with the burnisher on my scraper, it's working like a champ and I'm extremely pleased with my purchase. Lastly, I spent an hour and a half sharpening my Record plane's blade and finally worked up a mud-like slurry - at this point I blew through two more blades and a chisel in the space of a few minutes. What, why and how? Is this what a nagura stone does? All the best, Southern Heel fucked around with this message at 22:11 on May 25, 2009 |
|
#
?
May 25, 2009 16:09
|
|
|
Thanks for the kind words guys, you're the first people besides my classmates and wife to see the thing.GEMorris posted:Looks pretty nice. Only suggestion I would make is to plan out your dovetails better, and that is from purely an aesthetic concern. Do you mean the size or the spacing (or both)? I went big with them because I wanted the piece to have a solid feel - and when I sketched out designs with more/smaller ones it looked "busy". wormil posted:It looks like the big brother of the stool I made when hand cutting dovetails, the only difference is I used half dovetails on the back support. Dammit - that would have looked great, next time... My next project is a wall hanging spice rack - a friend gave me some walnut when he moved and I'm thinking to use that. It'll be another learning experience - box/finger joints for the carcase, dadoed shelves and mortise and tenon... whatever those things that run across the front to keep spices from falling out are called (runners?). After I finish that I'm on to the reason I took up woodworking in the first place - Bookshelves! I collect books and married a librarian, so we're drowning in em. Anybody have a favorite design?
|
|
#
?
May 29, 2009 17:06
|
|
|
Jagtpanther posted:Lastly, I spent an hour and a half sharpening my Record plane's blade and finally worked up a mud-like slurry - at this point I blew through two more blades and a chisel in the space of a few minutes. What, why and how? Is this what a nagura stone does? What grit stones and progression are you using? With a new tool I usually start with automotive sandpaper spray glued to a sheet of plate glass for and then work my way up through the stones when I'm sharpening blades. Anyway, I use Nagura stones to get a slurry going first, it does help. You have my admiration for planing boards by hand - I have hand planes, but I generally only use them for finishing and/or detail work.
|
|
#
?
May 29, 2009 17:22
|
|
|
Eamonn posted:Do you need it to be a special (metal) mechanism? On intructables there's a table made with wooden hinges. http://www.instructables.com/id/Coffee_table_upgrade/ It seems like it requires a bigger base though.
|
|
#
?
May 29, 2009 17:23
|
|

|
Glorified Scrivener posted:Do you mean the size or the spacing (or both)? I went big with them because I wanted the piece to have a solid feel - and when I sketched out designs with more/smaller ones it looked "busy". The relationship between the pins and the tails. They are, in my opinion, too close to the same size, without actually being the same size. This generally leads to a kind of uneasiness or imbalance in a piece. My personal preference is huge tails and skinny pins, and they don't have to be that skinny. Also, unless you are going to play up unequal spacing/size of tails or pins, I would try to make the spacing equal. As to not be confusing, I am meaning that either the tails or the pins should be significantly larger than the other, but that the pin-tail-pin-tail spacing should be consistent. Really it is a nice piece and it looks to be very well built, I was just nit picking. EDIT: I went back and looked at it, the problem is the fat pin in the middle. If the pin-tail proportions you have on the sides had been maintained throughout, the piece would look better IMHO.
|
|
#
?
May 30, 2009 03:45
|
|
|
Glorified Scrivener posted:What grit stones and progression are you using? With a new tool I usually start with automotive sandpaper spray glued to a sheet of plate glass for and then work my way up through the stones when I'm sharpening blades. 800 grit japanese waterstone basically, and using a 2000 grit to hone. Books have suggested 220 grit diamond plates first which seems pretty excessive as they're �100+ ! With regards to any admiration - it's kind of a neccessity - despite GEMorris's frequenty awesome ebay finds, there's nothing available that's affordable or within driving distance to get. I think that it's rapidly approaching the time to build my workbench. The Workbench Book suggests European Beech, and buying 2x12's to rip down into the 2x4's required for the work. Am I going to have that much of a disadvantage by using straight constructional lumber? It appears to be 'european redwood' ?
|
|
#
?
May 30, 2009 13:42
|
|
|
GEMorris posted:Really it is a nice piece and it looks to be very well built, I was just nit picking. No offense taken - I'm always looking for a critique where someone says something - not just that they do or don't like it. I went back and looked at my notes and I think I was going for it being symmetrical as it went away from the center pin. I can see your point though and i'll keep it in mind in the future - i'd like to incorporate dovetails into more of my projects.
|
|
#
?
May 31, 2009 19:35
|
|
|
Jagtpanther posted:800 grit japanese waterstone basically, and using a 2000 grit to hone. Books have suggested 220 grit diamond plates first which seems pretty excessive as they're �100+ ! Okay, at home with a new tool I use sandpaper instead of diamond plates and then use an 800 stone followed by a 1000/6000 dual sided combination stone; to me 2000 seems a low grit to stop at. I feel for you about affordable equipment... I'm lucky and I cheat; I'm enrolled at the community college here, where there is an excellent program, and they also have a couple of sections a semester of a projects class - basically an open shop class where the instructor is just there to make sure you don't cut a hand off and give advice. Its worth the tuition for me its great just to have access to a full shop. Maybe there's something like that near you? Its where I do all of my milling and glue-ups.
|
|
#
?
May 31, 2009 19:46
|
|
|
Jagtpanther posted:220 grit diamond plates first which seems pretty excessive as they're �100+ ! http://cgi.ebay.com/12-pcs-5gram-Di...1QQcmdZViewItem Doesn't matter that it's an AU auction, it all ships from HK anyway.
|
|
#
?
May 31, 2009 20:56
|
|
|
Squirt that crap onto a piece of glass?
|
|
#
?
Jun 1, 2009 13:17
|
|
|
Jagtpanther posted:Squirt that crap onto a piece of glass? A piece of flat maple works really well, or any hard, non-porus wood. http://www.woodworkforums.com/showthread.php?t=49344
|
|
#
?
Jun 2, 2009 01:18
|
|
|
So, I've been reading this thread off-and-on, and finally took the dive into attempting woodworking. I've already felt the itch for buying more and more tools. Currently, I just have a miter saw, a drill, some bits and cheapo clamps. Looking into picking up a router soon. Also, to contribute, here's my first project I've finished--a workbench! It's pretty basic and generally unimpressive, but I suppose we all have to start somewhere. http://bio-hazardous.com/ww/IMG_0015.jpg Basic 2x4's for the frame, and 2 pieces of 3/4 MDF glued together for the top. Added wheels to the bottom so I can actually move it around without killing myself.
|
|
#
?
Jun 2, 2009 10:57
|
|

|
^^ Looks awesome, but won't it skid around if you need to apply pressure in any direction but downwards? Can anyone get a consensus on whether construction lumber is good for workbenches too?
|
|
#
?
Jun 2, 2009 14:20
|
|
|
Jagtpanther posted:^^ Looks awesome, but won't it skid around if you need to apply pressure in any direction but downwards? The wheels have locks on them, so that should keep it kinda stabilized. Although, I guess it might still be able to skid some. Truthfully, this being my first project and having no real background in it, I'll admit I have a lot to learn. Also, that's a good question I didn't consider about the lumber. When I picked up all this stuff, my idea was "I need 2x4s! Let's go to Lowes!"
|
|
#
?
Jun 2, 2009 14:51
|
|
|
Glorified Scrivener posted:Dammit - that would have looked great, next time... re: half dovetailed bench supports - They look deceptively simple but it was one of the more difficult joints I've cut. Both sides have to be perfect or they are useless. The little stool is beat to hell but very strong. I'll post a picture of the joints, maybe tomorrow.
|
|
#
?
Jun 4, 2009 05:02
|
|
|
What's the difference between belt drive saws and direct drive saws? Why is it important?
|
|
#
?
Jun 7, 2009 07:20
|
|
|
Bigos posted:What's the difference between belt drive saws and direct drive saws? Why is it important? Well as the name says the first transfers the torque via a belt which means there might be slippage or a slight delay. The belt can also break so direct drive tends to last longer and not shake as much due to the weight and twisting being centered.
|
|
#
?
Jun 8, 2009 01:23
|
|

|
Bigos posted:What's the difference between belt drive saws and direct drive saws? Why is it important? Direct drive saws are generally tiny, cheap, underpowered and screamingly loud "laptop" saws. They use universal motors (think belt sander loud, the type of loud that makes you FEEL your hearing being damaged, of course I always use these ear muffs). If they break it's usually over Johnny. Belt driven saws are on a totally different page. Usually contractor or cabinet based, comparatively quiet due to using an induction motor, less vibration, smoother running due to having much more weight and material for dampening, and have more power. If the motor burns out (rare) you can just pop a new one in, maybe even upgrade it at the same time. I see no reason other than monetary to consider a tabletop table saw.
|
|
#
?
Jun 8, 2009 01:39
|
|

|
Bigos posted:What's the difference between belt drive saws and direct drive saws? Why is it important? What Chaotic Seven said. Basically direct drive saws are circular saws upside down in a table.
|
|
#
?
Jun 8, 2009 05:25
|
|
|
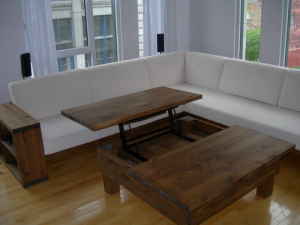
Eamonn posted:this is the best thread i could find for this question, and it's not worth it's own thread, so here goes: I am looking for a mechanism similar to the one in this photo, or what they're called, or even better, a source for tables similar to this. That has to be the coolest thing I have ever seen. I want one.
|
|
#
?
Jun 8, 2009 16:01
|
|
|
Bensa posted:Well as the name says the first transfers the torque via a belt which means there might be slippage or a slight delay. The belt can also break so direct drive tends to last longer and not shake as much due to the weight and twisting being centered.
|
|
#
?
Jun 10, 2009 01:09
|
|


|
I posted these pics a few years ago in GBS when I finished it, but I figured this thread is an appropriate place to pimp it again: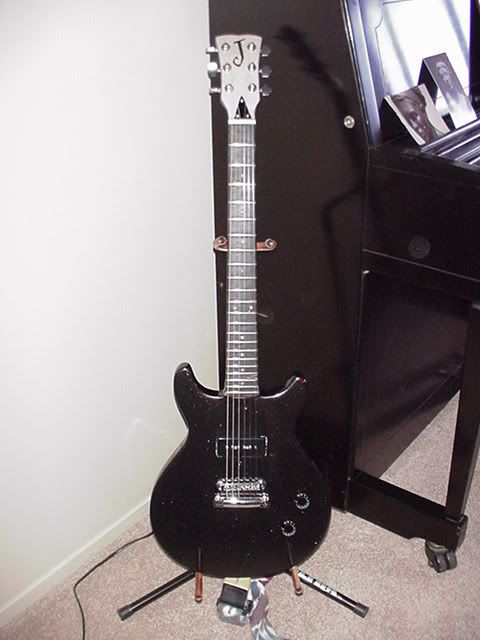  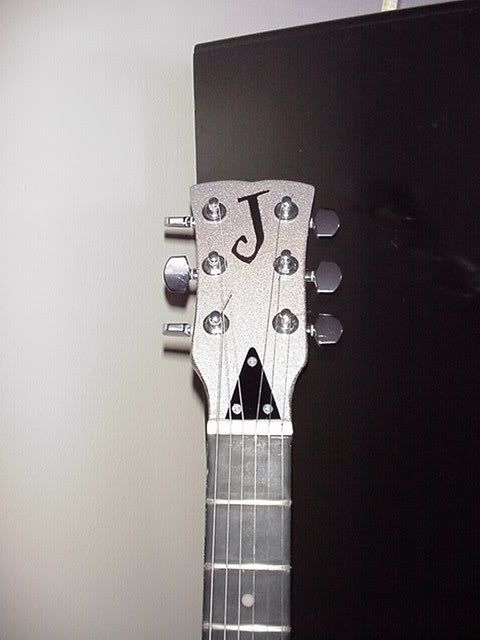 It's a copy (with some modifications) of a 50's Les Paul Jr. The body is made from alder with a couple of internal chambers routed out. The body top is 1/4" maple. The neck is laminated maple set in to the body, and the fretboard is ebony. There's a double acting truss rod in the neck so I didn't have to route a curved channel. I went the paint route to make everything look uniform. The metal parts are the only things I didn't make. The wood was all from a lumber yard, not blanks.
|
|
#
?
Jun 10, 2009 19:07
|
|


|
The woodworking megathread was about to slide off the front page, and frankly I cant let those Metalworkers, Plumbers and Sewers get away with it. So here's a mini update on how my guitar is coming along. After the purflings had dried into the top and bottom, it was time to cut a channel for the bindings, (these actually strengthen up the joints of the guitar, and help stop the end grain of the wood from being exposed)  Using lots of masking tape to hold them in place whilst they dry, I don't know how happy I was with this method, as the tape lifts little bits of the soundboard away with it. Still it meant I could do more than one strip at a time, which I wouldn't have been able to do using the only other method I know, lots of rubber bands.  Finishing off the bottom with a decorative end strip, I foolishly decided to do mine as a wedge and inadvertently made the job twice as hard.  Up next week(/month) making the neck.  Oh and I also bought some tuners, they were so expensive they came in a presentation gift box   Sorry for the terrible cameraphone quality photos, its all I have
|
|
#
?
Jun 12, 2009 15:33
|
|

|
anaemic posted:Up next week(/month) making the neck. Noce work so far! You're in for some fun making the neck. Depending on the kind of truss rod you use you're going to have to route that curved channel. Like I said in my post I used a double acting rod to avoid that one. The neck angle on mine was 2-1/2 degrees back iirc. That was a serious bitch to get right and glue in. Is an acoustic going to have an angle or does it run parallel with the body top? Also, how are you going to lay down your fretwire? I made a scale drawing in a CAD program of my fret positions and then printed it out 1:1 and cut over those lines. There's a table in a guitarmaking book I've got with the fret positions for a bunch of different scale sizes. So many questions!
|
|
#
?
Jun 12, 2009 18:31
|
|
|
anaemic posted:Up next week(/month) making the neck. So many questions indeed: Are you going to hand-carve that neck? Is that a plow plane in the background and if so what kind and how do you like it? Did you use a router or hand tools for your binding/purfling channels? Did you inlay the rosette yourself and if so what did you use? How'd you bend your sides (just curious)?
|
|
#
?
Jun 12, 2009 20:07
|
|
|
I just did the binding on my project guitar too.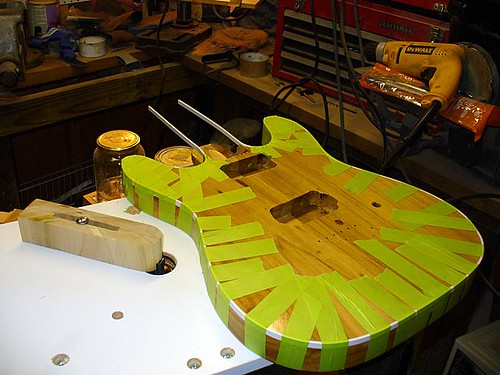 I used a router mounted in a table with a hand-made guide block/fence, adjusted to cut just the right depth/height for my binding. 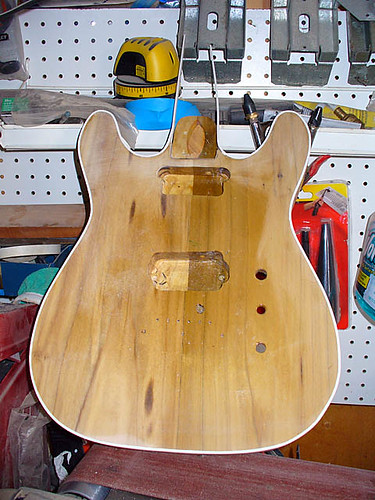 I used a cyanoacrylate glue to glue the binding itself on and taped as I went along. Then let it sit overnight and scraped and sanded the binding flush with the rest of the top. 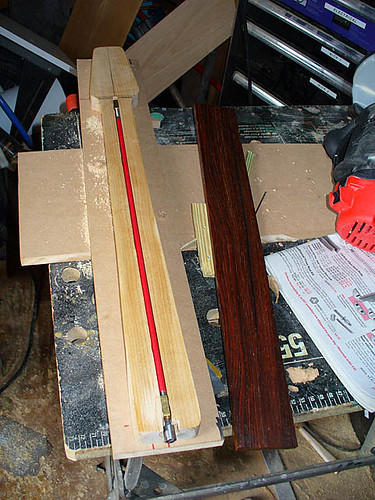 I got my truss rod channel routed last week too. I just need to slot my fretboard and glue it on and slim the headstock down a bit, and I will be ready for a final assembly before breaking it down to finish it.  I did the majority of the neck carving with a rasp, and smoothed it out with a belt sander, and finished smoothing/shaping with sandpaper by hand.
|
|
#
?
Jun 14, 2009 16:14
|
|

|
That neck is looking nice. I see you're using the same truss rod I used as well. How are you going to profile the fretboard? I did mine by hand with my palm sander, but I've heard of profiled sander attachments that can do it as well.
|
|
#
?
Jun 15, 2009 07:08
|
|
|
I bought a radius block from Stewart Macdonald guitar shop, and then you use a adhesive sandpaper on it to sand in the radius. There are ways to set up a router to do it, but it would have cost just as much to buy the materials to build a jig as it did to just buy the block. I got my fret scale all laid out yesterday, I left my camera at work so no pics yet. I bought a big huge piece of maple a few years ago I have enough to do like 7 or 8 more necks. Next neck blank I cut will be about a 1/4" thinner. This neck is really fat not uncomfortably so, but noticeable compared to my other guitars. I picked up a Flying V body on the cheap that is just rough cut with no bridge laid out yet. I was considering building a baritone neck for it. I won't get started on that one until I get this one painted and hanging up to cure for the 30 days or so that nitrocellulose lacquer needs.
|
|
#
?
Jun 15, 2009 13:23
|
|
|
With that out of the way, I basically need a couple lengths of 2"x3/4". I need 2 pieces 37" long, 3 pieces 15" long, and 6 pieces 4" long. My question is what would be the best/cheapest way to go about getting this wood? Is Home Depot or Lowe's going to have the right width/thickness? Should I ask if they have some scraps or something? We have an 84 Lumber near here too but needing such a small amount of wood I don't know if that would be the right place to go. Also, what kind of wood should I look at getting? Should MDF be fine for this? Is there anything I should know about nailing this? Thanks a lot in advance, if/when I get this done I'll post pictures of my ghetto-rear end repair job for laughs. Edit: nm got the wood sighnoceros fucked around with this message at 20:50 on Jun 15, 2009 |
|
#
?
Jun 15, 2009 16:51
|
|
 GOONS ARE MEAN
|
Hmm, lots of questions to reply to but I will try not to be too concise. Cobalt60's questions are a bit more simple and direct so i'll run through them first; Are you going to hand-carve that neck? Yes indeed, I should be able to achieve it using just a few gouges, an assortment of finger/thumb planes to even out the surface and a cabinet scraper to get a smoother result. If I attempt to use abrasives for non finishing work I will be hung drawn and quartered by my teacher, but really, power sanders are terrible pieces of equipment with a mind of their own which will in an instant ruin a good piece of work, and you shouldn't need to use them for fine work. Is that a plow plane in the background and if so what kind and how do you like it? It is indeed, but I couldn't say off the top of my head if its a Record or a Stanley, it's very easy to use and uniquely useful at times - I would break down and cry at the prospect of cutting a truss rod channel with a marking knife and chisel. However that particular plane is missing a fence adjustment screw so its a little wobbly and has contributed to my less than perfect truss rod channel, but with the money, I would buy myself one without a moments thought. Did you use a router or hand tools for your binding/purfling channels? Hand tools, hand tools, hand tools. It's the part of the guitar I wish most I had used a power tool for, but I am not allowed use the power tools in my first year. I'm not sure if that's to teach us good chisel work, or just out of sadism. Did you inlay the rosette yourself and if so what did you use? The rosette was a bit of a long process, I made it myself out of several strips of binding, but because some of them were made as fine mosaics (like classical rosettes) they needed to be pre bent to shape. so I have to bend them on a hot iron and then form them around a circular jig I made specificaly. When it was all ready the channel was cut out by using a circle marker to score the inside and outside rings (preventing chipping) and then using a 'hand router' (/grannies tooth/old ladies tooth) which is really a sort of chisel blade with a base and adjustable depth to remove the waste material. Again this would've been 100 times easier and probably neater with a Dremel, and a jig. How'd you bend your sides (just curious)? Using this fine machine and shaping them until they fit into my mould. It would be easier using a fox bender - and I will certainly be using one next year - but the actual bending iron can be used for a lot of other jobs (binding, purfling, rosettes) so is still very useful to have around. Phewph, onto McMadCow; Curved truss rod channels This issue is a bit of a bone of contention between me and one of my teachers, I've been talking to him about how I'm interested in putting a proper curved channel into the neck and he's been trying to dissuade me. Essentially, I've agreed to not do it for my first guitar because despite my research (that it can make the distortion of the neck under truss rod tension a more predictable affair) his opinion (backed up by one of the technicians) is that it is a time consuming and unnecessary luxury, which would require me making up a jig, then playing around making an infill between the rod and fingerboard once its in place. Certainly, when I'm making guitars out of the finest materials, to the finest standards, I will want to do it, but I'm letting it slide for this guitar, because this is the first time I've ever done this, and there seems little point putting a Rolls Royce engine into a Mini. Neck angle I don't have the information about angle to hand, but I know that for the guitar I'm making (a Martin 00-45) the neck should be angled back enough so that with a precision straight edge running down the neck it should be flush at the body join, but 5mm higher at the bridge. Laying out the frets One of the big perks, of being in college studying guitar making is that I have access to a whole storeroom (and storebasement) of tools including a pile meant for the actual engineering classes next door, so I can use an industrial flat bed with some ludicrous measuring gauges which will let me measure and score the fret positions to three decimal places. In reality though, my margin of error when hand sawing those slots out is going to throw all that precision out the window, so yeah id say your idea sounds just fine. Or if you want something you can use again and again, you can buy templates for fret positions from StewMac or LMI (or make your own, just be careful to double check them before you make ten new fretboards using them).
|
|
#
?
Jun 16, 2009 13:14
|
|
|
anaemic, that's all pretty awesome and inpiring to me, thanks. Apologies for the potentially endless questions, but what hand tool did you use to cut those binding channels? The IBEX one, by chance? Love the thinking on the restricted use of abrasives. I'm still getting practiced up on my new cabinet scraper (using it and also honing the edge!). I was also thinking of building a similar jig for rosette routing, but I'm nowhere near competent enough to actually make a full rosette. I was thinking of just sticking to a few solid wood circles, rather than buy a pre-made one. COOL!
|
|
#
?
Jun 16, 2009 21:02
|
|
|
Ive been doing all the binding/purfling channels by hand using this. You adjust it for the depth in from the edge you wish to cut, then run it around to score a line around the perimeter of your guitar. and then using a marking knife, deepen the channel carefully by hand, and using a chisel, pare out the waste material. As I said before though, its extremely long, and difficult to do well. If I had the supplies id be using a dremel and guide.
|
|
#
?
Jun 18, 2009 12:17
|
|
|
That's the product I was thinking of when I said IBEX, thanks. Edit: Oh wait, maybe it's just very similar? http://www.metmusic.com/item_detail.aspx?ItemCode=5067 Even with that cool base, is a Dremel really "good" for that job? A lot of the luthier forums seems to say that it's speed and accuracy are too ... something... for the job. I dunno, I still need to dig into my first real build here so I'm just collecting data!
|
|
#
?
Jun 18, 2009 23:27
|
|
|

|
| # ? May 15, 2024 21:54 |
|
|
Built a stand for my (new to me) 90 gallon acrylic aquarium. The front/back and top skirt thing are all maple, and the sides/bottom are birch hardwood ply. Since the tank should weigh about 900lbs when full of water, I braced everything with a 1.5" strip of maple as well. All the joints are glued and screwed, and the face/back are joined with biscuits. I'm just now debating how to finish it. Maple doesn't take stain very well, but I have some mahogany gel stain and all the prep stuff. Most of the furniture in my place is painted black or very, very dark brown, so a very light wood like maple won't go well with anything (even if it is very pretty). Comments welcome ")  Click here for the full 1280x853 image. 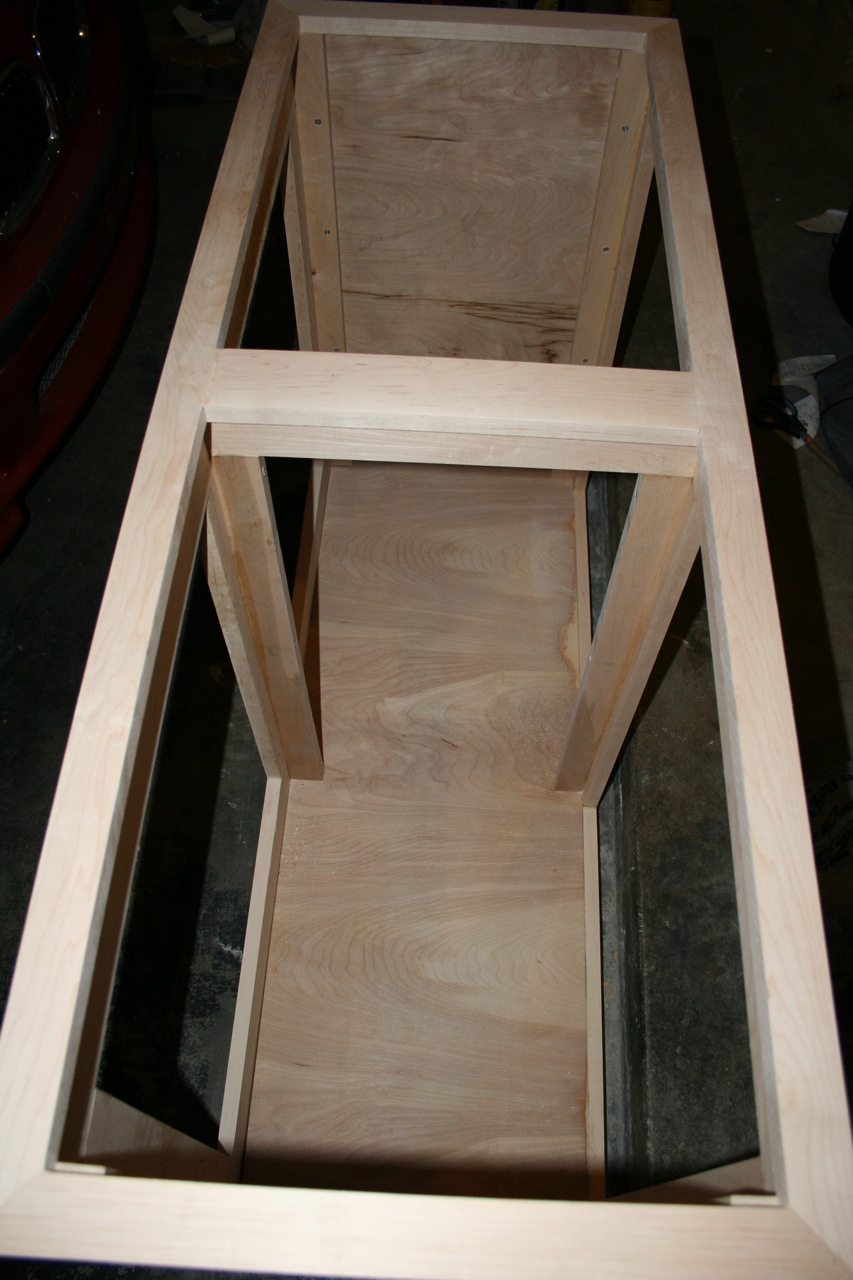 Click here for the full 853x1280 image. 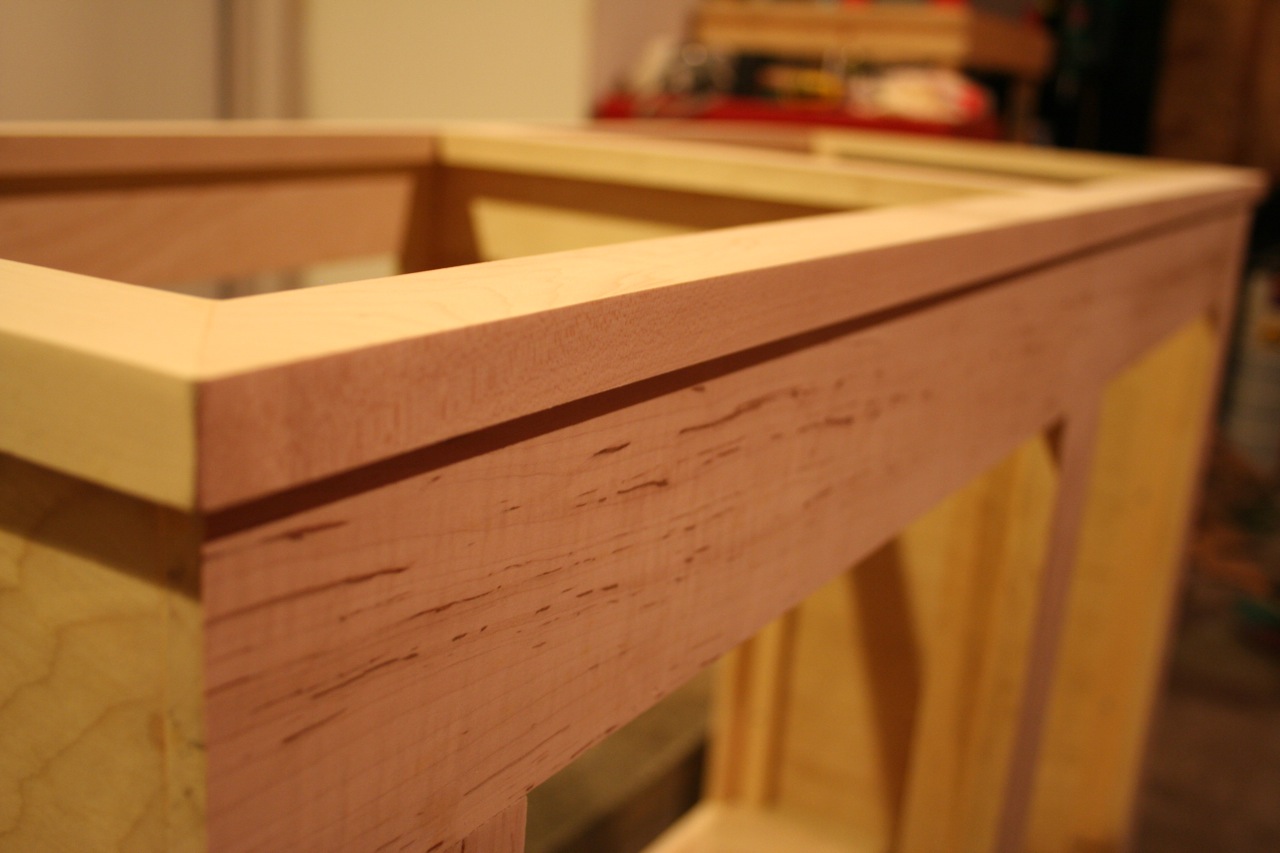 Click here for the full 1280x853 image. 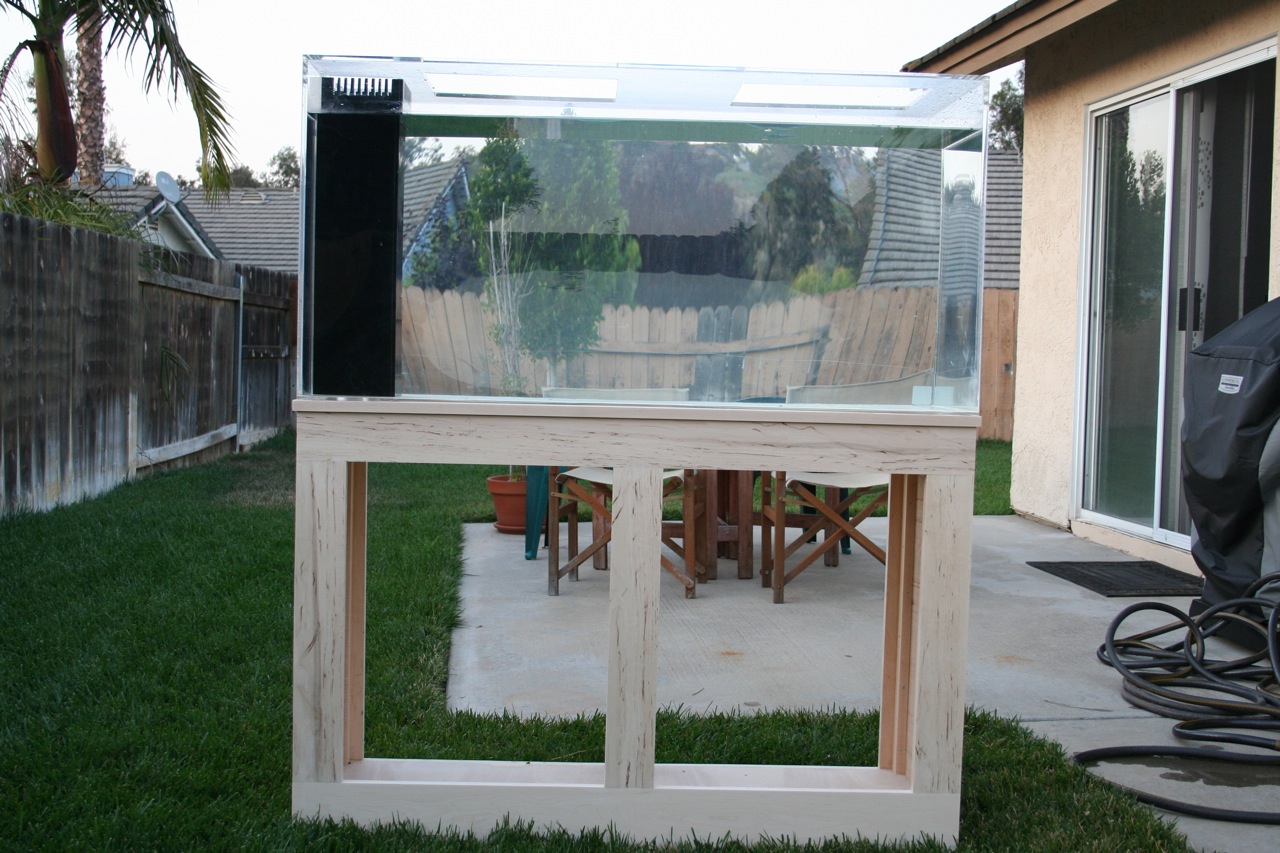 Click here for the full 1280x853 image.
|
|
#
?
Jun 18, 2009 23:31
|
|