


|
So is that knife done with a process similar to damascus steel? The pattern certainly resembles it...I wonder how it would look if you chemically etched it a little bit?
|
 #
?
Jul 1, 2009 19:14
#
?
Jul 1, 2009 19:14
|
|


|

|
| # ? May 25, 2024 04:40 |
|
|
Certainly looks like damascus to me, and as far as I know, that's what it looks like after it has been etched already.
|
|
#
?
Jul 1, 2009 21:57
|
|
|
Zquargon is correct, it is damascus and has already been etched. I want to get something to buff it with and see if I can get the nickel layers to be a bit shinier.
|
|
#
?
Jul 1, 2009 22:44
|
|
|
Out of curiosity, if I wanted one of you guys to make me a Damascus steel block that could be squared to 1" x 1" x 8" for a project how much would that cost?
|
|
#
?
Jul 2, 2009 03:23
|
|

|
Third Murderer posted:Zquargon is correct, it is damascus and has already been etched. I want to get something to buff it with and see if I can get the nickel layers to be a bit shinier. If you use some really fine sandpaper and go over it lightly it should shine up the nickle layers better. All this assuming you gave it a nice deep etch.
|
|
#
?
Jul 2, 2009 06:26
|
|
|
Third Murderer posted:Zquargon is correct, it is damascus and has already been etched. I want to get something to buff it with and see if I can get the nickel layers to be a bit shinier. So, how many hours do you have in it? Is that your first damascus piece? I'm very interested in attempting to make some at some point in the future, but I know that I have a long way to go. From what I've read, the most important things to practice are forge welding and just general hammering technique.
|
|
#
?
Jul 2, 2009 15:54
|
|
|
can of corn posted:If you use some really fine sandpaper and go over it lightly it should shine up the nickle layers better. All this assuming you gave it a nice deep etch. The etch is pretty deep - deep enough to feel the texture of it, anyway - so maybe I'll try this at some point. Powdered Toast Man posted:So, how many hours do you have in it? Is that your first damascus piece? Yes, it's my first. I made the steel about two years ago and never got around to doing anything with it - I don't have a forge at home, so I can only work once in a great while when I stop by a local craft school. I don't know how many hours it took to make the billet, but I made it over the course of three days, under the instruction of a knife guy who specializes in damascus. I could probably do it in an afternoon now that I know what to do - it's not very time consuming, assuming nothing goes wrong. I didn't find it terribly difficult, either - generally you just flux the hell out of the billet and make sure it's at a good welding heat before you smoosh it. If you have access to a power hammer or treadle hammer, use that - doing it by hand is certainly possible but would probably be very tiring. We actually did the welds by just squeezing the billet in a vice, and only used the power hammer to draw out the billet at a reasonable rate. Two years or so ago, I wrote up the method I used for Slung Blade, and I might still have those PMs in my outbox if you're interested. RealKyleH posted:Out of curiosity, if I wanted one of you guys to make me a Damascus steel block that could be squared to 1" x 1" x 8" for a project how much would that cost? Some quick Goolging tells me you might expect to pay around $50 from a professional, maybe more or less depending on how complicated the pattern is and so on. I don't have any way of making more at the moment, unfortunately, but maybe someone else here can help you out. Medenmath fucked around with this message at 17:37 on Jul 2, 2009 |
|
#
?
Jul 2, 2009 17:32
|
|
|
Third Murderer posted:Two years or so ago, I wrote up the method I used for Slung Blade, and I might still have those PMs in my outbox if you're interested. I'm pretty sure I do if you don't. Also, great job on that knife, it's gorgeous.
|
|
#
?
Jul 2, 2009 18:16
|
|


|
Third Murderer posted:Two years or so ago, I wrote up the method I used for Slung Blade, and I might still have those PMs in my outbox if you're interested. I'd like to hear it at least.
|
|
#
?
Jul 2, 2009 18:17
|
|

|
Third Murderer posted:Two years or so ago, I wrote up the method I used for Slung Blade, and I might still have those PMs in my outbox if you're interested. landis posted:Would it be too presumptuous of me to say 'duh?'
|
|
#
?
Jul 2, 2009 21:12
|
|

|
I checked and I still have the PMs, so I'll post them here later tonight. edit:  There are three things to keep in mind when making Damascus: heat, dirt, and scale. Heat is good - you want your metal to be in a good yellow heat whenever you're doing anything with it, because the welds can break at lesser temperatures if you put too much stress on the billet. Once the metal has cooled to an mid-range orange color, it needs to be heated up again. Scale and dirt are bad - if anything gets in between layers in your billet, the weld there will will fail to take. Furthermore, it is important to know that the amount of pressure you put on the billet when you are trying to get the layers to weld is not very important - as long as the metal is hot enough, they only need to touch properly to weld. The only tools you really need to make Damascus are the things you would normally find in a smithy - an anvil, a hammer, some tongs, a vice, and a forge. A power or treadle hammer is a huge advantage for drawing the billet out, but if you can't get access to one, just stick to smaller billets so you'll have less metal to move. I would suggest having a friend on hand to help you with your vice, by the way - they don't have to have any knowledge of smithing to help, you just need someone to close the vice for you while you're handling the metal; we'll get to that in a second. To start, you'll need to put together an initial billet. You should alternate pieces of tool steel and nickel (all cut to the same size, naturally), so that the pattern will be visible. For the billet I made, I used five pieces of tool steel, divided by pieces of nickel steel, for a total of nine starting layers. Note that my nickel steel, because it was scrounged form a saw blade, was thinner than the tool stock I had - this was solved by simply doubling up on pieces of nickel steel: any two pieces of the same kind of steel that are touching will become a single layer once the weld is set. Also note that the initial pieces of metal don't have to be ultra-clean; grind or file off any rust, obviously, but a little bit of factory scale or whatever will probably not be a problem. The first step is to find a way to keep the layers together until they are welded. If you have an arc welder, you can run a little weld down the middle of both ends of the billet, and you're done. You can even weld a piece of junk stock to one end as a handle, although this will eventually break off with repeated heats and can get pretty hot itself. Assuming that you do not have an arc welder, however, you can simply tie the metal together with steel wire. Once the billet is ready, stick it in the forge! You want it to get to a nice yellow heat, but as it's warming up, continually apply flux to the gaps between the layers. You'll want ot lay it on its side so that the gaps will face up, and thus the flux will flow down between the layers as it melts. Flux from both sides, and don't be afraid to be liberal with it. Don't leave the billet on its side too long, or the flux will run out the other side - let the flux melt a while, then turn the billet flat again. All this fluxing will help prevent scale from building up inside the billet, which would ruin your efforts. Once every layer has reached a bright yellow heat, and as long as you've been careful to use the flux to prevent scale building up between layers,you can set the first weld. If you've used the arc welder to keep the billet together, this step is pretty simple (see below for slightly different method if you don't have access to a welder) - just stick the billet in the vice so that the vice will be pressing the layers together, and squeeze it. Move the billet in the vice and squeeze again as neccessary, so that every part of the billet has been squished to force the layers to touch. You can probably do this step with a hammer instead of the vice, if you want, but the vice is easier if you have a helper or are working with a small enough piece of material that you can manipulate it with one hand, and you'll have less trouble making sure every part of the billet had been squished. Keep in mind that you want to do the squishing quickly, as the weld will only take while the metal is yellow! Once the billet is welded for the first time, turn it so you can see the edges of the layers and clean off any scale with a wire brush. Check all four sides (the ends don't count). You want to watch the metal cool a bit, and see if any layers (especially the outer ones) cool at a different rate than the rest of the billet. If this happens, it means that that layer did not weld properly. See below for a possible way to fix this. If the whole thing appears to be glowing a uniform color, congratulations! Your first weld is complete. If you do not have an arc welder, you can use steel wire to hold the billet together. Tie it at three for four locations evenly spaced out, and then heat the thing up as above. When it's all up to temperature, take the billet over to your vice and clip off one of the wires. Squish the part of the billet that now has no wire to set the weld, and check it via color as above to make sure it set okay. Then heat the billet up again, making sure to keep the gaps well fluxed, especially where they end at the welded section. Once it's up to heat again, clip off the next wire and vice it again. Repeat for each wire until the whole thing is fused, and always check to see that the welds are taking properly! Incidentally, as long as the first weld takes, you can probably clip all the wires off at once, since the weld should hold the layers together. If you end up with a tricky layer or a bubble (a darker spot on an outer layer), you can try to fix it by using a punch to open little holes in the troublesome layer. Punch through the entire layer so that you can see the layer beneath it as a little, hotter spot - a little jet of gas may shoot out when you break through as you release the stuff trapped inside. Make a bunch of such holes all over the darker area, and then flux the holes liberally, heat the thing up again, and pound the bad spot down to try and set the weld. I did not encounter this problem, so I can't give you too much specific information beyond this, except that when you go to fold the billet over you'll want to keep the troublesome layer on the outside, so that if it never really gets fixed you can eventually just grind it off. Sadly, if the weld never takes properly you may have to start over from the beginning - not everything is salvagable. If it looks really bad from the get-go, and you can't seem to get the errant layer to weld, it might be a better use of your time to start over immediately rather than try to salvage it. Next, folding. This part is a bit less complicated than the first step, and is technically optional. Now is the time to make sure you know how many layers you want, because each time you fold the thing over, the number doubles. When I made my billet, I started with nine layers and folded five times, so the number of layers went 9 -> 18 -> 36 -> 72 -> 144 -> 288. Naturally, the more you fold the thinner the layers get, which is important. If you have only a few layers - say, if I had stopped at 72 - the pattern will be large and very bold. If you have lots of layers - say, if I had gone on to 576 - the pattern will be small and fine. The thickness of the layers determines how thick the lines of your pattern will be, so more layers means finer lines. If you fold it too many times, the pattern may become invisible, the lines will be so thin. Make sure to always keep track of how many times you've folded the metal and how many layers you have - since the number doubles each time, one fold can make a monumental difference in the appearance of the finished product. First thing you'll need to do is heat up the billet - again, a yellow heat, both to make it pliable and to ensure that the welds don't pull tricks on you - and draw it out until it's long and not too thick. When you work on the sides where the gaps used to be, there will probably be some overhang where the metal wasn't quite the same size or shape. Be sure to flux these parts while heating it and maybe just before hitting it, so that when these overhangs fold over and touch the rest of the billet they weld to it rather than just fold over. Once the billet is a good shape - this will depend on what your intent is, I guess, so use your best judgement - even it all out so it's nice and regtangular (don't worry about the ends) and let it cool a bit. Once it's in a black heat - or totally cold if you want, I guess it doesn't matter - you'll want to grind off all the scale from one of the flat sides (not the sides where the gaps were visible!) - this will be the inside surface when you fold the thing over. I used an angle grinder to clean the thing off, but you can do it by hand or however else you want. Just make sure not to make any deep gouges in the metal, or you'll risk a bubble or a bad weld. You want the metal to really shine here - get as much scale off the thing as possible. Technically speaking, removing all the scale like this may not be necessary, as once it's hot again the flux should take care of it, but I watched one guy try to do a fold without removing the scale and it didn't work (he had to pry the thing open again to grind off the scale), so I would suggest taking your time here and doing the extra work. Once one side is nice and shiny and clean, find the halfway point on your billet and cut a little groove into it, going almost all the way through - the shiny side is the side that needs to stay connected. The shop I was using again came to my rescue with a nice power saw, but a hacksaw or anything that will cut steel will work. I don't know if a hardy or normal chisel would produce a clean enough cut, but it might. Once you have a billet with a clean side and a gouge in it, you can heat it up again. Keep the shiny side as fluxed as you possibly can in the forge. Once the whole thing is grey-going-into-cherry (NOT YELLOW THIS TIME!) take the billet out of the forge, and fold it over. The easiest way to do this is to strike the billet softly agaisnt the anvil with the shiny side facing down, and then once inertia gets it started do the rest of the work with the hammer. Again, I will point out that the metal should NOT be yellow at this point, or it may be too soft and simply break on you at the fold. Before you fold it over competely, flux the hell out of the shiny side. Once it's folded over, stick it back in the forge and bring it up to a yellow heat again. Flux the new gap the same way you did the first time you welded the billet, and when you're ready, do the same thing you did before - stick it in the vice and squish it to weld it, then check its color to make sure it's even, etc. This step is identical to the first weld, except there's only one gap this time so there's actually a little less that can go wrong. Once the weld is set, draw the thing out again the same way you did before, and repeat the whole thing as necessary - grind off scale, cut groove, fold, weld, draw out, grind off scale, cut groove... Again, make sure to keep track of how many times you fold it. Once you reach the desired number of layers, just draw it out into whatever shape is most useful to you. Now, patterns. There are many different patterns, but I only know how to do a few of them, and of course, I have only actually MADE one of them. Feel free to look around on the internet for more ideas, but here are two to give you some ideas. NOTE: Further forging beyond this can distort the patterns sometimes, so it's always best to form your billet into a shape you actually like right after you do whatever is needed to make the pattern. The risks of this depend on the pattern and luck, and of course it may actually end up cooler looking in the long run anyway, if your luck is good. Just keep all this in mind! Twists: Twists look like flowing lines, such as the maiden's hair (loose twist) or the star twist (tight twist). To make a twist pattern, even out your billet so it has a square profile, and then stick it in a vice and twist it (a monkey wrench or something can help act as a lever for this - have the billet standing straight up in the vice and stick the wrench on top to all you have to do is turn it around). Very simple to do. Make sure that you try to keep the twist even, and (especially if you're going for a tighter twist) only twist the thing when it's yellow hot - this puts a lot of stress on the metal and can break your welds if the billet is too cold. Rememebr that the part of the billet in the vice will obviously cool faster, so keep reheating the billet and change where you put the vice to keep the twist even. This is the pattern I did, as it sounded the least likely to mess something up, and it worked out quite well. Once you have the twist the way you want it, flatten the whole thing and make the corners as close to 90 degrees as you can. What used to be the edges of your billet now wrap around the thing, so when you etch it the layers will be visible. Incidentally, if you grind fairly deeply into the tighter "star twist," you'll get little star-shaped things in your pattern, hence the name. Pool-and-eye: This pattern looks sort of like ripples in water, and is also called the raindrop pattern. This one is simple to do but pretty labor intensive- you'll need a drill press. Basically, on each flat side of your billet, and generally while it's still nice and fat (i.e., dont really draw it out after the last fold, just even it up), you drill little holes all over the surface like Swiss cheese. Make the holes overlap, have some go deeper than others, do them in different sizes, etc. Don't go too deep, as the final billet can never be thicker than the thinnest part you make here! You want it to be pretty random looking. Once you're happy with it, just draw out the billet and make it all flat and even. The layers that were drilled away will reveal layers beneath, naturally, so that you have roundish ripples when you etch. Be careful: due to how this pattern is made, it exists only on the surface layers; if you file off too much stock or something later, you can actually grind away the pattern! Note that there's no reason why you can't combine things like this - say, do a pool-and-eye, and then twist it. Now the etch! This would be the easy part. This should be done after all shaping is finished - and in the case of a knife, after heat treating and tempering. Ferric chloride is generally the etchant of choice, but keep in mind that, even though it is fairly mild as acids go, it is still very nasty stuff so don't breathe it or drink it or pour it in your eyes or whatever other retarded poo poo you were going to do with it you idiot! Getting the stuff on your skin won't hurt you immediately, but make sure you neutralize it ASAP if you spill it. If you want you can use a milder acid (even vinegar would work - eventually), but then it will take much longer. Firstly, sand the item going from coarse sandpaper up to at LEAST ~300 grit sandpaper - you want it as smooth as possible, so go to as high a grit as your patience allows. Clean off the item with acetone or ammonia water or something to remove any finger-grease or whatnot form your filthy, goony hands. Mix a soluion of 1 part ferric chloride (you can get this at some Radio Shacks, by the way - it's used for etching circuit boards) to three parts water (distilled, if possible) and fill a jar or bowl or something (something made of glass or plastic, so the acid doesn't eat it) big enough to hold the item. You don't have to be too picky about how you put the item into the acid, but make sure there are no air bubbles stuck on it that would prevent a spot from etching - I just jiggled my knife around a bit with a pliers (so as to avoid sticking my hand in the stuff) and made sure to turn it over once in a while). Take the item out every few minutes and take a look at how it's coming along - if you want a deeper pattern put it back in, or if you're happy with it just take it out and neutralize it. If your item is going to have a non-wood handle, don't etch the part that will be in the handle - if you're using wood go ahead and etch it. I think this has to do with the grip the handle can get on the etched metal somehow, but I forgot to write down the exact explanation, so I could be talking out of my rear end here. You can reuse the same solution over and over again, by the way, but remember that it must stay clean, so if you plan to reuse it keep it tightly shut (also it's still pretty dangerous stuff!). When you remove the item from the solution, rinse it with water and then douse it ultra-liberally with a base to neutralize the acid - Windex contains some ammonia and works fine. Slather the item in oil to prevent rust - olive oil, WD40, whatever - and go at it gently with 600 grit sandpaper again, while the item is coated in a thin layer of oil. Don't sand too agressively over dark parts, as you can rub out some of the pattern. Ta da! You're done. As far as long term treatment goes, just put a little drop of oil on the item and rub it all over once every few months or so to prevent rust. Keep it clean and don't leave the item in a bucket of salt water for a week or something. If you want to see the pattern right away after you finish the billet, clean the scale off of a small section and apply ferric chloride for maybe twenty or thirty seconds, then spray it with windex and cover the newly etched spot with oil to prevent rust. This will allow you to see how the pattern turned out without having to wait. Oh, and don't bother to clean all the scale off the billet until you're ready to work with it, as it can actually help protect the metal beneath from oxygen. So that's it. Please keep in mind that I'm not an expert here, so forgive me if I've missed anything. P.S. If you do it right, if should look like this  http://www.jloose.com/forumpics/langseaxblade3.18.08.jpg Medenmath fucked around with this message at 06:12 on Jul 3, 2009 |
|
#
?
Jul 2, 2009 23:01
|
|
|
Third Murderer posted:Best drat instructions on damascus forging I've come across, well done Third Murderer. I've only done damascus billets by hand, and yes they are a pain in the rear end to do, but they can be done. I've not had access to power hammers in any of my forges, just hammers, tongs, anvils, etc. Usually if I'm doing stock work for sale and don't really want to invest time in the project I get wire rope (not stainless steel mind you), flux the hell out of it and you get a pretty good faux damascus. Most of the wire rope I've used for this was 1" or better so it was pretty quick to do billets for knives. The wire rope they use on smaller cranes are also good if you can find any. Now if you are a REALLY lazy bastard and want a good cutting edge and still want the damascus pattern, just do three layers with the middle being a solid known cutting steel and the outsides being wire damascus. I was doing the stuff for tourists out at Hunt Club Farm in Chesapeake, VA for a bit. Fast and easy was better than right for most of that stuff. Easy money though. Base price for any of my damascus knives was $100 easy, bigger ones were more. Blacksmith fucked around with this message at 15:01 on Jul 4, 2009 |
|
#
?
Jul 4, 2009 14:59
|
|

|
I saw a guy do wire damascus once. It might be sort of "faux" damascus but it still looks pretty cool. edit: I don't think I've thanked anyone for all the praise I've gotten, so thanks guys. 
Medenmath fucked around with this message at 03:43 on Jul 5, 2009 |
|
#
?
Jul 5, 2009 03:16
|
|
|
So I'm in the process of building my backyard foundry, and I was wondering if a regular BBQ style propane regulator would be kosher to use with my venturi burner. Searching around I've seen regulators ranging from $10 to $110 with various PSI ratings. I'm thinking of getting the burner kit off of Ellis Custom Knife(unless someone has a better suggestion, or an old burner they want to unload) if that helps at all. Money is always a factory, but safety is more important, so I want to make sure I'm not creating a weak link in the system.
|
|
#
?
Jul 8, 2009 00:33
|
|

|
The Adama posted:So I'm in the process of building my backyard foundry, and I was wondering if a regular BBQ style propane regulator would be kosher to use with my venturi burner. Searching around I've seen regulators ranging from $10 to $110 with various PSI ratings. I'm thinking of getting the burner kit off of Ellis Custom Knife(unless someone has a better suggestion, or an old burner they want to unload) if that helps at all. Money is always a factory, but safety is more important, so I want to make sure I'm not creating a weak link in the system. I've seen several guys use the standard BBQ regulators on propane burners, but I would highly suggest getting one you can adjust rather than one that has just a single setting. This is what you should want to shoot for http://www.grainger.com/Grainger/items/5KZ40  You can settle for less than that though, I highly suggest hitting up pawn shops, garage sales, and flea markets to find one if you can. You can pretty much use any gas regulator that is made of brass, as long as it is still in good condition. Don't pay more than $40 for a used one,
|
|
#
?
Jul 8, 2009 13:19
|
|
|
Pretty much everything at Grainger is overpriced. The only thing I would buy from them is something small that I need quick cause they're like 10 minutes away.
|
|
#
?
Jul 8, 2009 15:09
|
|
|
It was a quick place to grab an image from and they give decent specs on their gear. I'm inclined to agree that they are overpriced. That's why I advocate flee markets, pawn shops, and garage/yard sales.
|
|
#
?
Jul 8, 2009 16:28
|
|
|
The Adama posted:So I'm in the process of building my backyard foundry, and I was wondering if a regular BBQ style propane regulator would be kosher to use with my venturi burner. Searching around I've seen regulators ranging from $10 to $110 with various PSI ratings. I'm thinking of getting the burner kit off of Ellis Custom Knife(unless someone has a better suggestion, or an old burner they want to unload) if that helps at all. Money is always a factory, but safety is more important, so I want to make sure I'm not creating a weak link in the system. Bad news: You can't use a BBQ regulator with a venturi system. BBQ regulators can only be used with forced air systems. While a torch regulator as pictured above would work, the best deal I've seen for a propane regulator suitable for a forge or foundry is the "Red Dragon 567 RC" http://www.flameengineering.com/Regulators.html  It doesn't come with a gauge for the working pressure, but it has a port for you to add one. At $45 it's a good deal. You can buy a gauge from the same place at $14.40, or you might be able to find one cheaper. Just about any torch regulator will work, however it will need to have a CGA-510POL on it to fit the propane cylinder. If you get one that doesn't have that, you can buy a fitting and replace the one on the regulator at a nominal cost. Note many torch regulators are designed for acetylene and you can tell as such because the guage will not go bast 15 PSI. This will still work. However they do make regulators that are adjustable past 15 PSI designed specifically for propane or propylene. Oh btw, you should use some soapy water to test for leaks when you install a gauge, put on hoses or fittings, install the regulator on the cylinder, etc. FYI, you can tell the regulator above is for oxygen, not fuel, as evidence by the green writing. The Harris fuel regulators have red writing. You should never use an oxygen regulator fuel or vice versa. If you need a hose made up with the right fittings on each end you're best bet is your local welding shop. They can make you a custom hose. If you buy one online make sure it's rated for propane use, or is labeled "Grade T" Grade R roses are for acetylene only and propane will eat away at the rubber, however acetyelne can be safely used in a Grade T or Grade R. AbsentMindedWelder fucked around with this message at 03:40 on Jul 9, 2009 |
|
#
?
Jul 9, 2009 03:32
|
|

|
Ok guys. Need some advice. I want to buy a welder. I know how to MIG and TIG, but I am really torn on what I should get first. I've talked with my friend who basically welded professionally for a while and he said I should get a MIG, where as I can't constitute getting a MIG for what I'm going to be using the welder for. His justification is that a MIG is a lot faster, and there is no fussing with settings or setup like a TIG would be. I want to use it for my car and light duty applications (small fabricated parts/ motor mounts and such). I made a huge stainless steel sculpture (pictured a while ago in this thread) and it was all MIG. That project had a timeline, and my car really has no timeline except for myself and life/work. I honestly don't think I will be welding over 1/2" thick mild steel. I really like the idea of a TIG because I can really weld anything from aluminum to bronze to mild steel to stainless, where as I have to buy a plethora of wire to weld any of that, and welding aluminum with a MIG is drat near impossible. I also have access to a smaller MIG that I can borrow from my friend when I need to. What do you guys think? What did you start with? BTW, I am brand loyal and I  Miller. Can you suggest me a proper welder to start out with? Miller. Can you suggest me a proper welder to start out with?
|
|
#
?
Jul 9, 2009 20:31
|
|

|
What's your budget? Also I thought MIG welding aluminium was easy as long as you had the feeder gun and an AC welder. Not true? (I don't know for sure, I've never done it, just heard from friends who do.)
|
|
#
?
Jul 9, 2009 21:48
|
|
|
You're friend is right that MIG is faster, which if you're running a business is important because time = money. However, from what I can tell by your post, speed is not the issue. Versatility for hobby use is. If you want versatility, you can't beat a TIG machine. Also, because TIG uses a constant current power supply you can stick weld with it too. Eventually, you might find you'd like to have a MIG machine too... that will be a great excuse to buy a 2nd machine! ASSTASTIC posted:BTW, I am brand loyal and I ASSTASTIC posted:His justification is that a MIG is a lot faster, and there is no fussing with settings or setup like a TIG would be. Now TIG might have a couple more settings and issues to deal with but it ain't that hard. If you want a no-fuss welding machine get a stick welder, 300 lbs of electrodes, and start practicing! AbsentMindedWelder fucked around with this message at 21:58 on Jul 9, 2009 |
|
#
?
Jul 9, 2009 21:52
|
|
|
dv6speed posted:You're friend is right that MIG is faster, which if you're running a business is important because time = money. However, from what I can tell by your post, speed is not the issue. Versatility for hobby use is. If you want versatility, you can't beat a TIG machine. Also, because TIG uses a constant current power supply you can stick weld with it too. Thanks for the posts both of you! No idea on budget right now, but really I want to weld up to 1/2" mild steel. I guess that can be achieved with a MIG as well. After thinking about it, what I think I meant "faster" was more "maneuverability". When welding that art piece a while back, I had to jimmy myself in places so odd, its incomprehensible to even think that I would be able to TIG in that direction. Stick maybe, but definitely not TIG. I know what you mean by messing with settings. I would have to change the Millermatic 251 completely around from stainless to mild steel(IE, voltage, line speed, rollers(bigger wire), line guide(bigger wire), tips, new wire, switching gas from TRI-mix to argon, etc). I got so used to doing that switch around, I could do it blindfolded. I'll check out that Miller Dynasty 200DX. Thanks! ASSTASTIC fucked around with this message at 23:26 on Jul 9, 2009 |
|
#
?
Jul 9, 2009 23:19
|
|
|
You'll always want all the welding process available to you, oxy-acetylene flame, stick, MIG, and TIG (I highly doubt any of us here would ever have a use for sub-arc in our home shops.) The real question really is not, "Which machine should I buy?" but rather "Which machine should I buy FIRST?" In our home shops we actually have more use for the entire spectrum of welding processes, then most businesses that do welding. At my job working on railcars, everything* can be accomplished with .045 Flux-core (with shielding gas), 1/8" 6011, and 1/8" 7018. But in our home shops all sorts of weird projects will come across our workbenches where one, or even 2 machines will never be able to do everything. *OK, OK, once in a while they break out some stainless steel stick electrodes for some of the valve stuff on tank cars, but that's rare. AbsentMindedWelder fucked around with this message at 02:47 on Jul 10, 2009 |
|
#
?
Jul 10, 2009 02:43
|
|
|
One of my more detailed pieces: Angel 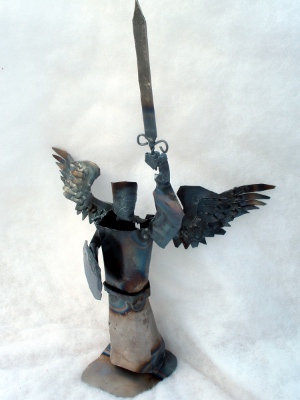 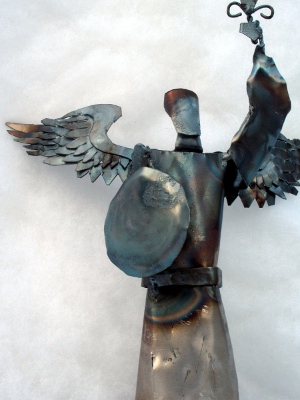 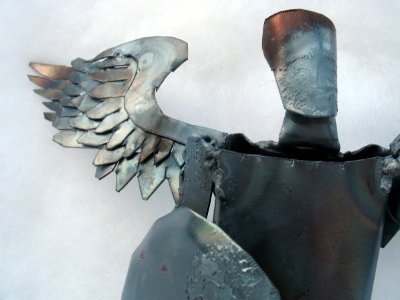
|
|
#
?
Jul 22, 2009 04:34
|
|

|
That is really impressive Jovial. Nice one.
|
|
#
?
Jul 22, 2009 05:00
|
|
|
jovial_cynic posted:One of my more detailed pieces: Excellent work, especially on the wings. If you're on an angel kick right now, you could try doing the "Four Living Creatures" (with the faces of a man, a lion, a bull, and an eagle) mentioned in Revelation 4...although each one is described as having six wings so that would be quite an undertaking...
|
|
#
?
Jul 22, 2009 13:06
|
|
|
Slung Blade posted:That is really impressive Jovial. Nice one. Thanks! Powdered Toast Man posted:Excellent work, especially on the wings. If you're on an angel kick right now, you could try doing the "Four Living Creatures" (with the faces of a man, a lion, a bull, and an eagle) mentioned in Revelation 4...although each one is described as having six wings so that would be quite an undertaking... The wings were fun to make. I originally was going to do individual feathers, but figured that if I made overlapping rows with long enough protrusions/feathers, it would have the same effect, but take significantly less time. The Four Living Creatures sounds like fun... but yeah - that would be a lot of work to make all of those wings.
|
|
#
?
Jul 22, 2009 14:32
|
|
|
jovial_cynic posted:The wings were fun to make. I originally was going to do individual feathers, but figured that if I made overlapping rows with long enough protrusions/feathers, it would have the same effect, but take significantly less time. I had a feeling that's how you did it, but I thought it would be rude to ask to see the back side of the sculpture. ") I can't really think of a good way to make small parts like that efficiently. Stamping them out of sheet metal would work, but I suppose that requires a specialized machine...and a custom die for the machine, to boot. This has been floating around the internets for a few months now, but some of you may not have seen this marvel of home machining: http://www.picsroll.com/2009/07/wall-e-case-mod-brilliant-guy-101-pics.html One day, I want to have a shop like that at home. The guy is in Russia, so I would speculate that used machines in decent condition might be easier to come by for a good price there. My experience with Russian manufacturing quality (specifically, Poljot mechanical watches) has been that it's "good enough" and generally durable.
|
|
#
?
Jul 22, 2009 15:46
|
|
|
gently caress. Someone was selling a "broken" Miller Maxstar 200 on craiglist for 150. Emailed the guy and it sold already  Not exactly what I wanted, but I could have saved some money. Besides my local dealer who has a overhead cost, where else can I get deals on TIGs?
|
|
#
?
Jul 22, 2009 19:23
|
|
|
I'm trying to find someone to make a 'custom' stove-pipe collar. I'm assuming it's custom because I can't find it anywhere else. It would need to be in two pieces and fit together around the pipe, as the pipe has a lip that won't let a normal pipe collar slide on. Do you guys have any ideas on how I could get something like this? Is tin able to withstand the heats to be used instead? Also - I love all of your work Jovial. It makes me jealous.
|
|
#
?
Jul 27, 2009 20:37
|
|

|
We'd need pictures of what you want (something similar to it, at least) and what it's supposed to fit on to make any kind of guess.
|
|
#
?
Jul 27, 2009 20:43
|
|
|
Solaron posted:I'm trying to find someone to make a 'custom' stove-pipe collar. I'm assuming it's custom because I can't find it anywhere else. It would need to be in two pieces and fit together around the pipe, as the pipe has a lip that won't let a normal pipe collar slide on. I'm not lessening the significance of Jovial's work at all, but you'd be surprised what you can do if you just start playing around with welding. A basic flux-core MIG welder is fine for small work like sculpture, and can be had for about $200 the last time I checked. The only way to find out what you can do is to try! ")
|
|
#
?
Jul 27, 2009 20:46
|
|
|
Slung Blade posted:We'd need pictures of what you want (something similar to it, at least) and what it's supposed to fit on to make any kind of guess. My bad! What I'd like is something like this: 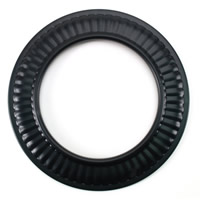 Only in two pieces that I can snap together, or attach in some way. They're made to fit snugly against the pipe, and the way the pipe is connected to my chimney, the lip stops this collar. I'd need a larger collar, which would then leave a large gap around the pipe at the wall. I've thought of just trying taking a dremel to one of these, cutting it in half, but them I'm not sure how I'd reconnect it, and I'm pretty sure it would be an ugly uneven cut (but I'm not great with this, so maybe I'm wrong). As for a welder... I got some cheap-o Harbor Freight special last year that I've never even used. I'm a little terrified of it. I need to figure out what I'm doing... I just don't know what uses I'll have for a welder yet, and that gives me an excuse to not use it yet.
|
|
#
?
Jul 27, 2009 20:56
|
|
|
You could certainly cut one in half and modify it. You could put it back together with something simple like pop rivets and a bit of scrap metal as a bracket or something. Or you could learn to weld it. For something that thin you'll need an argon bottle though. Flux core wire is probably too much. Can you take some pictures of where this goes when you get home? I need to visualize this.
|
|
#
?
Jul 27, 2009 21:08
|
|
|
I've got an old one from before the rock wall was finished: Click here for the full 768x1024 image. I had a chimney company reline my chimney and attach the pipe. The ended up adding that pipe jutting out from the wall and it's not removable. The end of it has a lip that normally wouldn't be there (from the other stoves I've seen) - that's why I can't slide on one of those puppies. Now the rock wall is done, just needs to be grouted, but we've got a 3" space around the pipe that's waiting for something!
|
|
#
?
Jul 27, 2009 21:49
|
|
|
You should be able to separate the horizontal chimney pipe from the 90' elbow and slip one over that. Did they attach that permanently?
|
|
#
?
Jul 27, 2009 21:52
|
|
|
The end of the horizontal pipe, where it connects to the 90', is the one that has the lip. I was pretty upset when I took it apart to find that. I've got a 6" collar that I tried to fit over it already. The other end is attached permanently into the wall and isn't moving in any way. I wasn't very happy when I saw this, as I told the guy my plans, but I wasn't there when he did the work so I guess it's my fault. EDIT: When I say 'lip', I mean there's a couple inches where the 90' slips on, then there's a small ridge about 1/4 high that stops the collar from sliding on.
|
|
#
?
Jul 27, 2009 21:57
|
|
|
Oh, so they built it backwards then? Man that sucks. How much are those little collars? If they're cheap, I would just cut one side of it, and gently bend it sort of like a key ring, and slip it over the chimney pipe. You may have to reform it with your hands, but if it's like the collars I've seen (really thin) it should be easy to get it back into the original shape. Or, cut 4-8 notches on the inner diameter of the collar and allow it to bend up and over the lip, then just bend them back once you get it in place. Paint it black on the wall and you'll probably never notice the little notches.
|
|
#
?
Jul 27, 2009 22:12
|
|
|
Slung Blade posted:Oh, so they built it backwards then? Man that sucks. I'd thought about the first one before, but wasn't sure how that would do, but option B sounds pretty awesome. I can't believe I didn't even think of it. They're not expensive, so maybe I'll buy a couple and just go to town. Thanks for the idea!
|
|
#
?
Jul 28, 2009 00:09
|
|
|

|
| # ? May 25, 2024 04:40 |
|
|
I hope it works. Oh, and get a can of matte-black high-heat spray paint. It will almost certainly scratch your chimney pipe sliding this thing down it. Shouldn't cost more than 5-10 bucks.
|
|
#
?
Jul 28, 2009 00:20
|
|