


|
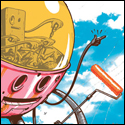
I had the whole weekend to myself so I thought I would do sort of a quick render. I based it off an old render I had in an inspiration folder from back when I was in school. Its always interesting to go back and see the images that used to blow your mind arnt nearly as good as you remember. Click here for the full 1300x772 image.
|
 #
?
Aug 3, 2009 22:03
#
?
Aug 3, 2009 22:03
|
|

|

|
| # ? May 16, 2024 09:05 |
|
|
TouchToneDialing posted:
A little nitpick or idea is that the sheet music on the floor doesn't read well. You might have some leaning up against the leg of the stool or something so that they all aren't completely flat, or bent out of shape slightly so that there is some space and shadow underneath them. Most of my sheet music is usually pretty warped with how much I thumb through it, and move it around while practicing. (Or it's borrowed and old as hell.) Just an idea.
|
|
#
?
Aug 4, 2009 00:28
|
|

|
I like it, looks really moody and nice but I'd personally get rid of the sheet music from the stand on the piano so its all on the floor!
|
|
#
?
Aug 4, 2009 08:49
|
|

|
The walls and ceiling are amazing, but i'm not that into the piano. It's a little too black, and the oversharpening makes it look quite cg. Room itself is an excellent base though, lighting is good too. After 3 weeks of no work on my animation, spent an hour tidying it up and exporting it last night. http://www.vimeo.com/5931600 The only thing changed is some colours, fog/dust layers in post and the train at the end. Stripped down the edit, not bothered doing any breakdowns or fancy poo poo. It's loving done, and I can stop thinking about it now.
|
|
#
?
Aug 4, 2009 15:40
|
|

|
cubicle gangster posted:The walls and ceiling are amazing, but i'm not that into the piano. It's a little too black, and the oversharpening makes it look quite cg. Looks really nice. One niggling little thing. 21 seconds. Look at the tiles on the wall. They are the same tile!  Also I'd possibly slow down the clock tick even more. Really love the lighting on the stairs, looking great and I love the end.
|
|
#
?
Aug 4, 2009 22:04
|
|
|
Thanks ") I know about the tiles unfortunatly... I did one set of stills for a couple of paths (none for others) and then it was rendered and whatever came out I had to use. I'm using the farm at work and with it being a low priority shove in where you can job which took 4 weeks to get rendered as it is, I hosed it off. Bad form on my part though, shouldve spotted it sooner. See what you mean about the clock - compared to the rest of it, it feels a bit rushed at the end of that path.
|
|
#
?
Aug 5, 2009 08:56
|
|
|
brian encino man posted:One niggling little thing. 21 seconds. Look at the tiles on the wall. They are the same tile!
|
|
#
?
Aug 5, 2009 13:49
|
|
|
That's beautiful work gangster. The lighting and atmosphere are great
|
|
#
?
Aug 6, 2009 00:49
|
|

|
Just got back in the country. Here are some more CGcon notes. I missed Saturday unfortunately, but here are Sunday's. Farzad Varahramyan (photoshop / concept art / industrial design) http://www.cgcon.net/speakers/farzadvarahramyan.cfm EXPLORE DESIGN Recommends Ian McCaig DVD -> how to sketch for industrial designs (?) starts by drawing rough with pencils and then uses markers (copics?) and then scans to photoshop ALWAYS start with LOTS of thumbs with notes (dimensions) Thumbs of 3/4 views and ortho views and action poses Sometimes simplifying is better (less detail can often be better) Always create images which are memorable / lasting (leave an impression) Uses "L" bars (photoshop blocks / bars) to preview crop Look to animals / bugs for inspiration when making robots Use perspective lines and vanishing points Add detail only when appropriate 1. sillouhette thumbs / sketches 2. surface rendering 3. details talked about structural integrity in relation to old gothic arches and curves art directors often don't know what they want, but they do know what they don't like make as many prototypes / variations possible for art director to choose from success is making art which "resonates" (buzzword of cgcon) with the audience mix elements from thumbnails → assemble in photoshop paint value by establishing key light / drama / mood cast shadows define form and �ground� objects make a series of �color keys� / colored thumbnails should take about 20 min each - start with dark thumbnails as base - add color on separate layer in �color� blending mode - think about base color of object vs color of light - explore complementary color gradients or unusual color combos (eg. purple and green) - multiply clean line drawing over color layers Spend less time in darker areas of painting use splatter brushes to add noise (surface qualities) Organize your thoughts beforehand / work in steps / milestones NEVER add pure white or black until very end � then use as �atomic bomb�/extreme to draw the viewer's eyes to that spot flip image left to right (mirror) to check balance of composition Always have FUN while working! / figure out hook **** Christian Lorenz Scheurer (photoshop / concept art) http://www.cgcon.net/speakers/christianlorenzscheurer.cfm Hero painting should sell evocative story start with sillouhettes / pencil sketch first has focus / characters / action start by laying down gradient for background rough out composition with characters and vehicles on separate layers character on separate layer (multiplied over rest) Try out different compositions by adjusting layer transparency + free transform on different elements use LINE tool for drawing architecture as well as perspective grid. Block in architecture with white lines (invert lines later) FIX PERSPECTIVE WITH GRID BEFORE BLOCKING OUT COMP Always ask questions about your work as you explore establish �color mood� with gradient tool (wash) (poly) lasso tool → make architectural shape → fill (or fill with gradient) Think about 1. form 2. shape 3. material 4. surface Masking brush / dual brush (for 2 color brush) To block in buildings fast use quick mask (Q) plus line tool Metaphor may equal concept Put thumbnails (variations) over photos of city / background Use a large noisy brush over quick masked buildings to lay down rust / grime duplicate layer → offset slightly → paint over this offset to create depth/ledges with mask Use the color dodge blending mode in layer properties → color dodge background with mask to create rimlight effect begin with cool colors / less contrast (atmospheric perspective) in background end with adding warm colors / more contrast in foreground final painting is typically 16x9 inches @ 300 dpi and can take 2-5days up to a month never deliver final painting too soon, just assume the art director will always want changes Creating reflections on water → duplicate layer → flip vertically → adjust opacity of reflection layer → add subtle ripple filter Creating lights for buildings → copy lights from reference → paste and free transform lights layer over buildings layer → screen blending → adjust color curve to make sure only lights appear on layer �if you want to change your style, change your reference� lens flare can act as rim light (screen blending) behind characters think about bounce light and bounce color / add lighting with masks + dodge/burn �blend interior effects as group� in layer properties (check DVD) multiply darker gradient layer over to make darker wash (add depth) use color curve layer to create shadows (with masking on) **** Christian had one of the best presentations. He worked unbelievably fast and really proved that knowledge of photoshop can actually be more important than the painting itself. His use of of the line tool and masks with blending modes and gradients was truly impressive. More notes soon. I promise. Only two more presentations to transcribe. In the meantime, have you guys heard of Project Natal / Milo? This is probably not news to most of you. cubicle gangster: Ditto to what has already been said. Amazing work. The lighting really sells it. sigma 6 fucked around with this message at 04:32 on Aug 7, 2009 |
|
#
?
Aug 7, 2009 04:09
|
|


|
Still need to do a detail pass on these and obviously the tops are unfinished, but I'm lazy. I'm modeling the legs straight but rotated them into the rest pose of the proportions model I posted a turn around of a while ago. About 3 hours of real work and about 3 hours of surfing the internet: 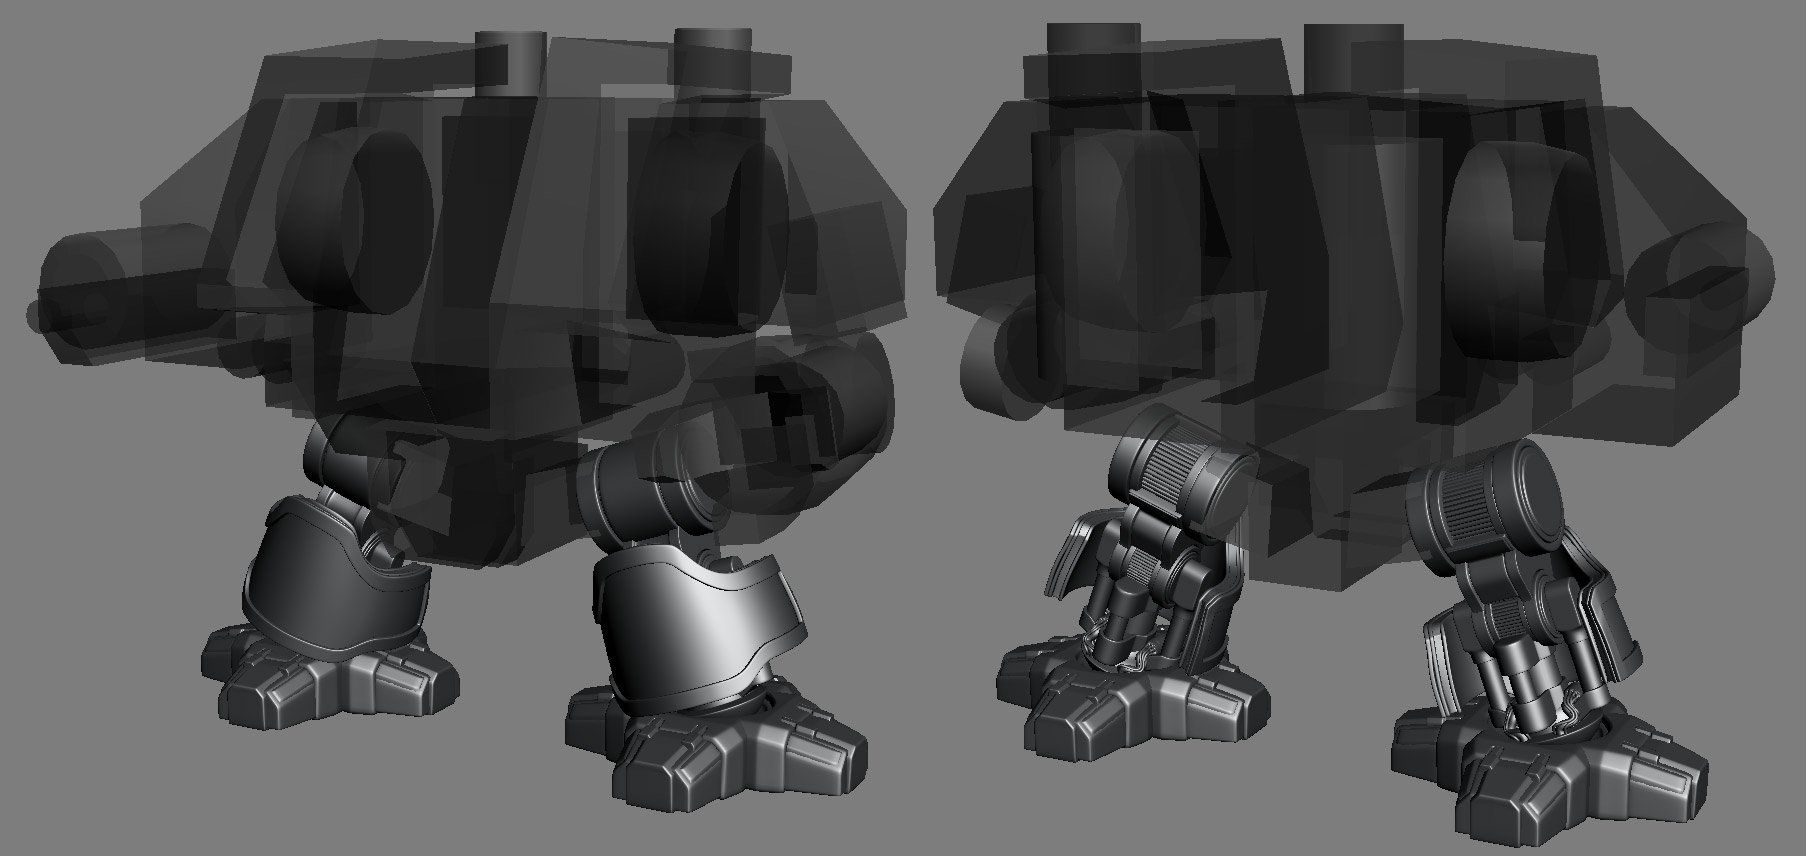 Click here for the full 1806x856 image. Pro-tip: adjust the shape of your complex shinguards before breaking out the details and trim parts, rather than adjusting them 4 loving times after the trim is created. Thank god for modifier stacks. I'll be taking the bland as gently caress shinguards into zbrush to sculpt cool poo poo once I figure out what that cool poo poo is.
|
|
#
?
Aug 7, 2009 13:27
|
|
|
Got done rigging him, so I'm working on morphs. I'm so close to starting to animate I can just feel it.
|
|
#
?
Aug 7, 2009 14:23
|
|
|
That's some badass hardsurface modeling there sigma. The proportions look strong aswell. *edit* tinman deforms nicely hinchu, looks cool. Does lightwave allow you to push morph targets past 100%? I don't remember if I've posted the current character I'm working on or not. Another one based on Terry Pratchett's discworld series, more specifically the art of Paul Kidby. Various parts are various stages of WIP. It's mostly going to be completely retopped in max, body is mapped and set up for displacement/normal whatever.  
EoinCannon fucked around with this message at 14:30 on Aug 7, 2009 |
|
#
?
Aug 7, 2009 14:27
|
|
|
EoinCannon, now that I know that he's from Discworld that makes him so much more awesome! I'm assuming that's that old hero character. I think you could push him to be even stringier, sinewy and scrappier than you have him now. He's looking great. I really need to get Z-Brush... Maybe I'll do that and play around with my vegetable people in my next scene. And yes Lightwave lets you push morphs to whatever value you want, past 100 and negative too. You just have to enter it in manually on the morph mixer, or use the graph editor if it's past -100% to 100%.
|
|
#
?
Aug 7, 2009 15:13
|
|
|
Sigma-X posted:
You need to make it chrome and put an anime chick on top of it. Set it to blade runner music. Instant demo reel 
|
|
#
?
Aug 7, 2009 19:21
|
|


|
EoinCannon posted:That's some badass hardsurface modeling there sigma. It's kinda sad that before even reading the post I went "Oh, hey, Cohen!" Either that or a testament to your skill. Good job.
|
|
#
?
Aug 7, 2009 20:21
|
|

|
BigKOfJustice posted:You need to make it chrome and put an anime chick on top of it. Set it to blade runner music. Rammstein is also acceptable demo reel music
|
|
#
?
Aug 8, 2009 00:55
|
|
|
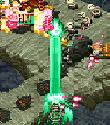
http://vimeo.com/6004232 I had the ground part done for a while but I decided to try and bang out a basic energy blast/fireball. The idea is for the thing to fly and hit the car at the end, I've found a pretty nice Chevy Impala model online so that's a bonus. This is just a work in progress.
|
|
#
?
Aug 8, 2009 13:13
|
|

|
ACanofPepsi posted:http://vimeo.com/6004232 Understanding it's a WIP, but... If the ground breaking is dynamic, tone it down a bunch. Looks like it's way too much. Also, try to make the ball cast some light -- it should be making the floor light up / glow some. Andrew Kramer recently put up a tutorial for this, though I haven't seen it yet so I don't know how applicable it'll be for this. http://www.videocopilot.net/tutorials/3d_light_casting/ Assuming that car is 3d, it looks pretty good but the shadow seems too dark, and it gets too dark when it goes off the right side, looks a bit strange. Otherwise, good job. The smoke looks a bit strange to me, but I can't specify why. Maybe it's too sharp / not noisy enough? Don't know.
|
|
#
?
Aug 8, 2009 16:55
|
|

|
Sigma-X posted:Still need to do a detail pass on these and obviously the tops are unfinished, but I'm lazy. I'm modeling the legs straight but rotated them into the rest pose of the proportions model I posted a turn around of a while ago. Too much smoothing going on right now, a lot of the corners look really round, sort of like a Fisher Price Dreadnought 
|
|
#
?
Aug 8, 2009 19:13
|
|

|
Travakian posted:Understanding it's a WIP, but... I couldn't tell you what's wrong with the smoke. I'm still puttering around Afterburn's interface so everything I do is hit or miss right now. I really like it at the beginning when it's bright but then the trail gets too dirty/smokey. It's probably a density issue. I've got a technical question: I want to render afterburn smoke along with motion blurred particles. I do not want my afterburn particles blurred, just the white streaks that are coming off. Is there a way to disable motion blur on a per object basis? Or is there a way to render my scene so that my afterburn smoke comes out as straight unlit black and my particle streaks in pure white so I can mask them out later? I want it to look like the white streaks are actually travelling through the trail, not just layered on top like it currently is. As for that car, it's real in the plate. What I meant was I had found a nice CG model I can cut in when it's supposed to get hit
|
|
#
?
Aug 8, 2009 19:37
|
|
|
Nice sculpt Eoin Progress on my duder: http://www.curtisbinder.com/axelsculpt3.jpg Not enough geo in the head so I'm going to have to retopo and resculpt once I get his clothing done >:[
|
|
|
#
?
Aug 9, 2009 02:34
|
|
|
Acanofpepsi - the only thing I didnt like which really throw me off was the camera running alongside it really close. If it was 5m away and a pan from the side I think it wouldve looked a hell of a lot more real. The effects themselves were solid, but it's hard to judge with 'THIS IS CG' being so apparent. The footage is really clear too - which although good for setting a standard with, most effects like that are heavily colour corrected and with a shitload of post work to hide any imperfections. Incidently, I really want to have a go at doing poo poo like that. No chance i'm using houdini though, haha. edit: actually, just saw the afterburn comment, max only isnt it?
|
|
#
?
Aug 9, 2009 04:01
|
|
|
I'm surprised this thread didn't explode because of SIGGRAPH, I didn't make it, but a friend did. The only thing he told me about so far was V-RAY RT, RT meaning Real-Time. This video is a few months old, but my friend said they were demoing it "on some lovely laptop" so I guess you don't need a quad-core and 16GB of RAM to utilize it.
|
|
#
?
Aug 10, 2009 18:34
|
|

|
The Merkinman posted:I'm surprised this thread didn't explode because of SIGGRAPH, I didn't make it, but a friend did. That would be so awesome to have. I hope they port it into rhino.
|
|
#
?
Aug 10, 2009 20:08
|
|
|
Vray rt has been around for a while - the exciting thing about siggraph was it working on nvidia CUDA. Compared to an 8 core i7 setup, on a geforce? 285 - it was about 20 times faster. Demo of it: http://www.cgarchitect.com/news/SIGGRAPH-2009-CHAOS-GROUP-GPU.shtml I wasnt interested before even after being in the beta, but once this is integrated into the max viewport i'm in so hard.
|
|
#
?
Aug 10, 2009 22:31
|
|
|
So I started a new job last week, and whereas at uni and in my own time I've only ever used 3DS Max, the studio I'm at uses XSI. I can do basic poly modelling things and tinker with UVs so far, but I miss how familiar I was with Max and I was wondering if anyone knew of any tutorials or something for going from Max to XSI, or just decent XSI tutorials? Also, I never realised how much I leant on pelt mapping til I had to unwrap something in XSI and the crazy-rear end texture editor confused the hell out of me.
|
|
#
?
Aug 10, 2009 23:44
|
|

|
Oh geez, I'm doing the exact opposite. I need to learn 3ds Max and I know XSI. Wish I know of some good tutorials to help ya out.
|
|
#
?
Aug 11, 2009 00:15
|
|

|
cubicle gangster posted:Vray rt has been around for a while - the exciting thing about siggraph was it working on nvidia CUDA. A question about that video: I immediately noticed how his version of Vray rendered. He had the little square dealies to from top to bottom, left to right, rendering his image one by one. Whenever I render with Vray, the squares just seem to render willy nilly wherever they feel like. Is there a way to control the priority of what Vray renders first? EDIT: And for the dreamers, can anybody attend SIGGRAPH? Are certain parts invitation only, or is it all just a big tech show open to geeks? I'd kill to get to go to SIGGRAPH, and NAB. bring back old gbs fucked around with this message at 01:55 on Aug 11, 2009 |
|
#
?
Aug 11, 2009 01:44
|
|
|
I'm a little surprised they have Vray RT running through CUDA. I remember a while back where Vlado said that the kind of calculations that Vray does isn't suited for GPGPU. I guess since it's more of a quick and dirty method than the standard Vray renderer, whatever shortcomings that are present on the video card don't matter as much. You can change the bucket progression in Vray in the render settings. It's on the same panel where you change their size. Can't remember the name of it off the top of my head. As far as attending SIGGRAPH, anyone can go as long as you pony up the cash. My first one was back in '96(also in NOLA) and I was just going into the 9th grade at that point. My mom had to go with me though, since under-18s have to be escorted by an adult. DefMech fucked around with this message at 03:15 on Aug 11, 2009 |
|
#
?
Aug 11, 2009 02:57
|
|
|
So! How's the contest going? 
|
|
#
?
Aug 11, 2009 11:14
|
|
|
No one really seemed that interested but also I didn't really take charge of it. I will do if you like. I'm 1/4 of the way through a model for it which I intend to finish anyway so yeah I'm still up for it.
|
|
#
?
Aug 11, 2009 14:52
|
|
|
Well, i said i would go for it, but i lied like the bastard that i am. Instead i'm thinking about making a new "i will 3d your idea/avatar/name/title/etc", because the last one made by Pumaman was quite a success: http://forums.somethingawful.com/showthread.php?threadid=2969549 But it kinda died out since most smileys were done, or all the 3d artists lost interest. I thought it was really fun to do, and gave me a new perspective of 3d as a whole. Anyway, let me know what everyone thinks. edit: right after, there was another thread where avatars were redone in 3d, but that didn't take off as well, if i remember correctly, because of lack of artists International Log fucked around with this message at 15:45 on Aug 11, 2009 |
|
#
?
Aug 11, 2009 15:42
|
|
|
The trouble with that concept is you can't really put in in your portfolio.
|
|
#
?
Aug 11, 2009 19:48
|
|
|
brian encino man posted:The trouble with that concept is you can't really put in in your portfolio. Portfolios are overrated.
|
|
#
?
Aug 11, 2009 20:10
|
|
|
Not CG, but a photo. Anyone need inspiration for a crazy creature sculpt? I was passing by our octopus tank today at the aquarium and our current giant pacific octopus likes to turn a bright white while he sleeps, so I grabbed a quick shot of him. He's creepy as hell, and awesome. I figured you all might like it. Hinchu fucked around with this message at 13:11 on Aug 12, 2009 |
|
#
?
Aug 11, 2009 21:19
|
|
|
^^^ That's pretty crazy. Didn't know squids could change color. Typing up the last of the notes from CGcon now. Can you guys give some advice on game engines? Unreal Engine - the standard for my school but only the level editor comes free with the game. To get the full engine + support you need to pay some ungodly amount. The school is looking for an alternative to this. Sandbox 2 / crytek 2 - free engine they used to make farcry 2 with (?). Heard a few good things but I know nothing about it. Is the sandbox 2 engine the same as the crytek 2 engine? Torque - Tried using this one a few years ago and it was pretty horrible and not really what the school wanted. Unity - Heard this one mentioned a few times and it seems promising but again, I don't know why this would trump any other engine out there. Abyssal Engine - This is being pitched to the school but again, I know of no reason why this should be chosen over any of the other option http://www.abyssalengine.com/ DefMech: Is there a list somewhere of which video cards / mobos which support CUDA? Or is this a dumb question? Ignition Engine - Another engine pitched to the school. How many tiny 3rd party middleware engines are out there? http://www.applied-ideas.com/Ignition_Engine.html Then there are others like Ogre etc. Which is best for beginning students? Which should be taught as part of a college curriculum? I am not on the game software side but the game art side, so I don't know much about this stuff at all. Any advice? brian encino man: I would still like to try the challenge, but I didn't think the parameters were ever decided on. DefMech: Is there a list somewhere of what video cards support CUDA? EDIT: Nevermind. EoinCannon: Amazing sculpt as usual. The veins on the legs seem a bit too big. Also the bandages on the sword scabbard and boots don't look right. Ryan Kingslien made a nice tutorial about making Thor's bandaged boots. sigma 6 fucked around with this message at 01:54 on Aug 12, 2009 |
|
#
?
Aug 12, 2009 00:54
|
|
|
I don't know enough about NVIDIA's product line to say which cards support CUDA, but I think it's basically all of them from the 8 series on up. As far as engines go, Sandbox 2 and the other associated tools that come with the Crysis SDK are the same ones Crytek used to build the game. It's not a whole lot different than UnrealEd as far as publishing goes. If you build something in it, you're going have to play it as a mod/addon level for Crysis, not a standalone application. I can not recommend Unity enough, btw. It's not as sophisticated as Unreal Engine 3 or Cryengine 2/3, but it's one of the best authoring environments I've ever seen. I don't think any mature engine in existence can match its art pipeline. If you want to import a model into your scene, just save the file in your project's asset folder. Unity immediately notices and imports it automatically. There is no need for a custom file format or exporter plugin for your modeling app. If you make a change to the file(anything at all from changing UVs to geometry), just save it to the assets folder and that's it. Unity will have imported and updated the file before you can even alt+tab over to it. To be more specific, it basically filters everything through .fbx. If you save a .mb or .max file into the assets folder, it opens an instance of Maya or Max and exports the file as an .fbx with the correct settings in the background. So if someone gives you a .mb and you don't have Maya on your system, you'll need them to provide an .fbx instead. It does the same with image files as well. Save a .psd into the folder and it automatically flattens and imports into the project. This is a non-destructive process, too, so the actual .psd stays the same, it just imports its own copy. You can leave the file open in Photoshop and make changes with Unity open next to it and see your adjustments immediately in-engine. It's really cool. On the scripting side of things, all the coding is done in C# or Unity's variant of Javascript. You don't have source access, but the vast majority of things(seriously) can be done through what's exposed to scripting. If you've got some other questions, feel free to ask. I've used Unity casually for the past few years and I adore it. The official site and forums are pretty great for learning more, as well. They've got a 30 day trial on the site that I would highly recommend. It's for the indie version, but you can request a trial of the pro version if you ask nicely I've used both Torque and Torque Game Builder for actual published games and it's total garbage. Especially on the art side. The new engine that's coming out soon supposedly fixes a lot of things, but from what I've heard from people who have used it, it's better, but GarageGames still hasn't "gotten it".
|
|
#
?
Aug 12, 2009 01:55
|
|
|
Dang that nondestructive .psd system sounds pretty cool.
|
|
|
#
?
Aug 12, 2009 02:03
|
|
|
I've got these images on my hard drive, but lost the site where they came from. Anyone know who the artist behind these is? 
|
|
#
?
Aug 12, 2009 02:06
|
|


|

|
| # ? May 16, 2024 09:05 |
|
|
That's really funny because I was just thinking about that guy/studio's work the other day and the fact that I forgot to save some of the videos last time I ran across them.
|
|
#
?
Aug 12, 2009 02:21
|
|