

|
I haven't for several years. My experience is all digital and I'll stand corrected. Thanks to Whitezombi for the links ") psylent posted:Have you seen kodachrome? That stuff is sharp as a tack and absolutely stunning to look at.
|
 #
?
Oct 17, 2009 02:59
#
?
Oct 17, 2009 02:59
|
|


|

|
| # ? May 16, 2024 15:15 |
|
|
Quick thanks for Zoowick and his instructionable utubs... Picked up a few handy pointers during them, even if I'm not shooting for the exact same technique described
|
|
#
?
Oct 18, 2009 12:15
|
|


|
reposting this from the wedding thread to hopefully get a suggestion tonight: Question; I'm shooting a wedding tomorrow thats outside on a mountain hillside and the guests will be facing straight at the sun at 5:00 when the ceremony starts. I was there today for the rehearsal and the lighting was a pain in the rear end. The backlighting was so strong I either had completely over exposed sky or completely underexposed subjects. Is my only solution to use flash during the ceremony? Can I edit this to be nice and soft somehow? What should I be metering in a scene this dynamic? Here's the setup: (straight from camera, and I have no idea how to make it look decent)  In short, how do I deal with intense backlit sun here?
|
|
#
?
Oct 24, 2009 02:40
|
|

|
Bottom Liner posted:reposting this from the wedding thread to hopefully get a suggestion tonight: Flash. Can't think of any other way that wouldn't be more intrusive.
|
|
#
?
Oct 24, 2009 02:47
|
|

|
Bottom Liner posted:reposting this from the wedding thread to hopefully get a suggestion tonight: I would consider taking a few underexposed shots of the sky, and a few really good ceremony shots, and bring the underexposed sky into the final image in post. I wouldn't normally recommend doing this, I have gone off the idea of compositing things into the frame later (even though I've done it myself), but: A) it's not too hard in this scenario B) heavy flash might be obnoxious during the reception C) a good picture will make the wedding couple happy, they won't care how you executed it
|
|
#
?
Oct 24, 2009 03:16
|
|
|
fenner posted:I made a tutorial of how I do it. Awesome and thank you.
|
|
#
?
Oct 24, 2009 03:22
|
|

|
Bottom Liner posted:reposting this from the wedding thread to hopefully get a suggestion tonight: Expose for them and add a sky in post. Also try and compose the images so there is not a lot of sky in them. Also take a few from the other side in those bushes so you can use the light.
|
|
#
?
Oct 24, 2009 03:31
|
|
|
Mannequin posted:I would consider taking a few underexposed shots of the sky, and a few really good ceremony shots, and bring the underexposed sky into the final image in post. I wouldn't normally recommend doing this, I have gone off the idea of compositing things into the frame later (even though I've done it myself), but: Hmm, I'll give that a try with some of the shots from today and see how it goes. That might be the easiest/best way.
|
|
#
?
Oct 24, 2009 03:43
|
|
|
Bottom Liner posted:reposting this from the wedding thread to hopefully get a suggestion tonight: You could also get some really dramatic, warm, half-lit shots from the sides (i.e. shooting north/south). Just expose for the highlights and let the east-facing bits be dark.
|
|
#
?
Oct 24, 2009 04:19
|
|
|
I was at a wedding that had the same lighting conditions and the photographer stood approximately where the guy in the white polo shirt on the left is standing. Not sure how it turned out.
|
|
#
?
Oct 24, 2009 05:05
|
|
|
Bottom Liner posted:reposting this from the wedding thread to hopefully get a suggestion tonight: actually, that's my answer for everything: curves. point curves.
|
|
#
?
Oct 24, 2009 18:37
|
|

|
notlodar posted:actually, that's my answer for everything: curves. point curves.
|
|
#
?
Oct 25, 2009 22:19
|
|

|
notlodar posted:now that the deed is done, clever use of curves will do you wonders. I really have no idea how to properly use curves, any pointers? Particularly with that image/backlit scenes. Bottom Liner fucked around with this message at 23:02 on Oct 25, 2009 |
|
#
?
Oct 25, 2009 22:37
|
|
|
psylent posted:Are there any tutorials online you'd recommend to help learn about curves? Bottom Liner posted:I really have no idea how to properly use curves, any pointers? Particularly with that image/backlit scenes. here's how i would have started, at least with a backlit image. 1: in photoshop, mask butan, curves  2: this is a graph. on the x axis, the more to the right you go the brighter part of the image you're controlling. I am just going to assume the dark faces are in the middle there, but using the eyedropper on someone's face will tell you where on the curve it falls. then you would pull it up to make it brighter  3:Pull the darks back down, because I didn't want to change them...  4: and pull the lights back down, with an extra point for a little control here and there (it's still a little off but i'm not going to kill myself fixing up a tiny jpeg)  note: things should remain relative or it will look weird. example, if I pull the lights below the value of the lights before it, things look strange.  notez2: things that get thrown out of wack, like the grass, the trees, maybe some clothes... who knows. i usually mix it up with some saturation and luminescence adjustments. of course, because this is a mask, you can get creative, but i won't get into masking how to... I have noticed that the more smooth the curve looks, the more natural the image looks. notes3: i usually shoot raw, i bring down the blacks and pretty much flatten the image as much as possible before i use curves. lightroom curves are different, they use some weird masking and have less control. I usually "show in explorerer" and "open with photoshop" and use the point curve in ACR, then back in LR i "read metadata from file." if you don't have lightroom create .xmp files, make curves your first step or everything you do in lightroom will be undone. cliff's notes: wash image out with curves, add contrast, fix highlights.
|
|
#
?
Oct 26, 2009 05:18
|
|
|
Curves won't save the sky if it's blown out. Hopefully you shot in RAW and under exposed the sky just enough to save some of it because then you can at least bring in some fill slider for the restBRING THE NOIZE *starts scratching*. Here are some tricks and basics you can use in PS- Hold CTRL while clicking your layer to select everything in it. Make a B&W adjustment layer and switch to luminosity blend mode. Use it sparingly to bring up particular elements. Note that everything of that particular shade will be affected. Similar if not the same using Selective Color. Make a curves adjustment layer. Use the pull down in curves to make color adjustments with the individual channels. Drag from the middle and watch for subtle changes. The black line on the grid represents all channels and the colored are, duh. Again the adjustment layer can be set to luminosity blending mode so that you aren't creating wild shifts in saturation. The corner edges of the curves can also be dragged (drugged? driggen? draggled?) up and down. Use it to shift colors in the shadows and highlights. X-process here kids. Hold ALT to link one adjustment layer to another. Say you masked a section out for one adjustment layer affect and you want to increase the contrast of the mask with yet another adjustment layer. Ohhhhhh... Draw a selection using one of the selection tools. Make an adjustment layer. What did you make in school today? Go to the channels tab and hold ALT while clicking a channel (any). This will load the luminosity as a selection. You can invert this for the opposite effect too. Now since it's a selection you can do the same trick as above. Use Refine Edge for selections...note the various views you can choose by clicking the boxes at the bottom. Use \ to see your mask in action. Double click the mask icon in layers to change the color. Mine is obnoxious lime green to stand out. For fun, make a gradient of your choosing in the layer mask (remember to paint in black or white) Now change blending modes. Scroll through them with the mouse wheel or finger them from the pull down. Don't go nuts if you like preserving your history steps though because it's remembering each change you cycle through. For mask you can invert them, fill em, liquify, sharpen, etc...the fun never ends. Experiment. Combine all of the above in various ways. And never use High Pass it's for posers.
|
|
#
?
Oct 26, 2009 08:44
|
|

|
fenner posted:I made a tutorial of how I do it. Fenner.gently caress yea.Post Process.gently caress yea.layer mask.gently caress yea.gradient.gently caress yea.
|
|
#
?
Oct 26, 2009 17:12
|
|

|
If blake_sw is reading this - id love to know how to get your desaturated look pictures. I've tried to speak to you on skype but i've never seen you on. Could you post a tutorial here? Id like to know about the girl-in-chair-with-mask picture and the steps you took to process it like that
|
|
#
?
Oct 26, 2009 17:20
|
|

 moray cup
|
I've got a question about colour profiles (sorry to go on about this again!). I've been editing a photo in PS, and when I do a normal save to jpeg it comes out looking flat, I assume this is because it's in adobe RGB, right? When I do save for web, it comes out looking nicer, is this because it converts to sRGB? If I wanted to upload it to a printing website, what file should I upload? The adobeRGB or sRBG version?
|
|
#
?
Oct 26, 2009 21:22
|
|

|
The website should tell you what they want. Usually sRGB unless it's a pro-type place. You can embed the color profile in the JPG as well, if you do that the adobe RGB one should come out looking OK if you use a profile-aware program to open it (firefox/safari for example). What website are you using? Someone might know if they use the profiles or just assume srgb.
|
|
#
?
Oct 26, 2009 22:23
|
|
|
does anyone here have a good workflow for using lightroom on multiple computers? looking around it seems like you cant put the catalog file on a network. my end goal is to have my laptop with me when im out shooting and use lightroom to pick my heroes and tag and rate them, then do the heavy edits at home on a desktop and it then might go to my wife on a separate desktop for some more retouching in photoshop.
|
|
#
?
Nov 10, 2009 17:39
|
|
|
Keep it on an external drive, or create a new library on set and merge it with your main one afterwards.
|
|
#
?
Nov 10, 2009 19:22
|
|

|
The big bitch is having to export your catalog, your photos, and then ensure that all lightroom changes are carried with them.
|
|
#
?
Nov 10, 2009 20:53
|
|
|
Bridge would probably be better suited for that. If you have PS you aren't going to lose any functionality, you're just going to be stuck doing the raw processing in ACR instead of lightroom. If you use sidecar XMP files lightroom and bridge and PS coexist pretty well.
|
|
#
?
Nov 12, 2009 07:07
|
|
|
THREAD RESURRECTION In CS4, how does one apply a gradient to an image so the images fades out into a transparency?
|
|
#
?
Dec 1, 2009 03:07
|
|

|
Put your image on top of a transparent layer then put a layer mask on it with a gradient.
|
|
#
?
Dec 1, 2009 03:11
|
|
|
I have no idea how to do the second part of your post, brad.
|
|
#
?
Dec 1, 2009 03:22
|
|
|
Add a layer mask to the layer you want to fade out Select gradient tool Select the "fade to transparency" gradient mode Then drag the gradient however you like
|
|
#
?
Dec 1, 2009 06:00
|
|


|
Martytoof posted:Add a layer mask to the layer you want to fade out And if that doesn't do you. Here's a more in depth one of mine: http://www.poopinmymouth.com/tutorial/masks.htm Cross posting from the November PAD thread. Started with liquify to reshape his hips and waistline (I honestly tried in person to get it to sag like this and couldn't) dodge/burn for the muscle enhancements, then sponge to fix saturation problems from the dodge/burn. Comped in the background, and another sky, used lens blur to match it to the scene, and that masking trick I posted earlier to get him to look not so cut out. Finally used a layer of just him with an inner glow affect applied, masked it all out, and then revealed it only where background lights would have made fresnel reflections on his silhouette. http://mr-chompers.blogspot.com/2009/11/sebastianbalconyportrait.html 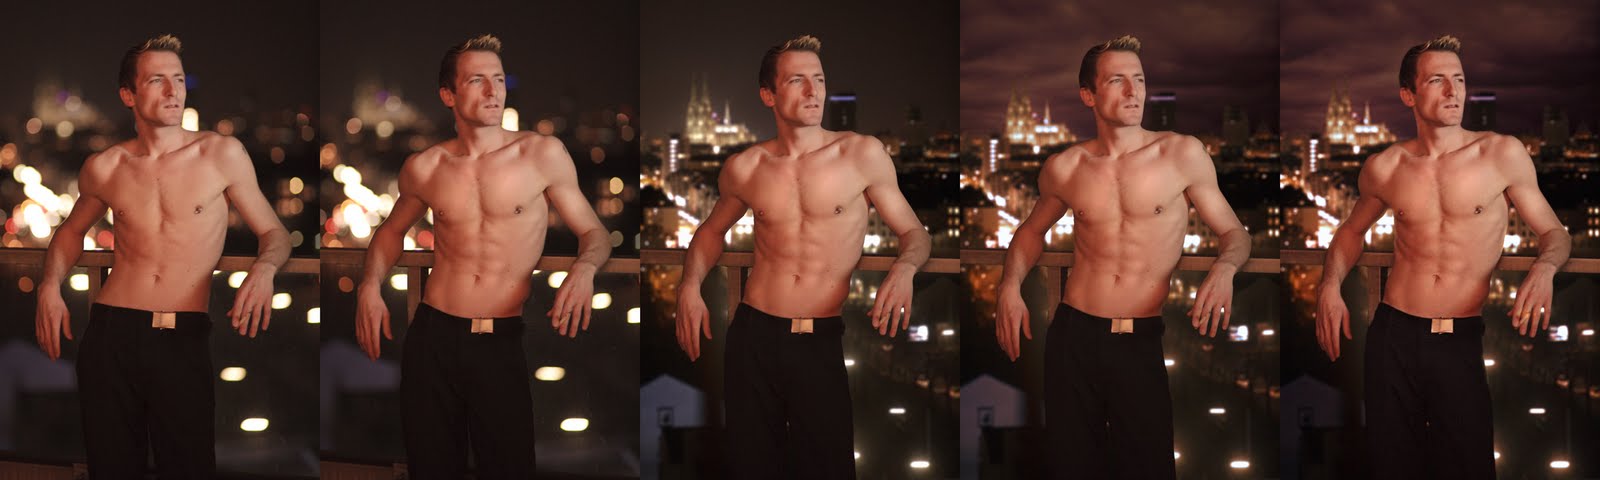
|
|
#
?
Dec 1, 2009 09:11
|
|

|
TsarAleksi posted:I think your understanding of post processing software is a bit... lacking. poo poo... from a LONG while back, but basically re: RAW converters: The manufacturer has access to the actual logarithms used to make whatever RAW file you are working with. Since those are "supposedly" classified or secret or IP or whatever, they supply Adobe with an approximation of it. Adobe then puts it into ACR to make a best guess as to how the colors should come out and all that. Usually, it's okay. But, see the rest of this post for times when it's *NOT* okay. In terms of PS vs LR: Lightroom, at least what I have done with it, seems great. You can process photos and do a bunch of cool poo poo with it. *As long as your original photo is of a certain quality*. But, in my situation, for instance, say, your boss thinks he's a photographer. So, he sends you a bunch of cellphone pics that he took using generic office-style flourescent lighting. And he wants you to make them useable for advertising. On one hand, you could just say "gently caress that" and quit. On the other hand, if you are concerned about how the economy is working fuckall for everyone, you have to figure out some way to make these poo poo-rear end photos work. That's where the whole workflow situation comes into play. First, you need to have the manufacturer's program so that you can keep as much information as possible. Then, in lightroom, you can do some effects and processing -- great! But, keep in mind that your boss doesn't know how to use autofocus, nor how to compose a shot. In that case, you end up having to find a semi- in-focus body and make a montage of that with a decent looking face. Then put those together in a believable way, then fix the lighting, then go ahead and do your normal post work, and see if you can maintain any kind of data integrity. In that case, for Canon, DPP is only the starting point. ACR is fine for pictures that are good from the start, but for poo poo pictures it cuts out too much information. And, yes, I understand and realize that my boss is a horrible piece of poo poo and doesn't know what the gently caress he's doing, but for the timebeing, he's paying my salary. Edit: Before I get any technical comments -- yes, I'm aware that cellphone photos are not the way to go with DPP. I was making a hyperbole. In my case, it is with Ixus photos... 
plaguedoctor fucked around with this message at 11:27 on Dec 13, 2009 |
|
#
?
Dec 13, 2009 11:16
|
|

|
hahahaha what the gently caress? Seriously? How many people are going to find themselves in that situation?
|
|
#
?
Dec 13, 2009 11:51
|
|
|
Fbi2thegrave posted:hahahaha what the gently caress? Seriously? How many people are going to find themselves in that situation? You'd be surprised. Again ---
|
|
#
?
Dec 14, 2009 08:46
|
|
|
Yeah that is pretty unlikely, and most definitely sucks, but I've noticed a much more common situation where lightroom is a disadvantage. On my d90 any picture above iso 800 looks like poo poo when I get it into lightroom. The original pictures look great, the camera actually has a pretty good high iso noise reduction built in, but lightroom doesn't get that info, so you have to use the luminance noise reduction slider in light room, which looks like total rear end compared to what comes out of the camera. If I used nikon's software the images would look great, but because of proprietary raw formats I get shafted. One thing I'm not sure about, does long exposure noise reduction work the same way? This is where the camera takes a dark frame of the same exposure length to reduce noise in long exposure images. But I'd assume since the other noise reduction isn't applied when using lightroom/camera raw, that this is the same scenario. It's really a bummer. I couldn't give a poo poo about the different camera profiles like camera standard, vivid, acr etc, but the noise reduction is a pretty big deal if you are shooting in low light.
|
|
#
?
Dec 15, 2009 23:40
|
|
|
snowman posted:Yeah that is pretty unlikely, and most definitely sucks, but I've noticed a much more common situation where lightroom is a disadvantage. On my d90 any picture above iso 800 looks like poo poo when I get it into lightroom. The original pictures look great, the camera actually has a pretty good high iso noise reduction built in, but lightroom doesn't get that info, so you have to use the luminance noise reduction slider in light room, which looks like total rear end compared to what comes out of the camera. If I used nikon's software the images would look great, but because of proprietary raw formats I get shafted. Your two main options are to do noise reduction in the nikon software and kick it over, or use a photoshop plugin. apparently noise reduction in LR3 is much improved, but I haven't used it yet. I always leave luma noise reduction at zero, because I hate the smeary look and prefer noise, but my sensor doesn't produce banding.
|
|
#
?
Dec 15, 2009 23:56
|
|
|
Would this at all be an appropriate place to talk about loading custom curves/profiles into our Nikon bodies, or is that not 'post' enough?
|
|
#
?
Dec 16, 2009 01:39
|
|
|
UserNotFound posted:Would this at all be an appropriate place to talk about loading custom curves/profiles into our Nikon bodies, or is that not 'post' enough? O_o You can do that?
|
|
#
?
Dec 16, 2009 09:35
|
|
|
poopinmymouth posted:O_o You can do that? So far I've learned to modify existing "Picture Control" settings (standard, vivid, neutral, b&w) using NX2 and saving them as a new file, which can be transferred between cameras easily. I believe it works with the D100/200/300/700 D2x and D3 series. I'll post back a guide once I get some screen shots. Here are samples of the first 8 listed here : http://www.neebu.net/~khuon/photography/NIKON/CUSTOMPC/ I've never tried to shoot for any kind of comparison like this, I'm at work and winter sucks, so here you go:   Frankly I'm disappointed you can't add vignetting in camera. It really would have made the top gear preset settings  A quick tutorial to using these: create NIKON\CUSTOMPC\ on your memory card save the .ncp files with the names PICCON01.NCP , PICCON02.NCP , PICCON03.NCP, etc to that folder go to shooting menu, manage picture control load/save, copy to camera, and choose the files. They will come out with friendly names you can see under "set picture control" UserNotFound fucked around with this message at 19:05 on Dec 16, 2009 |
|
#
?
Dec 16, 2009 13:49
|
|
|
UserNotFound posted:So far I've learned to modify existing "Picture Control" settings (standard, vivid, neutral, b&w) using NX2 and saving them as a new file, which can be transferred between cameras easily. I believe it works with the D100/200/300/700 D2x and D3 series. I'll post back more info or maybe a little guide since it was kinda confusing to figure out.
|
|
#
?
Dec 16, 2009 19:01
|
|


|
Interrupting Moss posted:Pretty interested in this. Here's the only guide i've found that's worth anything (goes with the linked files above): http://www.neebu.net/~khuon/photography/NIKON/CUSTOMPC/readme.txt If you have Capture NX (or View NX, I believe) installed, you can run C:\Program Files\Common Files\Nikon\Picture Control Utility\PictureControlUtil.exe and make copies of these custom .NCPs (or the default .NCP) with additional tweaks to your liking, including actual curves and levels, not just contrast and brightness like you adjust them in camera. There are some additional curves you can open in Picture Control Utility: http://www.pixelistes.com/download/courbes/ NCP are what your camera can load directly, NTC are just the tone curve portion that you can import to an NCP with the utility. UserNotFound fucked around with this message at 19:25 on Dec 16, 2009 |
|
#
?
Dec 16, 2009 19:11
|
|
|
Anyone using a Wacom tablet with Lightroom? I'm thinking about picking up one of the Bamboo or smaller Intuos4 tablets.
|
|
#
?
Dec 17, 2009 21:59
|
|

|

|
| # ? May 16, 2024 15:15 |
|
|
Whitezombi posted:Anyone using a Wacom tablet with Lightroom? I'm thinking about picking up one of the Bamboo or smaller Intuos4 tablets. I do. It's pretty useful for little touchup work like dust removal, but nothing that I couldn't do with my mouse. The real meat and potatoes are when you export the photo for touchup in photoshop. It's infinitely more useful for things like sketching layer masks and things like that. some kinda jackal fucked around with this message at 22:07 on Dec 17, 2009 |
|
#
?
Dec 17, 2009 22:03
|
|