|
Got the modeling fo my anime character done. I think the hair came out well, I used PVC figurines for the reference on how to contruct the different hair segments.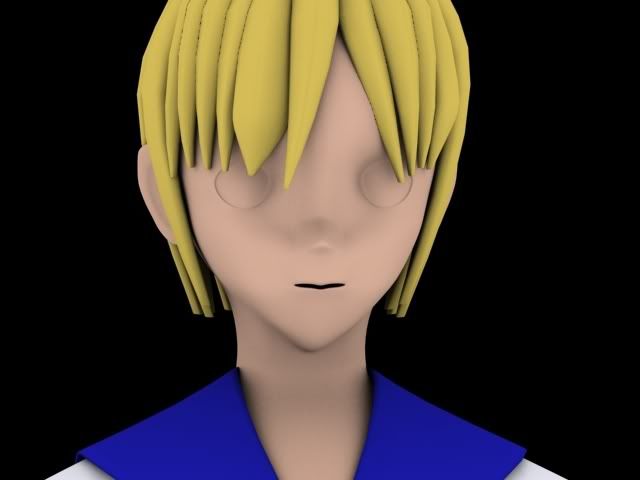 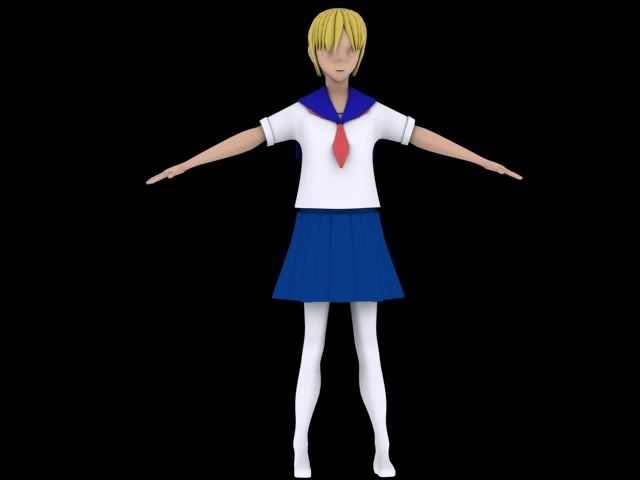
|
 #
?
Dec 10, 2009 18:08
#
?
Dec 10, 2009 18:08
|
|


|

|
| # ? May 14, 2024 01:06 |
|
|
EoinCannon posted:I've done some texture work on the tortoise and made a bit of a simple rig. Most of the maps still need work (damned colourblindness), the claws especially. This is a test pose with a cactus fruit added in for fun. That's loving amazing. Is this like Zbrush vertex colouring or a diffuse map?
|
|
#
?
Dec 10, 2009 18:51
|
|


|
Cheers mate The texturing was all done in photoshop. Diffuse, displacement, bump, spec & gloss maps. When I'm finished working on it I'll do a little making of or something with the maps I used. Rendered in mental ray for max using the A&D shader.
|
|
#
?
Dec 10, 2009 21:44
|
|

|
Ok started texturing the face stared to trace the 2d reference material I drew in Photoshop Allthough I'm not really sure on the skin tone.  Wondering if it should be more subdued in terms of tone.
|
|
#
?
Dec 11, 2009 01:43
|
|
|
3D anime characters never fail to look much more creepier than their 2D counterparts.
|
|
|
#
?
Dec 11, 2009 08:32
|
|
|
Does anyone have any advice for trying to make a recess in mudbox? Say you want to extrude some toes or push in a mouth or something; right now it feels like pushing in, pulling out the edges, trying to smooth and grab and it's fighting me every step of the way.
|
|
#
?
Dec 12, 2009 23:01
|
|
|
ceebee posted:3D anime characters never fail to look much more creepier than their 2D counterparts. I agree. The Appleseed movie is kind of proof of this. Not to mention the totally unrealistic anime style of HUGE eyes with a tiny chin and mouth. EoinCannon: Would love to see that material / painting breakdown. Surprised you didn't poly paint it and then export out the texture to photoshop for touch up. Is subtle DOF acceptable these days on characters? Seems so easy to over do it. This Jeff Miller article shows him doing it http://features.cgsociety.org/story_custom.php?story_id=5346&page=2 This is still WIP but it is driving me crazy trying to nail the likeness. Sculpted from zspheres, as you can see from the wireframe. Needs to look more feminine.  
sigma 6 fucked around with this message at 02:02 on Dec 13, 2009 |
|
#
?
Dec 13, 2009 00:38
|
|


|
So, who is it supposed to be?
|
|
|
#
?
Dec 13, 2009 10:00
|
|
|
Here's a quick doodle a couple of hours in. Going to try to make him look a little bit like an Uakari, but have the face as a mask made out of skin. Yeah.. The theme is "psycho" so that's my excuse. More to come soon! 
|
|
#
?
Dec 13, 2009 22:39
|
|
|
ceebee posted:So, who is it supposed to be? I am a little hesitant to post the reference because it is photography a friend of mine shot, and he is letting me use it as a favor. Plus, I painted a concept painting here . . . which caused a LOT of drama with the model. She claimed the painting "ruined her life" yadda yadda. Imagine, a fashion model being dramatic?  Screw it. Here is the latest update with the ref.   Definitely getting closer. The ref image plugin I was using in 3.1 is broken with 3.5. How do you guys make image planes in zbrush? Does anyone know a way to undo camera position in zbrush? Sometimes the camera (model's position, scale, rotation) will go bonkers and the undo function doesn't do it. Getting used to using "markers" in zbrush. They help a little bit in terms of placing the model against an image.
|
|
#
?
Dec 14, 2009 01:46
|
|
|
A few things. Are you going for an exact likeness? If so here's what I'd personally do: Shoulders look too wide for a typical female. Your model's nose is quite European. Look at the bridge of the nose and the base, its much less prominent and the face is flatter. You have quite a European face going on really. I think the mouth is too small and a little too pursed. Eye's are a little too small in my opinion and also because she has a flatter face they go back too far, although changing the shape of the face should fix this. I think it's looking quite promising so far definitely, but you really need to keep rotating your model every time you pull stuff about and keep saying does it look right, should I move this more etc.
|
|
#
?
Dec 14, 2009 15:02
|
|
|
Thanks. Was trying to get the structure of the head and face before finishing up the hair and shoulders and ears etc. You are right about the European look. Fixing the nose and the angle of the cheekbone is a lot of what defines the ethnicity. The eyes were bigger but I changed the shape of the eyelids. Do you think the eyes go to far back in the head? I did not use a basemesh (instead tried zspheres) but lining up things proved very difficult without image planes or a basemesh. You are absolutely right about the shape of the face. The 3/4 view looks the worst but it is really hard to get that view perfect without that image plane plugin.
|
|
#
?
Dec 14, 2009 18:03
|
|
|
Honestly I would start over with a good feminine basemesh and work at the lower subdivision levels before moving up to the detail you have right now. The majority of the form is off and it doesn't really look anything like your reference. The head is too skinny/oblong, the eyes are too deep, face sticks out too far and looks like it's sliding off of the skull. Try not to go directly off of the image planes anyways, just have reference collection in a seperate window next to your zbrush window. The reference pictures will be off because of lens distortion and the perspective difference between a photo and zbrush, so it's probably a bad idea to try and match them exactly (which is what explains some of your anatomical errors). Don't use not having image planes as an excuse to not really study the planes of her face, racial qualities, and proportions.
|
|
|
#
?
Dec 15, 2009 01:41
|
|
|
Thanks but the objective here is to retopo a zsphere based sculpt. I am using multiple images at multiple angles but I am usually just staring at those 3, since I load them into the document background. The other references are at odd angles and with different expressions. I tried to pick the most orthogonal and neutral photos for my primary reference, though I do have LOTS to choose from. Regardless of whether or not image planes should be used or not, I am still curious how the rest of you make image planes in zbrush? Had some great reference for differences in ethnicity in humans etc. but now I can't find the URL. Instead, here is some useful info on the differences between male and female faces, with a very disturbing gallery. EDIT: FOUND IT! sigma 6 fucked around with this message at 20:24 on Dec 15, 2009 |
|
#
?
Dec 15, 2009 02:36
|
|
|
sigma 6 posted:Thanks but the objective here is to retopo a zsphere based sculpt. Then why would you bitch earlier about trying to nail the likeness? The woman's face is considerably wider, giving a very round cross section from the front, whereas you've made her face much more V-shaped. You've put her eyes too deeply back, she has a very flat face. Your eyes are off - the round part is much too centered, with her eyes there isn't the mirrored shape you've got on each eye. Her nose is completely loving different - her nose doesn't come to a point like yours does and her nostrils in fact dip slightly below the middle of the nose, which they don't on your mesh. All of these are important parts for nailing the ethnicity of the person, and you're missing them, making this sort of hybrid, vaguely european caricature. Additionally, you've made her mouth smaller than her nose (it isn't, look at your ref) and you've completely hosed up the ears, when the ears are easily one of the more defining features of a face, since they allow for so much uniqueness. If the point is just to retopo a zsphere based sculpt, then why bother trying to hit a likeness at all or post one? Especially if she's pissed at you because you've used her likeness without permission before?
|
|
#
?
Dec 15, 2009 03:06
|
|
|
I already OK'd the 3d likeness with her. She is pissed about the pose I chose for the painting. Why does re-topo'ing imply I shouldn't make an accurate likeness? That makes no sense. Thanks for all the suggestions on the facial features. I will do my best to implement them. As I mentioned earlier, the ears and hair isn't even close to being done. All this is very WIP and I wanted to get the face down first, figuring that would be the hardest part. The reason I am doing this is to get faster and more accurate at sculpting. Also, I have never sculpted a decent head only using zspheres before. A common modeling exercise is to sculpt celebrities, so the likeness is immediately recognizable. In this case I just had some very good photo ref of a random model, and I know the photographer, so it was a personal goal to get the likeness as close as possible. Also haven't posted on here in a while, and wanted to share my current project. I am hoping the other aspects of the model won't prove so difficult. EDIT: At some point Ben Mathis posted a model of some girl with huge eyes and eyeliner in the previous 3d thread which I thought was extremely creepy. Didn't know who she was until now. My friend pointed out that she was on TV. America's top model? . . . . creeeeepy.  EDIT2: It was a 4Chan thread which featured her originally. That explains a lot. VVV Not bad. Did you want critique? sigma 6 fucked around with this message at 22:39 on Dec 15, 2009 |
|
#
?
Dec 15, 2009 04:00
|
|
|
Turntable of my character: http://www.youtube.com/watch?v=E5GBARfyIOQ I'm kind of proud of the final render although image quality is down due to youtube.
|
|
#
?
Dec 15, 2009 21:32
|
|
|
Fur techniques. Besides something like Maya Fur, what techniques do ya'll use for large areas of hair?
|
|
#
?
Dec 16, 2009 23:26
|
|

|
Outside of some fur or hair system, I would imagine displacement would be another option. This probably won't look good, depending on the distance of the camera. What kind of project is it?
|
|
#
?
Dec 17, 2009 00:21
|
|
|
Can anyone recommend some good beginner's resources on digital lighting? I understand the basics about CG light types and how they work, but I'm looking for something that gives practical examples of when and where you'd use specific types of lights when building environments (especially indoor ones).
|
|
#
?
Dec 17, 2009 01:54
|
|

|
GFBeach posted:Can anyone recommend some good beginner's resources on digital lighting? I understand the basics about CG light types and how they work, but I'm looking for something that gives practical examples of when and where you'd use specific types of lights when building environments (especially indoor ones). This: http://www.amazon.com/Digital-Lighting-Rendering-Jeremy-Birn/dp/0321316312/ref=sr_1_1?ie=UTF8&s=books&qid=1261014474&sr=8-1
|
|
#
?
Dec 17, 2009 02:48
|
|

|
Ratmann posted:This: Seconded. Probably the best lighting book I have read. Jeremy Birn knows his poo poo.
|
|
#
?
Dec 17, 2009 03:12
|
|
|
mashed_penguin and Ratmann posted:Digital Lighting and Rendering 2nd Edition  I forgot I had that book. I haven't looked at it since my intro to lighting class a couple of years ago, so I guess it's time to dust it off and give it another read. Thanks! I forgot I had that book. I haven't looked at it since my intro to lighting class a couple of years ago, so I guess it's time to dust it off and give it another read. Thanks!EDIT: VVV In my defense, it's been a long while since I did any major lighting projects. Out of sight, out of mind. 
GFBeach fucked around with this message at 15:23 on Dec 17, 2009 |
|
#
?
Dec 17, 2009 03:59
|
|
|
GFBeach posted:
Haha, should have read your own first post in this thread: GFBeach posted:The lighting book I used for my class at SCAD was Digital Lighting and Rendering 2nd Edition. It's pretty good, and it's more about general technique and concepts rather than "press button, light bacon".
|
|
#
?
Dec 17, 2009 11:04
|
|
|
BonoMan posted:Fur techniques. Besides something like Maya Fur, what techniques do ya'll use for large areas of hair? Define large areas of hair. #1 flaw I see with folks new to fur is they try to do everything with one big super guide/guide group and one big fur patch. Break up your fur into groups, upper arm, lower arm, neck, skull cap, back of head, however many it takes. Have one short fur base fur layer covering everything to get rid of exposed surfaces you may see between the hairs. Brake up guide work into guides to super guides using corresponding groups. You'll have split groups where you have changes in how hair is group, eg. if you have a long haired character where the hair needs to part a certain way. Sometimes you can bind guides to geometry/lattices/cloth sims to get better results and eliminating inter hair penetration issues.
|
|
#
?
Dec 17, 2009 16:59
|
|


|
BigKOfJustice posted:Define large areas of hair. Thanks for all the info! It's an animal like a deer. We have Maya Complete, but were looking into Shave and a Haircut instead of upping to Maya Unlimited for budgetary reasons.
|
|
#
?
Dec 17, 2009 17:13
|
|
|
Working on snow effects. I'm still completely green to particles, although I've been getting some good results with emfluid2, and ICE is generally intuitive. Snow contact effect test  Almost every shot is going to be snowy so I need to work out a bunch of ways to speed snow effects up, like collecting on the suit, clumping, etc.
|
|
#
?
Dec 18, 2009 01:17
|
|

|
Got bored, decided to make a superhero guy, remembered how easy Zbrush was to use and something just clicked. I actually might end up making something halfway decent if I stick with it this time.
change my name fucked around with this message at 05:50 on Dec 18, 2009 |
|
#
?
Dec 18, 2009 04:32
|
|


|
BonoMan posted:Thanks for all the info! It's an animal like a deer. We have Maya Complete, but were looking into Shave and a Haircut instead of upping to Maya Unlimited for budgetary reasons. You should be able to get good results with nCloth/nFur I think it's called now. Buuuut. Since it's a Deer, and it has relatively short hair, you don't need to worry about animating medium to long hair via harmonics/jiggle or simulation. From an friend who used Maya and a Haircut on a [large feature production which may or may not feature pirate zombies] he felt that Shave and a Haircut gets great results fast, but lacks options for realistic animation. Not an issue for short fur, but if you have to wispy long hairs, its more work than using other packages. I'm guessing you can go with two approaches, use shave and a hair cut to get the lookdev done, and use another package to animate the guides [ncloth/whatever on maya or maybe syflex]. The only thing I've done fur in is Houdini and custom software so I can't comment on specific solutions in Maya. I need to sit down with Maya and knock out a furred critter one of these days.
|
|
#
?
Dec 18, 2009 11:12
|
|
|
This is cool, you might be able to use it to animate fur attribute maps in maya - http://www-viz.tamu.edu/courses/tutorials/gary/index.html EDIT: Don't know if that helps. It is still a cool concept anyway.
|
|
#
?
Dec 19, 2009 20:36
|
|
|
A few pages ago I asked about (in Maya/MEL) using a locator to manipulate y-positions to 'dip' things; I got that sorted, but I'm looking at the next stage of what I want to do and I really can't get it sussed. I've got a grid of cubes, and as the locator passes them I want them to rotate 90�; this is simple enough, but I want them to stay rotated as the locator passes by. Here's the code I've got for this, so far. What this should do (in my mind), is look at where the locator is in correlation to each object, and if the qualifiers work out (and it evaluates into it just fine), set a keyframe at the current time with rotation = 0 and another one 20 frames from now with rotation = 90. Problems with this: a) It doesn't actually set any keyframes. b) This will only run once; how can I set this up so that it always evaluates? I tried setting rotation using expression -alwaysEvaluate 1 but Maya won't accept the expression I'm giving, as it's too long/complicated. Can anyone give any thoughts / tips / advice on this? I know I'll also need a 'reset' script to set things back to their initial values (as I want them to hold 'flipped' afterwards), but that ought to be easy enough to set up. code:
|
|
#
?
Dec 19, 2009 20:37
|
|

|
Travakian posted:A few pages ago I asked about (in Maya/MEL) using a locator to manipulate y-positions to 'dip' things; I got that sorted, but I'm looking at the next stage of what I want to do and I really can't get it sussed. I don't do any scripting but it seems like you could set up a some set-driven-keys (that's the maya term afaik, in Max they're wire-parameters) parameters, so you wind up with a variable like is_rotated_90 and when it is at 100% have them rotated 90 degrees. Then you could have the proximity of the influencing object add towards the 100%, but never subtract to it. This seems like it would be easier to futz with than trying to access the rotation directly and constrain it because that would require some goofy math, whereas here in your scripting you can just have it continue to add towards 100% IDK I'm not a maya user or a scripter but set-driven-keys seems like something useful to use.
|
|
#
?
Dec 19, 2009 21:45
|
|
|
change my name posted:Got bored, decided to make a superhero guy, remembered how easy Zbrush was to use and something just clicked. I actually might end up making something halfway decent if I stick with it this time. The problem I think I'm facing is in that by not using a reference, I seem to be subconsciously creating myself (Facial-wise). How narcissistic. 
change my name fucked around with this message at 04:10 on Dec 21, 2009 |
|
#
?
Dec 21, 2009 03:05
|
|
|
You would be better off using reference until you get more familiar with the anatomy you are trying to sculpt. It is good practice and good fun to sculpt straight out of your brain once you understand the proportions and forms of the face but until then I would brush up on my observation skills by using lots of references. I did this in about 2 hours last night without using any references as a bit of a challenge and just to see what would happen. Sculpted from a cube instead of a basemesh like usual. 
|
|
#
?
Dec 21, 2009 04:57
|
|
|
I'm feeling pretty crap at the moment. Looks like the Victorian College of the Arts is unable to run their VFX course next year so I'm just going to throw my hands up in the air and run around in a panic at not knowing what to do now.
|
|
#
?
Dec 21, 2009 10:40
|
|


|
tuna posted:Almost every shot is going to be snowy so I need to work out a bunch of ways to speed snow effects up, like collecting on the suit, clumping, etc. This is excellent, i'd love to see more of your tests ") You also reminded me how badly I deluded myself into thinking I knew particles.
|
|
#
?
Dec 21, 2009 13:02
|
|

SynthOrange posted:I'm feeling pretty crap at the moment. Looks like the Victorian College of the Arts is unable to run their VFX course next year so I'm just going to throw my hands up in the air and run around in a panic at not knowing what to do now. Come to California and join us at Gnomon.
|
|
|
#
?
Dec 21, 2009 13:38
|
|
|
ceebee posted:Gnomon. How basic are those Nuke tutorials? I don't do a whole lot of roto, but I've been thinking of getting off the sinking ship that is Combustion.
|
|
#
?
Dec 21, 2009 19:14
|
|

|
SynthOrange posted:I'm feeling pretty crap at the moment. Looks like the Victorian College of the Arts is unable to run their VFX course next year so I'm just going to throw my hands up in the air and run around in a panic at not knowing what to do now. Can't teach yourself?
|
|
#
?
Dec 21, 2009 21:51
|
|
|

|
| # ? May 14, 2024 01:06 |
|
|
butterypancakes posted:How basic are those Nuke tutorials? I don't do a whole lot of roto, but I've been thinking of getting off the sinking ship that is Combustion. You mean the dvd training with the jet fighters on em? I would save those for last if you can since from what I hear they are already covering outdated versions
|
|
#
?
Dec 21, 2009 23:29
|
|