

|
LuisX posted:It's definitely not a portrait preset. 'Cause I tried. Thanks. I have many versions that I have been working on for a long time that I hope to release at some point. I tried to come up with a preset that would work for everything but it seems impossible. If you guys shoot something specifically for this preset you might try over exposing it a little bit.
|
 #
?
Jan 10, 2010 06:53
#
?
Jan 10, 2010 06:53
|
|


|

|
| # ? May 16, 2024 18:18 |
|
|
In lightroom Im trying to import tiff's and have them copied and converted to DNG, but its just not happening. ive noticed the files coming out of my scanner are TIF and not TIFF, could that be the answer?
|
|
#
?
Jan 10, 2010 12:58
|
|
|
fronkpies posted:In lightroom Im trying to import tiff's and have them copied and converted to DNG, but its just not happening. ive noticed the files coming out of my scanner are TIF and not TIFF, could that be the answer? TIF / TIFF is just a difference between Mac and PC file conventions, they should work either way. What color depth are you scanning at? I haven't used Lightroom yet or DNG conversion, but anytime I've scanned film in 16-bit B&W or 48-bit color, Bridge's (CS2) Adobe Camera Raw thought it was a raw file and all the camera raw commands worked on it. I don't think 8-bit color would work for that.
|
|
#
?
Jan 10, 2010 15:53
|
|

 is go
is go
|
Dr. Cogwerks posted:TIF / TIFF is just a difference between Mac and PC file conventions, they should work either way. What color depth are you scanning at? I haven't used Lightroom yet or DNG conversion, but anytime I've scanned film in 16-bit B&W or 48-bit color, Bridge's (CS2) Adobe Camera Raw thought it was a raw file and all the camera raw commands worked on it. 16 bit grayscale. I can export them as DNG, so im just doing that now.
|
|
#
?
Jan 10, 2010 16:03
|
|
|
Alvination posted:Thanks. I think the history section will do me well.
|
|
#
?
Jan 10, 2010 16:10
|
|

|
Quick lightroom question: So, 20% of my catalog's photos are in my old file naming scheme, whereas all my new stuff gets converted to DNGs and put into a massive dated folder. Is there any way to convert the old RAWs to DNGs en masse and move them to this massive dated folder (a la the import options) via Lightroom without having to meticulously go through each folder?
|
|
#
?
Jan 12, 2010 12:04
|
|
|
Hot Cops posted:Quick lightroom question: I'm not at home so can't give you specifics but you should be able to click on the top of your library (left-hand panel), then apply filter to show only specific extensions and finally export them as DNGs (to original locations). After that's done - close Lightroom (not really necessary), search for files with old extensions, delete them, open Lightroom and synchronize folders. This way it will remove thumbnails of old pictures and see new ones. Perhaps there's an easier way but this worked for me. Word of caution - back up your images data before reorganizing your library in case poo poo happens.
|
|
#
?
Jan 12, 2010 21:44
|
|

|
Back up the catalogs as well.
|
|
#
?
Jan 12, 2010 22:51
|
|
|
I have this image I have it in a RAW as well, aside from the fact I just noticed it's mis-focused, what would be a good technique to make his hands and hair 'pop' I feel that the image is very flat and somewhat lifeless which de-saturated images shouldn't be. I was considering trying a psedo-HDR treatment on it and comping some of the result over to give more depth. Ideas?
|
|
#
?
Jan 14, 2010 05:39
|
|
|
I would just go with curve masks, its really simple and you get lots of control. Here is an example I did, it may not be how you want it but you can get lots of control like this and get it how you like it without doing something unpredictable like HDR.
|
|
#
?
Jan 14, 2010 06:14
|
|
|
^^^^^ I have this problem where I automatically jump to the most convaluted soloution to simple problems. I was digging through my 'done' folder today and thought that could do with some work. Thanks.
|
|
#
?
Jan 14, 2010 06:27
|
|
|
Does anyone know if there's any lightroom plug-ins to mimic an effect like this at all? 
|
|
#
?
Jan 23, 2010 15:57
|
|


|
I have a photoshop action that does something similar, but no lightroom presets.
|
|
#
?
Jan 23, 2010 16:19
|
|
|
Is it possible you could share the action? Or link to it or something? Thanks ")
|
|
#
?
Jan 23, 2010 16:27
|
|
|
Sure, that can be arranged. Let me figure out which one matches closest to that, I have a few that do similar things.
|
|
#
?
Jan 23, 2010 16:34
|
|
|
Brilliant, thanks so much man!
|
|
#
?
Jan 23, 2010 16:39
|
|
|
In GIMP: 1) How does one flip only one layer? It keeps flipping both my layers. Edit: okay, I figures out a way: using flip in the toolbox rather than by right-clicking. Still, that limitation doesn't make sense. 2) How does one transfer one selection to another image? The outline of the selection, not the actual contents of the selection. Thanks! Regression fucked around with this message at 16:47 on Jan 23, 2010 |
|
#
?
Jan 23, 2010 16:43
|
|

|
A5H posted:Brilliant, thanks so much man! I combined two of my fading actions that got something reasonably close. Run the one called vintage fade. You can adjust the opacity on the layers, I already lowered one of them to get something close to that photo. Let me know if all three actions are in there, I've never exported an action set before. Edit: Link wasn't working. rockcity fucked around with this message at 18:22 on Jan 23, 2010 |
|
#
?
Jan 23, 2010 17:15
|
|
|
rockcity posted:
That link doesn't appear to work?? Also I think the link maybe has your ftp password in it so I've removed it from the quote. Would it be easier to just email it to me? (A5H_87(at)hotmail.com) Thanks again!
|
|
#
?
Jan 23, 2010 17:40
|
|
|
A5H posted:That link doesn't appear to work?? For some reason it seems to truncate the link so that it won't work, I'll just email it to you.
|
|
#
?
Jan 23, 2010 18:22
|
|
|
Thanks a lot buddy! 
|
|
#
?
Jan 23, 2010 20:27
|
|
|
A5H posted:Does anyone know if there's any lightroom plug-ins to mimic an effect like this at all? Just make your own preset. Decrease contrast, desaturate a little, split tone it for cool shadows and slightly warm highlights.
|
|
#
?
Jan 23, 2010 20:29
|
|

|
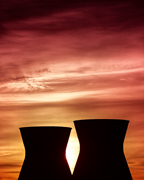
A5H posted:Does anyone know if there's any lightroom plug-ins to mimic an effect like this at all? Aside from decreasing the contrast a little and cross processing it a little, you can't mimic this unless you recreate the light: -Sun in front of camera (but not in frame) -Exposing for the shadow side of the car/object This way your background will look a little cloudy as you see in this shot.
|
|
#
?
Jan 24, 2010 07:06
|
|


|
Is there a simple toggle key in Lightroom to do full screen before/after comparisons ? Let's say I changed a setting I can alternate Ctrl-Z and Ctrl-Y to go back and forth between the two. Is there a (better) way to do this with two history states and only one keyboard combination ?
|
|
#
?
Jan 26, 2010 00:12
|
|
|
Cross_ posted:Is there a simple toggle key in Lightroom to do full screen before/after comparisons ? Let's say I changed a setting I can alternate Ctrl-Z and Ctrl-Y to go back and forth between the two. Is there a (better) way to do this with two history states and only one keyboard combination ? Yes, the \ key.
|
|
#
?
Jan 26, 2010 00:33
|
|

|
Is there an easier way to use the filter>distort>lens correction in PS? What I'm imagining is similar to the angle correction where you draw a straight line and it automatically rotates it to make the horizontal. What I want from the distortion correction (specifically that vertical and horizontal transform functions) is to be able to draw a straight line which I want to be the right vertical of the image, a line for the left vertical and lines for the top and bottom and for it to stretch/transform/rotate and crop to that size. I took some pictures of big apartment buildings in Hong Kong and I want to make all of the lines perfectly straight with square angles but I can't seem to find the right combination of vert and horizontal transform and angle adjustment. Has anyone else shared my frustration on something like this? e: Here's an example: 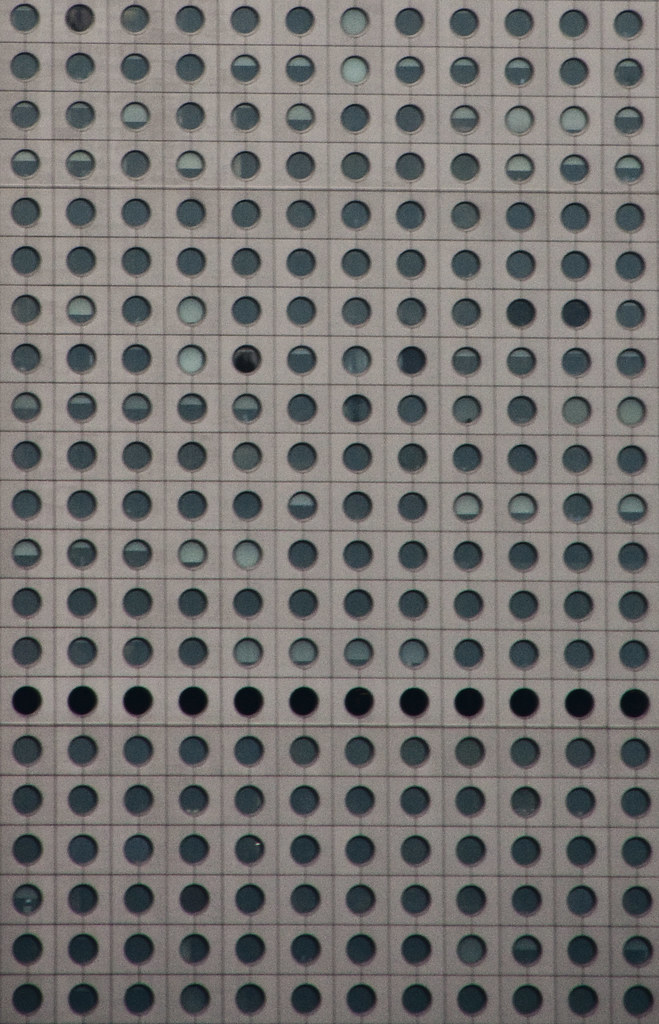 . I have the left and bottoms pretty much straight and square but the top and right aren't. If I fiddle with the angle or vert/hotiz transpose sliders, it fucks up the left or bottom. . I have the left and bottoms pretty much straight and square but the top and right aren't. If I fiddle with the angle or vert/hotiz transpose sliders, it fucks up the left or bottom.
spf3million fucked around with this message at 15:22 on Jan 26, 2010 |
|
#
?
Jan 26, 2010 15:12
|
|
|
spf3million posted:Is there an easier way to use the filter>distort>lens correction in PS? What I'm imagining is similar to the angle correction where you draw a straight line and it automatically rotates it to make the horizontal. What I want from the distortion correction (specifically that vertical and horizontal transform functions) is to be able to draw a straight line which I want to be the right vertical of the image, a line for the left vertical and lines for the top and bottom and for it to stretch/transform/rotate and crop to that size. I took some pictures of big apartment buildings in Hong Kong and I want to make all of the lines perfectly straight with square angles but I can't seem to find the right combination of vert and horizontal transform and angle adjustment. You want to display a grid in photoshop, then transform the layer, and use the skew feature till it all lines up.
|
|
#
?
Jan 26, 2010 16:55
|
|
|
I've scanned some negatives and saved as tiff. In Photoshop, I'd like to run lens correction (ideally) or transform>perspective, but both are greyed out. Any suggestions?
|
|
#
?
Jan 26, 2010 20:04
|
|
|
Image->Mode->8-bit Color
|
|
#
?
Jan 26, 2010 22:13
|
|
|
I'd already converted it to 8bit, and the layer's not locked. I just converted it from greyscale to RGB, and now I've got access to all filters - why should this make a difference?
|
|
#
?
Jan 26, 2010 23:06
|
|
|
You are an absolute god at post Brad... Are you all self taught?
|
|
#
?
Jan 31, 2010 05:20
|
|
|
Ric posted:I'd already converted it to 8bit, and the layer's not locked. That was going to be my next suggestion. Some of the filters use the information from the RGB channels to do whatever it is they do, so if you're in grayscale they don't have anything to work with. And yeah I am pretty much all self-taught.
|
|
#
?
Feb 1, 2010 22:41
|
|
|
http://www.flickr.com/photos/bigsleep/3613246902/ http://www.flickr.com/photos/bigsleep/3816284659/ http://www.flickr.com/photos/bigsleep/3872841717/ http://www.flickr.com/photos/bigsleep/3968306232/ How do I process like this? The colors are always so nice, is it all color balancing? They always seem to have a "bright" feel to them too without being too bright/blown out or too contrasty. I really like this guys style even though I know some people will hate on the saturation. I believe he works a lot on the greens in his photos, but how does he do this since masking the greens away from the beach would be insanely hard unless there is some technique im missing.
|
|
#
?
Feb 2, 2010 03:38
|
|
|
You have to start with good overall color to begin with. Then if you have a specific color palette in mind it's usually easiest to make changes with curves/HSL adjustment layers with masks. You can also limit the scope of what an adjustment layer does by setting the blending mode to Saturation, Luminance, etc.
|
|
#
?
Feb 2, 2010 04:01
|
|
|
fenner posted:I believe he works a lot on the greens in his photos, but how does he do this since masking the greens away from the beach would be insanely hard unless there is some technique im missing. ETA: Actually it would be easier to switch to Lab mode and use the a channel if you just want greens. Cross_ fucked around with this message at 21:57 on Feb 2, 2010 |
|
#
?
Feb 2, 2010 21:55
|
|
|
Cross_ posted:ETA: Actually it would be easier to switch to Lab mode and use the a channel if you just want greens. Unless it's something really finicky and critical I think Lab color is probably a little over kill. If you want to isolate the greens do a HSL adjustment layer, switch it to green only, and mask as needed.
|
|
#
?
Feb 3, 2010 00:43
|
|
|
brad industry posted:Unless it's something really finicky and critical I think Lab color is probably a little over kill. If you want to isolate the greens do a HSL adjustment layer, switch it to green only, and mask as needed. It's the "mask as needed" part that made me think of using an inverted a-channel so you only adjust the green parts and not anything that's say bright grey.
|
|
#
?
Feb 3, 2010 01:38
|
|
|
The problem is that the "greens" are usually mostly made up of yellows and so are rocks/sand, so masking away a bunch of moss or seaweed with all the detailed edges becomes very hard.
|
|
#
?
Feb 3, 2010 03:02
|
|
|
fenner posted:The problem is that the "greens" are usually mostly made up of yellows and so are rocks/sand, so masking away a bunch of moss or seaweed with all the detailed edges becomes very hard. Make H/S adjustment layer Select "Greens" from top drop down On the rainbow thingie on the very bottom move the little tabs to get whatever part of the spectrum you need to adjust (ie. make it cover yellow-green). In CS4 you can also do this visually by using the hand-slider and clicking and dragging on whatever you're changing. If you do that you can just make a rough mask really quickly, the detailed edges won't matter because of the narrowed scope of the layer. If you really want to narrow it down to something specific like JUST the saturation, set the blending mode on the adjustment layer to "Saturation" (or "Color" or "Luminance" or whatever's appropriate).
|
|
#
?
Feb 3, 2010 03:13
|
|
|

|
| # ? May 16, 2024 18:18 |
|
|
brad industry posted:Make H/S adjustment layer Oh wow, didn't know about the rainbow thingie at the bottom. Now I feel p dumb. Thanks a lot for the help guys.
|
|
#
?
Feb 3, 2010 04:34
|
|