


|
Thumposaurus posted:Titebond I or Titebond II? Here's the glue I have: http://www.titebond.com/IntroPageTB.ASP?UserType=1&ProdSel=ProdSelectorIntroTB.asp
|
 #
?
Feb 24, 2010 16:42
#
?
Feb 24, 2010 16:42
|
|

|

|
| # ? May 15, 2024 23:07 |
|
|
MarshallX posted:Here's the glue I have: That link just goes to the main product selection page.
|
|
#
?
Feb 24, 2010 20:31
|
|

|
Thumposaurus posted:That link just goes to the main product selection page. Oops. Titebond Original.
|
|
#
?
Feb 24, 2010 20:49
|
|
|
WildFoxMedia posted:Here are the plans in question: I wish I took more pics of the stand I built, but I looked at the same plans and decided to roll my own instead.  The sides and bottom are 3/4" hardwood ply. The front and rear face frame are maple and just biscuit jointed together. They're rabbeted on the sides so that the plywood sits flush. There is a bunch of cheap 1x2 maple supports tying everything together and adding strength. Everything is glued and screwed together from multiple angles, then stained with a medium dark stain. I finished it (interior and exterior, adding excess to the crevices) with a spar urethane for water protection. The only thing I wish I did differently would be to build a flat top out of the remaining ply, then just build a maple trim around that. What I did was build something like a picture frame and set that on top. It doesn't support the tank as well as I would like. I added a 1/2" insulation board under the tank itself to eliminate stress points from the wood not being perfectly flat. Let me know if you want more information. Total build cost was ~300 but mainly because I used maple instead of oak or some other cheaper wood. I wouldn't recommend pine, though.
|
|
#
?
Feb 24, 2010 22:33
|
|
|
MarshallX posted:Oops. You should be able to steam it apart pretty easily then, hot vinegar is supposed to weaken Titebond Original as well. Just go slow and work the putty knife blade a little at a time into the joint. The glue is stronger than the wood, so if you try to force it apart before it is weakened enough you could end up breaking something.
|
|
#
?
Feb 24, 2010 23:12
|
|
|
Thumposaurus posted:You should be able to steam it apart pretty easily then, hot vinegar is supposed to weaken Titebond Original as well. I just decided to wood filler the 1/32nd gaps on the miters. It's a cabinet for a dart board in a barn, so it won't be a big deal.
|
|
#
?
Feb 25, 2010 03:51
|
|
|
WildFoxMedia posted:Here are the plans in question: I would not start over with this, it's not a good design. Let me think about it considering the range of tools you have available. I'll try to sketch something and post it. Edit:  Here is a really terrible sketch but hopefully it's enough you get the idea. I would construct two end panels using 2x4s, your pocket hole screws and some glue. Ideally you'd want to use mortis and tendon joints here but I think you'll be fine. If you want to make it stronger you could use half-laps. Notch out each corner of the end panel (probably easier before you assemble it) to accept a total of four 2x4s (2 top, 2 bottom) that will run the length of your front and back. Secure with screws (or pocket screws) and glue. The advantage here is that all the weight from your aquarium will be transferred directly to the floor via the four upright 2x4s. If you plan on skinning it with 1/4", you shouldn't need any additional reinforcement. Hopefully these pics will make up some for my lovely sketch. 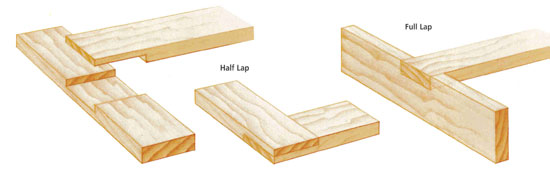 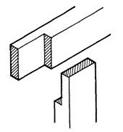 
wormil fucked around with this message at 17:04 on Feb 25, 2010 |
|
#
?
Feb 25, 2010 16:29
|
|

|
Here is an aquarium stand I built for a guy with a pretty large aquarium. Poplar, birch plywood, black dye. The guy didn't want a waterproof finish for some reason. I think I ended up spraying it with flat lacquer anyway just so it wouldn't be destroyed in 2 months.   And a few miscellaneous I've kept meaning to post. One of my first ever tables. SYP, shellac over boiled linseed. Eventually the top cupped and broke the wood buttons that were holding it. I'll probably need to make a series of cuts running along the grain underneath so I can flatten the top back out and reattach it. Oh, and I tapered those legs with a circular saw!  I don't have any pictures of my favorite table, a shaker style woman's desk I built from walnut. The picture below makes the table look crooked but it's just a bad picture. Beginning with unsurfaced lumber I glued up the top and planed it flat by hand, it was actually not as difficult as I expected. Solid mahogany, oil and varnish. The finish was a mistake, it was too soft and now the tabletop really needs to be refinished. Mahogany is an absolute joy to work with though. 
wormil fucked around with this message at 22:00 on Feb 25, 2010 |
|
#
?
Feb 25, 2010 17:28
|
|
|
Cool stuff Wormil. I like the mahogany table. I can't afford to get any real stuff, but theres some African locally for $4.85 I might be able to get for something small. Another plane restoration.    
|
|
#
?
Feb 25, 2010 19:47
|
|

|
How are you re-flattening the bottoms of these planes? I'm trying very hard to get chummy with some engineering technicians so they'll let me use their surface grinders to make my record planes more precise than lie nielsens .
|
|
#
?
Feb 25, 2010 20:12
|
|

|
I haven't, yet. I don't have a lapping stone or anything. I don't really have a way to sharpen the blades, or the know how. Else I'd have posted the obligatory shaving money shots. I do have a 2 foot square granite plate that I could use sandpaper with I guess. Let me know how your idea works out, maybe you could sneak mine in while your at it.
|
|
#
?
Feb 25, 2010 20:32
|
|
|
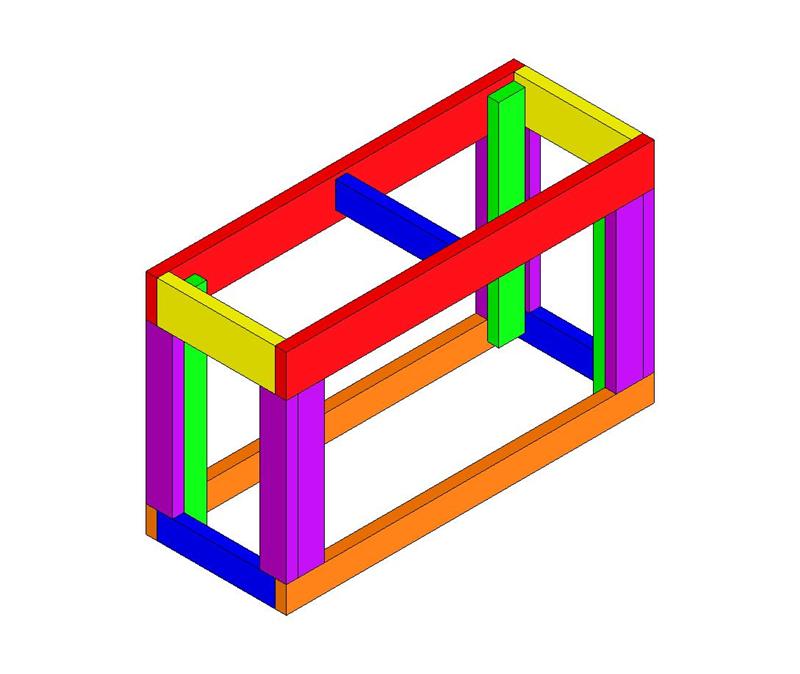
wormil - Thank you for all of the info you posted. Just so im clear on the construction/layout of the stand, I am attaching a quick render I did. I am mainly curious about the supports that are purple - I didnt quiet see how those attached in your drawing. Click here for the full 640x480 image.
|
|
#
?
Feb 25, 2010 21:06
|
|
|
Do any of you sell your crafts? And if so, how do you go about figuring how much to charge? And for that matter, how do you go about finding customers? I'm not looking to make a living here, but I would sure like it if my hobby was a little more self-supporting. Not to mention that it would force me to get a lot better at what I do.
|
|
#
?
Feb 25, 2010 21:13
|
|


|
ChaoticSeven posted:I haven't, yet. I don't have a lapping stone or anything. I don't really have a way to sharpen the blades, or the know how. Else I'd have posted the obligatory shaving money shots. I do have a 2 foot square granite plate that I could use sandpaper with I guess. The granite plate and sandpaper would work well, albeit a little slow, but you really shouldn't have to remove that much material anyway. You can also use valve lapping compound. If you don't' have granite, most pieces of glass should be flat enough. You can also use hand scraping, a surface plate, and prussian blue to get a perfectly flat surface... and this is the best option. AbsentMindedWelder fucked around with this message at 22:09 on Feb 25, 2010 |
|
#
?
Feb 25, 2010 22:06
|
|

|
ChaoticSeven posted:Cool stuff Wormil. I like the mahogany table. I can't afford to get any real stuff, but theres some African locally for $4.85 I might be able to get for something small. I actually meant to say that planing the top was not as difficult as I expected. Although it would have been a lot easier with a scrub plane, all I had was a jack. drat, those planes look fantastic. You are really inspiring me to have a go at it. You can flatten the sole with sandpaper and a piece of granite countertop (fake edit: which I see you already have). Just spray glue the paper down and pretend you are planing. Make sure the blade is fastened in place but raised up (I'm sure you already know that part). WildFoxMedia posted:
BTW, what are you modeling that with? The purple pieces (rails) will span between the blue pieces (posts), attached with your pocket screws, like a cabinet door frame. The rest of it is spot on (I've been watching too much British tv). The idea is kind of a hybrid between post & rail construction and standard casework. Here is a picture that probably explains it better than I. Like this but with 2x4s. 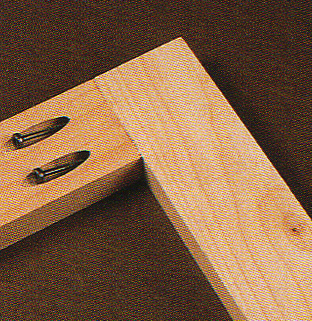 Ideally you want the weight directly transmitted to the floor. Basically this is a stressed skin structure, the plywood will transmit weight from the center out to the compression bearing 2x4s on the outsides. After some thought, I would consider going with 1/2" plywood instead of 1/4". If you jump all the way to 3/4" you could probably park a small car on it. If you needed more strength, you could use 4x4 corner posts and lap all the joints forgoing pocket screws. Actually you could lap all the joints with 2x4s increasing the strength over pocket screws.
|
|
#
?
Feb 25, 2010 22:54
|
|
|
I was just poking around on google and I ran across a video detailing the Leigh D4R 24" dovetail jig. That looks like a drat fine piece of hardware.  Then I saw the $500 price tag. 
|
|
#
?
Feb 25, 2010 23:28
|
|
|
wormil I realize you said lap joints in your original post, were you talking about lapping the joints like this: 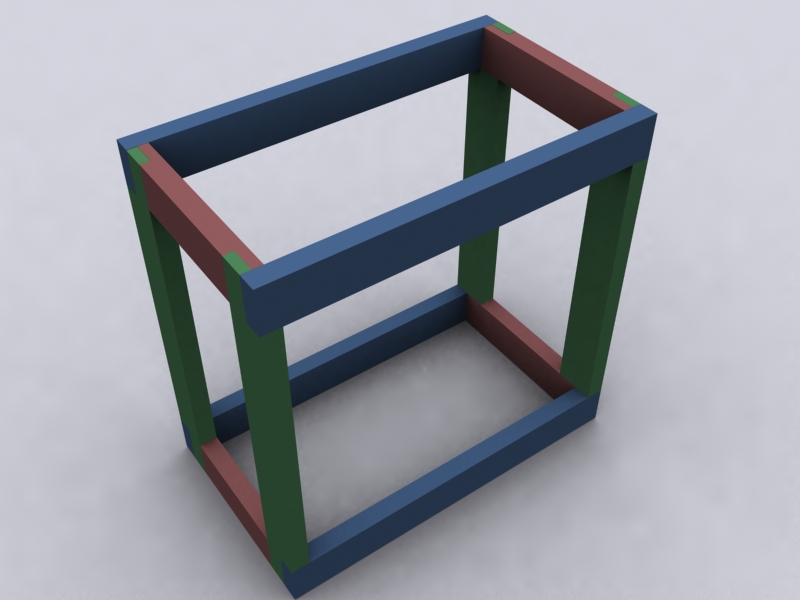 Click here for the full 800x600 image. Also, im using 3d Studio Max for modeling and I use a ghetto method of doing clay rendering.
|
|
#
?
Feb 25, 2010 23:44
|
|
|
WildFoxMedia posted:wormil You nailed it (hardy har har). Park a 3/4" piece of plywood on the bottom rails for a shelf, skin it and you'll have one drat strong stand. Bad Munki posted:I'm not looking to make a living here, but I would sure like it if my hobby was a little more self-supporting. Not to mention that it would force me to get a lot better at what I do. Lots of people sell crafts at the local flea market. I've never tried it but they sell everything from furniture to dog houses.
|
|
#
?
Feb 26, 2010 00:59
|
|
|
ChaoticSeven posted:I'm guessing they don't come out of electrolysis that shiny and clean, how much polishing comes before it looks like the above picture?
|
|
#
?
Feb 26, 2010 01:04
|
|
|
wormil posted:You nailed it (hardy har har). Park a 3/4" piece of plywood on the bottom rails for a shelf, skin it and you'll have one drat strong stand. I know it's asking alot, but would you be willing to point out on that image how/where you imagine things being fastened together?
|
|
#
?
Feb 26, 2010 01:12
|
|
|
Anyone here ever build a big wooden shed? I want to build a post/beam workshop in my future backyard for a smithy. I've got a pretty decent idea of how to do it: Measure and mark holes. Drill with auger below frost line. Gravel, put in post, temporary tripod support with 2x4s, concrete. Level the tops of the posts. Frame and build roof trusses. Skin. Shingle. Side. Finishing. I just would like some images or something for things to consider or good ideas that you came up with.
|
|
#
?
Feb 26, 2010 01:23
|
|


|
wormil posted:I'm guessing they don't come out of electrolysis that shiny and clean, how much polishing comes before it looks like the above picture? Nah, they come out free of rust but sort of dingy gray. I use a green scotch brite pad to get the initial crap off, then 600 grit sandpaper on a piece of granite to shiny things up. The screws,blade,chip breaker take up the most time because it isn't large flat surfaces like the plane body. I did order some red rouge and crushed walnut media, as I ran into a small jewelry sized vibratory tumbler last week. We'll see how that works, hopefully very well. I hate those parts. Actually I only have on more plane in my possession and it's not anything near the shape these two were in. So I guess I might have to hit the flea markets to see if I can find one that these retarded locals don't have $100+ marked on. They think all hand planes are automagically worth hundreds, even if it looks like one of my before pictures and was manufactured in the early 1990's. Same with any anvil.
|
|
#
?
Feb 26, 2010 01:36
|
|
|
WildFoxMedia posted:I know it's asking alot, but would you be willing to point out on that image how/where you imagine things being fastened together? The lap joints resist racking forces so the whole thing doesn't fold up when you apply weight or lean on it. Post and rail construction is very strong, which is why tables don't sway back and forth. I don't even use mechanical fasteners on my tables, just glued mortis and tenons. On this stand, I suggested lap joints because they are far easier but they will also provide resistance to shearing forces. The glue (really any glue, Elmer's white glue is fine) will bond it together and a couple of screws (with lap joints you won't need pocket screws) into each lap joint will pull and hold everything together while the glue is drying. Once you cut the lap joints, spend a minute making each as smooth as possible with your chisel (do not sand them) so that you get the maximum surface to surface contact between joints. Another terrible sketch, I really should practice my mechanical drawing again. 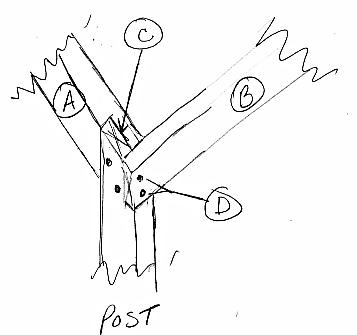 At C, you'll have grain at 90 degree angles which is relatively weak, I would use two 1.25" screws diagonal from one another. I think screws and glue will be plenty but if you are a worrier, you can use two 1/4" bolts (countersunk). At D, I would put two 2.5" or larger screws one above the other, driving them into the side grain of the Post. You might want to pick up a basic cabinetry reference (in woodworking cabinet=furniture) from the library or bookstore if you will be doing much woodworking. I have a copy of Illustrated Cabinetmaking by Bill Hylton but there are plenty others out there. These are basically exploded drawings of various furniture pieces so you can see how they are put together. Steve Henderson has several books out on 2x4 furniture which would also provide some insight on projects like this.
|
|
#
?
Feb 26, 2010 15:26
|
|
|
wormil - That makes complete sense. I was a little curious about trying to do pocket holes in that setup, but the way you drew it out makes sense. What is the issue with sanding a lap joint?
|
|
#
?
Feb 26, 2010 20:18
|
|
|
WildFoxMedia posted:wormil - That makes complete sense. I was a little curious about trying to do pocket holes in that setup, but the way you drew it out makes sense. The strongest glue joint is formed with the grain of the two woods running parallel because you are essentially gluing the wood fibers back together. Joints at right angles are weaker because the strength depends on the glue. You can actually demonstrate this with uncooked spaghetti, orient the spaghetti all the same way and it will stay together better than spaghetti at right angles. Sanding the glue face disintegrates the fibers, makes them uneven and fuzzy if you look under a microscope, and weakens the joint overall. Ultimately it's much easier to get a nice, clean, flat, glue surface by cutting the fibers rather than grinding them.
|
|
#
?
Feb 26, 2010 23:37
|
|
|
ChaoticSeven posted:Cool stuff Wormil. I like the mahogany table. I can't afford to get any real stuff, but theres some African locally for $4.85 I might be able to get for something small. Holy Awesome batman. I have serious doubts that my patience and follow-through would allow me to complete such a restoration, so I always spend more on tools that don't need restoring. However none of mine save the new ones look anywhere close to as good as your restorations, and the new ones don't have the character.
|
|
#
?
Feb 27, 2010 00:19
|
|

|
Another great episode of the New Marvel Workshop. Thanks for the informative post Wormil!
|
|
#
?
Feb 27, 2010 00:20
|
|
|
wormil posted:The strongest glue joint is formed with the grain of the two woods running parallel because you are essentially gluing the wood fibers back together. Joints at right angles are weaker because the strength depends on the glue. You can actually demonstrate this with uncooked spaghetti, orient the spaghetti all the same way and it will stay together better than spaghetti at right angles. Sanding the glue face disintegrates the fibers, makes them uneven and fuzzy if you look under a microscope, and weakens the joint overall. Ultimately it's much easier to get a nice, clean, flat, glue surface by cutting the fibers rather than grinding them. QFT Never depend on an end-to-edge or end-to-face joint to hold from any adhesive, ever. End grain just doesn't adhere well, examine furniture and you will find most end-to-edge or end-to-face joints involve a mechanical fastener, or a joint that creates a face-to-face gluing situation (mortise & tenon or lap). Just make everything with drawbored mortise & tenon joints so you never have to worry ")
|
|
#
?
Feb 27, 2010 00:25
|
|
|
Just found a video showing how to do drawbored mortise and tenons... That was loving incredible. Another site also showed 17th century chairs put together with that method and they are still strong.
|
|
#
?
Feb 27, 2010 01:20
|
|
|
dv6speed posted:Sharpen the blades just like a chisel, or any other sharp edge, pretty much. Slow is the word. I've been working on this one plane for about 6 months on and off, went through about two dozen sheets of sandpaper already. Work is temporarily stopped because the adhesive I've been using to stick the sandpaper to the granite slab I use is all gummed up with iron powder and I can't be assed to clean it up since its cold outside.
|
|
#
?
Feb 27, 2010 08:47
|
|
|
Archives posted:Slow is the word. I've been working on this one plane for about 6 months on and off, went through about two dozen sheets of sandpaper already. Work is temporarily stopped because the adhesive I've been using to stick the sandpaper to the granite slab I use is all gummed up with iron powder and I can't be assed to clean it up since its cold outside. If it's that bad you need to see a machine shop. Or you're using fine grit sandpaper. When using sandpaper, many articles make the mistake of telling you to start with 220 grit. You want to start with 60 grit until the bottom is flat, then it will only take a few seconds on each successive grit (80, 120, 220, 600). And I'm not even sure it's necessary to go above 220. The more polished the sole, the more friction you create and the more difficult it is to push the plane. Some articles suggest removing the blade but I was taught to leave the blade in but raise it above the mouth so it's out of the way. The reason is clamping down the frog could cause minute changes in the sole.
|
|
#
?
Feb 27, 2010 10:07
|
|
|
I know we've got a couple Kreg jig users here - I just started using mine today. I was impressed at how easy the pocket holes were to make, but when I went to fasten the joint with screws (fine thread), my board split. I was putting together a cherry face frame and it split right on the end of a stile. I read the instructions, but didn't watch the DVD yet, but I don't really see how I could do a pilot hole for the screws since I'd need such a long drill bit. I'm fairly sure I can fix the mistake without it being TOO obvious - hopefully I don't have it happen any more with the rest of the face frame.
|
|
#
?
Feb 27, 2010 21:55
|
|


|
I picked up a Ryobi circular saw today and decided to test out making the lap joints per wormils earlier posts. Here is my test attempt thus far - Whatcha guys think? 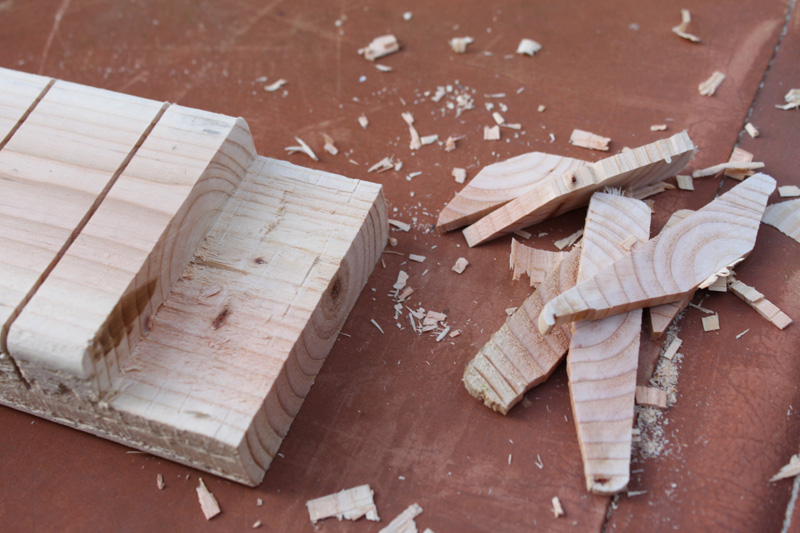 Click here for the full 800x533 image. 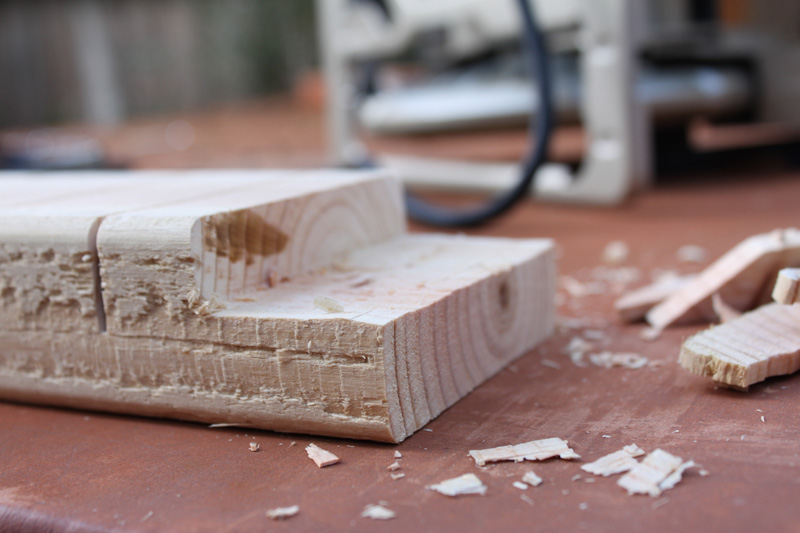 Click here for the full 800x533 image. Im not familiar with using a chisel so im still working on my technique.
|
|
#
?
Feb 27, 2010 22:31
|
|
|
wormil posted:If it's that bad you need to see a machine shop. Or you're using fine grit sandpaper. I'm using 100 grit, and there's still a noticeable concave bow to the sole. And yes, I flatten it with the blade in, but retracted. I'm seriously envisaging just buying a new one, it would be so much simpler.
|
|
#
?
Feb 27, 2010 22:40
|
|
|
Well, just finished the face frame without too much of an issue. Sure wish I had sprung for the face frame clamp though - I may run to Mendards tonight and buy one since I have a bunch more to do. Of course, after I finished the face frame I realized I should have probably learned pocket hole joinery on one of the many hidden, interior surfaces where little screw ups wouldn't be so obvious.
|
|
#
?
Feb 27, 2010 23:48
|
|
|
WildFoxMedia posted:Im not familiar with using a chisel so im still working on my technique. Pretty good considering you only made a few cuts. Generally I would make a cut every 1/8 - 1/4 inches but I understand that would be a bit tedious without a tablesaw. Make sure your chisel is sharp. It should shave the hair from your arm easily. Archives posted:I'm using 100 grit, and there's still a noticeable concave bow to the sole. And yes, I flatten it with the blade in, but retracted. I'm seriously envisaging just buying a new one, it would be so much simpler. Yeah, I would buy a new one or visit a machine shop. At some point it just isn't worth the effort. Being that bad I would probably have started with a file. But you know the entire sole doesn't need to be flat -- you really only need the toe, mouth and heel flat, the parts between can be concave.
|
|
#
?
Feb 28, 2010 04:08
|
|
|
1/4" cuts over a 3 1/2" span - God drat. I guess that's really when having the right tools like a dado set comes in handy. Its going to be interesting to do all that tomorrow - granted its more fun then trying to make a poo poo load of cuts exactly the same because I needed 2 supports per corner. Ill post my results while working.
|
|
#
?
Feb 28, 2010 07:32
|
|
|
I always wanted to learn woodworking, and this thread has motivated me to start. My first foray into certain disaster is the torsion box workbench I found through some links in the first few pages. I have all of the materials except the plywood. The plans specify fir, which I can't find at either Lowe's, Home Depot, or the few local lumber yards. My google searches seem to suggest that pine may be a decent substitute. As far as I can tell, the plywood doesn't really serve a vital structural function; is there any reason I need to keep hunting for fir or will pine be acceptable?
|
|
#
?
Feb 28, 2010 18:44
|
|

|
WildFoxMedia posted:Just found a video showing how to do drawbored mortise and tenons... That was loving incredible. Another site also showed 17th century chairs put together with that method and they are still strong. I would love to see it, where did you find it?
|
|
#
?
Feb 28, 2010 18:58
|
|
|

|
| # ? May 15, 2024 23:07 |
|
|
Blckbuster posted:I would love to see it, where did you find it? http://www.finewoodworking.com/SkillsAndTechniques/SkillsAndTechniquesArticle.aspx?id=28508
|
|
#
?
Feb 28, 2010 21:20
|
|