


|
The laser I'm not sure about. As it's mounted at the moment, it has no chance in hell of holding a zero. The only way I can imagine a laser being useful on one of those is if it was mounted to the barrel by a clamp. Another thing is the grip.  It's actually two wooden half-grip panels screwed onto an extension of the metal body, rather than the one-piece handle you've modelled so far. As well as that, you can also notice a notch on the back of the pistol grip where you can slot in the wooden stock that doubles as a case. Just some thoughts from one gun modeller to another.  Here's one I'm planning to model for a quick modelling exercise. ")  My L85 is on hold until I get this one done.
|
 #
?
Mar 21, 2010 16:22
#
?
Mar 21, 2010 16:22
|
|


|

|
| # ? May 15, 2024 22:53 |
|
|
That gun is pretty out there Aliginge, I'm assuming it's your concept? Looks cool Another wip of this character, still just going with the flow a bit and changing things up constantly. I can't decide how realistic I want it to be. Hair and costume elements are placeholders 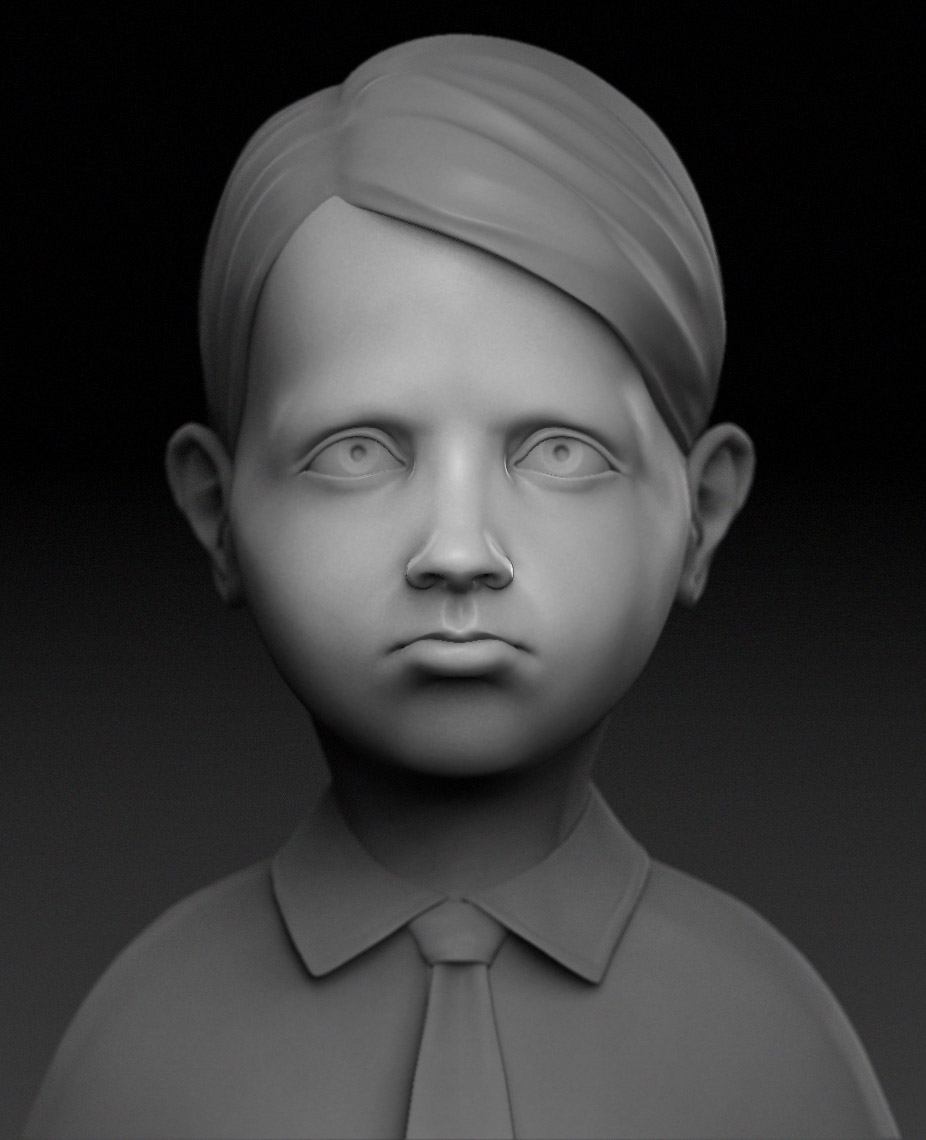
|
|
#
?
Mar 22, 2010 12:10
|
|

|
EoinCannon posted:That gun is pretty out there Aliginge, I'm assuming it's your concept? Looks cool Actually, I have a question for you. Looking at the collar on the shirt, thin objects like that seem really difficult to deal with in zbrush, did you model it ready for SubD in Max or Maya and import it to zbrush?
|
|
#
?
Mar 22, 2010 12:52
|
|
|
Yeah, the shirt is pretty much modeled ready for smoothing in max, I just brought it into Zbrush because it helps to have it there when sculpting the face and other pieces that I'm using Zbrush more heavily on.
|
|
#
?
Mar 22, 2010 12:59
|
|
|
That's looking really nice EoinCannon, seems like a fun project Children are difficult with their crazy proportions and all - good luck!
|
|
#
?
Mar 22, 2010 13:38
|
|

|
Progress:    Is there, like, a simple tag for thumbs? Thnx. Fuzzy Modem fucked around with this message at 07:49 on Mar 23, 2010 |
|
#
?
Mar 23, 2010 07:36
|
|

|
Just the fact that you changed it from that horrible blue background makes it look a bit better.
|
|
|
#
?
Mar 23, 2010 07:42
|
|
|
EoinCannon posted:That gun is pretty out there Aliginge, I'm assuming it's your concept? Looks cool Is he sad because his mum forced him to join the Hitler Youth?  Good job so far, should be a fun model.
|
|
#
?
Mar 23, 2010 08:20
|
|

|
The ship looks a lot better in that lighting. Based on how what style you're going for, I think you'd benefit from upping the resolution on everything. Geometry and your maps. The low-res maps that define your panel gaps look soft and dull. It makes the ship look like a die cast toy car. Make it look like it's actually two pieces of something next to each other, not just an indentation and you'll go a long way to selling it as a legit machine.
|
|
#
?
Mar 23, 2010 08:55
|
|

|
tuna posted:Is he sad because his mum forced him to join the Hitler Youth? Oh god what have I done? It would be awesome add a moustache and do a lil' Hitler but I must resist.
|
|
#
?
Mar 23, 2010 12:43
|
|
|
Question regarding normal mapping and smoothing groups. As I understand it, when baking a normal map and thereafter, you apply a single smoothing group to the entire final mesh. To apply no smoothing group leaves faceting and to apply different smoothing groups across a model leaves razor-sharp edges, when the normal map is supposed to provide those smoothed edges anyway. However, what about smoothing errors? These seem to affect normal-mapped models just as much as models without. 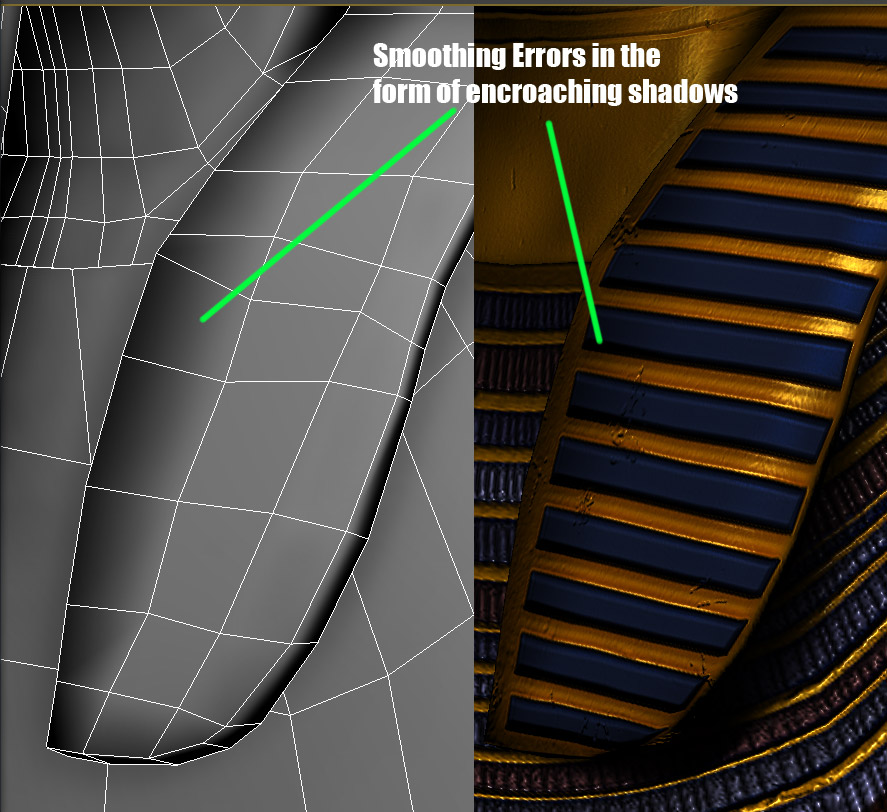 Click here for the full 887x812 image. One solution to dealing with these errors would be to stick with a single smoothing group and bevel edges where the smoothing issues occur, however the polycount would increase a shitload. I am however out of ideas for alternative methods of dealing with this beyond moving those polys in the middle of the form out towards the edges to minimise the effect, but that might give me topography problems Thoughts? (This is for the gun model I posted above, not the model shown in the pic.)
|
|
#
?
Mar 23, 2010 13:38
|
|
|
You use different smoothing where you want it to have edges and you use more than one group for a blend surely, like normal? Also that death mask has some pretty untidy geometry.. Do you plan on optimising it?
|
|
#
?
Mar 23, 2010 13:57
|
|

|
Aliginge posted:As I understand it, when baking a normal map and thereafter, you apply a single smoothing group to the entire final mesh. NO NO NO NO NO NO NO NO WHO THE gently caress KEEPS TEACHING THIS? Seriously this idea got put out into the ether and trying to undo it is like pulling loving teeth. use smoothing groups like normal. break UVs at smoothing group seams and bake with padding or else you'll wind up with seams in your normal map for when it tries to lerp between two different normal values (giving you an un-normalized light vector which usually results in an ugly black seam). Beveling and maintaining a single smoothing group does not increase the true vert count compared to making multiple smoothing groups/hard edges because at the low level, both are simply two verts. A hard edge at the hardware level is made with two verts on top of each other with different normals.
|
|
#
?
Mar 23, 2010 16:58
|
|
|
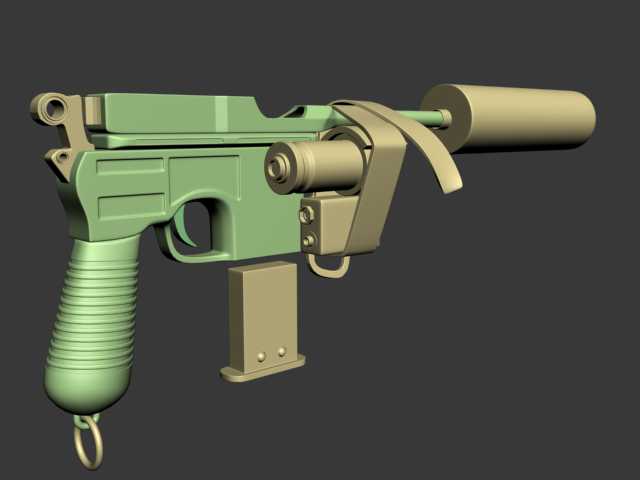
le capitan posted:Haven't done any modeling in a while so I decided to start a new one today. Still need to add details and finish the top of the Mauser. It's supposed to be a lazer sight on the side, but i'm not sure if the design really conveys that. I could tell it was some sort of attachment. A few things though: A) That is the smallest belt on Earth. It would probably fit a three year old. B) I kind of like the asymmetric idea of putting the sight on the side, though it probably isn't very useful. C) Maybe a shoelace would look better than a belt to hold on the attachment?
|
|
#
?
Mar 23, 2010 17:44
|
|

|
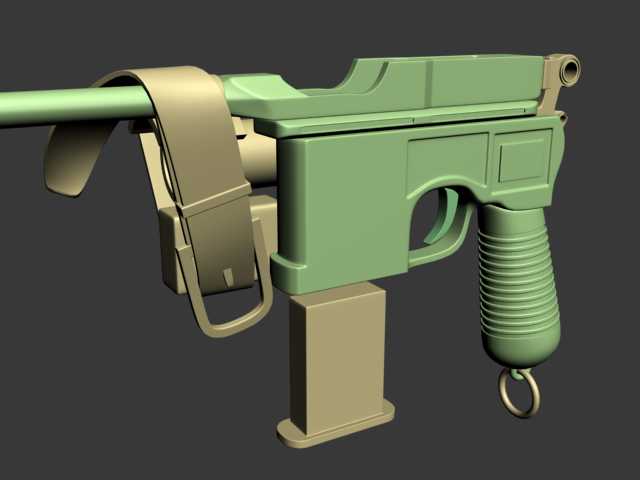
Sigma-X posted:use smoothing groups like normal. break UVs at smoothing group seams and bake with padding or else you'll wind up with seams in your normal map for when it tries to lerp between two different normal values (giving you an un-normalized light vector which usually results in an ugly black seam). I think I follow as to your second point, but do you have access to any reading that'll get me up to speed on proper use of smoothing groups? Also, just a very quick update, just a couple of small details to add then I'm ready to go on the low poly. 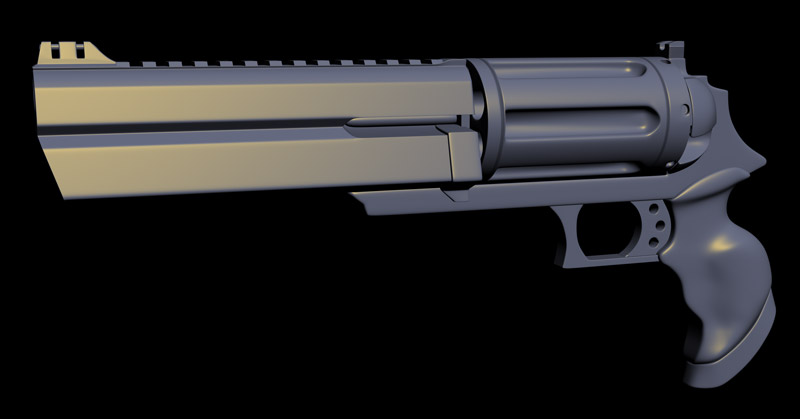 Click here for the full 800x419 image.
|
|
#
?
Mar 24, 2010 03:02
|
|
|
Aliginge posted:I think I follow as to your second point, but do you have access to any reading that'll get me up to speed on proper use of smoothing groups? I wish I had a tutorial handy but I don't - for the purposes of normal mapping, you pretty much want to avoid any steep angles over 60 degrees or so - if you wind up with parts of your model inappropriately darkening as you rotate it, then you'll want a hard edge there. You pretty much want hard edges at the natural seams or at steep angles. For something like a gun, you're going to have a lot, and thats ok.
|
|
#
?
Mar 24, 2010 07:08
|
|
|
Aliginge posted:I think I follow as to your second point, but do you have access to any reading that'll get me up to speed on proper use of smoothing groups? This is one of those nitpick realism things, but that rail doesn't actually work. Here's a cross-section of a Picatinny rail: 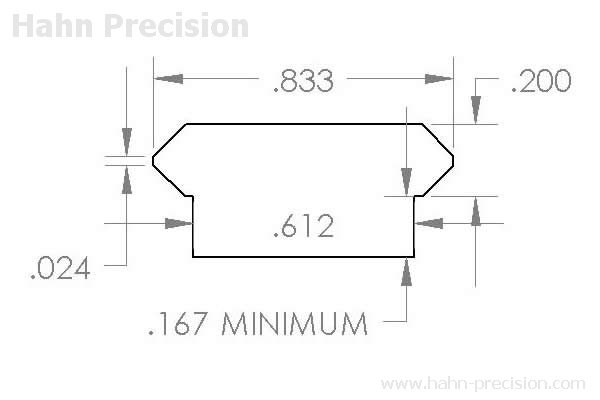 It's that shape that actually allows attachments to be clamped on. The gaps are just there to reduce weight and prevent warping from barrel heat. Then again, I've seen hundreds of professional weapon concepts that show exactly what you did, so V  V V
|
|
#
?
Mar 24, 2010 17:05
|
|

|
ThreeHams posted:This is one of those nitpick realism things, but that rail doesn't actually work. Here's a cross-section of a Picatinny rail: yeah in the concept it looked like an integrated rail like on a desert eagle:  But in the actual model it just looks some visual flair notching. I'm not sure what the intent was (the rest of the front looks DE inspired but also has significant differences (which it would since it doesn't have a slide like a DE) I think it really only matters one way or the other if you were planning on making an attachable sight for the top, otherwise you can just write it off as something that will add interest to the barrel in FPS mode. Looking at the gun again it looks like the handle is awfully thin, too. I'm also curious as to whether the cylinder pops out to the side for reloading or if it cracks in half, mateba-style.
|
|
#
?
Mar 24, 2010 21:36
|
|
|
Some better images for you guys.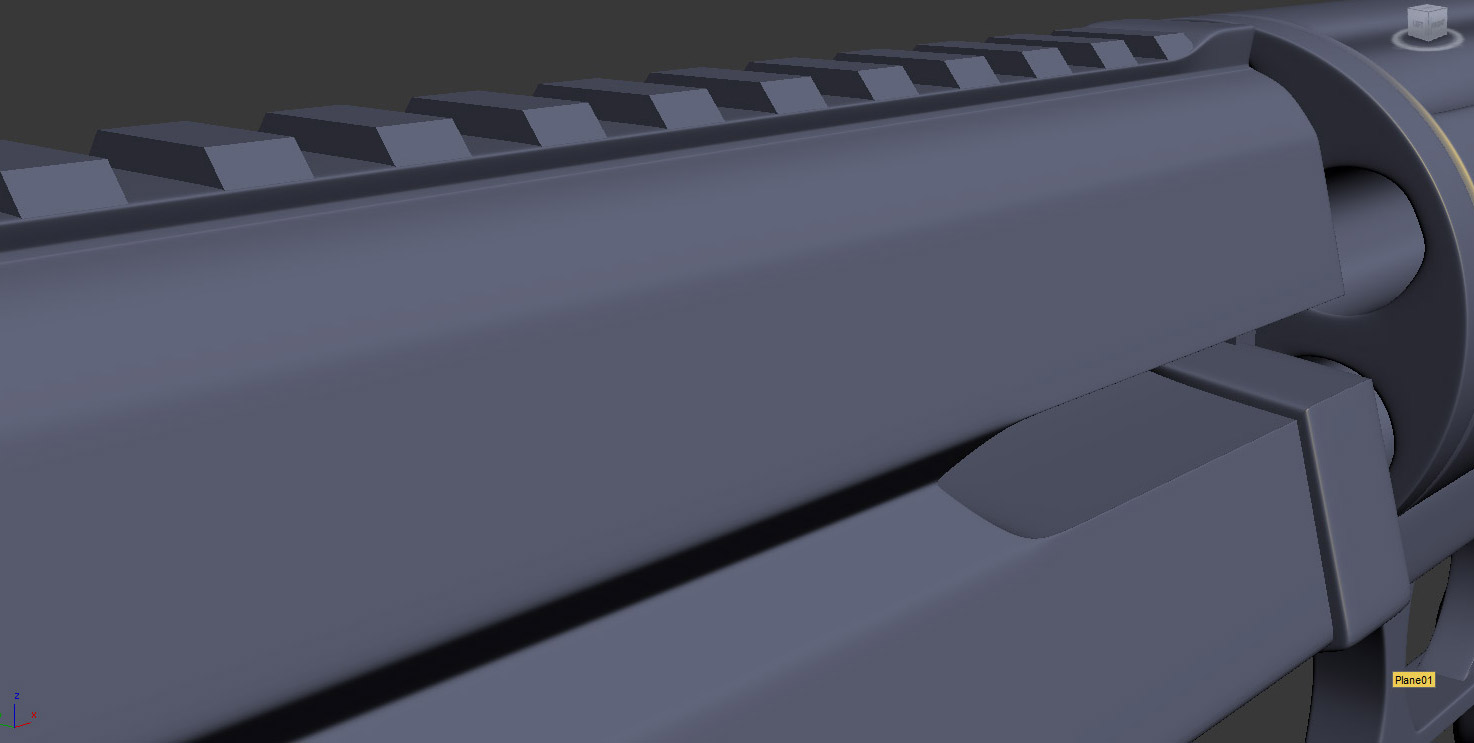 Click here for the full 1474x743 image.  Click here for the full 819x719 image. The rail probably isn't precise to milspec measurements, I'm just not sure if the image showed it clearly enough. My bad for providing a quick and crappy render. And I'm honestly considering modelling an Aimpoint Micro for it, just for fun. EDIT: Sigma: The cylinder will flip out to the side but I need to model the switch first and make a bunch of adjustments to the barrel and frame sections to make that work. Although come to think of it, a break-design might be easier. GeeCee fucked around with this message at 23:23 on Mar 24, 2010 |
|
#
?
Mar 24, 2010 23:14
|
|
|
The Teapot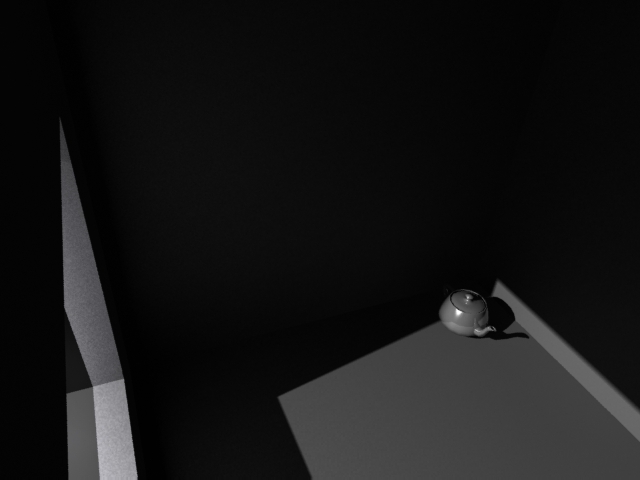 3DSMax 2010, Mental Ray.
|
|
#
?
Mar 26, 2010 19:11
|
|
|
GrazoTheClown posted:The Teapot Light bounces, you should add some soft interior lights to simulate the bouncing and keep the pure blacks away. other than that, congrats on finding the teapot prim 
|
|
#
?
Mar 26, 2010 20:10
|
|
|
Sigma-X posted:Light bounces, you should add some soft interior lights to simulate the bouncing and keep the pure blacks away. I just started playing with 3DSMax a few months ago, I suck at modeling, need a decent tutorial.
|
|
#
?
Mar 26, 2010 21:38
|
|
|
I'm hoping somebody with vray knowledge can help me out. I can't seem to get displacement maps to work properly. This is just my normal low poly mesh: 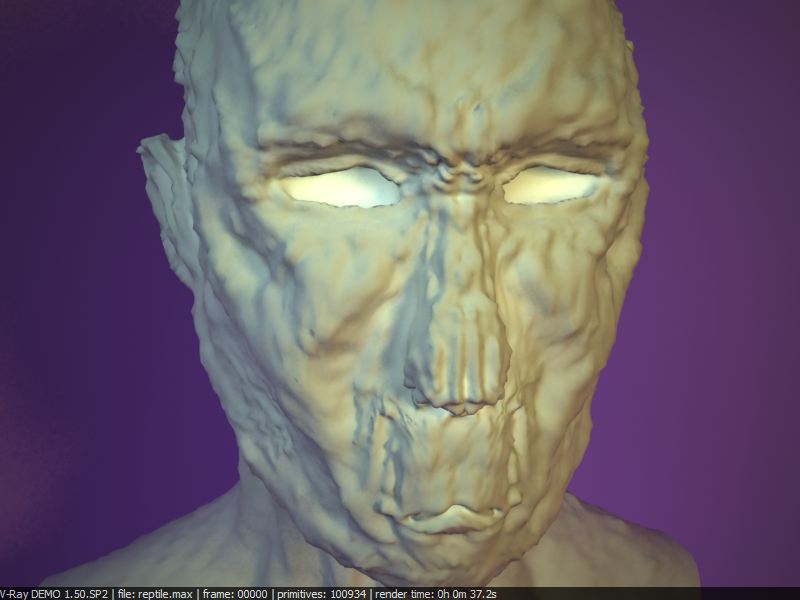 Click here for the full 800x600 image. When I set up the vray displacement mod with my map at reasonable settings, I get this: 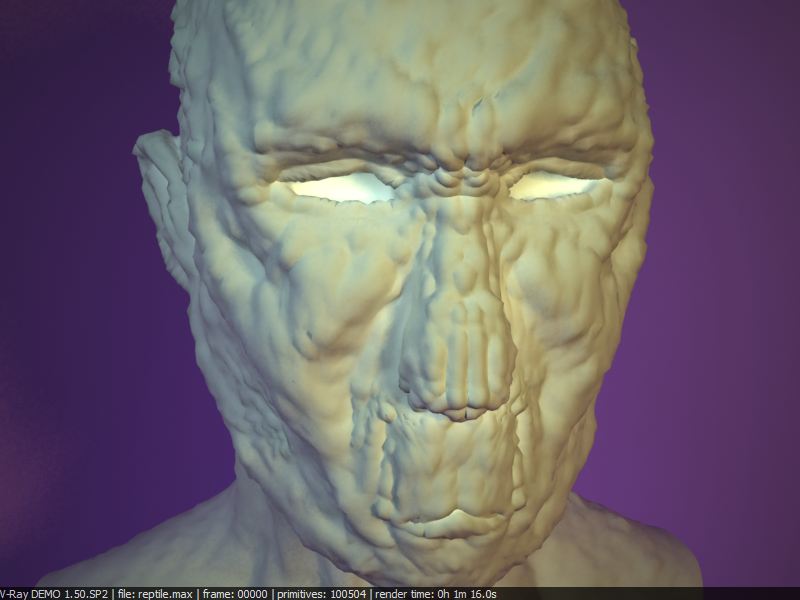 Click here for the full 800x600 image. which has pretty much no effect. At ridiculous settings, I get this: 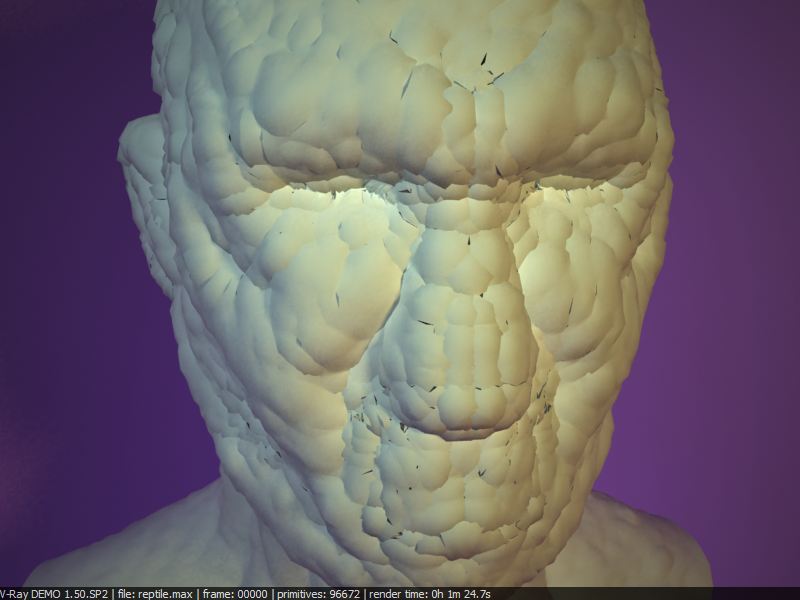 Click here for the full 800x600 image. As you can see, the map is not adding any detail but just puffing up the mesh. How can I fix this? here are my settings: 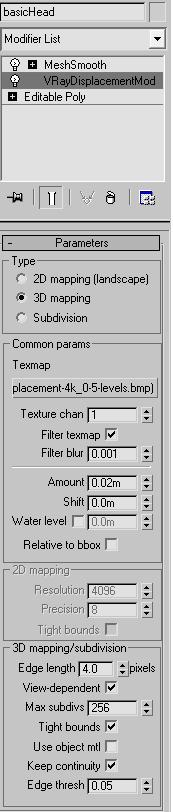 Click here for the full 173x812 image. I'd appreciate any help.
|
|
#
?
Mar 26, 2010 21:39
|
|


|
I love the Lynch-ian vibe of the teapot pic. I feel for you, though. Max's implementation of Mental Ray is utterly terrible. Getting good results from it is almost like trying to write your signature with your hand behind your back.
|
|
#
?
Mar 26, 2010 23:30
|
|
|
FERN GULLY FAN posted:I'd appreciate any help. It's a little difficult to tell what you're aiming for. Do you have a shot of the high detail sculpt to compare against?
|
|
#
?
Mar 26, 2010 23:36
|
|


|
SynthOrange posted:It's a little difficult to tell what you're aiming for. Do you have a shot of the high detail sculpt to compare against? Right, that might help. This is the high res from mudbox  Click here for the full 1551x1520 image. As you can see, a gently caress ton of little bumps and poo poo. The various displacement maps all have this detail but it's not showing up. Even after bringing it into photoshop and adjusting the levels for more contrast, the details still aren't showing up. edit: VV I completely forgot about the vray forum. The only other place I thought to look was on cg talk but the area there was pretty dead. Thanks for the reminder. Also, I'm using the 3d option because in 2d the entire mesh disappears when rendered. It's really nothing to do with a specific need other than needing something to actually show up. Nondescript Van fucked around with this message at 05:33 on Mar 27, 2010 |
|
#
?
Mar 27, 2010 00:48
|
|
|
I'd expect your low res model to be lot smoother, but can you post on the vray forum? There was a thread started a while ago when someone was having trouble with displacement from mudbox and after a fair few posts figured it out - I didnt pay much attention not using it and i'm not in work to find the thread. I think it may have been rurai that was doing it too. If you can get on it, have a search. I've never used 3d displacement myself - 2d is all i've needed in work.
|
|
#
?
Mar 27, 2010 04:52
|
|

|
So you're using a displacement map to generate extra detail on a low poly mesh? I've no experience with displacement maps but your low-poly doesn't look low poly at all. I may be misunderstanding something about the process you're using but maybe your low poly is just too high-res?
|
|
#
?
Mar 27, 2010 16:42
|
|
|
Aliginge posted:So you're using a displacement map to generate extra detail on a low poly mesh? I exported the mesh at 2 different levels with accompanying maps to see if one was working better than the other. They were ~2,000 and ~32,000 polygon meshes. Neither was working better than the other. I still haven't looked on the vray forums for a solution because I've been busy. I'll edit this post if I find a solution instead of taking up more space in this thread.
|
|
#
?
Mar 27, 2010 18:38
|
|
|
Are they UVed or did you use some kind of automatic mapping in Mudbox?
|
|
|
#
?
Mar 27, 2010 19:38
|
|
|
ceebee posted:Are they UVed or did you use some kind of automatic mapping in Mudbox? yes they are. I read some things on the vray forums and decided to use a 32bit exr map. 2d mapping is actually rendering and working out well. It's given me some good results and adds some details but it's not at the level I'd like. I tried to find the thread about mudbox maps and vray that cubicle gangster mentioned but i had no luck. I think messing with the setting of the exr will really help me out.
|
|
#
?
Mar 27, 2010 22:38
|
|
|
If anyone is interested, The Foundry just announced the 3D texture painting application I've been working on for the last 4 years while at Weta. It is called Mari. http://www.fxguide.com/article604.html And there is some more information here... http://www.thefoundry.co.uk/dl_file.aspx?ui=625782B3-7DF7-4C44-A571-E4439943704C It is fun.
|
|
#
?
Mar 29, 2010 13:14
|
|

|
Wow so you work at Weta? That's really really cool. What's it like there? Er basically give me your autobiography up to this second. Thanks!
|
|
#
?
Mar 29, 2010 14:22
|
|
|
brian encino man posted:Wow so you work at Weta? That's really really cool. What's it like there? Er basically give me your autobiography up to this second. Thanks! I did work at Weta, I'm now at the Foundry as product manager for Mari. Erm, I graduated in Computer Science, worked in the games industry for a while, left the games industry as film VFX was really what I wanted to do. Got a job at FrameStore in London in R&D, worked there for 3 years then Weta for the last four. I started the first week of Avatar production and left the week after the Oscars party. Weta is fantastic. A strange mix of very laid back and staggeringly hard working.
|
|
#
?
Mar 29, 2010 14:34
|
|
|
Cool cant wait to give mari a try when its out on windows.
|
|
#
?
Mar 29, 2010 18:30
|
|

|
keyframe posted:Cool cant wait to give mari a try when its out on windows. No kidding! That looks like a great painting program.
|
|
#
?
Mar 29, 2010 18:41
|
|


|
forelle posted:I did work at Weta, I'm now at the Foundry as product manager for Mari. Awesome, hello fellow CG dev person! Nice work, looks like a fun app, i'll definitely have to check it out, interesting seeing other companies releasing their proprietary software.
|
|
#
?
Mar 29, 2010 18:43
|
|
|
Ratmann posted:Awesome, hello fellow CG dev person! Now if only imageworks released arnold... 
|
|
#
?
Mar 29, 2010 19:10
|
|
|
COOL! I'm stoked to try Mari out.
|
|
|
#
?
Mar 30, 2010 00:31
|
|
|

|
| # ? May 15, 2024 22:53 |
|
|
EoinCannon posted:That gun is pretty out there Aliginge, I'm assuming it's your concept? Looks cool Hi, I know this is unsolicited, but I couldn't help point out a problem with your model, given that your other work is really good. His Frontal Eminence (frontal part of the head) is set way too high. It's actually something that I've noticed on most of your head sculptures (the Lithgow sculpt being one). Attached are two pics, one with what is generally considered ideal proportions (canon) and the other a Photoshop correction. Again, I don't mean to step on any toes and I hope you don't take it the wrong way. Constructive criticism n' stuff. 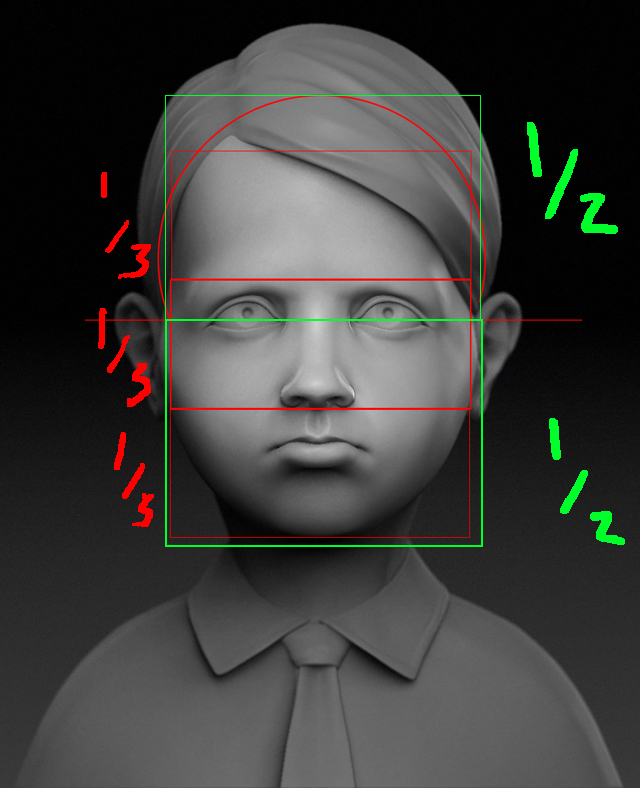 
|
|
#
?
Mar 30, 2010 06:37
|
|
