


|
Finished my Cedar deck this weekend. I still am in the process of building a gigantic cedar planter for the front (To cover that ugly rear end PT). Also have a ton of screws to still put in (We only did every 4th joist for now to get the boards in place)
|
 #
?
Apr 5, 2010 20:34
#
?
Apr 5, 2010 20:34
|
|

|

|
| # ? May 18, 2024 13:16 |
|
|
Looks pretty nice. And it just inspired me, when I finally own a place and can do such things, to build a sandpit into the deck. Maybe with a little kiddie-sized gazebo over top. Not sure how I got from your new deck to pint-sized gazebo sandboxes, but hey, inspiration strikes when it wants to. ")
|
|
#
?
Apr 5, 2010 20:57
|
|


|
I had a little sandbox when I was a kid. Helped make me into the person I am today. Your kids will love it.
|
|
#
?
Apr 5, 2010 21:21
|
|


|
I had a sand rowboat, actually. An old plastic one, we filled it with sand, it was the greatest thing ever. Also, last time I was visiting a friend back home, I built a quick little sandbox for his kid who I hadn't seen in a couple years. It was about a $20 project, and it's one of those things you think, "gosh, that'd be great, I should get around to that eventually" and then never do. It seemed a nice way to return the favor of the friend housing me and my wife for a week. But yeah, I was just thinking that a sandbox built in to the deck (as a pit with the rim flush to the deck) would be crazy awesome.
|
|
#
?
Apr 5, 2010 21:24
|
|
|
GEMorris posted:My real suggestion would be to buy a Stanley #6 or #7, and build a Roubo workbench from southern yellow pine. You can build the basic bench without the tail vise for less than $200 and add the vise later. SYP is a forgiving medium to learn how to plane on, and the bench will give you enough material to practice with that you should be relatively competent at flattening boards once you finish. Interesting suggestion. I don't have one of the huge planes (jointers?) but wouldn't mind an excuse to have one. I derive some sick satisfaction from plane tuneups. I would certainly know how to use it after building a bench, no question. One of my first projects was actually a bench based on the assembly table in the wood whisperer videos. It is flat and level (mostly) but almost no thought went in to it, as far as utility went. I ended up drilling holes in it later for pegs to hold things I'm working on. Having something a little better thought-out would definitely be nice. I wonder how much pine I'd have to go through before I got the hang of facing it, though.  Very thin shavings to start with, I guess. Very thin shavings to start with, I guess.
|
|
#
?
Apr 6, 2010 00:00
|
|

|
laod posted:I wonder how much pine I'd have to go through before I got the hang of facing it, though. SYP is incredibly forgiving. By the time you got through a pair of sawbenches you'd be set for planing softwoods and mild hardwoods unless something was wrong with your plane. The Nicholson in Schwarz's book is substantially quicker to build than the roubo unless you have access to cheap 12" x 3" x 8ft timbers, due to all of the laminations involved. I have seen even simpler examples of the Nicholson being made, but I do dig the canted legs/vise on Schwarz's version. I'd start with some Nesting Sawbenches since they are so useful when you are making a bench, and then still useful afterwords. You should get the hang of things pretty quickly. A #6 is big enough for flattening a benchtop, if you can't find/afford a #7 or #8
|
|
#
?
Apr 6, 2010 02:04
|
|

|
That's a really nice little deck there. So, I'm not sure if this is the right place to ask for advice, I have an open plan kitchen with a bench that faces the living area, and I want to have a cabinet built that will store liquor and glasses (and other stuff) that will fit in under the overhanging lip of the kitchen counter. The dimensions are 1290 long, 185 wide and 870 tall. I would like the cabinet to be symmetrical on the front but have wine bottle slots on one end (lengthways along the cabinet obviously), and them smaller cubby holes on the other end as that end faces towards the hallway anyway. One cupboard with 2 doors in the middle, with one shelf inside. Maybe a glass front in the doors? I'm pretty crap at mspaint but I could do a mockup of the living area/kitchen/planned cabinet if it helps? What I was wanting to know was, is it possible? or will a woodworker just laugh me out of his shop when I go in to request it built for me? thanks chaps!
|
|
#
?
Apr 6, 2010 09:27
|
|
|
mincedgreen posted:1290 long, 185 wide and 870 tall. I wouldn't laugh at you, but I would ask to see some pictures of this aircraft hanger you call a kitchen  Seriously though, I believe I have a pretty good mental picture of what you want built and it seems like a pretty straightforward job for any cabinet shop. Nothing at all about it would be unusual or get you laughed at. It would be about as funny as taking your car to a mechanic and asking him to change your spark plugs. Which would not be funny at all, unless you drove a diesel. Then the mechanic would probably laugh you out of his shop. That was a bad analogy.
|
|
#
?
Apr 6, 2010 10:00
|
|


|
Finishing up my desk refinish. As a reminder, it looked like this: Now it looks like this! 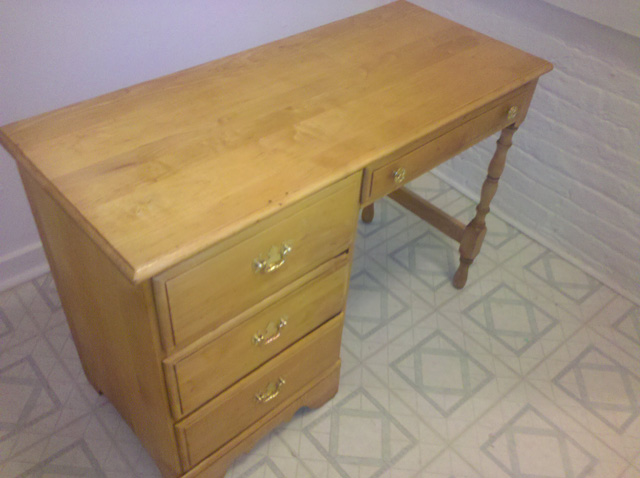 Sadly, all I had was a cameraphone to take the second picture. I used stripper and sandpaper to get the desk down to bare wood, then built up quite a few coats of tung oil with a fine sand between each. It's got a thin coat of paste wax on it now; probably going to build up a few more on the top for a nice smooth shine. Got some new knobs for the thin drawer and spray-painted them in hammered brass to match the rest, but the antique hardware on the other ones was basically like an ad for Brasso: 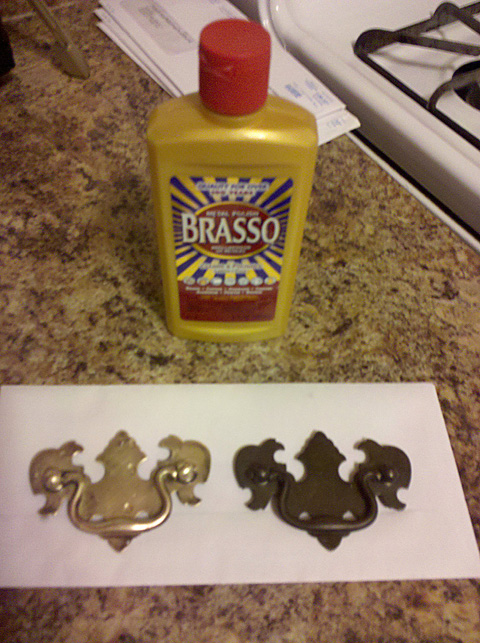 It's still busted in parts and my strip-job wasn't perfect, but for a beginner's first-time project I think it came out really well.
|
|
#
?
Apr 7, 2010 05:16
|
|


|
PipeRifle posted:It's still busted in parts and my strip-job wasn't perfect, but for a beginner's first-time project I think it came out really well. I gotta say, this exceeded any expectation I had based on your original pic/post.
|
|
#
?
Apr 7, 2010 07:53
|
|
|
GEMorris posted:I gotta say, this exceeded any expectation I had based on your original pic/post. Yeah, my advice for anyone starting out in refinishing would be to start with a desk TOP or like a small end table with no round bits, or a cutting board or something. I feel like I learned the hard way what works and what doesn't when it comes to sanding, stripping, etc., only I got to do it vertically as well as horizontally, and on rounded decorative pieces as well as flat, straight ones. Still, now I have a lot of stuff left over that I can use on some other project!
|
|
#
?
Apr 7, 2010 13:12
|
|
|
 Finally finished the custom planter. Definitely worth the effort. Now to plant a huge garden and put some Semi-Transparent UV Protection on.
|
|
#
?
Apr 7, 2010 13:34
|
|
|
drat, lotta good stuff coming out of here lately. Kudos to all.
|
|
#
?
Apr 7, 2010 15:46
|
|
|
PipeRifle posted:Still, now I have a lot of stuff left over that I can use on some other project! Well, don't keep us in suspense. Was it originally coated in shellac, varnish, or lacquer?
|
|
#
?
Apr 7, 2010 16:39
|
|
|
SkunkDuster posted:Well, don't keep us in suspense. Was it originally coated in shellac, varnish, or lacquer? I don't think it was shellac; the denatured alcohol didn't put a dent in it. When I thought that isopropyl alcohol had injured a spot, it had really just left a residue that wiped right off. I wouldn't know how to tell the difference between varnish or lacquer, after that. It gummed the hell out of my sandpaper, if that helps.
|
|
#
?
Apr 7, 2010 18:02
|
|
|
Very nice jobs on the desk and planter box. Came out looking great. Today this thread is 2 years old. That's pretty cool I guess.
|
|
#
?
Apr 7, 2010 19:50
|
|

|
PipeRifle posted:I wouldn't know how to tell the difference between varnish or lacquer, after that. It gummed the hell out of my sandpaper, if that helps. Dab a little lacquer thinner on with a cloth. If the finish liquifies and smooths out with light rubbing it's a lacquer. If if roughs up and cracks, but doesn't get smooth or come off it is a varnish. Lacquer thinner wrecks smooth varnish but does not dissolve it. The refinished desk looks nice! ibpooks fucked around with this message at 22:14 on Apr 7, 2010 |
|
#
?
Apr 7, 2010 22:12
|
|

|
ibpooks posted:Dab a little lacquer thinner on with a cloth. If the finish liquifies and smooths out with light rubbing it's a lacquer. If if roughs up and cracks, but doesn't get smooth or come off it is a varnish. Lacquer thinner wrecks smooth varnish but does not dissolve it. Well, it's all off now. But good call!
|
|
#
?
Apr 8, 2010 02:09
|
|
|
I want to make a butchers block with the end grain facing upwards, I'd like to make 2-3 actually in different sizes, whats the cheapest way I can cut the wood straight and true without having to buy one of those several hundred dollar tables?
|
|
#
?
Apr 8, 2010 09:50
|
|

|
What tools do you have already? Which gives me an idea. How about an offsite index that people could link to that would have a list of all their tools, that way before someone asks they can fill out their info and we'll know each time what they're working with?
|
|
#
?
Apr 8, 2010 14:43
|
|
|
His Divine Shadow posted:I want to make a butchers block with the end grain facing upwards, I'd like to make 2-3 actually in different sizes, whats the cheapest way I can cut the wood straight and true without having to buy one of those several hundred dollar tables? Speed square and circular saw, using the square as your 'guide'. My experience with cutting boards is that when you are doing your glue up of pieces, don't worry too much about how they level up on the cutting surface; just make sure that everything is glued tight. When it then sets up take your plane to it and level it off. You might be worried about the chip out around the edges, but if you chamfer an edge in with your plane you should be alright.
|
|
#
?
Apr 8, 2010 15:26
|
|

|
I have access to various powertools, an electric uh... "stick" saw, dunno what to call it, it has got a blade that goes back & forth anyway, english is not my first language. But what I got, probably have more, it's my dads stuff mostly: -Electric saw (not a circular saw) -Hand saw (big stereotypical model) -Plane (several old as hell ones) -Orbital grinder -Belt sander I thought the belt sander would be the best tool for leveling the wood out, didn't think I'd have much luck trying to push the plane against the grain of the wood or maybe it's just my imagination that it would be difficult as hell. I think my dad might have a circular saw, I've seen circular saw blades over there, just never a saw, but he's got lots of stuff piled up.
|
|
#
?
Apr 8, 2010 18:22
|
|
|
His Divine Shadow posted:an electric uh... "stick" saw, dunno what to call it, it has got a blade that goes back & forth anyway Sawzall:  Jigsaw:  If it helps at all. ")
|
|
#
?
Apr 8, 2010 18:27
|
|
|
Bad Munki posted:Sawzall: Pshaw "Sawzall" indeed. That there is a reciprocating saw. I bet you are one of those people that call a tongue and groove pliers a "channel lock" aren't you. Why I bet you even call a locking pliers a "vice grips" don't you, you jaw dragging plebeian? Oh, don't even get me started on needle nosed pliers. 
|
|
#
?
Apr 8, 2010 19:02
|
|
|
Yeah, and I eat jello and use kleenex...deal with it. [edit] P.S. Wikipedia posted:The term reciprocating saw (also oscillating saw) is also applied generically to any saw which cuts with a back and forth motion. These include: Just sayin'... Bad Munki fucked around with this message at 19:13 on Apr 8, 2010 |
|
#
?
Apr 8, 2010 19:11
|
|
|
After I hit "post" I thought about it a bit and both of those saws are technically reciprocating saws. I just hoped nobody would call me on it. I'm busted I was digging through some boxes of woodworking stuff a couple days ago and found this router base for cutting circles I made about 6-8 years ago. I think the last time I used it was about a week after I made it, so I had a moment of "what the hell is this thing?" when I pulled it out of the box. After a few seconds, I remembered what it was, but I was stumped on why I installed those two screws. I mean really stumped. I kind of set it aside (because I don't need to cut any circles at the moment), but kept it in mind. This morning, I looked at it again. I had my router in my lap and the jig in my hand and spent a good 5-10 minutes looking at it wondering what purpose two screws served. I built the damned thing, so I must have had a good reason for it, but for the life of me, they only seemed like they would get in the way. Then it hit me and I remembered exactly why they were there and they are there for a very good reason. Just for fun, I'll toss it out to see if you guys can figure out why I drilled and threaded those two holes and installed screws in them. The holes and threading go all the way through the plate, but that doesn't matter at all. They could only be drilled and tapped halfway though and still do the job they are intended to do. Skunkduster fucked around with this message at 19:46 on Apr 8, 2010 |
|
#
?
Apr 8, 2010 19:29
|
|
|
Here is another view. It may not seem like it is much different, but it shows something that the first picture doesn't.
|
|
#
?
Apr 8, 2010 19:39
|
|
|
I don't know, but you said you built that part yourself? How did you go about cutting it? Are you still set up to manufacture such parts?
|
|
#
?
Apr 8, 2010 19:44
|
|
|
Bad Munki posted:I don't know, but you said you built that part yourself? How did you go about cutting it? Are you still set up to manufacture such parts? I don't really remember all the steps. I'd guess I cut it sqaure to the length/width on the radical harm saw for the first step. I had a circle cutting jig made out of 1/4 birch ply, so I probably used that to round it off after rough cutting it with the bandsaw or reciprocating scroll saw. After that, it was just a matter of cutting the grooves and I probably did those on the router table. Then I drilled the holes and tapped them as an afterthought. I think the peg is just a nail that I cut off and smoothed with a bench grinder and sandpaper. I have some extra polycarbonate here that I bought specifically to make router bases. When you stop over to resaw that wood, maybe we can take some extra time and make a couple custom router bases as well. Edit: Looking closer at it, I probably didn't use my plywood circle cutting jig. It doesn't matter at all what shape the ends are, so I probably just used a compass to draw an arc and cut it close to the line with the scroll saw, then followed it up a belt sander to smooth it off. Skunkduster fucked around with this message at 19:59 on Apr 8, 2010 |
|
#
?
Apr 8, 2010 19:54
|
|
|
Aww, bummer, I thought maybe you had some awesome laser cutting robot or something. v v vSkunkDuster posted:reciprocating scroll saw.  I say "circular saw" all the time
|
|
#
?
Apr 8, 2010 19:58
|
|
|
Bad Munki posted:As opposed to some other kind of scroll saw? I guess if you had a tiny little band saw, it could be a non-reciprocating scroll saw.
|
|
#
?
Apr 8, 2010 20:02
|
|
|
I guess...  Also, I don't know if or when I'll ever get up to your neck of the woods. Work and all. How long before you reveal the purpose of the screws? 24 hours? 2 minutes? Also: SkunkDuster posted:a tiny little band saw Barbie Band Saw, the latest addition to the New Barbie Workshop
|
|
#
?
Apr 8, 2010 20:04
|
|
|
Bad Munki posted:I guess... If you do make it up here, you are going to be sorely disappointed with the temporary shop I have set up in my basement. Instead of laser robots, it is more like "Okay, set the planer over there on the floor and bring over the router table. No, put it on the left side of the bench, the cord doesn't reach when it is way over there. Don't unplug that one! That's for the droplight I have hanging from the ceiling vent so I can see what the hell I am doing. Yeah, unplug the bench grinder and plug it in there". I'm headed to bed soon (third shift worker), I'm figuring on later tonight or early tomorrow morning if nobody has guessed it. Skunkduster fucked around with this message at 20:16 on Apr 8, 2010 |
|
#
?
Apr 8, 2010 20:13
|
|
|
That sounds a lot like my 3/4-car garage-become-shop. Everything's on wheels.
|
|
#
?
Apr 8, 2010 20:28
|
|
|
SkunkDuster posted:Pshaw "Sawzall" indeed. That there is a reciprocating saw. I bet you are one of those people that call a tongue and groove pliers a "channel lock" aren't you. Why I bet you even call a locking pliers a "vice grips" don't you, you jaw dragging plebeian? Oh, don't even get me started on needle nosed pliers. Actually that looks like a Milwaukee, and that just happens to be the actual reciprocating saw called "Sawzall". So technically, it was correct. I hate it when people call them sawzalls too.
|
|
#
?
Apr 8, 2010 20:45
|
|
|
Meh, eventually the brand becomes synonymous with the item. It happens. vv
|
|
#
?
Apr 8, 2010 20:51
|
|
|
Bad Munki posted:Meh, eventually the brand becomes synonymous with the item. It happens. v It's the mark of a good product most of the time yes? I mean it's not great for business sometimes, and certainly no good for the trademark.
|
|
#
?
Apr 9, 2010 08:46
|
|
|
Well based on those pics I have a jigsaw.
|
|
#
?
Apr 9, 2010 09:43
|
|
|
I just had kind of a weird idea for a project and I'd like to get thoughts about the feasibility. I'd like to build something like free-standing bookshelf but instead for a hydroponics system for house plants. Kind of a living wall. In the place of shelves I'd have troughs with hydroponics style tops (ie holes for plant stems). Each trough would have a fluorescent tube on the bottom for the trough below. I was thinking I could make the troughs water-tight by doing a boat style glassing on the insides. From there it would be matter of plumbing, a pump, and a timer for the flooding schedule. Flood the top trough and then let the water run down to each lower trough. I guess I'd need a reservoir at the bottom for the nutrient solution (ph controlled water + plant feed) that could be easily emptied and refilled. I think I'd have finger holes in the tops and set them in rabbets in the troughs so I could inspect the roots or troughs periodically. Some problems: I need some kind of design or mechanism that keeps water in a given trough for long enough to do the trick. The roots need to be thoroughly wet, I believe. Is glassing the troughs (fiberglass epoxied to the trough) going to be adequate for water tightness? And, is a single fluorescent tube per trough (run while we're not home -- 8 hours each day) going to be enough light for your typical cat-friendly houseplant? Is wanting to do this with wood silly?
|
|
#
?
Apr 9, 2010 18:46
|
|
|

|
| # ? May 18, 2024 13:16 |
|
|
Give me some of the stash you grow and I'll help I think it's perfectly reasonable to do most of this with wood. As far as the actual troughs go, there are probably better, easier ways. For instance, just go buy a length or two of rain gutter. Cut to length, put caps on the end, and use caulk to seal them off. Put a small drain tube from the end of one down to the start of another. As for keeping them filled for a while, why not just let everything drain straight through to the reservoir, and just have a pump run for a while on a timer? Have a small tube to as the primary transfer from trough to trough (small enough that you can pump water faster than it will drain) and then a larger diameter overflow tube to make sure the trough doesn't overfill (large enough to transfer more water than your pump will pump.) Then just keep a reservoir large enough to hold water for all troughs plus some amount to keep the pump submerged. Timer turns pump on, pump starts filling top trough, which drains (slowly) to second trough, third trough, etc...at some point, top trough fills to overflow, which drains into second trough, which eventually overflows to third trough, etc. Keep the pump running for however long you want the trough to be filled. Once the timer shuts off, everything drains out to the reservoir. This would require some basic flow calculations to figure out how big to make your drain tubes (or just go really small for the little drain and really big for the big drain), and would be far simpler than some complex system of electronics, possibly multiple pumps, valves, etc. But certainly build the frame and lighting structure out of wood, I see nothing wrong there. Just make sure to put a good water-resistant finish on there.
|
|
#
?
Apr 9, 2010 19:12
|
|