


|
laod posted:Is wanting to do this with wood silly? I'd do that with IKEA Broder as the frame, some sort of plastic trough, and probably a simple relay-controlling PLC collected to relay solenoid valves. The PLC might be overkill and I don't know enough about PLCs to actually program it right. I was thinking something like an OMRON CPM1 but you probably could do that fine with something like a basic stamp. Basically, refer to the electronics thread for your automation needs. As far as the frame, I'll fall back to my earlier materials position: appropriateness. You want a framework to hang troughs from to grow plants, I think two T-feet and two tall posts of BRODER will fit the bill far far cheaper than any wood frame short of 2x4 studs and you wont have to worry as much about water/frame damage. Use a polymer to contain the water, as you don't have to worry about water damage with that. I'm no fun.
|
 #
?
Apr 9, 2010 19:41
#
?
Apr 9, 2010 19:41
|
|


|

|
| # ? May 15, 2024 03:51 |
|
|
Personally, I like simplicity over arguably more complex systems like solenoid valves and control circuits. There's a reason the overflow in your sink is just a hole near the top of the basin, rather than a water sensor wired up to a valve, or maybe a servo controlling the drain plug... ") I say: refer to gravity for your automation needs! 
|
|
#
?
Apr 9, 2010 19:43
|
|


|
Bad Munki posted:Personally, I like simplicity over arguably more complex systems like solenoid valves and control circuits. This is what I get for replying without reading everyone else's reply first ") Please disregard anything I said about electronic automation, Munki is right you just need a timer.
|
|
#
?
Apr 9, 2010 20:11
|
|
|
I'm a loving cheapass and can't even bring myself to spend 100$ on 25 board feet of white ash to ebonize for a coffee table.
|
|
#
?
Apr 9, 2010 20:28
|
|
|
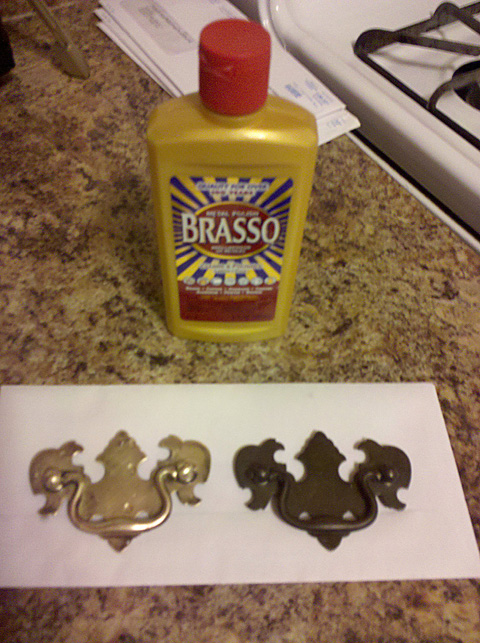
Quick question: is there a trick to using paste wax? Right now I'm just rubbing my cloth (old t-shirt) along the top of the can until it builds up a bit, then gently rubbing it on the top of my desk. I read that "if you can see ridges, there's too much on", so I smooth it out until it's nice and even, I guess. My problem is that I can't really see...anything. If I get down real close I can tell the wood is a bit darker where I've put the wax on, and when I buffed it out I could see a bit more shine than usual, but it doesn't feel smoother or really ever get to a good luster. Should I put more coats on? Thicker coats? The can just says "apply a thin layer" without really telling me how.
|
|
#
?
Apr 9, 2010 20:55
|
|


|
PipeRifle posted:Quick question: is there a trick to using paste wax? Right now I'm just rubbing my cloth (old t-shirt) along the top of the can until it builds up a bit, then gently rubbing it on the top of my desk. I read that "if you can see ridges, there's too much on", so I smooth it out until it's nice and even, I guess. Paste wax is what you use when you don't want the finish to stand out, but you want a modicum of protection from moisture. I apply it just like you are, but I leave a bit extra, so there are a few ridges, then I come back with another cloth and wipe off the excess. I usually do about 3 coats or so. You'll need to freshen it up every 6 months to 3 years depending on use. If you want a shine, try a buffer?
|
|
#
?
Apr 9, 2010 23:03
|
|
|
I've got some cherry I'd like to give that deep, brilliant rosy color. I put some danish oil on it just to see what it'd look like and I'm not crazy about what I would almost describe as "orange." What's the best finish here? It won't see much abuse, so it doesn't have to be a super powerful finish. Would some combination of shellac be a good choice here? Oh, also, I've seen on some wood creations (often small things like boxes and small lathed containers and such) some sort of finish that almost looks like glass. What is that?
|
|
#
?
Apr 9, 2010 23:34
|
|
|
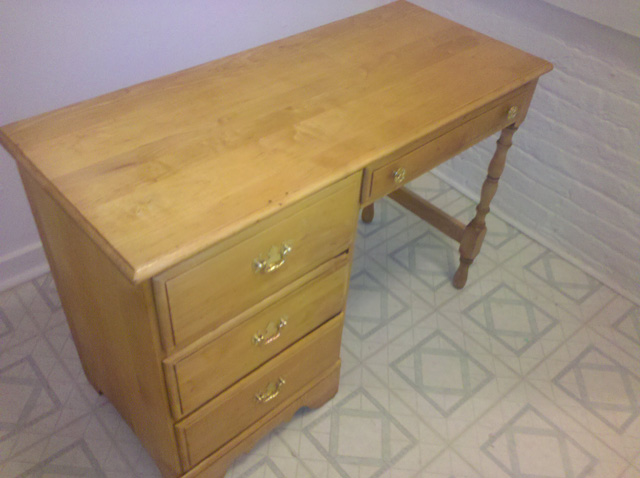
PipeRifle posted:Finishing up my desk refinish. As a reminder, it looked like this: Out of curiosity, is there a manufacturer's stamp somewhere on this desk? It looks to be the same style as my old bedroom set. If you don't know where to check, look inside or on the back of one of the bigger drawers.
|
|
#
?
Apr 9, 2010 23:44
|
|


|
If you mean the "cherry" red color you see on a lot of manufactured furniture you'll have to use some kind of dye. If you mean the nice, natural color cherry then you'll need to be patient. The white balance is off, but this should give you some idea. The only difference between these two boards is that I ran the bottom one through the planer 10 minutes ago. The top has a few coats of semi-gloss poly and one coat of dust.  Cherry darkens over time. You can get a head start on this by leaving it outside on a nice clear day or three and give it a tan. I actually put one of my boxes in my aunts tanning bed because I made it two days before the graduation it was being given away at. A BLO or other base coat will help provide some chatoyance and deepness to the wood. As for the glass-like finish on turnings, I'd hazard a guess at either cyanoacrylate or a buffed finish using something like the Beal buff system. Heres a pen sized spindle I hit with the Beal, light is bad but it feels and looks amazing in person: 
|
|
#
?
Apr 10, 2010 01:08
|
|

|
A followup to that router base plate. The screws that come with the router to hold the factory base on are flathead screws that are countersunk into the base. For the circle cutting base, I needed to use roundhead screws and washers to mount it to the router. The purpose of the two tapped holes in the base is so I can have a place to keep the screws so I don't lose them.PipeRifle posted:Quick question: is there a trick to using paste wax? Right now I'm just rubbing my cloth (old t-shirt) along the top of the can until it builds up a bit, then gently rubbing it on the top of my desk. I read that "if you can see ridges, there's too much on", so I smooth it out until it's nice and even, I guess. You've never been in the army, have you? I don't really believe you can apply too much as you need to build up a thick finish to get a good shine. Scoop out a big blob of wax and smear it all over. It should turn clear and more liquidy as you rub it in. Don't worry about ridges because they will polish out very easily. Let that harden up for a couple hours, then go back in with a clean soft rag and polish out with a fair amount of pressure. Repeat the whole process a couple more times until all the grain is filled and you have a nice smooth surface then hit it with a car buffer to polish it up to a glassy finish. Pretty much everything GEMorris said, but I wanted to emphasize that you should be applying a LOT of wax with each coat. The way you are doing it will work eventually, but it will take forever and a day. Skunkduster fucked around with this message at 02:11 on Apr 10, 2010 |
|
#
?
Apr 10, 2010 01:43
|
|


|
ChaoticSeven posted:If you mean the "cherry" red color you see on a lot of manufactured furniture you'll have to use some kind of dye. If you mean the nice, natural color cherry then you'll need to be patient. This is what I want. Would it be preferable to "tan" it before or after applying a finish? We're supposed to have some great sun this weekend, so I could really bake it for a couple days. Thanks for the tip on that, though. So cool.
|
|
#
?
Apr 10, 2010 02:03
|
|
|
Before. A finish slows the process considerably. It'll still happen, though. Edit: It'll do maybe 50% of the darkening over a several days outside. Past that, it takes months/years to finish up. ChaoticSeven fucked around with this message at 02:30 on Apr 10, 2010 |
|
#
?
Apr 10, 2010 02:26
|
|
|
That's fine, I'm in no hurry. I just like the idea of getting a head start.
|
|
#
?
Apr 10, 2010 02:31
|
|
|
According to one of the finishing books I have, BLO (boiled linseed oil) will accelerate oxidation and darken wood faster, not much faster but a little. Whether true or not, it will improve the look significantly. PipeRifle posted:Quick question: is there a trick to using paste wax? Are you waxing the bare wood or the finish?
|
|
#
?
Apr 10, 2010 03:05
|
|

|
wormil posted:Are you waxing the bare wood or the finish? It's been finished with a half a dozen applications of tung oil. The wax buildup is working just fine for now, just wasn't sure if I could glob a bit more on. Amstrad posted:Out of curiosity, is there a manufacturer's stamp somewhere on this desk? I'd have to check when I get back to the work area where the desk is, but I'm pretty sure I saw something that said "Taiwan" in a blue circle. The back plywood sheet behind the drawers says "1926" in a stencil font but I don't think that means anything. It was apparently bought relatively new in the '70s.
|
|
#
?
Apr 10, 2010 04:56
|
|
|
I got my copy of The Complete Woodworker's Companion by Roger Holmes in the mail the other day, and I feel pretty retarded. I also learned that there is a TON of vocabulary I'm completely oblivious to. Some I can get out of contextual clues like dadoes, and some I just sit there scratching my head until I cave and google it. I felt like I needed to calmly put the book down and find a class first. (It probably wouldn't have hurt.) Other than some of the unexplained woodworking vocabulary, I'm finding it pretty easy to follow. It's been a rough start though. I think the recommended 'basic tool list' is a little more than basic as well - costing anywhere from several hundred to several thousand dollars.
|
|
#
?
Apr 10, 2010 06:11
|
|
|
Speaking of books, anyone have a recommendation for more advanced kitchen cabinet building? My wife wants new cabinets and I'd like to add a few features beyond drawers and shelves.
|
|
#
?
Apr 10, 2010 06:53
|
|
|
Boogabu posted:I got my copy of The Complete Woodworker's Companion by Roger Holmes in the mail the other day, and I feel pretty retarded. I also learned that there is a TON of vocabulary I'm completely oblivious to. Some I can get out of contextual clues like dadoes, and some I just sit there scratching my head until I cave and google it. I felt like I needed to calmly put the book down and find a class first. (It probably wouldn't have hurt.) I think that there are two "must have" woodworking books. One of them is The Complete Illustrated Guide to Joinery. This book is awesome because it covers pretty much every type of joint imaginable and shows several methods to create each joint depending on the tool you are using. I'd recommend that you pick this one up and refer to it when you come across an unfamiliar term instead of going to Google. Joinery is the core foundation of woodworking and I have not read a book that covers it better than this one. The other "must have" book is Flexner's Understanding Wood Finishing: How to Select and Apply the Right Finish. wormil posted:Speaking of books, anyone have a recommendation for more advanced kitchen cabinet building? My wife wants new cabinets and I'd like to add a few features beyond drawers and shelves. What features are you thinking of? Aside from making a lazy susan or a pull out cutting board, I can't really think of much you could add to kitchen cabinets.
|
|
#
?
Apr 10, 2010 08:17
|
|
|
wormil posted:Speaking of books, anyone have a recommendation for more advanced kitchen cabinet building? My wife wants new cabinets and I'd like to add a few features beyond drawers and shelves. I have "The Complete Kitchen Cabinetmaker" by Robert Lang, I found it useful although it's the only book on cabinetmaking I have. It covers both styles of cabinets and there's plenty of drawings. It goes from the planning stage all the way to the installation stage, so it's fairly comprehensive.
|
|
#
?
Apr 10, 2010 12:34
|
|


|
With all the finishing talk going on right now I figure this is probably the best time to post. I've finished putting up tongue and groove pine on the ceiling of the living room, I'm at the point where it needs to be sanded to clean up some of the shoe marks and other dirt that was on some of the boards. I still haven't figured out how to finish it though. I'd like it to stay as natural looking as possible, what should I be using to seal it to achieve that look? More pictures at http://www.flickr.com/photos/messyflickr/sets/72157623152052449/
|
|
#
?
Apr 10, 2010 16:13
|
|

|
SkunkDuster posted:What features are you thinking of? Aside from making a lazy susan or a pull out cutting board, I can't really think of much you could add to kitchen cabinets. There are a lot of features you can add beyond drawers and lazy susans; and actually there are better options than the classic lazy susan on corners. Years ago I had custom cabinets built and the guy showed me all sorts of neat things but we weren't able to afford most of them. Here are a few I found on the web but there are more out there. I'm hoping to find a book that will demonstrate how to build some clever solutions and storage ideas. Many I could probably figure out but I'm not afraid of studying up a bit before tackling a whole kitchen. SkunkDuster posted:The other "must have" book is Flexner's Understanding Wood Finishing: How to Select and Apply the Right Finish. I own this and agree, a must have. Another set of books I highly recommend is Tage Frid Teaches Woodworking. Originally three volumes, the first two books can now be bought in a single volume. Book one is joinery; two is shaping, veneering and finishing; three is furniture. LordOfThePants posted:I have "The Complete Kitchen Cabinetmaker" by Robert Lang... Looks like a comprehensive book. Does it include any advanced storage ideas or just building and installation?
|
|
#
?
Apr 10, 2010 19:38
|
|
|
wormil posted:Looks like a comprehensive book. Does it include any advanced storage ideas or just building and installation? I haven't read that book, but Lang was a Senior Editor at Woodworking Magazine and Popular Woodworking, and is still a Senior Editor at the newly merged Popular Woodworking Magazine. His articles are top shelf, as good as Schwarz but a bit less prolific.
|
|
#
?
Apr 10, 2010 21:18
|
|
|
Messadiah posted:With all the finishing talk going on right now I figure this is probably the best time to post. I've finished putting up tongue and groove pine on the ceiling of the living room, I'm at the point where it needs to be sanded to clean up some of the shoe marks and other dirt that was on some of the boards. I still haven't figured out how to finish it though. I'd like it to stay as natural looking as possible, what should I be using to seal it to achieve that look? Try a test board with clear lacquer and see what you think.
|
|
#
?
Apr 10, 2010 21:23
|
|
|
wormil posted:Looks like a comprehensive book. Does it include any advanced storage ideas or just building and installation? I'm not 100% sure what you mean by advanced storage, but if you mean things like slide out shelving or waste basket cabinets, I don't recall any of that. He mentions a few cases of applying cabinetry to other furniture building (like the proper drawer height if you're building a desk with a file drawer), but other than that it's mostly building and installation. Just picked something up from Woodcraft: 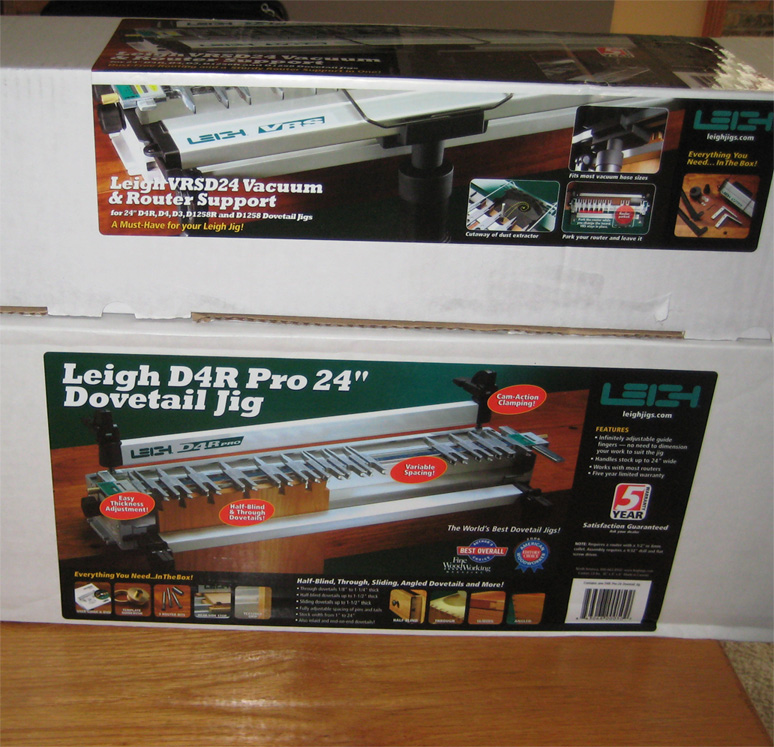 Click here for the full 774x747 image. Won't get to use it until next weekend maybe, but I bought it today because I'm working a weird schedule at work and won't be able to make it into the local Woodcraft this week when they're open. I'm glad I waited for a couple reasons. The D4R Pro is improved in that it can cut half blind dovetails in a single operation now, which is something I thought I'd miss on the standard D4R (and one of the reasons the guys at Woodcraft originally suggested I go with a SuperJig). On top of that, Leigh is doing a mail in offer on the D4R this month where you get the 11 piece bit set free. I'm going to unpack it and play around with it now, it's probably good that I don't have a router here at my apartment because I'd probably be trying to figure out how to hook it up to my carpet vacuum so I could actually use it. LordOfThePants fucked around with this message at 21:54 on Apr 11, 2010 |
|
#
?
Apr 10, 2010 23:24
|
|
|
I have the super 12 and it's pretty awesome. I wanted the d4r, but I just couldn't justify the $500. You will love that jig, no doubt about it. As for single-pass half blind dt's, I'm pretty sure you could do those before...I know I can do them with my super 12, and I really doubt it knows any tricks that any of the d4r's don't... v  v vQuestion: how do I flatten a board that is wider than my jointer? Of course the planer won't help here, although I suppose I could shim under the board or something so the rollers wouldn't press it completely flat...but that sounds horribly inexact and time consuming. I also suppose I could resaw it, but I lack a bandsaw (although I may be picking one up for my birthday in a week.) Any other options? Bad Munki fucked around with this message at 17:04 on Apr 12, 2010 |
|
#
?
Apr 12, 2010 17:00
|
|
|
A plane that has a sharp blade and a very long base.
|
|
#
?
Apr 12, 2010 17:09
|
|

|
Bad Munki posted:I have the super 12 and it's pretty awesome. I wanted the d4r, but I just couldn't justify the $500. You will love that jig, no doubt about it. http://woodworkerszone.com/wiki/index.php?title=Jointing_wide_boards
|
|
#
?
Apr 12, 2010 17:16
|
|
|
dv6speed posted:A plane that has a sharp blade and a very long base. QFT I'm honestly considering selling my jointer/planer combo and using the money to buy a bigger planer. Why? You only need to joint a face once, and you don't even have to get it perfectly smooth, just rough and flat will do. Once you've planed the opposing face flat, you flip the board and smooth out your rough handplane tracks. Rough planing is really fast work, as long as you have a good method of holding your workpiece (like a proper bench). Furthermore, a handplane has much less disfigurement-injury potential compared to a jointer, and doesn't take up any real floorspace in your shop. A tablesaw, bandsaw or a radial arm saw can all make one edge parallel to another, and then it is just a swipe or two with the plane to get a glassy smooth edge. I'm tired of making a pass and wondering if I did hold the board down with the correct pressure in the correct spot so that the jointer did its job, with long boards this is really pronounced as you are trying to hold up say 7' of 10" wide by 1.5" thick SYP by forcing one end down on the outfeed table near a spinning cutterhead. ChaoticSeven posted:http://woodworkerszone.com/wiki/index.php?title=Jointing_wide_boards Jesus Christ just learn to use a handplane, do you know how much faster that would be compared to all of that setup? The link is helpful, if someone is committed to only using power tools or has no handplane available, but wow that looks like a lot of hassle in order to work around developing a useful skill. LordOfThePants posted:
As for the dovetail jig, single pass half-blinds can be done with just about any jig on the market, that is the mainstay task of the router dovetail jig. Through dovetails are finnicky on most jigs, and your pin width is limited by your bit selection. A bandsaw can do an excellent job on through-dovetails but can't do the pins for half blinds. I'm a 'tails-first' guy and just use the bandsaw to make the tail cuts as it is so easy to get them properly spaced with a Duginski jig, then I chop them out and mark my pin board and cut those by hand. So for me the pin limitation on half-blind bandsaw-cut dovetails is a moot point. Just my preferred way of working. GEMorris fucked around with this message at 22:50 on Apr 12, 2010 |
|
#
?
Apr 12, 2010 22:48
|
|
|
GEMorris posted:pin width is limited by your bit selection https://www.youtube.com/watch?v=s5ZC57DbYBQ
|
|
#
?
Apr 12, 2010 23:07
|
|
|
I was taught to rip the board in half, joint, then glue it back up. A hand plane is a good option and if you have a planer you can just plane those rough marks out to save time. For really wide stuff you can use a router and a jig although I've always just used a hand plane, it isn't that difficult.
|
|
#
?
Apr 12, 2010 23:10
|
|
|
Bad Munki posted:Not actually true with the D4R. The key being that the guide fingers are split in half, so you can adjust the sizing of both the pins and the tails. You can adjust spacing, but you can't make a pin slot in a tail that is narrower than the shank of the bit. This is one of the reasons skinny pins are in fashion in craft furniture, so you can show that the tails were not cut by a bit. I've seen a number of pieces where the narrow part of the pin is really just a point, just wide enough for the sawplate to get through. Also most craftspeople are using shallower angles than the typical DT bit is set at.
|
|
#
?
Apr 12, 2010 23:24
|
|
|
Oh, by the way, the sled I made (from a post way back) in order to avoid snipe while planing down the racetrack pieces of my poker table worked like a charm. 5 stars, would plane again. And since we're talking about dovetail jigs and such, leigh's videos on youtube make me drool. The one where they're showing off their mortising jig? Sick.
|
|
#
?
Apr 12, 2010 23:26
|
|
|
GEMorris posted:
Well, it's what I'm doing until I get a Roubo or similar built. I don't find the setup to be extravagant...Just pop off the stock guard and put on the really simple to make temp guard...
|
|
#
?
Apr 13, 2010 00:04
|
|
|
Bad Munki posted:As for single-pass half blind dt's, I'm pretty sure you could do those before...I know I can do them with my super 12, and I really doubt it knows any tricks that any of the d4r's don't... v Actually, you couldn't with the D4R until the "Pro" version came out in the last couple of months. When Leigh introduced the SuperJigs, they offered it on them but only recently changed the D4R so you could do them on it as well. That's one of the reasons I'm glad I waited to buy it. The manual doesn't even have instructions for them (although you can get them online). I'm going to fire off an email to Leigh and see if they'll drop an updated manual in the mail for me - I'd rather have the spiral bound version if it's available.
|
|
#
?
Apr 13, 2010 02:17
|
|
|
Ah. Well, I was only looking at jigs as of this year, so they must have updated the product line before that (as you said). Definitely let me know how the vrs works once you get around to trying everything out.
|
|
#
?
Apr 13, 2010 03:04
|
|
|
Bad Munki posted:Ah. Well, I was only looking at jigs as of this year, so they must have updated the product line before that (as you said). Sneak preview "Really well. Especially compared to the naked jig."
|
|
#
?
Apr 13, 2010 03:46
|
|
|
Well enough to be worth the extra bucks? Like I said, I've got the super 12, but right now all that dust falls on the floor (and the bottom shelf of my workbench.)
|
|
#
?
Apr 13, 2010 03:51
|
|
|
Hm, well I guess it depends on how much you value dust collection in general. I personally despise getting router chips on my hand knit turtle necks, so it was worth it to me. My sweaters have rarely been cleaner.
|
|
#
?
Apr 13, 2010 04:03
|
|
|
I found an ad on Craigslist today for a "gently used Bosch table saw" for $50 and hoped it was somebody getting rid of something that they didn't know the value of, but it turned out that somebody had listed some poor lady's phone number as a prank. She sounded really exasperated and I felt bad for her after I called My search for a garage full of tools continues!
|
|
#
?
Apr 13, 2010 04:40
|
|

|

|
| # ? May 15, 2024 03:51 |
|
|
ChaoticSeven posted:Hm, well I guess it depends on how much you value dust collection in general. I personally despise getting router chips on my hand knit turtle necks, so it was worth it to me. My sweaters have rarely been cleaner. Well...here's the dust collector I put together for my planer (shown with the planer running for inflated bag goodness): 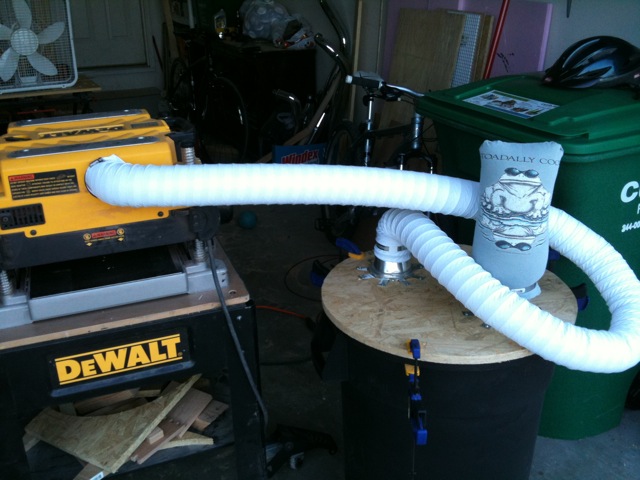 It works reasonably well, but the bag clogs fairly easily. Still, it cost me about $15 total, and I got to practice my hand on the sewing machine. Also, awesome re-use of a 20-year-old rag shirt. Of course it does nothing to collect fine dust, just large chips really, so I put that outside the garage and let all the fine dust get carried away by the constant Iowa wind. Here's my actual "dust collection system":  Box fan near back of garage + wide open garage door = ventilation? I dunno, you tell me if I'm going to develop nasal cancer in a year. My options are pretty limited at the moment due to renting and space, so I just try to keep as much air moving through as possible.
|
|
#
?
Apr 13, 2010 04:48
|
|