


|
Ratmann posted:Just using straight up mantra delayed read Nice. I remember doing something similar with some medieval style torches. At the moment I'm stamping density values into one giant volume (from particles). I like the idea of delayed read, certainly beats sprites lookwise.
|
 #
?
Apr 23, 2010 12:50
#
?
Apr 23, 2010 12:50
|
|


|

|
| # ? May 18, 2024 04:13 |
|
|
cubicle gangster posted:I dont use cinema, or after effects. Or fusion. But it seems to make sense from here!  The main thing taht I have trouble understanding is when to apply 2.2 gamma correction and how to properly preview everything while you are working. The main thing taht I have trouble understanding is when to apply 2.2 gamma correction and how to properly preview everything while you are working.EDIT: Created a thread. Das MicroKorg fucked around with this message at 13:26 on Apr 23, 2010 |
|
#
?
Apr 23, 2010 12:53
|
|
|
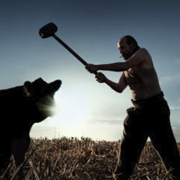
Hackuma posted:Just finished these animations for a game I am working on. I didn't make the models. Cool stuff. I like the bear and the baby bear the most. Just a couple thoughts: -more offset I think you could push the offsets on the bear a little more to make him feel bigger. -animate your fingers I noticed a few fist clenches and that's about it. Most of the animations are really short so you probably can't fit much in there, but the bear's idle and other longer animations you could have some more finger/hand movement. Also some of the poses, such as the guy's excited jump, could be exaggerated more. Some of the animations were a bit hard to understand what action you were trying to convey. Just my .002 cents
|
|
#
?
Apr 23, 2010 21:24
|
|
|
Some stuff I've been working on. Feedback is welcome. I'm an unemployed architect, not really a viz guy, but I'm trying to improve my rendering abilities. Everything is modeled in rhino, rendered with vray. I'm doing all this on a 2 year old macbook pro, so there's a limit to what I can really do in a reasonable time-frame right now.    
Biohazard fucked around with this message at 21:47 on Apr 23, 2010 |
|
#
?
Apr 23, 2010 21:40
|
|

|
le capitan posted:Cool stuff. I like the bear and the baby bear the most. One of the things I find the hardest is to get a balance between animation and gameplay requirements. Like the walks and runs have to match the ground, so that forces me to make them really fast since that's how they are in the game. Or how I can't have much anticipation (if any) on the main character since players expect immediate response.
|
|
#
?
Apr 23, 2010 21:55
|
|

|
what is linear workflow?
|
|
#
?
Apr 24, 2010 23:16
|
|
|
--
SPACE CARBS fucked around with this message at 06:04 on Sep 2, 2010 |
|
#
?
Apr 24, 2010 23:26
|
|

|
SPACE WEED posted:
Is it supposed to say "accurate scale mode" in the intro text?
|
|
#
?
Apr 25, 2010 01:02
|
|


|
Gromit posted:Is it supposed to say "accurate scale mode" in the intro text? What? It doesn't say that. ")
SPACE CARBS fucked around with this message at 01:59 on Apr 25, 2010 |
|
#
?
Apr 25, 2010 01:18
|
|
|
Odddzy posted:what is linear workflow? http://www.djx.com.au/blog/2008/09/13/linear-workflow-and-gamma/
|
|
#
?
Apr 25, 2010 03:15
|
|

|
Thanks for the link! I don't understand what gamma level should the textures be at in that case. 2.2 is used for the gamma at the output in mentalray (or V-ray, etc) but is a set number used for the textures? If so, How do I export my images and keep the details in post and all and where do I lower the value of the textures in max? Also, what kind of codec do you guys use that works out good for film and so on. the basic Animation codec seems to do a good job although heavy but what are the alternatives?
|
|
#
?
Apr 25, 2010 08:00
|
|
|
I think in Vray all you need to do is to check the "linear workflow" checkbox and it does everything for you. Maya 2011 is supposed to have linear workflow under the new color profile settings too but I havent tried it so I dont really know if its a one click solution as well.
|
|
#
?
Apr 25, 2010 19:59
|
|
|
A speed sculpt, about 4 hours It was supposed to be Nicolas Sarkozy but the hair makes him look more like Sean Penn  
|
|
#
?
Apr 26, 2010 04:59
|
|

|
dug this fucker out and have been finishing him up. Gotta make the low poly next  Click here for the full 1300x1091 image. If anyone has some crits I'd love them before I start on the low.
|
|
#
?
Apr 26, 2010 06:25
|
|
|
EoinCannon posted:A speed sculpt, about 4 hours If it makes you feel any better, I saw the picture and thought 'Sarkozy' before I read the words.
|
|
#
?
Apr 26, 2010 06:53
|
|

|
keyframe posted:I think in Vray all you need to do is to check the "linear workflow" checkbox and it does everything for you. Apparently this is just for quickly converting old scenes, you're supposed to do it the proper way with fresh ones. I'm not sure why theres a difference though, or if it's just so that max/your bitmaps are the ones altered instead of vray.
|
|
#
?
Apr 26, 2010 09:09
|
|

|
A warning all of you working in Linux using RV, have IT remap the launch command to something else, or you'll live through this: "Hmm let me check my render" "Hmm let me check my render"*types rv * &* "Hey where'd it go?""OH GOD I TYPED rm * & !" 
|
|
#
?
Apr 26, 2010 09:35
|
|

|
Ratmann posted:A warning all of you working in Linux using RV, have IT remap the launch command to something else, or you'll live through this: Oh my
|
|
#
?
Apr 26, 2010 14:46
|
|

|
Ratmann posted:A warning all of you working in Linux using RV, have IT remap the launch command to something else, or you'll live through this: drat... You could add an alias to your cshrc as well. I have all sorts of "time saving" alias's at the moment. Also good fun is editing coworkers cshrc files to make nuke launch maya and maya launch nuke
|
|
#
?
Apr 26, 2010 19:11
|
|

|
I keep launching nuke scripts with houdini anyway, it's like this ingrained retarded habit.
|
|
#
?
Apr 26, 2010 20:58
|
|
|
Biohazard posted:Some stuff I've been working on. Feedback is welcome. I'm an unemployed architect, not really a viz guy, but I'm trying to improve my rendering abilities. Everything is modeled in rhino, rendered with vray. I'm doing all this on a 2 year old macbook pro, so there's a limit to what I can really do in a reasonable time-frame right now. hey man, from your original post, it looks like your rendering skills are coming a long way, I'm on a 4 year old mbp, so I know how you feel. Are these for your personal projects, or freelance work? also, I'm going to be posting some of my senior year option studio work in the next few days.
|
|
#
?
Apr 27, 2010 01:12
|
|
|
Well, I've been doing job interview stuff lately, so I'm trying to go back and revisit some old projects real quickly in order to fill out the portfolio a little. Thanks though. Yeah the Old Macbooks are a pain, but it gets the job done for now. I was reading about AMD coming out with a $200 six-core processor today, maybe I'll be building myself a new little rendering tower on the cheap soon.
|
|
#
?
Apr 27, 2010 15:06
|
|
|
Georg LeBoui posted:A couple of months ago I had to urgently put together some lifestyle shots for a range of storage cubes, had about two days to put it all together. I'm still very new to this 3D thing, so I wanted to get your opinions:
|
|
#
?
Apr 27, 2010 15:52
|
|


|
EvilHobo posted:Seconding this. Thanks! I forgot to reply, but this is the first asset I've made that I'm actually happy with, even if it still needs some work.  Post for critique everyday. If you wait until you're almost done like I used to, you'll find that you have to redo half the model to fix things. Sigma-X posted:dug this fucker out and have been finishing him up. Gotta make the low poly next You're missing the two hexagonal stabilizing rings around the assault cannon (or whatever those things are called). Also, someone who's REALLY into 40k might point out that, on the right side, the skull in front should be bigger than the skull in back. http://lh6.ggpht.com/_2HAuhOIOb6s/R4ojATqeL4I/AAAAAAAAByg/e5vqcULi4RU/Dreadnought+A+-+Weapon,+Autocannon+01.jpg I like how it has balls.
|
|
#
?
Apr 27, 2010 22:30
|
|


|
ThreeHams posted:Thanks! I forgot to reply, but this is the first asset I've made that I'm actually happy with, even if it still needs some work. FUUUUUCK I even made sure to line up the banner-clips with those rings, too. And then forgot them. Thanks for noticing it has balls. Yeah the skull on the side of the gun is a bit different than the regular one, its a Crux Terminatus, too, instead of a skull and crossbones. I actually changed up the asscan proportions a bit, too. Sigma-X fucked around with this message at 01:34 on Apr 28, 2010 |
|
#
?
Apr 28, 2010 01:31
|
|
|
This is a model I've put together for the same short film I posted about a while back. The textures are purely temporary. One thing I can't seem to get right with my modelling is the edges. I'm using Max and Vray... is there a good technique to make edges nice and rough in a natural-looking way? I've tried chamfering them and adding bump maps and stuff, but it still doesn't quite come together. Any hints?
|
|
#
?
Apr 28, 2010 06:36
|
|
|
schmuckfeatures posted:This is a model I've put together for the same short film I posted about a while back. The textures are purely temporary. Here's some advice that other people might disagree with, but it's worked for me so far. This is from the perspective of game textures (especially weapons), but it should still work - you'll just be able to use much bigger textures and higher poly counts. - Add support edges and throw on Turbosmooth. Support edges are edgeloops right next to the edge you want to keep sharp (for instance, make a cylinder, give it three height subdivisions, then move those extra loops so they're right near the top and bottom of the cylinder). This will give you perfectly smoothed edges and very nice edge highlights. Since this can be high-poly, it's your choice of whether to bake to a normal / displacement map. Chamfering inside Edit Poly is a destructive action, and it sucks my rear end. Never use it (well, never use it for smoothing edges in high-poly work). - You said the texture is temp, but even so, it's worth saying that noisy bump tends to ruin the look of metal, and makes it look more like stone. Keep it smooth except for some very, VERY subtle scratches. The edge highlights are the really important part. - That "old worn metal" look comes largely from the variation in diffuse and specular color. There's a lot of trial-and-error here (or there was, for me). Search around for some organic-looking Photoshop brushes and create some layers that have lots of variation in color and value, then tone it down if you need to. Always easier to go too far, then pull back. - After you unwrap it, draw in scratches along the parts you'd expect scratches to show up. Assuming this thing is dragged around for a while, you'd probably see the most damage along the very outer edges of the fins, along those rings at the top, on the rivets around the outside, and probably in some places on the conical section in front. Keep it subtle, overall - it'll look much better. If you want some serious dents in the edges, throw it into Mudbox or Zbrush and add just a couple in select places. Still, keep it subtle. ThreeHams fucked around with this message at 07:13 on Apr 28, 2010 |
|
#
?
Apr 28, 2010 07:11
|
|
|
ThreeHams posted:- Add support edges and throw on Turbosmooth. Support edges are edgeloops right next to the edge you want to keep sharp (for instance, make a cylinder, give it three height subdivisions, then move those extra loops so they're right near the top and bottom of the cylinder). This will give you perfectly smoothed edges and very nice edge highlights. Thanks for the advice duder! I gave it a try on a cylinder but got some weird tesselation though, which didn't seem to change with increased cap segments. Is there a step I missed? ThreeHams posted:dust & scratches notes Great advice, thanks! Especially that bit on how to avoid it looking like stone. I remember there was a good tute which had some similar tips re: weathering & scratches -- aha, here it is. I sorta used that approach with the derrick I posted a couple of months back... here's a closer view of it that shows more of my nasty edge problems:  Weathering things up definitely seems to look nice, but wow, I was surprised by how time-consuming it is. Just doing the texture for the counterweights here took me a whole day. But yeah, those edges are already chamfered and look sharp as hell. I'm getting similar issues around the concrete base: 
|
|
#
?
Apr 28, 2010 08:46
|
|
|
schmuckfeatures posted:Thanks for the advice duder! I gave it a try on a cylinder but got some weird tesselation though, which didn't seem to change with increased cap segments. Is there a step I missed? Nope, it'll cause horrible-looking geometry. It's all right, it won't be seen outside of wireframe, and won't be transferred to normal maps. Just make sure you're using at least 2 subdivisions (it helps hide problems like that). Adding a single-segment chamfer isn't going to help for smoothing out edges. I used to work that way until I learned how to use smoothing for hard-surface work. Here's the wireframe for the high-poly for my last model:  Click here for the full 1601x808 image. This looks like a mess, but it's all completely based on edge loops. If I need to change the curve of an object, I can delete 3-4 edges all the way around a part, change it, then add them back in. Trying to change things after using the chamfer tool is horrifying. The sharpness of the edge, after smoothing, is completely dependent on how close the support edges are to the corner of the model. For the cylinder example, if you move those extra loops closer to the top and bottom, you'll get a sharper edge. For edge scratches and damage, there are a couple tricks for automatically generating it - for when you've got a model in the background and doing them manually just isn't worth the time. It involves using Find Edges on the baked normal map, or using an xNormal plugin in Photoshop. I haven't really gone in-depth with it, but search around, and you should be able to find it. I think Sigma-X might know more about this, too. Neil Blevins also has a method using vertex paint and procedural work in 3ds max: http://www.neilblevins.com/cg_education/vertex_map_wear/vertex_map_wear.htm For other general hard surface work, this tutorial is a great start: http://racer445.com/pages/tutorials/ak-tutorial.php It's not perfect (his UV layout is completely inefficient) but it covers an entire weapon from start to finish, which is impossible to see otherwise.
|
|
#
?
Apr 28, 2010 09:46
|
|
|
Hey guys. I'm trying to do a low-poly mesh for the Source engine based on this sculpt I was given and I've got the shape more or less right, but the meshflow looks vewwy ugwy. What should I be working on here before I move to unwrapping?
|
|
#
?
Apr 28, 2010 21:01
|
|

|
theta-ix posted:Hey guys. I'm trying to do a low-poly mesh for the Source engine based on this sculpt I was given and I've got the shape more or less right, but the meshflow looks vewwy ugwy. What should I be working on here before I move to unwrapping? if it's a game model with a very low resolution requirement, get rid of those spheres, and close off the eyes with a flat surface [which will have textured eyes] as an option. Or use a partial sphere. I'd try to work in eyelids or something. If I was at home I'd draw some topology suggestions overliad on the screen shot but I'm at work at the moment.
|
|
#
?
Apr 28, 2010 22:37
|
|


|
ThreeHams posted:- After you unwrap it, draw in scratches along the parts you'd expect scratches to show up. Assuming this thing is dragged around for a while, you'd probably see the most damage along the very outer edges of the fins, along those rings at the top, on the rivets around the outside, and probably in some places on the conical section in front. Keep it subtle, overall - it'll look much better. I don't know poo poo about it, but how many scratches and dings to people put into bombs they have lying around? I would have thought you'd be a lot more careful with something like that. Unless it was dropped and failed to go off, but then it would be beaten all to hell.
|
|
#
?
Apr 29, 2010 06:13
|
|
|
Gromit posted:I don't know poo poo about it, but how many scratches and dings to people put into bombs they have lying around? I would have thought you'd be a lot more careful with something like that. Oh, realistically it'd be in great shape. I just assumed that judging from that image, someone stole the thing and ungracefully threw it into the back of a truck, then drove it a few thousand miles, then tossed it onto a ship or plane to get it out of the country. Or, something like that. Bombs seem like they'd be pretty unstable, but they typically have to be electronically armed before they'll detonate at all, and there's a certain delay before they'll detonate on impact. Imagine if one was accidentally dropped from a jet while on an aircraft carrier.
|
|
#
?
Apr 29, 2010 09:23
|
|
|
Hi, first time 3DCG Thread poster. My back story is that I'm going to school for medical illustration and animation (2 year program). I had my first 3ds max class this semester (so, I've only had about 4 months with this program or anything like it) and am looking for critiques on my final piece. It's far from finished but better to start off with critiques early in the game.  Click here for the full 1024x576 image. The story is about the Ascaris worm, with this scene telling about the birth and adult life of the worm. I wanted to show how the eggs will reside tucked away in the villi of the intestines and zoom back to the full grown worm being huge in a non-microscopic view of the intestines. (I still have yet to composite this piece. This is just a render within 3ds max still) If you want references, google the name (youtube is also fabulous for some gross colonoscopy videos) Thanks and I look forward to this piece being butchered with critiques ")
|
|
#
?
Apr 29, 2010 13:35
|
|

|
polarbear_terrorist posted:
The first thing that stands out is the glass-smooth specular. It may be that I just don't know poo poo about the texture of microscopic intestinal villi, but right now they look like they're made of silicone. Granted, a lot of medical illustrations take a more generalist approach, so if that's the case here, the only thing I can really say is they look too solid; some sss would help immensely. polarbear_terrorist posted:If you want to throw up, google the name fixed that for you
|
|
#
?
Apr 29, 2010 18:03
|
|
|
Handiklap posted:The first thing that stands out is the glass-smooth specular. It may be that I just don't know poo poo about the texture of microscopic intestinal villi, but right now they look like they're made of silicone. Granted, a lot of medical illustrations take a more generalist approach, so if that's the case here, the only thing I can really say is they look too solid; some sss would help immensely. I did do SSS :\ I put a DGS material in the specular slot and I'm not exactly happy about it, but I wanted a texture that would help produce a really wet look. I don't just want a "generalist" look here but I might settle on it for turning it in and go back later when I learn more. Also, my light set-up is pretty straight, so it doesn't bring out the nice subdermal scatter. Thanks for the input!
|
|
#
?
Apr 29, 2010 18:14
|
|
|
polarbear_terrorist posted:I did do SSS :\ Aren't Villi ultra-porous and fleshy? Maybe it's only because I've only seen electron microscope shots of them but yours seem way too smooth. I think that might come down to personal/artistic preferece though because a normal map might add too much detail or texture to it and take away focus from the worms.
|
|
#
?
Apr 30, 2010 09:13
|
|

|
Moist von Lipwig posted:Aren't Villi ultra-porous and fleshy? Maybe it's only because I've only seen electron microscope shots of them but yours seem way too smooth. I think that might come down to personal/artistic preferece though because a normal map might add too much detail or texture to it and take away focus from the worms. This, some dof might mitigate a bit of texture focus. edit: made a funny
|
|
#
?
Apr 30, 2010 13:14
|
|
|
Yeah, the look of it reminds me immediately of balloons (http://www.jasonhackenwerth.com/) rather than medical viz.
|
|
#
?
May 1, 2010 07:05
|
|


|

|
| # ? May 18, 2024 04:13 |
|
|
Thanks so much for the input. I've been so caught up in "omg I know how to make something in a 3d program" I've been missing the little details that make it pop.SynthOrange posted:Yeah, the look of it reminds me immediately of balloons (http://www.jasonhackenwerth.com/) rather than medical viz. That's awesome
|
|
#
?
May 1, 2010 11:55
|
|