
|
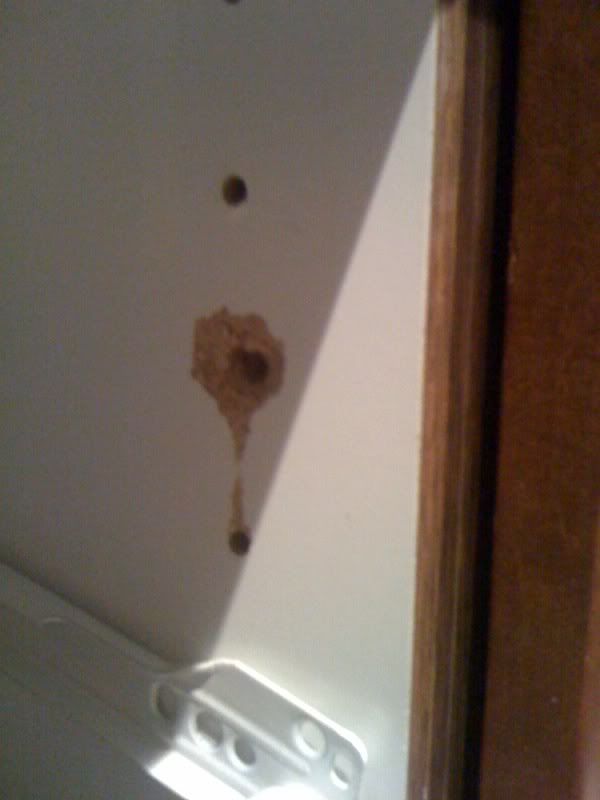 I did this to a kitchen drawer. The screw got ripped out and now the hole is too big/loose for the screw to screw back in. What's an easy/good fix for this? I'm not handy at all, my boyfriend has basic tools and basic DIY-ability.
|
 #
?
Apr 20, 2010 02:13
#
?
Apr 20, 2010 02:13
|
|

|

|
| # ? May 26, 2024 18:33 |
|
|
wormil posted:The two points I'm supporting in the concept sketch are two joists that run the length of the building, that's where most of the ceiling load is. The center point is pointless as there was nothing above it connecting to the actual roof. There is a pier under the old center post (which I've already removed as it was termite infested). It would probably be a good idea to have a center post supporting the header but that limits the functionality of my tablesaw. If my beam sags and I have to do it, I will, but I hope not to have to do it. You really shouldn't need to worry about sagging. If if does sag you can always double up on the header instead if you really like having that clear span. Alternately, get a glued laminate beam. It kinda does the same principle right off the bat.
|
|
#
?
Apr 20, 2010 03:06
|
|

|
Cat-Bert posted:
kid sinister fucked around with this message at 03:25 on Apr 20, 2010 |
|
#
?
Apr 20, 2010 03:20
|
|
|
Cat-Bert posted:
Is the white rail in the picture the piece that needs to be put back into place? Can you put the screws in a new location?
|
|
#
?
Apr 20, 2010 03:26
|
|
|
morethanjake32 posted:You really shouldn't need to worry about sagging. If if does sag you can always double up on the header instead if you really like having that clear span. Alternately, get a glued laminate beam. It kinda does the same principle right off the bat. I saw on the Homes by Holmes show they glued & screwed 3/4" plywood to both sides of a single 2x8 floor joist and claimed it increases strength by 5X, so there is always that. I had considered gluing and screwing a piece of plywood between the solid wood headers anyway. Cat-Bert posted:
Ghetto fix would be to stick a matchstick in the hole and reinsert the screw although that hole may be too big for that. Another idea is fill the hole with epoxy and drill a pilot hole before it dries rock hard.
|
|
#
?
Apr 20, 2010 06:52
|
|

|
I've had good luck with repairs like that by mixing sawdust and wood glue together into a stiff paste, then packing the hole and letting it dry.
|
|
#
?
Apr 20, 2010 13:03
|
|

|
For that drawer track you could also get a short dowel wider than your hole, cut a short disc off of it, drill a hole for that dowel and glue it into place. You'd get a nice, wide piece of real wood to screw into.
|
|
#
?
Apr 20, 2010 18:34
|
|
|
For a lab project I am trying to embed a ceramic filter inside a piece of stainless steel tubing. I think the easiest way to do this is to crimp the tubing to narrow the diameter to provide a "stop" for the filter, and then crimp the tubing just past the opposite end of the filter. This is kind of hard to visualize in words, but I basically want to uniformly "pinch" the tubing. The problem is, I have no clue what would do this. It also has to make a full circumferential crimp to narrow the diameter such that little or no water flows past the filter. I said we should just kink the drat tube twice but the lab says no. It's 9/32" OD stainless tubing. I'm guessing a large diameter wire crimper could? AWG 1 wire is 0.2893" which is only 0.2mm larger, but maybe that 0.2mm makes enough difference that it wouldn't work? ..here's a lovely MS paint diagram: JackBoCracken fucked around with this message at 08:20 on Apr 22, 2010 |
|
#
?
Apr 22, 2010 08:08
|
|

|
You might be better off asking in the blacksmithing/metworking thread, they might have a better idea of how to fix that filter into place without crushing the ceramics.
|
|
#
?
Apr 22, 2010 16:00
|
|
|
jackpot posted:I know this is probably unanswerable, but my shower is a piece of poo poo and I'm looking at getting it replaced (the shower walls are tiled, and they leak, and the tub is an old and ugly piece of poo poo). So it'll basically involve a new tub, tearing out the tile and putting up one of those plastic three-walled thingers, and installation. Anyone want to hazard a guess what this might run me? If location matters it's Richmond, VA. I know it's 3 days later, but we just did this exact job in my grandmas house. Material cost would be roughly $1000 for shower, doors, misc hardware. If you're not going to do it yourself, you'll need to factor in labor which I'm not sure what is going to run, it really just depends on who you get to do the work for you. Another option, if you want to cut cost is to see if you have a habitat for humanity re-store near by, they usually have a lot of extra materials there, some new, some used. Our local Home Depot was selling the 3 wall shower for around $750 but we ended up finding a new one at the re-store for $200 and we did the labor ourselves so the cost ended up being roughly $500 because we got the rest of the hardware at Home Depot.
|
|
#
?
Apr 22, 2010 19:30
|
|

|
I'm looking for some sort of room layout/planning software. I've seen Smartdraw, and kinda like what they have going on there. What do you suggest?
|
|
#
?
Apr 23, 2010 17:44
|
|

|
JackBoCracken posted:For a lab project I am trying to embed a ceramic filter inside a piece of stainless steel tubing. I think the easiest way to do this is to crimp the tubing to narrow the diameter to provide a "stop" for the filter, and then crimp the tubing just past the opposite end of the filter. This is kind of hard to visualize in words, but I basically want to uniformly "pinch" the tubing. What other constraints are you dealing with? Can you use epoxy, silicone, or o-rings? Are you dealing with high temperatures? What kind of pressures are you expecting? Does the filter have to be a specific diameter, or can you do something else? Do you have access to a machine shop? A welder? Without knowing more what I would consider doing is to cut the tube in half and use a ceramic filter with the same OD as the stainless tubing. I would put the filter inside the center of a sleeve whose ID is equal to the tube OD, and then put the tubes inside the opposite ends of the sleeve. I would then secure the assembly using either epoxy, RTV, o-rings, or possibly even weld it depending on what you're going for. Check the image below to see what I mean:  I would be worried about crimping causing damage to the ceramic. My personal preference for this kind of stuff is Dow Corning 832 RTV Adhesive. It sticks pretty much to everything, makes a great seal, and is fairly cheap. Make a thin ring of the stuff around each tube before you shove them into the sleeve. Put the ring at least 1/4" away from the front of the tube to prevent the RTV from getting on the filter. If you use McMaster-Carr the RTV is P/N 66235A1 and is $10 a tube. A 12" length of .292" ID SS tubing is P/N 6100K227 and will set you back $14. Use a pipe cutter to cut the tubing so you don't get burrs or pinch anything.
|
|
#
?
Apr 23, 2010 18:43
|
|
|
My aunt had someone replace the floor on her front porch. He did a pretty okay job for what she paid him but he used boards that are too thin to really stand up to a lot of wear (1x4s, I think). Instead of ripping the entire floor up and re-doing it myself, is there some sort of sheet material that could go over it and stand up to the weather? I'm thinking something about an inch and a half thick would make it feel solid and the treated lumber floor that she just had put down would act as a good base but I don't know. I wish she would've paid for thicker wood but she doesn't have much money now so I'm just trying to make sure her chairs won't bust through the floor when she's sitting out there.
|
|
#
?
Apr 28, 2010 07:25
|
|
|
Lincoln`s Wax posted:I wish she would've paid for thicker wood but she doesn't have much money now so I'm just trying to make sure her chairs won't bust through the floor when she's sitting out there. Decking material is normally 5/4 (1.25" thick) so .75" material is on the thin side. I wouldn't recommend sheet goods if they are exposed because standing water will make the deck slippery and promote rot. You could lay more .75" material for 1.5" total which would be plenty but it should probably be at an angle to the current decking.
|
|
#
?
Apr 28, 2010 07:51
|
|
|
The thickness of decking depends on the span, too. If it's 1x4 over 12"OC, it may be OK, otherwise, gotta go with wormil on this one. Plywood underlayment is usually 3/4" T&G for floors and would be stable if laid over planks (especially if glued & screwed), but I wouldn't recommend it for am exterior deck.
|
|
#
?
Apr 28, 2010 11:23
|
|


|
Does anyone know what the backing material for latch hook rugs is called? You know, it's like embroidery canvas but with huge holes for threading tufts of yarn through to make rugs. Is it expensive too?
|
|
#
?
Apr 29, 2010 16:07
|
|

|
madlilnerd posted:Does anyone know what the backing material for latch hook rugs is called? You know, it's like embroidery canvas but with huge holes for threading tufts of yarn through to make rugs. It's also called canvas - google "latch hook rug canvas". Doesn't seem to be expensive; Amazon has 36"x60" sheets for about $11 american.
|
|
#
?
Apr 29, 2010 16:18
|
|


|
Suppose I have a length of Schedule 80 PVC pipe that is 5 inches in diameter, adequately sealed on both ends. I want to submerge it into ~30 meters of water for a day or two. Will the pipe be able to withstand the water pressure? According to this chart, max PSI for this type of pipe is 173 PSI. I believe water is 15 PSI for every 10 meters of depth (plus the atmosphere itself), for a total of 60 PSI. Are my calculations correct? Schedule 80 pipe should be able, under ideal conditions, to withstand water pressure up to 100 meters? Iron Squid fucked around with this message at 07:36 on Apr 30, 2010 |
|
#
?
Apr 30, 2010 07:15
|
|

|
It's too late for me to do math right now but I really want to know why you are submerging this pipe/what is in the pipe.
|
|
#
?
Apr 30, 2010 08:26
|
|


|
Iron Squid posted:Suppose I have a length of Schedule 80 PVC pipe that is 5 inches in diameter, adequately sealed on both ends. I want to submerge it into ~30 meters of water for a day or two. Will the pipe be able to withstand the water pressure? Also NancyPants posted:I really want to know why you are submerging this pipe/what is in the pipe.
|
|
#
?
Apr 30, 2010 12:06
|
|
|
grover posted:Pipes are rated for internal pressure (tension), not external (compression). These numbers don't apply to your application. That's what I wanted to know. Any way that I can find the compression strength of schedule 80 pipe? NancyPant posted:It's too late for me to do math right now but I really want to know why you are submerging this pipe/what is in the pipe. The pipe is for a project. DO NOT ASK WHAT PROJECT IS FOR.
|
|
#
?
Apr 30, 2010 17:05
|
|
|
Iron Squid posted:That's what I wanted to know. Any way that I can find the compression strength of schedule 80 pipe? Hard maths, but http://www.uni-bell.org/pubs/Chapter%207.pdf should answer the question. Short version: you could send pvc to the bottom of the ocean, however, gasses inside might blow off the endcaps at extreme depths
|
|
#
?
Apr 30, 2010 17:36
|
|

|
Iron Squid posted:The pipe is for a project. DO NOT ASK WHAT PROJECT IS FOR.
|
|
#
?
Apr 30, 2010 17:37
|
|
|
Flay Minion posted:Hard maths, but http://www.uni-bell.org/pubs/Chapter%207.pdf should answer the question. At the bottom of the ocean, how would air trapped within the PVC overcome water pressure to push off the endcaps? I can see endcaps as a point of failure, but not because the internal pressure of the tube is greater than the surrounding water pressure. Or am I misreading you? grover posted:Dude, you can't post a question like this and NOT tell us what it's for! Sometimes plausible deniability is the greatest gift in the world.  But all comedy aside, I've been building a small submarine in my head during the last two weeks of work. I know how I want it to work; I just have to put some numbers behind it.
|
|
#
?
Apr 30, 2010 17:50
|
|
|
madlilnerd posted:Does anyone know what the backing material for latch hook rugs is called? You know, it's like embroidery canvas but with huge holes for threading tufts of yarn through to make rugs. Not pricy, tho some of the more exotic wools are. Google 'linen burlap' or 'monks cloth' for an idea. Plain, coarse woven linen is also popular and reasonably priced -- tho if I remember right, you're in the UK so the nomenclature may differ from the states Also 'latch hook canvas' might work for you e: dont spel gud e2: drat didn't see alucinor's post Flay Minion fucked around with this message at 22:11 on Apr 30, 2010 |
|
#
?
Apr 30, 2010 17:53
|
|
|
Iron Squid posted:At the bottom of the ocean, how would air trapped within the PVC overcome water pressure to push off the endcaps? I can see endcaps as a point of failure, but not because the internal pressure of the tube is greater than the surrounding water. Nah, I'm just explaining it poorly. Water pressure might cause the seal (glue, threads, whatever) to fail at great depth. Doubtful that the pipe itself would crush/fail. Those numbers in the link indicate the pipe can take a huge amount of external pressure (admittedly the example is pressure on a buried pipe, but hey)
|
|
#
?
Apr 30, 2010 18:00
|
|
|
Flay Minion posted:Nah, I'm just explaining it poorly. Water pressure might cause the seal (glue, threads, whatever) to fail at great depth. Doubtful that the pipe itself would crush/fail. Those numbers in the link indicate the pipe can take a huge amount of external pressure (admittedly the example is pressure on a buried pipe, but hey) Yeah, I can think of several pressure-related ways the endcaps can fail. I've got a couple of ideas to fix that.
|
|
#
?
Apr 30, 2010 18:17
|
|
|
Iron Squid posted:At the bottom of the ocean, how would air trapped within the PVC overcome water pressure to push off the endcaps? I can see endcaps as a point of failure, but not because the internal pressure of the tube is greater than the surrounding water pressure. I kind of hoped it would be a submarine.
|
|
#
?
Apr 30, 2010 21:15
|
|
|
Iron Squid posted:a small submarine
|
|
#
?
Apr 30, 2010 21:53
|
|

|
alucinor posted:It's also called canvas - google "latch hook rug canvas". Ah, I had no idea Amazon would stock it. That's much cheaper than I was expecting. Flay Minion posted:Not pricy, tho some of the more exotic wools are. Google 'linen burlap' or 'monks cloth' for an idea. Plain, coarse woven linen is also popular and reasonably priced -- tho if I remember right, you're in the UK so the nomenclature may differ from the states The actual stuff I'm hooking through it is free- I'm using old tshirts shredded. Started experimenting with a piece of canvas I already had and it makes and really plush, thick rug, so I think I might start making them as presents. Someone I know with an extensive tshirt collection is on the path to weightloss so I've hopefully got 30 or so XL tshirts on their way to my work bench. Gonna cut out the threadless designs and make him a blanket/quilt with them and then shred the rest of the fabric or turn it into non-sock-monsters.
|
|
#
?
Apr 30, 2010 22:08
|
|
|
madlilnerd posted:Ah, I had no idea Amazon would stock it. That's much cheaper than I was expecting. Amazon sells everything. I've ordered transmission fluid from Amazon.
|
|
#
?
Apr 30, 2010 22:14
|
|

|
I'm real dumb about home repair and such. I just bought a house. Project 1. Painting. This house is old, 1916 with plaster walls. Would it be worth my while to sand the walls down (I have a power sander) before painting? I just have this idea that there are like 200 coats of paint on the walls. I know it will be labor intensive, that doesn't bother me, but I'm thinking maybe I'm over reacting and I don't really need to do this.
|
|
#
?
May 1, 2010 00:20
|
|

|
You don't need to do that. It would be a near-impossible task.
|
|
#
?
May 1, 2010 00:29
|
|
|
Richard Noggin posted:You don't need to do that. It would be a near-impossible task. Word. Paint is paint. Paint over it! Now layers and layers of wallpaper, that's a different story. I swear half my childhood was spent either scraping paint off the outside of our house or steaming wallpaper off of the inside. loving old farm houses.
|
|
#
?
May 1, 2010 00:52
|
|

|
Cool. Can someone explain to me, does paint just literally not layer on as thick as I'm imaging in my head?
|
|
#
?
May 1, 2010 00:57
|
|
|
Interior paint is pretty thin, yeah. But it's also just not going to come off evenly or well, and anything that could really remove all the paint will also gouge through the very thin surface of the wall and start into the plaster under it and it'll just be a godawful mess. Honestly if you had a situation so bad you couldn't paint over it, you might be better off replacing entire panels with sheetrock rather than trying to strip it, I dunno. Probably take less time and effort, anyway.
|
|
#
?
May 1, 2010 01:05
|
|

|
Here's my question... I have a bedroom with ceiling texture on the walls. The house came that way I have no idea why anyone would do something like that but I want to remove it. I scraped it with a paint scraper and knocked off the high points but it still has a texture. Is there a way to do it short of taking down the sheetrock and starting over? If there is an easy way I would also like to remove it from my kitchen and dining ceiling.
|
|
#
?
May 1, 2010 01:44
|
|
|
wormil posted:Here's my question... I have a bedroom with ceiling texture on the walls. The house came that way I have no idea why anyone would do something like that but I want to remove it. I scraped it with a paint scraper and knocked off the high points but it still has a texture. Is there a way to do it short of taking down the sheetrock and starting over? If there is an easy way I would also like to remove it from my kitchen and dining ceiling. spray bottle full of water. Try wetting it, let it sit a couple of minutes and try scraping it off w/ a wide spatula. I use this method w/ popcorn ceilings tho I cant fathom why somebody did it to a wall
|
|
#
?
May 1, 2010 06:53
|
|
|
Flay Minion posted:spray bottle full of water. Try wetting it, let it sit a couple of minutes and try scraping it off w/ a wide spatula. I use this method w/ popcorn ceilings tho I cant fathom why somebody did it to a wall Thanks, I'll give it a try this weekend.
|
|
#
?
May 1, 2010 07:40
|
|
|

|
| # ? May 26, 2024 18:33 |
|
|
jassi007 posted:I'm real dumb about home repair and such. I just bought a house. Project 1. Painting. This house is old, 1916 with plaster walls. Would it be worth my while to sand the walls down (I have a power sander) before painting? I just have this idea that there are like 200 coats of paint on the walls. I know it will be labor intensive, that doesn't bother me, but I'm thinking maybe I'm over reacting and I don't really need to do this. For a house that old, you would also be throwing all kinds of lead paint powder into the air with a sander. The only time you should need to remove paint on walls is when it's chipping off and you're about to repaint.
|
|
#
?
May 1, 2010 19:26
|
|