

|
The problem with that shot is the tree in the back in my opinion. The leaves make the edge of of the wings blend in a little, especially on the right one. Playing with the contrast and color saturation could help out a bit. It would have been so much better if the tree wasn't behind it. Not that you can do it now, but you would have benefited from taking a few steps forward and crouching down and angling up a bit. You'd have gotten the top of the statue up against the sky instead of the tree and it would have added more drama and attention to the statues themselves.
|
 #
?
May 6, 2010 01:27
#
?
May 6, 2010 01:27
|
|

|

|
| # ? May 16, 2024 05:25 |
|
|
I would definitely play with the reds and greens to make the background more uniform, then bring their luminosity down to try and reduce the focus on the background.
|
|
#
?
May 6, 2010 01:31
|
|


|
Does CS5 have the crazy camera/lens correction options yet? I'd love to see how it handles some shots I've taken with my 10.5mm fisheye
|
|
#
?
May 6, 2010 02:29
|
|
|
Martytoof posted:Can you link to a larger file so we can play around with a full sized version? It's hard to say what I'd do to improve it without fiddling with a few buttons and knobs. Hurrrrrrrrr Stupid auto resize. Here's the fullsize version, bit grainy though. http://yfrog.com/5zdscf3778uj rockcity posted:The problem with that shot is the tree in the back in my opinion. The leaves make the edge of of the wings blend in a little, especially on the right one. Playing with the contrast and color saturation could help out a bit. It would have been so much better if the tree wasn't behind it. Not that you can do it now, but you would have benefited from taking a few steps forward and crouching down and angling up a bit. You'd have gotten the top of the statue up against the sky instead of the tree and it would have added more drama and attention to the statues themselves. Oh I'm definitely inclined to agree, its times like that I wish I had a decent camera and could've played around with the focal point or something. Yeah, especially against the sky it would've looked alot more imposing if I took the time to frame and set the shot up properly. I tried getting a bit closer but couldn't quite frame everything properly with the huge rear end trees in the background, for scale http://yfrog.com/1rdscf3777vj It was just a very surreal moment accidentally stumbling across such an ominous looking monument in the middle of this serene park while out for a leisurely stroll, not even intending to take pictures. I just stood there in shock like 'whoa... *click*' ")
|
|
#
?
May 6, 2010 02:30
|
|
|
So I have a quick question about light room for you guys that use it. Does it have anything that would let me say select the background of my photos and blur it out more or is that something that I'm going to have to use like photo shop for? Sorry again for the stupid question, I only just started using it and I was not seeing anything like that but I thought I would ask.
|
|
#
?
May 6, 2010 03:21
|
|

|
That's more of a photoshop task. You need to mask out the background in that case anyway, something you can't do in LR as far as I know.
|
|
#
?
May 6, 2010 03:41
|
|
|
I'm 99% sure there's nothing like that in LR.
|
|
#
?
May 6, 2010 04:00
|
|

|
Fetus Pie posted:Hurrrrrrrrr I gave it a try, for some reason waffleimages kept rejecting it, so I can't imbed it. I tried perspective correction, but the sides are still off because if I go any further, more of the wings get chopped off. Removed some leaves on the floor, upped saturation a bit, did slight sharpening. e:  Trying to straighten it is really difficult due to being shot at 13mm. I tried to get rid of the lens distortion, but that didn't work very well without making the statue look super odd. I tried perspective distort, it sort of worked. I tried to straighten it, but due to the way the picture was shot, it can't be straight at any angle change that I was able to find. The perspective on the box-y thing makes them extend outward a little bit, but unless you don't mind losing more of the angel wings, then it can't be done very easily. Shmoogy fucked around with this message at 04:10 on May 6, 2010 |
|
#
?
May 6, 2010 04:06
|
|

|
psylent posted:I'm 99% sure there's nothing like that in LR. I am 100% sure there isn't anything like that in LR. You want to load up photoshop and play with some blur filters.
|
|
#
?
May 6, 2010 04:07
|
|
|
Thanks guys!
|
|
#
?
May 6, 2010 04:11
|
|
|
Obscurum posted:So I have a quick question about light room for you guys that use it. Does it have anything that would let me say select the background of my photos and blur it out more or is that something that I'm going to have to use like photo shop for? actually you could make a custom adjustment brush with -100% clarity and sharpness and apply it a few times, but yeah, it would be way better and easier in photoshop.
|
|
#
?
May 6, 2010 04:11
|
|

|
RangerScum posted:I am 100% sure there isn't anything like that in LR. You want to load up photoshop and play with some blur filters. You can paint with clarity -100 and sharpness -100 with a few layers to get a faux blur thing going on, but it's not quite the same as you would achieve in photoshop. e: gently caress beaten
|
|
#
?
May 6, 2010 04:13
|
|
|
Yeah I considered it and while it sorta achieves the effect, negative clarity looks a lot different than bokeh or whatever you wanna call it.
|
|
#
?
May 6, 2010 04:32
|
|
|
Huh well I might play around with it just to see what one could do but I guess in the end I'll have to learn my way around photo shop too.
|
|
#
?
May 6, 2010 04:34
|
|
|
 Ehh, it ended up with a kind of "selective colour" thing which I hate, and specifically blew out the midtones a little, I dunno.. It's different at any rate. I guess I wouldn't really call it a "photo" at this point though  Here's the original sized photo with edits if you want it. (~2mb) http://dl.dropbox.com/u/58959/PhotoEdit.jpg some kinda jackal fucked around with this message at 04:44 on May 6, 2010 |
|
#
?
May 6, 2010 04:42
|
|
|
Didn't see the other photo, here is my take on it. e: It looks way oversharpened, and I don't have my calibrated monitor-- When I lightened the trees to the top got some wicked noise, but didn't feel like trying to take it out.
|
|
#
?
May 6, 2010 05:11
|
|
|
..and another version. I thought the bronze wings were interfering with the green foliage, so they got heavily desaturated.
Cross_ fucked around with this message at 07:42 on May 6, 2010 |
|
#
?
May 6, 2010 07:39
|
|
|
What the heck, might as well do the close-up too : Again, desaturated statue, boosted saturation for the foliage and sky. Luminance sharpening for foreground only. Lens correction clipped the wingtips.
|
|
#
?
May 6, 2010 08:39
|
|
|
Had a few minutes to kill at work.
|
|
#
?
May 6, 2010 23:44
|
|

|
I have a PSD that I use as a template to apply color processing to photos (images are pasted onto the blank layer):  Is it possible to convert all of these layers to some sort of action (so I can automatically add these layers in my photo of copying them from a separate PSD)?
|
|
#
?
May 7, 2010 02:18
|
|
|
Just go to the actions palette, hit "record", do all the stuff you'd normally do to create the layers from scratch, and hit "stop".
|
|
#
?
May 7, 2010 02:20
|
|

|
Great, thanks - that worked fine.
|
|
#
?
May 7, 2010 02:58
|
|
|
You guys are brilliant! I'm at work at the moment, I'll sort everything out when I get home late tonight. Amazing what a bit of post processing can do, I really gotta start practicing this. With th close up, if it would be possible to somewhat crop the bottom of the photo slightly or not correct the perspective quite as much so that the angel wings remain intact, I'd be eternally grateful. When I get the photo printed the top and bottom will be slightly cropped so I fear that a fair bit of the shot may be lost is all
|
|
#
?
May 7, 2010 06:49
|
|
|
I'm not on my work monitor so I didn't touch the focus or alignment. Hope you like it with the stonework looking warmer. I didn't want to oversaturate the trees but they could be pushed a little more. [img]http://img.waffleimages.com/f9aa4233d563667a28a7846605bd5e6fe334921e/dscf3777v[1].jpg[/img]
|
|
#
?
May 7, 2010 06:56
|
|

|
How would I go about toning down the overexposed bits in the sky in this? 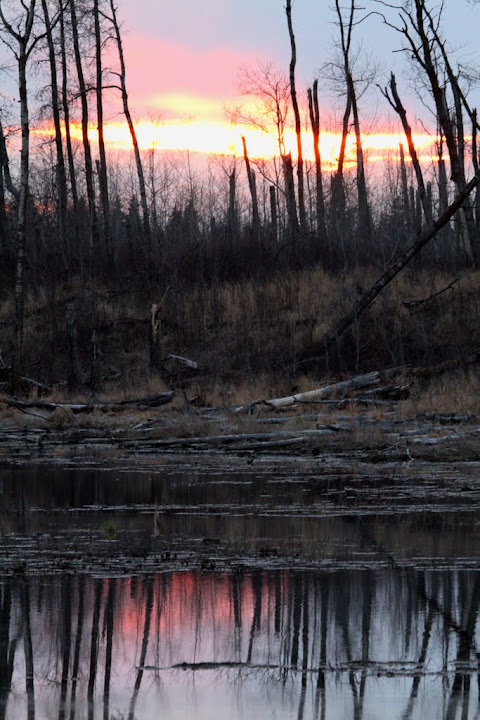
|
|
#
?
May 7, 2010 16:35
|
|

|
InternetJunky posted:How would I go about toning down the overexposed bits in the sky in this? Most likely with curves but the result will probably look a little oddly underexposed compared to the rest. Just play with the very top 90% of the curve and bring it down. Should work.
|
|
#
?
May 7, 2010 17:09
|
|

|
InternetJunky posted:How would I go about toning down the overexposed bits in the sky in this? Mask the overexposed parts in from another layer that you have tried to save? Easiest way to do it without ruining the rest of the picture.
|
|
#
?
May 7, 2010 19:44
|
|

|
Yeah, just mask off the overexposed areas and then do your editing on those, it'll save you a lot of headache.
|
|
#
?
May 7, 2010 20:20
|
|
|
I actually reckon the selective colour thing you've got goin looks pretty snaz martytoof, but yeah sorry I was just after something to enhance/fix the original a bit, cool though, sincerely appreciate it Cross, could you send me the .psds/full res .jpgs to my email and I'll paypal ya. If you've got time, would you be able to try and save the wings by not correcting the perspective as much or cropping the photo slightly in the close up? Hit me up either way Thanks again to everyone who gave their time to help me out!
|
|
#
?
May 9, 2010 19:02
|
|
|
No need for paypal. Just tell me where you want the files sent.
|
|
#
?
May 11, 2010 19:25
|
|
|
Very much a work in progress here, but I'm getting frustrated with this and don't know how to fix it. Here's the original after a little bit of lightroom:  And what I've done so far.  I'm going to fix the colour correction in the foreground, that's easy, and the sharpening I'm doing is much less harsh at higher resolutions, but why is there a grey line between the sky and the farthest top of the canyon like, right offcenter in the top of the frame? It cropped up when I selected the sky and then adjusted it to reduce the exposure so that blown out details would come through a little bit. I tried feathering the selection about 10 pixels but it made no difference. I don't even know what this problem is called.
|
|
#
?
May 11, 2010 20:15
|
|


|
I looked around and couldn't find a more appropriate thread I could post this question in, so I hope this is the right one. I'm calibrating my monitors with a Pantone Huey Pro, and my desktop's LCDs calibrate just fine, but when I try it on my laptop, I get a horrible green tint to everything. The desktop is running Vista 64-bit with an NVIDIA GeForce 9800 GTX+, and the laptop is running Windows 7 64-bit with Intel GMA 4500M integrated graphics. The LCDs are matte and the laptop screen is glossy. Is there something I'm doing wrong here? The Huey Pro software says that it works with Vista and 7 64-bit, and since it worked perfectly with my desktop, I doubt it's a problem with the calibrator itself.
|
|
#
?
May 11, 2010 23:20
|
|
|
Cross_ posted:No need for paypal. Just tell me where you want the files sent. Whoa okay cool, thanks dude If you could email them to actionpotato@gmail.com that'd be very much appreciated!
|
|
#
?
May 12, 2010 08:11
|
|
|
tuyop posted:why is there a grey line between the sky and the farthest top of the canyon like, right offcenter in the top of the frame? That�s the edge between two radically different exposure settings. You need to keep the mask crisp between mountain and sky, like pixel perfect to avoid it.
|
|
#
?
May 12, 2010 16:02
|
|

|
poopinmymouth posted:That�s the edge between two radically different exposure settings. You need to keep the mask crisp between mountain and sky, like pixel perfect to avoid it. I have this problem a lot - it seems like this would pretty easy to automate, but Lightroom hasn't got any selection tools and Photoshop's magic wand is useless at it. edit: ooh forgot about auto-mask Zegnar fucked around with this message at 16:20 on May 12, 2010 |
|
#
?
May 12, 2010 16:14
|
|
|
Zegnar posted:I have this problem a lot - it seems like this would pretty easy to automate, but Lightroom hasn't got any selection tools and Photoshop's magic wand is useless at it. Nah, it's something that photoshop workers have had to deal with forever, and it's surprisingly hard to automate. You should only ever be using the magic wand to get a rough idea of a selection when something is on a perfectly even background, and then doing all the fine tuning yourself. Zoom in to 400% and use the polygonal lasso, turn that into a layer mask, and touch it up with the brush tools.
|
|
#
?
May 12, 2010 16:22
|
|
|
If you've just got a little line like that, you can zoom in and, in Lightroom, use the adjustment brush to drop the exposure on the line just a touch. It's a bit crude, but it only took me ten seconds to get this: If you're careful and actually attentive to detail, you could probably make the line wholly invisible at reasonable resolutions. a foolish pianist fucked around with this message at 16:41 on May 12, 2010 |
|
#
?
May 12, 2010 16:25
|
|
|
[e] how the hell did I get a double post with one in between 
|
|
#
?
May 12, 2010 16:30
|
|
|
I'm having trouble getting a smooth gradient. It looks fine and smooth in Photoshop but once saved as jpeg it looks like poo poo. I have increased the brightness so you can see it more clearly. It looks like it's reducing the colors or something. I'm saving it with quality set to 10 and baseline format. What can I dooooo?
|
|
#
?
May 12, 2010 17:34
|
|

|

|
| # ? May 16, 2024 05:25 |
|
|
Try saving as PNG. I don't think there's any way around it with JPEG.
|
|
#
?
May 12, 2010 17:47
|
|