


|
Hmm. Well, there's a vent at the top of my garage apparently - I can see it from outside. The previous owners for some reason stapled blue tarp all over the inside ceiling, and put up pieces of drywall in random places... we think someone must have been living in the garage for a while. (There's no leaks or anything to explain the tarp though.) I figure once we tear down the tarp and figure out what's going on under it, I could always build a hood and venting up to that vent in the roof, hook up a fan to it, and have forced-air exhaust above a forge. This is all long-term planning though. We have other projects that need to be done first.
|
 #
?
Apr 14, 2010 06:00
#
?
Apr 14, 2010 06:00
|
|


|

|
| # ? May 24, 2024 21:37 |
|
|
I work outside, but I'm trying to fix that. Mostly because I have this outside for 5 months every year: Once I move, I'm hoping to get a little wooden shed I can put out back and put all my forge gear into. I don't need a whole lot of space, I've decided, most of the major power tools can stay in the garage and be used there.
|
|
#
?
Apr 14, 2010 06:21
|
|


|
Well, maybe, but you need room for a 100lb power hammer, right? And a couple of post vices, a big project table, a bench-mounted shear, maybe an english wheel, your anvil, a big forge and a little forge and maybe an oven for annealing... there's never too much room, right? (I'm kidding, I've been following your housebuilding thread and your tractorbuilding thread so I've got a really good idea of how much space you've got and I'm very jealous.)
|
|
#
?
Apr 14, 2010 17:11
|
|
|
Yeah, the workshed just needs to be big enough to hold a bench, a saw, the anvil, two forges, and a power hammer. Everything else can go in the garage.
|
|
#
?
Apr 14, 2010 17:21
|
|
|
I adjusted the carburetor on the welding machine, and got some fresh gasoline. It's running sweet now. I whipped out the Arcair K2000 and gave it a whirl with the machine. I'm pleased to report that she works GREAT with 1/8" DC carbons. This, of course, means I can now do air-carbon arc cutting and gouging in my shop, because single phase power won't normally handle it. The machine does not have enough juice for a 1/4" carbon. A 3/16" might work, but I don't have any to test out. For most of the work I do here, 1/8" is the perfect size anyway. 3/16" would be useful on occasion, if the machine can muster it.  I got the torches, and the welding machine, now I just need an engine driven air-compressor, and a trailer to put it all on.
|
|
#
?
Apr 16, 2010 01:19
|
|

|
Just get a 240v electric one and plug it into the generator on your welder. No need to maintain two gas engines if you can avoid it. Also congrats, glad to hear it's running well ")
|
|
#
?
Apr 16, 2010 07:26
|
|
|
Slung Blade posted:Just get a 240v electric one and plug it into the generator on your welder. No need to maintain two gas engines if you can avoid it. The more generator power you are using, the less welding power you have, and vice versa.
|
|
#
?
Apr 16, 2010 12:42
|
|
|
This thread has been a great read. I've always thought about dabbling in metal casting, and I was finally inspired to use this Instructable to make a rudimentary furnace. I have exactly $2 invested in the project so far - the hair dryer was purchased at a thrift shop yesterday, but I had everything else on hand already. It all went together it a matter of minutes, and while I can't really say much for the efficiency of the coffee can apparatus, it did indeed melt the two hard drive carcasses I fed it. Since this was just an experiment, and I wasn't really set up to do any real casting, I just made a couple of depressions in some sand so I could pour ingots for (hopefully) future use: 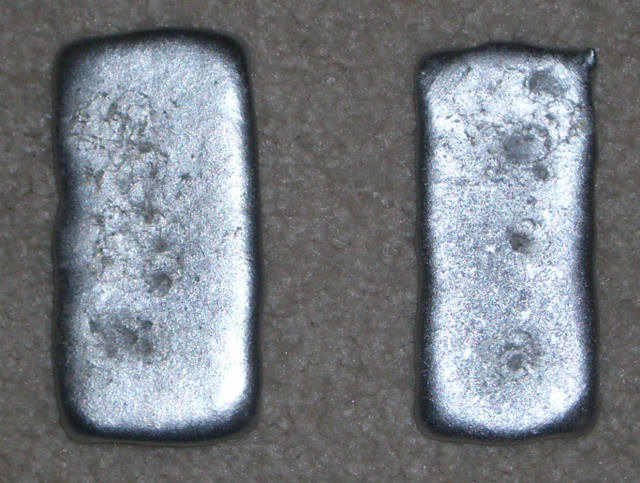 That's just the back side, though. I figured the experiment would be a bust if I didn't try to mold something, no matter how crude: 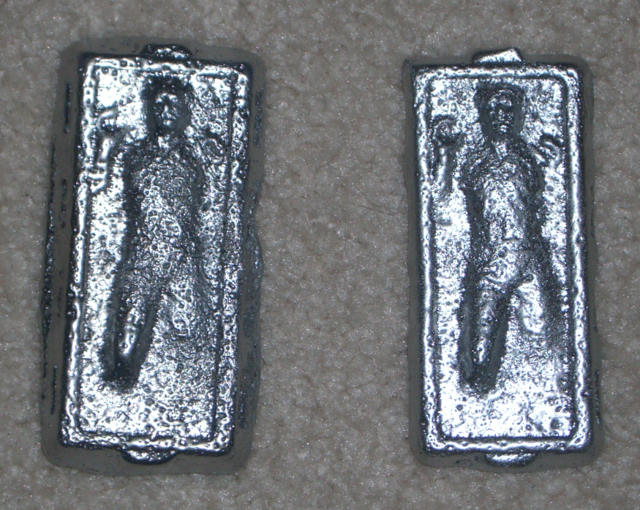 I'll futz with this for a while until I can scrounge/afford better equipment. Time to research proper mold making!
|
|
#
?
Apr 18, 2010 18:35
|
|

|
Acid Reflux posted:This thread has been a great read. I've always thought about dabbling in metal casting, and I was finally inspired to use this Instructable to make a rudimentary furnace. I have exactly $2 invested in the project so far - the hair dryer was purchased at a thrift shop yesterday, but I had everything else on hand already. Haha that is amazing. How did you make the molds?
|
|
#
?
Apr 18, 2010 19:29
|
|
|
Brekelefuw posted:Haha that is amazing. How did you make the molds?  All I did was press a Han in Carbonite toy down into some sand, nothing special at all. I was going to try another one with some sifted sand to maybe pick up a little more detail, but I ran out of charcoal and I'm too lazy to run out for more. All I did was press a Han in Carbonite toy down into some sand, nothing special at all. I was going to try another one with some sifted sand to maybe pick up a little more detail, but I ran out of charcoal and I'm too lazy to run out for more.
|
|
#
?
Apr 18, 2010 21:04
|
|
|
dv6speed posted:That won't actually work very well in real life because the air compressor draws too much current to be used at the same time you are striking an arc. For quick and dirty jobs that don't need much air it'd be OK, but more involved ones would not work well. How big a tank would you need for it be practical to alternate between cutting/gouging and runnign the compressor to refill the tank, you could surely get an acceptable duty cycle if it refilled the tank while you changed rods.
|
|
#
?
Apr 19, 2010 00:46
|
|

|
I asked this in the "quick questions that don't deserve a thread" thread and they referred me here... For a lab project I am trying to embed a ceramic filter inside a piece of stainless steel tubing. I think the easiest way to do this is to crimp the tubing to narrow the diameter to provide a "stop" for the filter, and then crimp the tubing just past the opposite end of the filter. This is kind of hard to visualize in words, but I basically want to uniformly "pinch" the tubing. The problem is, I have no clue what would do this. It also has to make a full circumferential crimp to narrow the diameter such that little or no water flows past the filter. I said we should just kink the drat tube twice but the lab says no. It's 9/32" OD stainless tubing. I'm guessing a large diameter wire crimper could? AWG 1 wire is 0.2893" which is only 0.2mm larger, but maybe that 0.2mm makes enough difference that it wouldn't work? ..here's a lovely MS paint diagram:
|
|
#
?
Apr 22, 2010 16:24
|
|

|
You will need a custom made 2 piece die to crimp that (just like a terminal on a wire). It's a relatively simple job for anyone with a metal lathe to make. A hydralic press or even a bench vise can be used to preform the crimp. Since crimping came to your mind, obviously the filter isn't replacable, so an adhesive might do the trick, also. Edit: Come to think about it, you Might be abel to make the die using nothing but a drill press and a hack saw. Cut the block in half, clamp it together, drill a hole down the middle for the small diameter, then drill from either side for the large diameter. That will leave a little bit of metal inside to preform the crimp. AbsentMindedWelder fucked around with this message at 18:08 on Apr 22, 2010 |
|
#
?
Apr 22, 2010 18:00
|
|
|
You may not need a custom dieset unless youre unlucky with your dimensions. First of all, fix your units. Say what the tubing is in decimals and an estimated tolerance and what the 1AWG gauging is and the difference between them all in inches. Second, a die meant to crimp 1AWG will not have any dimension near what the diameter of the actual wire is because theyre designed to crimp terminals, not wire. Questions that will help to answer your question: Whats the wall thickness of the tubing? What is the ID? If you crimp the metal onto the filter will it crack the filter? If the answer is not so thick a hand tool couldnt do it and it wouldnt crack it then you can probably crimp it directly onto it. Ill ask at work (I work for a company that makes crimp tools) what type of diesets we use when we need a crimp through which fluid cant pass. I am betting a typical circular/crescent crimp will do. Another question which gives another solution is this, whats the diff between the OD of the filter and the ID of the tube? If it is close enough that you could put some silicone sealent then drill a hole and drive a pin through as a backstop youre pretty much set. It'll stop water form flowing around it and be cheap and simple. You may need to spot weld the pin in place or add loctite.
|
|
#
?
Apr 22, 2010 18:19
|
|

|
well so the whole idea was to keep glues and such other compounds to a minimum. Partially because we need to make a buttload of these. And you're right, the filter is non-replaceable. Actually I don't know the answer to a lot of the questions because we haven't bought the tubing. The important thing is that the OD is 0.28125" We have a choice of wall thicknesses (and corresponding IDs), and I was told to just pick the one that would let us do this. We can make the filters narrower in diameter fairly easily. But basically we are at the mercy of McMaster which has: code:We don't want to crimp directly onto the filter, just past the edges of it, like so:
|
|
#
?
Apr 22, 2010 18:38
|
|
|
How many of these do you need to make? It's sounding like a custom die may be worth the $ to obtain. You mentioned this is a "lab" project, I assume for school? Does your school have a machine shop?
|
|
#
?
Apr 22, 2010 18:41
|
|
|
Yes they do, but for a senior project I don't want to shell out $300 of my own money to pay for the training course, and all the funding I've gotten for the project is sucked up by transportation costs I could, however, probably talk someone into making this for me, if I ask around. I've never actually been inside the machine shop, but it's shared with the physics students, so I'm presuming it is fairly well equipped
|
|
#
?
Apr 22, 2010 19:04
|
|
|
Why cant you use an inline filter? The only way the crimp will seal is if the angle of the crimp in the ID pretty precisely matches the angle of on the filter that will be touching that surface. (Or use a ball end filter like a check ball/valve in hydraulics) Which is going to have a good chance of tolerance stack I bet between filters and what you'll get from crimping by hand/tools. Again if stuff flowing past it isnt a huge issue due to size you can simply drill and put in a stop. You could also make a sleeve for the filter to ensure a tight fit if you have enough clearence in the ID.
|
|
#
?
Apr 22, 2010 22:28
|
|
|
Or just use an array of normal pipe filters unless the ceramic filter is the point.
|
|
#
?
Apr 22, 2010 23:26
|
|

|
I replied to your question in the other thread, but I see you're here so I'll repost it. Can you give us more info about your project?Beer4TheBeerGod posted:What other constraints are you dealing with? Can you use epoxy, silicone, or o-rings? Are you dealing with high temperatures? What kind of pressures are you expecting? Does the filter have to be a specific diameter, or can you do something else? Do you have access to a machine shop? A welder?
|
|
#
?
Apr 23, 2010 18:48
|
|

|
Thanks for all the help! Well, basically the idea was to create an easy way to sample, store, and dry the top few cm of mud from a tidal flat. We have a bunch of these ceramic-like (I don't know if they're *actually* ceramic...sure feels like it though) plugs from a former lab occupant that look like a brillo sponge pad (only hard), and they do a bang up job of letting seawater trickle out of mud when we used them to plug a hole in the bottom of a PVC pipe cap. So my idea, instead of stabbing into the mud with the stainless tube, blowing it out into another container to let the water drain and dry, and then putting it into another container for storage, was to do this, so we could just stab the stainless tube into the mud, flip it upside down and set it in a rack (well okay holes drilled in a board on top of a box). And avoiding glue and using only hand tools allows us to make more in the field if we so wish. Turns out, a steady hand with a dull tube cutter works pretty well. Got the idea from a physics paper from the 70s that was using dull tube cutters to join tubing.
|
|
#
?
Apr 23, 2010 21:45
|
|
|
JackBoCracken posted:Turns out, a steady hand with a dull tube cutter works pretty well. Got the idea from a physics paper from the 70s that was using dull tube cutters to join tubing.
|
|
#
?
Apr 23, 2010 21:58
|
|
|
I agree. That's a much easier way of doing things, and it sounds like it would work great.
|
|
#
?
Apr 23, 2010 22:22
|
|
|
I can start buying equipment now that I have a garage with plenty of space. Hurrah  10" grinder, 10" slow water grinder, and a little bench to put it on.  I have a belt sander on back order, hopefully it works out.
|
|
#
?
Apr 24, 2010 00:54
|
|
|
So, you just built a Ron Reil propane burner, bought yourself an anvil and hardy tool, but haven't gotten around to getting a forge yet. Bummer. I feel your pain, you want to use your new toys. I bet you are hungry too. Let me suggest grilling in the mean time! For me, grilling is a year round activity. Rain or shine, hot or cold, you will find me outside cooking in front of a fire. Last fall, I wanted to grill some food but was out of the hardwood charcoal I enjoy using, and didn't want to buy any more, that's when the light bulb went off. Why not just use hard wood for my grilling activities? What I found is, not only is it cheaper, starting with your own hard wood and making a fire makes for better tasting food! The reason it tastes good is because of all the chemicals that make their into the food as a result of combustion. But, you know, life is short anyway, better make the most of it. We start with a chop saw:  I use a hardy tool (in the red circle) and a brass hammer to split the wood into nice charcoal sized pieces. Don't forget safety glasses and gloves!  A normal person would use newspaper and some other combination of various kindlings to start the fire. As you can clearly see, I am not normal. Ron Reil propane burner it is!  The beauty of using the propane burner is, it takes less time, is much easier, and wet wood is not a problem.  The goal is to get it to the point where a small fire starts, and then, you can nurture it bigger by gently blowing on it.  Soon, your fire will look like this. At this point you'll want to let it burn for a little bit till the fire dies down and you have a bunch of great coals to cook on.  Don't have any pics of cooking food, as I was a little too busy cooking food! In any event, after you're done cooking, you can close the lid on the grill to snuff the fire out. The left over coals will start easily in a chimeny starter with a piece of newspaper next time. 
|
|
#
?
Apr 25, 2010 14:36
|
|
|
Everything you wanted to know about AC, DC, 1 vs 3 phase power, and rectification as it relates to welding: First, let's start by reviewing some basic terms. Voltage or Volts: Electrical pressure. Using a water analogy, think of this as pounds per square inch. Current* or Amps: Volume of electrons. In the water system, this would be the gallons. Resistance or Ohms: Opposition to the path of the electrons. A smaller water pipe would offer more resitance then a larger water pipe for a given volume of water. Volts, Amps, and Ohms share a mathematical relationship known as "Ohm's law". Ohm's law states that I = V/R, where I = amps, V = volts, and R = ohms. *(Note, the term "amperage" is an outdated, incorrect vanacular, and using it only shows your own ignoarnce. "Current" is the correct term instead. From now on, if you say "amperage", I will hunt your rear end down. Similarly, saying "ohmage" is also stupid and warrants me hunting yours rear end down.) Power supplies are either AC or DC. The difference between the two is best shown using a graph showing time (x axis) and voltage (y axis). Direct Current (DC): With DC, the waveform is a straight line above 0 volts.  Alternating Current (AC): On the other hand, AC alternates between +V and -V over time. The sine wave seen in the graph is known as a "phase".  For most welding purposes, we prefer DC, because it provides a very stable, high power, intense arc. On the other hand, because the voltage with AC is constantly changing from postive, to zero, to negative, this makes maintaing a stable arc a little more difficult. AC, however, does certainly have it's place in welding. For example, the famed 6011 SMAW electrode runs fine on AC or DC. This is because the flux has added chemicals that as burned, help to stabalize and maintain the arc. Welding machines convert the AC from the power company to DC via a process called rectification. Rectification occurs when you pass an AC current through a semiconductor known as a rectifier, which is basically a diode. There are several types of rectifiers, and it's not the intent of this post to explain them. For our purposes, let's just say that all welding machines use what is known as a "full wave bridge rectifier." Basically what a full wave bridge rectifer does is chop off the bottom half of the graph, invert it, and put it on the top half like so:  You will note in the above graph that the "rectified" wave form still has a changing voltage. Capacitors (temporary electrical storage tanks) are used to help smooth these change out to make somethign that more resembles a DC wave form. Most industrial and commercial property is supplied with 3 phase power instead of the single phase your house gets. For profesional welders this is a good thing, because 3 phase power makes better DC then your single phase. 3 phase power has 3 sine waves offset 120 degrees from each other. Take a look at the graph on the top:  Now, in the above images, take a look at the bottom graph. The green line represents what the wave form would look like when we pass 3 phase current through a full wave bridge rectifier. As you can see, when compared to rectified single phase current, it's voltage is ramping up and down much much less. When you add capacitors to a rectified 3 phase signal, you will get a really clean, powerfull, DC wave form that will put a smile on any welder's face. Image of dv6speed welding: 
AbsentMindedWelder fucked around with this message at 23:18 on May 1, 2010 |
|
#
?
Apr 30, 2010 01:02
|
|
|
Everything you wanted to know about Air-Carbon-Arc Cutting & Gouging Air-Carbon-Arc Cutting & Gouging is a very usefull metal removal process. It differs signicantly from both oxy-fuel cutting and plasma cutting. The process uses a carbon electrode, a standard Constant Current Welding power source, and compressed air to melt the metal and blow it away. This process will work on anything that can conduct electricity and be melted with an arc. Steel, cast iron, stainless steel, copper, brass, aluminum, magnesium alloy all can be destroyed with air-carbon-arc. It is not a common process among hobby metalworkers, and is typically only found in industrial environments. This is unfortunate becuase it is a process that can be of great value to us. After reading this post, you will know everything you need to get started. The main purpose for air-carbon-arc is gouging and removal of old or defective welds so that they can be redone, or the equipment dismantled. It will allow you to remove the minimum possible amount of material so that the joint can be re-welded. Oxy-fuel and plasma cutting are capable of gouging, however, neither does it as well as air-carbon-arc. It can be used for cutting too. Oxy-fuel cutting is pretty much limited to steel, and plasma equipment can be very expensive when compared to air-carbon arc. Depending on the thickness of the material you may have to take multiple passes. If you have a cutting situation where mechanical means are not suitable, and plasma/oxy-fuel is not available, it may just be your solution. With some practice, an operator can very accurately remove metal in a controlled fashion, and applications besides weld removal will soon be discovered. I have used it to destructively remove bolts and nuts, make quick and fast bolt holes, heavy demolotion, you name it. A little history lesson: Air-carbon arc cutting and gouging was invented during WWII when, while building a warship, a very long stainless steel weld was done incorrectly and had to be removed. The labor costs of grinding and chipping were cost prohibitive, not to mention the time it would have set the job back. At the time, they didn't have air-carbon-arc torches, so the operator held a carbon electrode in a welding stinger, and an assistant followed the arc with a compressed air nozzle. The gentleman who came up with the idea invented the first air-carbon-arc torch, patented it, and started the "Arcair" company that Thermadyne now owns. Equipment and consumables needed First, let's discuss the power source. Air-carbon-arc cutting requires use of a standard Constant Current (CC) SMAW (stick welding) power source. Remeber that post I made right above this one that discusses electricity? No? Well go read it now. The reason I made that post is actually so you can understand why the following is true: Single phase DC Welding power sources will NOT work with DC carbon electrodes. Don't even try it, it ain't going to happen. The reason is that DC carbons do not have the same chemicals found in welding electrode fluxes, and therefore do not have the same arc stabilization properties. The capactiors are not quite enough to smoothe out the waveform to make a stable arc with DC carbons. You will require a machine powered by 3 phase power, or an engine driven welding machine. For most hobbiests, 3 phase is out of the question and the best option of course is to go the engine driven route. (Tell your wife, girlfriend, husband, or boyfriend that it's a backup power generator, and you won't be lying.) Now you have to be carefull when you go to buy your engine driven machine. Some lower end machines generate single phase power and rectify it, just like you would with line powered machines and aren't suitable. The mid to higher range machines will generate 3 phase power or pure DC internally for the welding circuit, and these are what you want. (The machine I use for my air-carbon-arc cutting is an old, used, Lincoln Weldanpower) (Note: They do make AC carbons that would in theory work OK on single phase power, however they do not make these in all sizes, and I have not yet had a chance to personally try them myself. When I do, I will post about it.) Well, how many amps do I need? I'm glad your asked that question! Air-carbon-arc cutting and gouging uses significatnly more amps then welding of the same sized electrode does. For most of the type of stuff you and I do, an 1/8 carbon is the most usefull size, with 3/16" coming in a close second. 1/4" and above is really too big for our needs. Here's a nifty chart:  Note: I've found when using engine driven machines (both mine, and ones at work), that I need more amps to accomplish the same cut as compared to 3 phase powered machines. What else do I need? Obviously you need the air-carbon-arc torch! My one and only recomendation to you is the Arcair K2000 torch by Thermadyne products (Same people who make Victor gas-apparatus.) Anything larger then that is over kill for our needs, and also requires very large air compressors. The other brands of air-carbon-arc torches I've seen, I have not been impressed at all with, I think Arcair is the best. The K2000 will run you anywhere from $200-350 retail. I got a great deal on mine in "new" condition from Ebay for $95 plus shipping. Also, you will need an air compressor. The K2000 requirse 40 PSI at 8 CFM. The K2000 features a coaxial air hose/conductor. This hose accounts for about half the cost of the torch, so take drat good care of it. Running too many amps, stepping on the hose, melting the hose, kinks, etc., will all ruin your day. Here's a pic of the torch setup:  You'll want to add an air hose, and welding lead pigtails with quick connects to the coaxial hose. Not using quick connects is a royal pain in the rear end. (I keep my welding stinger on a 5 foot long pigtail and quick connect as well.) The rubber boot slides over the connection points to keep from arcing against crap. Safety Air-carbon-arc cutting and gouging is a very dangerous process. The arc is much brighter and more intense then a welding arc. It is an EXTREMELY loud process, and hearing protection is NOT optional. (Also, don't forget, not only do ear plugs save your hearing, they keep spatter out of the ear canal.) Heavy welding gloves, and leathers are also reccomended. I do NOT reccomend using auto-darkening hoods with air-carbon-arc cutting. Use a standard hood with a glass filter. Make sure you pick a shade filter # that is approiate for the amount of amps you are running. Also, this process presents a very large fire hazard. It is capable of blowing molten metal through the air up to 15-20 feet away if the trajectory is right, so make sure you have a good clear path, and DO NOT do this inside your shop. Electrocution is also a concern. Don't do this (or weld) if it's wet on the ground, you clothes are dripping from sweat, etc. The worst electrical shock I've had in my lifetime happened at work, last summer, sitting on top of a railcar on a hot sweaty day while using air-carbon-arc to trim a piece for fit up. I shocked myself, and was thrown back about 4 feet. I'm lucky I did not fall off of the car, and the electricity didn't pass thru any organs. Another considerion is your neighbors. Trust me, they will be able to see and hear you, so keep them in mind. Can you loving quit blabbing and get on to it, rear end in a top hat? First of all, these carbons are BRITTLE, and expensive ($0.30-$1 a piece), be careful with them. You want your electrode stick out to be no more then 6" for the larger electrodes, and 3" for the smaller ones. As the electrode wears away, you simply loosen the clamp and slide it further out. Most DC carbons have a thin copper coating on them to improve the electrical contact between the carbon and the torch.  Make sure the air holes are pointing the right direction! (That's towards the work, you idiot.) The piece that has the air holes swivels 360 degrees so you can put it at any angle you like.  Striking the arc is a little bit different (and easier) then with a welding electrode. Just LIGHTLY touch the electrode to the work, let the arc start, and slowly move it where you want it to go. This requires a special touch, and to be honest, I don't know how else to describe it. Some practice time will quickly teach this to you, as well as how fast you should travel. This really is easier then welding, however, like welding you will get better with practice. You want to hold the electrode at about a 45 degree angle. You want to use a "push" direction*. Make sure the air holes are BETWEEN the electrode and the work, not over top of the electrode. THIS IS IMPORTANT. Also, don't forget to open the valve! You will make a big mess if you don't. The valve is that black button on the torch handle. *(same meaning as with MIG welding.) Note: if you are having trouble starting an arc, try increasing the amps. Don't worry if this takes you past the limits of what the chart says above, or the box of carbons' documentation. Just use enough amps to get the job done, and no more. However, make drat sure you don't exceed the rating of the K2000!!! Note2: DC carbons use DC Electrode Postivie polarity.  Here's a picture of what a gouge looks like, half way thru a weld.  Here's an action shot. Note the intensity of the arc vs welding. To the right of the arc, you can see the molten metal flying to my right. (The electrode is traveling left to right.)  Here's the completed gouge.  Then you can take a grinder and clean it up. If you look very carefully on the bottom piece, you can see where I gouged the surface a little bit. This can be filled in with weld metal and ground smooth, before re-welding the joint. Nobody will know the difference.  Here's an action shot of welding it back together.  And here's the completed welded, gouged, and re-welded coupon. Yeah, yeah, my heat was hosed up on the beggining of the weld. If I did that on a jobsite, I'd have to gouge it out (again) and fix it!  Well that's about it. Feel free to ask questions. Air-carbon-arc cutting is a really usefull process, and I hope you enjoy using it. With the large amount of amps, the intense sound and light, the fact you can cut thru metal like butter, and flying molten metal all make this a really loving awesome process, that is really fun to do (Until you have to do it out of position on a jobsite, and give yourself minor burns every 2 seconds.) AbsentMindedWelder fucked around with this message at 14:29 on May 1, 2010 |
|
#
?
Apr 30, 2010 01:02
|
|
|
Made myself a redneck forge today. Had some scrap steel laying around, so I welded it into this. I know the welds look lovely, but its just a flux core mig. They look better close up.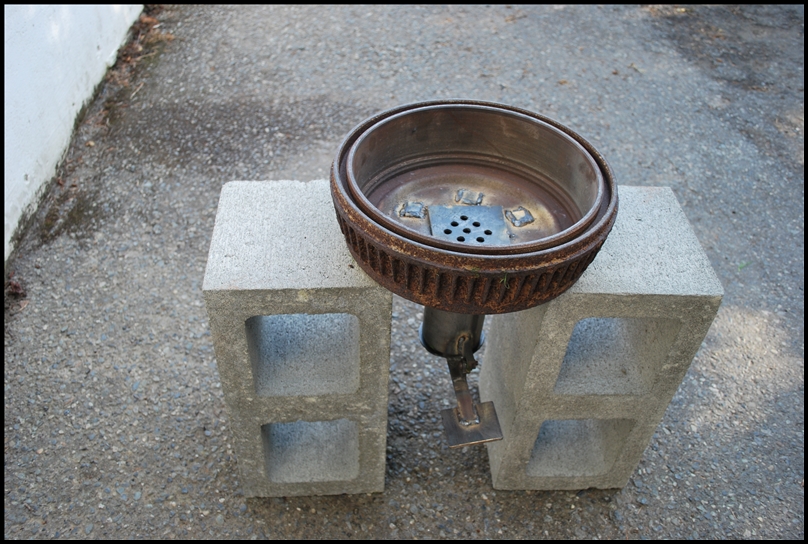 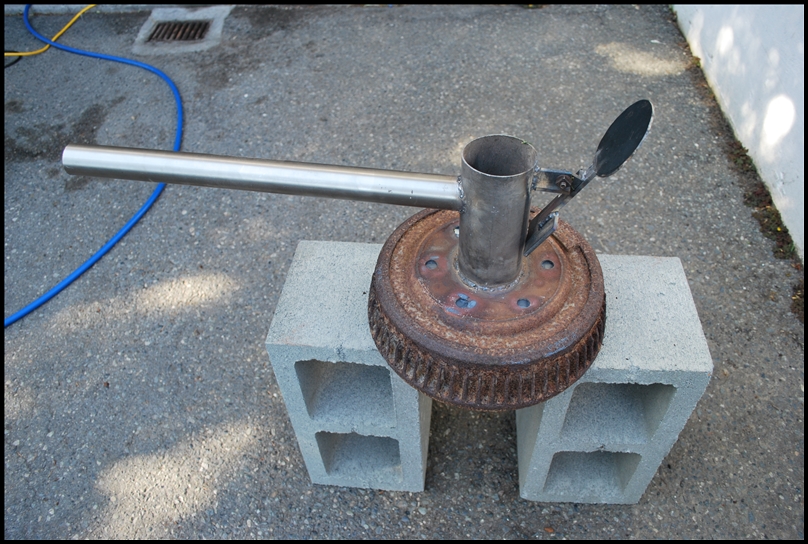 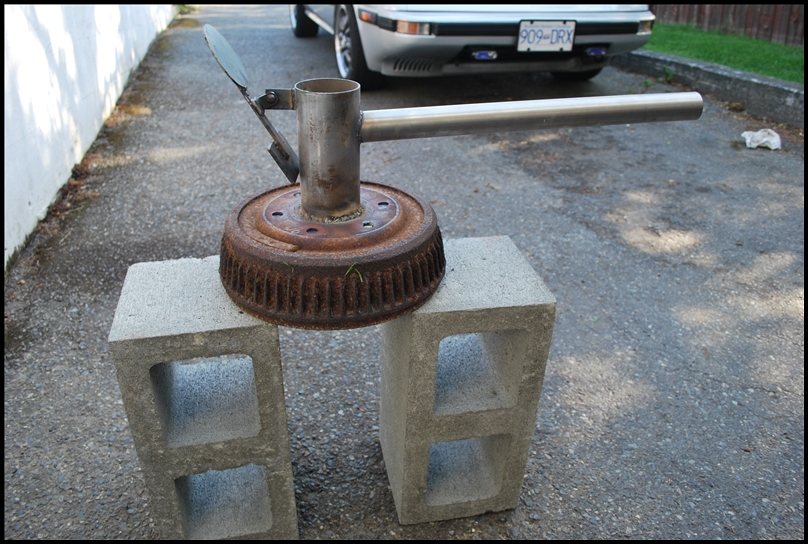  I need to get some proper charcoal/coal for it.
|
|
#
?
May 12, 2010 17:11
|
|

|
Redneck forges aren't the epitome of fancyness, so no one cares about lovely looking welds That's basically how mine looks, except I upgraded from a brake drum to an old wheel rim. Zquargon fucked around with this message at 18:18 on May 12, 2010 |
|
#
?
May 12, 2010 18:16
|
|
|
I need an anvil now, but the only one local is a 55lb chinese one: http://www.kmstools.com/wisdom-55lb-anvil-7760 I cant afford to shell out much over 100$ either. Think this will be good enough for making some decorative horseshoes/other pieces?
|
|
#
?
May 12, 2010 18:40
|
|
|
Sgt Fox posted:I need an anvil now, but the only one local is a 55lb chinese one: http://www.kmstools.com/wisdom-55lb-anvil-7760 I wouldn't bother, it's probably cast iron. Good enough for light duty in a machine shop (maybe) but there's no way it will stand up to actual forge work. Go to your steel supplier, try to find a 4"x4" (or 5x5, 6x6) bar of 4140 (1040 or 1060 would probably be ok too) and ask for a cube of it. Take one side and grind the corners down to a smooth radius, make it a progressive radius if you're good with a grinder.
|
|
#
?
May 12, 2010 18:53
|
|
|
Bay Area metalgoons: I got this in the e-mail this morning.some guy posted:Alco Iron & Metal is preparing to move to a new location across the street. They've lowered prices on "small stuff" to reduce moving expenses. I believe this is the San Leandro location but call to be sure.
|
|
#
?
May 12, 2010 20:05
|
|
|
Dv6: that carbon arc gouging writeup is great, thanks for the info.
|
|
#
?
May 12, 2010 20:39
|
|
|
What's the difference between a plasma cutter that can cut 3/16" and one that can cut 1"? Specifically, what's going on inside a plasma cutter that ramps up the juice to allow for an arc hot enough to melt the steel? Can parts be swapped out internally to "upgrade" a plasma cutter?
|
|
#
?
May 15, 2010 01:58
|
|

|
jovial_cynic posted:What's the difference between a plasma cutter that can cut 3/16" and one that can cut 1"? About 10000 dollars. Seriously though I think it's mostly a cost/benefit thing. You need to have that little plasma arc be big enough to cut your material, and that takes power, lots of it. To cut thicker, you need additional power to generate an arc of the right size, and the components for that are more expensive. Given that hobbyists tend to work smaller materials, this works out well for the lighter duty components. Not to mention that three phase power is rare in a home setting. Most hobbyists like ourselves don't need to pay the extra expense for the higher capacity machines anyway, we can usually get just as good a result from an O/A cutting torch, for the thicker materials. And O/A torches don't cost 15 grand.
|
|
#
?
May 15, 2010 04:40
|
|
|
Slung Blade posted:... And O/A torches don't cost 15 grand. ha. I'd forgotten that my oxy/acetylene rig can cut. I don't think I'm at a point where I need super-precise cuts for anything that thick... but I'd like to do some artistic things with metal too thick for my plasma cutter. I'm just wondering if the oxy/acet cut will be too rough.
|
|
#
?
May 15, 2010 04:48
|
|
|
With a steady hand and some practice, I've seen people make nearly perfectly flat cuts. Of course, the texture of a cut can be a feature of the art, I've seen that done convincingly many times. Besides, there's always a grinder or some files.
|
|
#
?
May 15, 2010 05:32
|
|
|
jovial_cynic posted:ha. I'd forgotten that my oxy/acetylene rig can cut. The head welder at my last job was a loving wizard with an oxy/acetylene torch, its all about steady hands, you only ever had to hit his cuts with a little bit of filing or a few seconds on the belt sander to make them perfect you can also make up jigs to hold the torch for cutting radii, and we had a little attachment with wheels on it (i don't know if he made it or bought it) that allowed you to roll the cutting head along a big piece of flat and it kept the tip at a constant distance. we used it to cut up to 1 inch plate on a regular basis, anything thicker than that we sent out to get water cut. that said these plasma cutters that jay leno reviews look really neat, http://www.jaylenosgarage.com/segment/under-the-hood/hypertherm-plasma-cutter/
|
|
#
?
May 15, 2010 21:29
|
|
|
Question for the Metalwork thread, my fireplace, firebox, wood stove insert: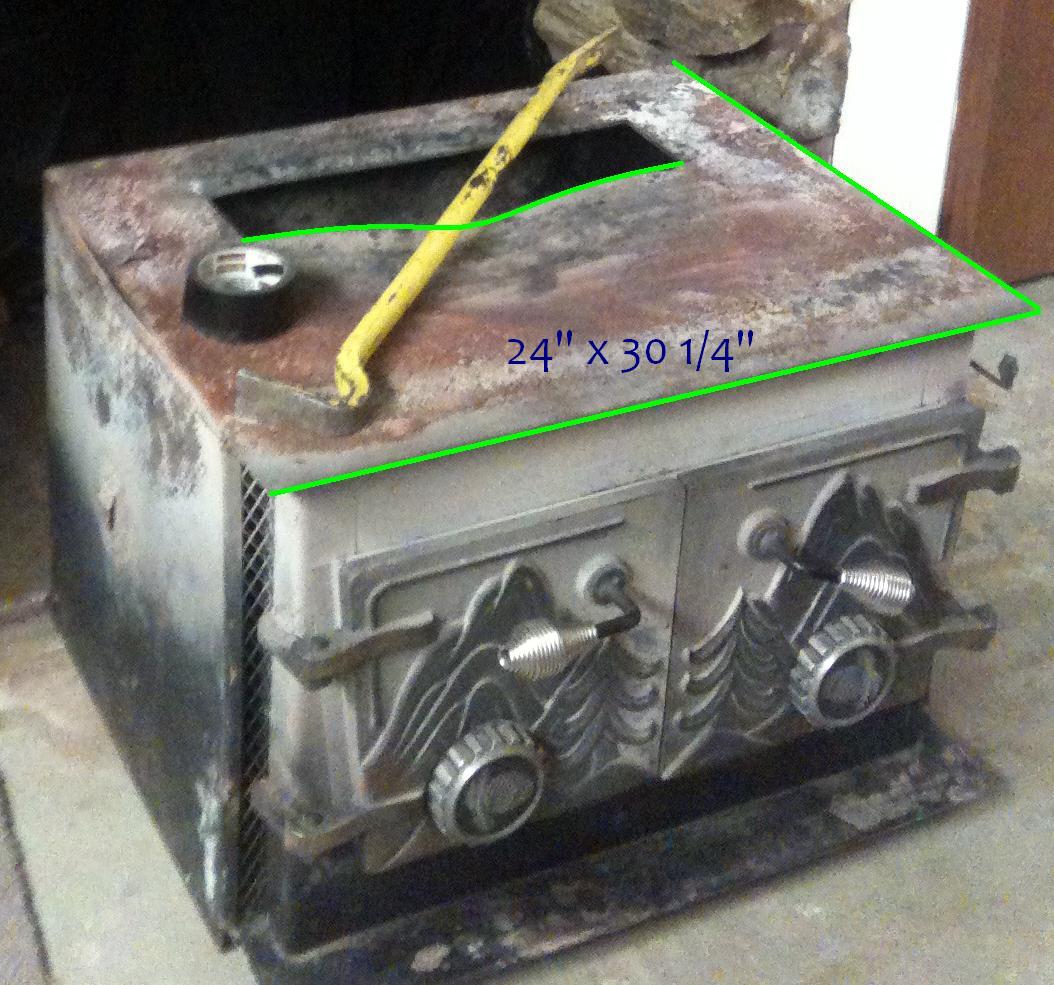 Click here for the full 1054x985 image. The former homeowner melted the 1/4" steel top plate, the curved line in the back should be straight. Woodheat.org says "You shouldn't build your own fireplace blah blah blah". I would much rather buy a piece of plate steel, weld on a new top & build up a proper damper. Nothing else is wrong with the firebox or masonry chimney system. The damper was made crappy and caused the firebox failure as the damper did not seal. I cannot find what grade of steel to purchase or materials info anywhere. I've googled through every wood stove manufacturer out there and am not ready to spend ~$2400 were $60 of plate steel would fix up my stove. some more background info: I can arc weld, have access to a 200a Cobramatic & a Lincoln Arc Welder. No air-carbon-arc though, that is a good setup and would help immensely. Do not want to go stainless steel. A local steel shop quoted ~$53 for 5/16" 24x30 1/4" mild steel, but needed to know what grade of steel I would want if I wanted something with higher heat capacity, help please. Slick fucked around with this message at 00:57 on May 18, 2010 |
|
#
?
May 18, 2010 00:24
|
|
|

|
| # ? May 24, 2024 21:37 |
|
|
Just go with mild steel of the appropriate thickness. The ability to deal with heat and not deform gets into pretty exotic (and expensive as hell) alloys and is totally not worth it for a wood stove. You wouldn't be able to weld stainless to that fire box anyway (at least, it wouldn't last long). Looks like yours just had a really unusually hot fire in it and was a freak accident. Would you make it out of 4 pieces, or just cut that rectangle out of a single piece?
|
|
#
?
May 18, 2010 05:00
|
|