


|
A5H posted:if anyone's interested? This should be bannable forum-wide in every context ever. Just post it. this is a thread full of people posting work to ogle, unsolicited. asking permission is not the norm and yes, we want to see SPACE CARBS fucked around with this message at 23:55 on Jun 11, 2010 |
 #
?
Jun 11, 2010 23:53
#
?
Jun 11, 2010 23:53
|
|


|

|
| # ? May 29, 2024 14:55 |
|
|
SPACE WEED posted:This should be bannable forum-wide in every context ever. I only said it because I don't have a clue how to upload to vimeo or anything. Or whether or not the video is compatible. So it would take me a while is all. Sorry.
|
|
#
?
Jun 11, 2010 23:54
|
|


|
Okay here we go. Interior stuff:  Click here for the full 1000x563 image.  Click here for the full 1000x563 image.  Click here for the full 1000x567 image. 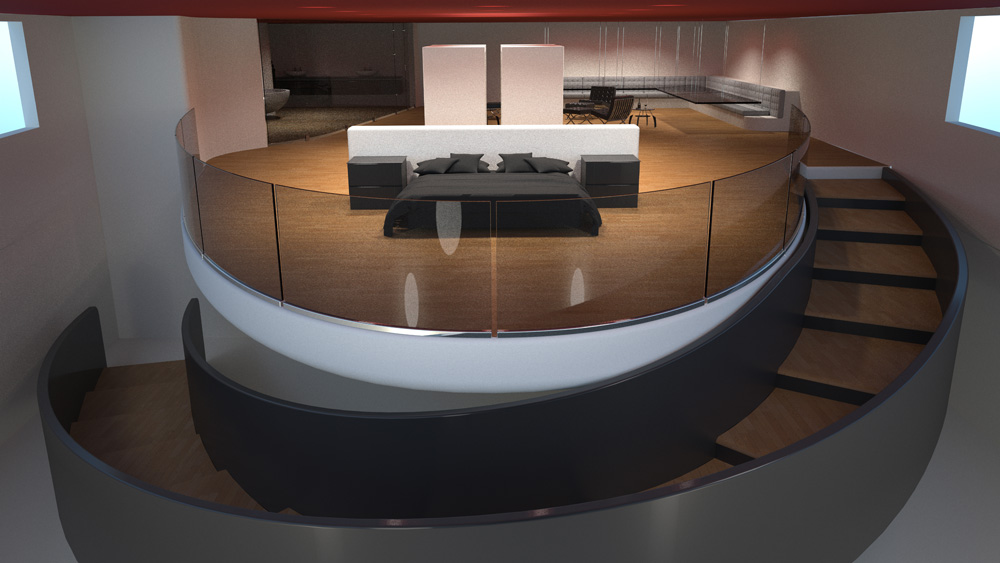 Click here for the full 1000x563 image.  Click here for the full 1000x563 image.  Click here for the full 1000x646 image. Exterior stuff:  Click here for the full 1000x563 image.  Click here for the full 1000x563 image.  Click here for the full 1000x563 image.  Click here for the full 1000x563 image.  Click here for the full 1000x563 image.  Click here for the full 1000x563 image. Video: http://www.vimeo.com/12500152 Apologies on quality and the corny ad like structure!
|
|
#
?
Jun 12, 2010 00:40
|
|
|
They're actually really good mate, the interior renders are pretty well developed. Looks like suurland should be your next target ") Incidently, I totally forgot this was on his site - http://www.suurland.com/tutorials_newbeetle.php It's really good, and done in rhino!
|
|
#
?
Jun 12, 2010 11:57
|
|

|
I worked on a short called 'Avatar days'about 2 years ago, its recently been released; http://vimeo.com/9157869 'Avatar days' 3ds elements were done in 3DMax. It was shot, animated and composited in 4 days.We used motion capture where we could but some shots had to be keyed (eg. forklift shot). The other work i'd like to share were mainly completed in Softimage. I'm linking to two albums on vimeo, some 3d animation i'm attempting to perfect and some projects completed in my work: http://vimeo.com/willsharkey/albums I need to put together a reel, would love some feedback on the strongest work. edit: VVVV-John came up with the workflow for 'Avatar Days' (4 days, so corners need to be cut), it wouldn't have happened without him!-VVVV Citadel fucked around with this message at 17:18 on Jun 12, 2010 |
|
#
?
Jun 12, 2010 14:26
|
|
|
I saw that on the vray forum, it's awesome! John o'connell took loads of time out to teach me how to remove cranes/background elements from a tracked shot a couple years ago, he's sound as. Knows his poo poo. cubicle gangster fucked around with this message at 16:07 on Jun 12, 2010 |
|
#
?
Jun 12, 2010 15:59
|
|
|
cubicle gangster posted:They're actually really good mate, the interior renders are pretty well developed. Yep he knows his poo poo. Learned a lot from him over the years. He'll tell you great tricks if you can get through his grumpy exterior.
|
|
#
?
Jun 13, 2010 23:26
|
|
|
^^ What do you mean? Does he post here??cubicle gangster posted:They're actually really good mate, the interior renders are pretty well developed. Thanks man ") I'd not heard of that fella before, his work is amazing to me! Thanks a lot for the link, I'll read through it now and hopefully it'll help me a bit
|
|
#
?
Jun 13, 2010 23:30
|
|
|
A5H posted:^^ What do you mean? Does he post here?? No, I've known him for a while now through IRC. He's on the #vray channel on EFnet.
|
|
#
?
Jun 13, 2010 23:43
|
|
|
Ah I see. That's awesome
|
|
#
?
Jun 13, 2010 23:54
|
|
|
Sigma-X posted:This guy's work is loving amazing holy poo poo: Also, for content, I think my meshflow needs work. Can anyone help me here? I try to stay in quads but it seems like that creates a lot of unnecessary poly density unless I merge the edges at some points:  Click here for the full 566x683 image.
|
|
#
?
Jun 14, 2010 07:09
|
|

|
theta-ix posted:I know I'm behind here but jesus christ this is terrifying. Utterly terrifying. I can't decide whether it looks more like the Predator or one of the Achewood cats. Or maybe Birdo. The advice to stay in quads is mostly because tri's and stars create strange pinchings in the smoothing and especially in deformation. If you are modeling for games, this is less important. If you're high-poly modeling, there isn't really such a thing as "unnecessary poly density", but if you're modeling for games, you need to be a lot more conservative. Your model has some awkward halts to the edgeflow. Anywhere more than 4 edges converge on one point (your 3-point, 5-point, and 6-point stars) can cause artifacts in smoothing and deformation, and tri's cause haults in the edgeflow. Try to keep your model as close to 100% quads as possible before finding tucked away places to kill off edges with tris and such. In other news, I start a 10 week internship at SOE San Diego tomorrow. It still doesn't feel real. I guess I'd better go to bed...
|
|
#
?
Jun 14, 2010 08:22
|
|


|
I have just finished updating my showreel and would greatly appreciate peoples critiques of it. http://www.vimeo.com/12554711
|
|
#
?
Jun 14, 2010 17:05
|
|
|
Yasha From Russia posted:I have just finished updating my showreel and would greatly appreciate peoples critiques of it. http://www.vimeo.com/12554711 I'd caution against self-deprecating humor in the opener because it sets the wrong tone for something that is supposed to be showing your best work. In order to pull it off you pretty much need to be the best in the biz - if you had a bunch of professional, completely exemplary work immediately following it that would be one thing, but basically you're setting up the audience to start hunting for flaws to "prove you right." I'm not an animator, but in general all of your animations felt very stiff and inhuman. I felt they had a good sense of weight (esp. the banging into the table and falling over) but that the actual characters in each scene were automatons not entirely versed in how to walk. Like I said, I don't animate, I model, and am fully aware that I lack a sense of timing to make my own animations, so I lack the ability to really pinpoint what you're missing with your guys, but in general they have an unnaturalness about them that feels mechanical and linear. The exploding computer feels rather out of place among the character animation, it isn't particularly amazing or well animated, and its not impressive as an effects piece.
|
|
#
?
Jun 14, 2010 17:59
|
|
|
Sigma-X posted:I'd caution against self-deprecating humor in the opener because it sets the wrong tone for something that is supposed to be showing your best work. In order to pull it off you pretty much need to be the best in the biz - if you had a bunch of professional, completely exemplary work immediately following it that would be one thing, but basically you're setting up the audience to start hunting for flaws to "prove you right." Thanks for that, Il see what I can do about it.
|
|
#
?
Jun 15, 2010 03:34
|
|
|
Yasha From Russia posted:I have just finished updating my showreel and would greatly appreciate peoples critiques of it. http://www.vimeo.com/12554711 Posting a Quicktime version somewhere would really help - it's the easiest way to do frame-by-frame analysis. I hate Quicktime itself, more than anything else, but it's industry standard for animation WIP for a reason. From just watching it in realtime, I feel like you've got great attention to detail in every scene and some real variety of actions, but all your motions feel way too fast, and there's very little followthrough on anything. Just as an example, look at the second shot, when the guy slams down the mug he's holding. He hits the table with the glass, snaps back suddenly within 1-2 frames, then freezes. It gives this feeling that I'm watching CG, rather than watching a character, and that's not what you want people to think. The rig you're using - how is it set up? Does it have IK/FK switch, and do you use it? When I used an all-IK rig, I ended up with problems similar to what I'm seeing in your reel, and it was incredibly frustrating. How many keys do you use per second, in general? It feels like you have a lot more than you need, and it's preventing you from getting smooth arcs of motion. The Vespa 150, by itself, is really out of place on an animation reel. Could make for a really fun animation in the future, though.
|
|
#
?
Jun 15, 2010 04:09
|
|

|
ThreeHams posted:Posting a Quicktime version somewhere would really help - it's the easiest way to do frame-by-frame analysis. I hate Quicktime itself, more than anything else, but it's industry standard for animation WIP for a reason. They look like the Animation Mentor rigs, though I don't know what they're made of. That motorcycle comment is a good one. Throw one of those characters on it and have him ride around and then you can put some text "Animation and Motorcycle Model" on the side.
|
|
#
?
Jun 15, 2010 04:26
|
|
|
Citadel posted:I worked on a short called 'Avatar days'about 2 years ago, its recently been released; Saw this posted on Reddit a few days ago. Showed it to my World of Warcrack addicted students. Nice work and clever idea! My only slight critique is that it runs a bit long.
|
|
#
?
Jun 15, 2010 05:13
|
|


|
ThreeHams posted:Posting a Quicktime version somewhere would really help - it's the easiest way to do frame-by-frame analysis. I hate Quicktime itself, more than anything else, but it's industry standard for animation WIP for a reason. All the rigs have IK/FK switches and I generally use IK for the legs and FK for the arms. I always use 24 frames but most things were sped up in post production because when I was studying last year my teacher was always hasseling me about everything being too slow. And yeah I have been thinking of adding some animation to the Vespa model.
|
|
#
?
Jun 15, 2010 05:56
|
|
|
Yasha From Russia posted:I always use 24 frames but most things were sped up in post production because when I was studying last year my teacher was always hasseling me about everything being too slow. This is probably why it looks strange, and I couldn't figure out why. Can you post a version without speeding it up in post? Having motions be too slow is a really common problem, but the solution is more complicated than just compressing all the keyframes, for the same reason that a fast walk isn't the same as a slow run. Try speeding up the main part of a motion, while lengthening the follow-through, and see how that looks - in general, it'll feel much faster, even if it's actually longer. Oh yeah, a disclaimer: I animate, but there are many, many people out there who are better and more experienced, and they can give you much more specific and in-depth critique than I can.
|
|
#
?
Jun 16, 2010 00:10
|
|
|
Yasha From Russia posted:I always use 24 frames but most things were sped up in post production because when I was studying last year my teacher was always hasseling me about everything being too slow. At the very least use some frame blending.
|
|
#
?
Jun 16, 2010 00:59
|
|

|
The theme for the Gnomon contest this month is "armoury." I'm into the layout phase here. The background will have a brown / orange fog (as if the place is on fire), and a few other details will give the impression that everyone in the castle was killed before they could get to their weapons  . .The main focal point is intended to be the spear in the foreground, where around 80% of the effort is going to go. It's based off a couple real-world combination weapons - polearms with one wheel-lock pistol on either side, built into the handle. It's something I've wanted to do for a while, and this is a good enough excuse to do it. Spear references:  Click here for the full 800x350 image.  Click here for the full 800x600 image. Layouts. Everything is temporary or stolen from other projects.   Thoughts? I'm trying to stick with standard dimensions to make it easier to print or frame. Right now, the vertical layout shows a lot more of the spear, but it makes the entire piece feel cramped (and not in a good way).
|
|
#
?
Jun 16, 2010 08:58
|
|
|
Am i going to want to kill myself if i have to work at an arch firm that uses a Revit > Max > Mentalray > toxik workflow? They have setup a cg department, but it's still in the infant stage, so i might be able to sneak in some vray/photoshop eventually. But i've never used mentalray so i'm kinda worried i won't be able to dish out the same graphics as i could do with vray. Any thoughts?
|
|
#
?
Jun 16, 2010 11:05
|
|
|
Question of curiosity: How come Maya's built-in renderer sucks so much compared to, say, Mental Ray?
|
|
#
?
Jun 16, 2010 13:14
|
|

|
looking for Houdini goons out here, the few there may be we like procedural things  Click here for the full 1280x720 image. http://vimeo.com/12599031 -it moves first use of the wedge rop, though i wouldnt use more particles unless i had a bigger fancier setup
|
|
#
?
Jun 16, 2010 18:33
|
|

Travakian posted:Question of curiosity: How come Maya's built-in renderer sucks so much compared to, say, Mental Ray? Because they realized that why waste more money on making their software renderer good when mental ray does everything better.
|
|
|
#
?
Jun 16, 2010 22:11
|
|
|
International Log posted:Am i going to want to kill myself if i have to work at an arch firm that uses a Revit > Max > Mentalray > toxik workflow? I've found that mental ray is pretty much the same deal as Vray, although I'm no expert with either. They're both raytracers with similar GI methods (although I've found vray's easier to understand) and use specialised materials. The A&D material is pretty much the same deal as the Vray material, although vray seems to do glossies better. You obviously know your vray so I don't think you would have trouble with mental ray. There's also tonnes of info/tutes out there on mental ray.
|
|
#
?
Jun 17, 2010 00:34
|
|

|
ThreeHams posted:The main focal point is intended to be the spear in the foreground, where around 80% of the effort is going to go. If the spear is supposed to be the focal point, you've pretty much done everything possible to lead the viewers eye away from it  You've essentially picked a composition in one point perspective, which means the viewer's eye is going to be drawn towards the center of the image. Also, you are probably going to have an area of high contrast around the doorway which will further lead the viewer's eye there. If you are set on this composition, I might try to counteract this by playing with the lighting so that the background is a lot darker than the area around the spear. Maybe even throw in a skylight with a beam of light shining down on the spear. 
|
|
#
?
Jun 17, 2010 02:21
|
|

|
Kingsbury posted:If the spear is supposed to be the focal point, you've pretty much done everything possible to lead the viewers eye away from it This is all completely right and really frustrating, but it's making me realize I have to focus on just two things - the foreground spear, and the armory. The "story" can come from the contrast between the state-of-the-art, expensive, completely impractical spear, and the heavily-used polearms in the background that do all the real work. At least I have a reason to dig out my 40lb art history book from college. I'm experimenting with ways to keep the perspective, but have the spear be near to or occluding the the vanishing point - without it seeming completely out of place.
|
|
#
?
Jun 17, 2010 05:00
|
|
|
YAY for 17 hr workdays  Maybe I should go back to games.
|
|
#
?
Jun 17, 2010 06:50
|
|

|
Travakian posted:Question of curiosity: How come Maya's built-in renderer sucks so much compared to, say, Mental Ray? It was made by one guy and he left alias years ago. It was a pile of spaghetti code, and all the big customers used renderman so why bother with it. keyframe posted:YAY for 17 hr workdays Are you getting paid overtime at least?
|
|
#
?
Jun 17, 2010 14:34
|
|


|
I'm trying to export an .obj so I can put it into Zbrush but it tells me there is a rats nest. What is that? I imagine it is a place where more than 4 edges converge or something like that. If so, how do I find it/get rid of it in Max? I imported it like that and it still worked fine on Zbrush but I don't know if it could cause problems later.
|
|
#
?
Jun 17, 2010 21:28
|
|
|
Hackuma posted:I'm trying to export an .obj so I can put it into Zbrush but it tells me there is a rats nest. What is that? I imagine it is a place where more than 4 edges converge or something like that. If so, how do I find it/get rid of it in Max? I've gotten this warning when exporting meshes with vertices or faces - and yeah, you could end up with some pretty weird smoothing when you subdivide. Try selecting all your vertices and welding them with a really low threshold. If that doesn't fix it, you might just have a really complex ngon somewhere with bad triangulation - and that's not going to subdivide well, anyway. BigKOfJustice posted:Are you getting paid overtime at least? I was wondering about this, but I didn't really want to ask.
|
|
#
?
Jun 17, 2010 22:43
|
|
|
Hackuma posted:I'm trying to export an .obj so I can put it into Zbrush but it tells me there is a rats nest. What is that? I imagine it is a place where more than 4 edges converge or something like that. If so, how do I find it/get rid of it in Max? Are you using max? When I export a mesh from max to Zbrush I run a little checklist on the mesh. Run a script that checks for non quad faces Put a relax on the mesh and crank it right up to check for non welded verts Use max's xview thingy to check for isolated verts You could do all of these things in any package but the things you want to check for are non quad faces, non welded verts and isolated verts
|
|
#
?
Jun 18, 2010 00:01
|
|
|
Thanks guys. I downloaded a script for non quads and it did exactly what I needed.
|
|
#
?
Jun 18, 2010 00:21
|
|
|
Ok, more questions. This is my first time jumping into a 3D sculpting program (Zbrush) and I'm having a couple of problems. First, how do I export/import different objects together but in sub-tools so that I can edit them individually? And second, there are a lot of areas that are losing definition when I smooth them. Is there any way to fix this? On the eyes the smoothing is making the eyeball socket bigger than the eye and on the nose and mouth it is leaving open gaps. On the teeth and collars it is just over-smoothing everything. 
|
|
#
?
Jun 18, 2010 04:40
|
|
|
You work on larger forms first and refine towards fine detail to avoid this in the future. If you do want to keep detail while smoothing out overall shapes though, you can either mask, or step down to lower resolutions to smooth out.
|
|
#
?
Jun 18, 2010 05:02
|
|


|
Hackuma posted:Ok, more questions. This is my first time jumping into a 3D sculpting program (Zbrush) and I'm having a couple of problems. To import objects as subtools: -Import your main obj as per normal -In the subtool panel go to append and append a polymesh3d (the star) -activate the newly appended polymesh3d and go Tool>import and import your next obj It will replace the star object.
|
|
#
?
Jun 18, 2010 05:07
|
|
|
Notbuckethead posted:looking for Houdini goons out here, the few there may be Hay Houdini goon, fun times with wedge rop. I did something similar a while back with a bit of the same approach, though I have been looking at writing a faster command line tool to do the same particle multiplier type deal. http://vimeo.com/7728646 Also, MentalRay blows Ratmann fucked around with this message at 21:57 on Jun 18, 2010 |
|
#
?
Jun 18, 2010 21:50
|
|

|

|
| # ? May 29, 2024 14:55 |
|
|
Cool, thanks again.
|
|
#
?
Jun 18, 2010 21:53
|
|