|
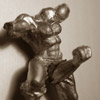
Cyberbob posted:How the heck do I learn how to craft composite shots? I want to learn the photoshop side of some of Dave Hill's latest campaign shoots, and it's all just individual shots stitched together. Sorry to pull this one up again, but I had a few comments. I did this shot with Dave Hill's Adventure Girl series in mind.  This was a photo I did on Halloween and being in geographically boring Orlando, I don't exactly have ready access to caves for awesome photo shoots. But I did have access to photos I took in a cave in Hawaii a few years ago. I'm sure poopinmymouth would agree that the most important thing in a composite is the color tones. If you don't do a good job matching up the colors in the different shots, it's never going to look right. For this shot I did a lot of color work to the cave shot because it was much warmer and yellow as shot and when I originally edited it, I liked it that way, but for editing in the photo of me, I wanted a dark, cool, cave feel, so I pulled the levels way down and changed changed the overall coloring of the image to be much whiter/bluer. The photo of me was taken in my garage with two lights. I had one light up high and to the left behind me, bare, and one big softbox camera right. The big thing I did which I think helps was that I actually went out and got dirty. my hands, face, arms, etc. You don't really notice it unless you really look close, but I think it helps with the shadows and overall grungyness of the shot. To edit in the shot of me to the cave photo I went with the erasing/masking method vs lasso. With a shot like this it's a lot easier to blend it in with erasing since the cave is dark, but if you have a crisp contrasting background you probably want to lasso. Oh and the flashlight light is also edited in to the photo because the strobe lights were considerably brighter than my mag light. I also wanted the look of an LED mag light, but mine is the old style.
|
 #
?
Jun 12, 2010 16:37
#
?
Jun 12, 2010 16:37
|
|
")

|

|
| # ? May 16, 2024 17:11 |
|
|
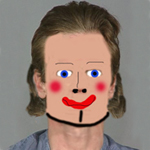
  Maybe went a bit overboard. I know this isn't at all what you asked for but hey it's saturday night! 
|
|
#
?
Jun 12, 2010 17:09
|
|

|
Ringo R posted:
I don't think the hair and whitening the background was too much but adding the catch lights just made me think of 
|
|
#
?
Jun 12, 2010 19:50
|
|


|
This is a super stupid question - but is there a way to get photoshop keyboard shortcuts to "overpower" OSX shortcuts. I keep ending up triggering expose or spaces or changing my volume when trying to use the function keys.
|
|
#
?
Jun 13, 2010 12:41
|
|

|
Leyendecker posted:Augh 
|
|
#
?
Jun 13, 2010 15:57
|
|


|
whoops, was meant for the people thread.
poopinmymouth fucked around with this message at 22:09 on Jun 13, 2010 |
|
#
?
Jun 13, 2010 22:03
|
|

|
Paragon8 posted:This is a super stupid question - but is there a way to get photoshop keyboard shortcuts to "overpower" OSX shortcuts. I keep ending up triggering expose or spaces or changing my volume when trying to use the function keys. System Preferences, Keyboard, check "Use all F1, F2, etc. keys as standard function keys." You'll have to then hold Fn to trigger Expose and whatnot. Alternatively hold Fn in Photoshop to use the F-keys, but that would get a little annoying, I think.
|
|
#
?
Jun 14, 2010 17:20
|
|
|
orange lime posted:A very carefully hand-painted layer mask. There are tools that will automate parts of it pretty well (mess with the refine edge tools for instance), but for the highest quality in a selection like that, you're going to want to be painting in each hair individually. Actually a combination of the two works best, start out with the channel masking then fix with drawing the mask with pen pressure on, especially great for curly hair and when there isn't much contrast in the channels. I don't do catalog work though so no comment on that one
|
|
#
?
Jun 14, 2010 22:31
|
|
|
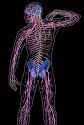
Forgot how to make abs look better, found this easy to use tutorial: http://www.youtube.com/watch?v=bRINyoIIIrg My results: Before  After  (Are they over done? Or do they look alright?)
|
|
#
?
Jun 14, 2010 23:02
|
|
|
LuisX posted:(Are they over done? Or do they look alright?) I can't really tell much of a difference other than the fact that you lightened them up a bit. I don't think there was anything wrong with them in the 'before' shot.
|
|
#
?
Jun 14, 2010 23:08
|
|
|
I can't tell what you did either, just increased contrast?
|
|
#
?
Jun 14, 2010 23:13
|
|

|
brad industry posted:I can't tell what you did either, just increased contrast? Pretty much yes, increase darks and highlights and mask appropriately.
|
|
#
?
Jun 14, 2010 23:31
|
|
|
I didn't see a difference either. This is a case where knowing anatomy and how to straight up paint lighting from nothing (which enables you to create details that adhere to an existing light source) come in handy. Dodge and burn and a little high pass gives: 
|
|
#
?
Jun 14, 2010 23:31
|
|
|
I forgot to mention, don't just use big rear end soft brushes when doing muscles. That only increases volume. If you want to actually make a muscle look defined, you need hard edges, black right against white. Small soft brushes are for this. I didn't really make his abs any bigger, I just made the creases between them sharper, as if his skin was thinner and shrink wrapped.
|
|
#
?
Jun 14, 2010 23:34
|
|
|
poopinmymouth posted:I forgot to mention, don't just use big rear end soft brushes when doing muscles. That only increases volume. If you want to actually make a muscle look defined, you need hard edges, black right against white. Small soft brushes are for this. I didn't really make his abs any bigger, I just made the creases between them sharper, as if his skin was thinner and shrink wrapped. Thank you, much appreciated. I think the difference is that you used sharper brushes to define the muscles, whereas I used softer ones.
|
|
#
?
Jun 14, 2010 23:50
|
|
|
Yeah I was going to say use a high-pass, then you can increase contrast (which in this case is basically sharpness since we're dealing with edges) without making his skin look like sandpaper.
|
|
#
?
Jun 15, 2010 02:31
|
|
|
Try this- use a selective color adjustment layer above and set it to luminosity. Slide the red and yellow around for contrast. If the color shifts too much desaturate the reds and yellows with a hue/saturation adjustment layer* *actual results may vary 
ass is my canvas fucked around with this message at 21:59 on Jun 16, 2010 |
|
#
?
Jun 16, 2010 01:53
|
|

|
Ive been trying my hardest the last week to figure out how to accomplish this look: http://bludomaintemplates.com/oscar/index2.php#/rgallery/1/ (there is music on that page so turn your speakers off) Contrast is great, the color is really vivid, smooth skin, no color blotches, detail maintained... Are there any tutorials/tips anyone knows of on where to start heading in that direction specifically the coloring? I imagine there is a gently caress-ton of painting and dodging/burning, not to mention lighting.
|
|
#
?
Jun 16, 2010 09:34
|
|

|
rear end is my canvas posted:Try this- use a selective color adjustment layer above and set it to luminosity. Slide the red and yellow around for contrast. If the color shifts too much desaturate the reds and yellows with a hue/saturation adjustment layer. This plus high pass only can make existing definition pop more. If you want to truly make a person look ripped, you are often either adding new shadows or highlights that weren't present in the first place, or changing how it responds to existing details. Contrast adjustments are fine for the end, but most fitness touchup goes in and is adding new information with brush work. For example the individual muscles on the sides of the ribcage on LouisX's model were made stronger by hooking the shadows around the insertion points. That happens on people who do tons of chinups and torso stabilization exercises. He didn't have that detail at all in the originals, so contrast and high pass won't bring it out, it was a flat gradient with no detail. If you get into that kind of work, you can do more radical changes:  vs 
|
|
#
?
Jun 16, 2010 11:05
|
|
|
What is this guy doing in post to get this effect on his photos? http://jonaspeterson.com/wedding/up-up-and-away/
|
|
#
?
Jun 16, 2010 14:26
|
|

|
Anyone else having issues with Lightroom 3 being slow as gently caress? Click on an image and wait 10 seconds.
|
|
#
?
Jun 19, 2010 05:54
|
|

|
Whitezombi posted:Anyone else having issues with Lightroom 3 being slow as gently caress? Click on an image and wait 10 seconds. Lightroom 3 is slow as gently caress for me, I'm not certain if it's 10 seconds slow, but it's pretty bad. I almost pulled the trigger on an SSD today to try to make it a little bit more fun to try editing things. Loading images is slow, importing is slow, everything takes nearly twice as long as Lightroom 2.
|
|
#
?
Jun 19, 2010 06:02
|
|

|
Shmoogy posted:Lightroom 3 is slow as gently caress for me, I'm not certain if it's 10 seconds slow, but it's pretty bad. I almost pulled the trigger on an SSD today to try to make it a little bit more fun to try editing things. loving awesome. It's driving me nuts.
|
|
#
?
Jun 19, 2010 06:07
|
|
|
Phew, I thought it was just me.
|
|
#
?
Jun 19, 2010 06:08
|
|
|
For me, everything is faster in LR3 than LR2. Load folder: ~2 seconds from click to first image rendered Click image (20MP DNG): ~1/2 second until full render Zoom to full-res: ~1 second It's not like minority-report kind of speed, but it's perfectly usable and pretty damned impressive considering that it's working with 30-meg RAW files.
|
|
#
?
Jun 19, 2010 06:20
|
|

|
What system specs you guys (slow and quick, both) running with? Windows 7 x64 quad core 4gb ram 8600gt I'm working with 8mp raw files, there is no reason my machine should struggle with my new 800 picture catalog. e: Could be a memory leak in the x64 version of LR3 - My friend told me he installed x32 and it runs as well as LR2.7~ for him. Shmoogy fucked around with this message at 06:29 on Jun 19, 2010 |
|
#
?
Jun 19, 2010 06:22
|
|
|
Slow as gently caress for me too, but my laptop probably isn't up to snuf. Vista 64 Core2Duo 1.4GHz 4gig RAM GMA 4500MHD 5d2 raws
|
|
#
?
Jun 19, 2010 07:03
|
|
|
Fast as gently caress for me. Hackintosh 10.6.4 Q6600 @2.4 16gb ram 9400GT ~40mb TIFFs and (smaller) K10D RAW files. The best part of LR3 for me is that I can open the Export menu, select a preset without having to go make some tea while the UI updates my export settings.
|
|
#
?
Jun 19, 2010 07:21
|
|
|
Like I said, for me LR3 is fast as hell, even working with 21MP RAW files. I have: Windows 7 x64 C2Q @ 2.5GHz 4GB of RAM 9800GTX+ and all my photos are on a dedicated HDD (just a regular SATA 7200, nothing special). Maybe it's dependent on the graphics card? I know that Adobe is adding CUDA support and GPU acceleration to a lot of their products recently.
|
|
#
?
Jun 19, 2010 10:21
|
|
|
LR3 seems on par with, if not just a bit slower than 2 on my rig. Windows 7 64 Phenom x4 555 4gb RAM Caviar Black drive
|
|
#
?
Jun 19, 2010 13:22
|
|
|
psylent posted:What is this guy doing in post to get this effect on his photos? It looks to me, especially in the black and white photos near the top of the page that he's using (way too aggressive) high-pass sharpening techniques. You can also somewhat tell because the bokeh in some of his photos is very contrasty, which is consistent with using a sharpening method that didn't accurately pick up on the foreground subjects and instead sharpened the entire photo. I could definitely be wrong though.
|
|
#
?
Jun 19, 2010 13:26
|
|
|
So I had an idea that LR3 must be doing something super intense with the graphics card, that should, theoretically make things faster. Turns out, when I went into the Nvidia Control Panel and changed all the settings for maximum performance, LR3 started performing a lot better. I'd say it's almost on par with LR2, and anything that loads slower is most likely due to the new NR/Sharpening algorithm that it appears to redraw any time I zoom in for a 1:1 preview, despite having 50GB available on the HDD for cache. If any of you guys that are running slow, could change your graphics controller settings to force maximum performance instead of allowing applications to choose for themselves, it might help.
|
|
#
?
Jun 19, 2010 15:47
|
|
|
Speaking of Lightroom stuff, I have two questions: 1) is there a way to invert a RAW image (I photograph all my negatives) without also inverting what all the controls do? Once I've swapped the curves, the exposure control works backwards, and so does the white balance tuning, and everything else. It's tolerable but irritating. 2) Can I change what shows up in the "quick develop" bar? I would love to have a panel with just the WB, NR, and exposure in it for quick basic adjustments.
|
|
#
?
Jun 19, 2010 16:59
|
|
|
I tried the Nvidia control panel stuff - nada. Windows Vista Core2Duo 6400 4gig RAM GTX 260 All files on dedicated hard drive. I had zero problems with Lightroom 2. EDIT: I have all my photos on an external drive. I just moved a bunch of photos to an internal drive and worked with them from there. Half of them take half the time to open now - the other half take DOUBLE the loving time to open. EDIT #2: I decided to go back to LR2 - it now runs just as lovely as LR3 - gently caress me. Whitezombi fucked around with this message at 17:36 on Jun 19, 2010 |
|
#
?
Jun 19, 2010 17:04
|
|
|
Lightroom 2 was always a dog for me Lightroom 3 is much faster almost twice as fast. iMac 3.06ghz 2gb RAM Geforce 8800 GS With 18 MP raw files from a 7D.
|
|
#
?
Jun 19, 2010 18:16
|
|

|
What's everyone's thoughts on Aperture 3? Given a choice between Aperture and Lightroom, is Lightroom the one to go with?
|
|
#
?
Jun 19, 2010 19:33
|
|

|
moron posted:What's everyone's thoughts on Aperture 3? Given a choice between Aperture and Lightroom, is Lightroom the one to go with? For me, Lightroom was always the obvious choice because it lets you store your photos in a regular folder structure. Aperture (at least in the version I had, maybe they've changed it now) puts everything in a single giant package file that is irritating as hell to work with. VVVV orange lime fucked around with this message at 22:09 on Jun 19, 2010 |
|
#
?
Jun 19, 2010 19:46
|
|
|
orange lime posted:For me, Lightroom was always the obvious choice because it lets you store your photos in a regular folder structure. Aperture (at least in the version I had, maybe they've changed it now) puts everything in a single giant package file that is irritating as hell to work with. Main reason I used Lightroom. How many images do you guys have in your catalogs?
|
|
#
?
Jun 19, 2010 20:02
|
|
|
~3,000 give or take. Not a lot.
|
|
#
?
Jun 19, 2010 22:07
|
|
|
|
| # ? May 16, 2024 17:11 |
|
|
Whitezombi posted:How many images do you guys have in your catalogs?
|
|
#
?
Jun 19, 2010 22:14
|
|