


|
I'd keep the knots too.. as for the bowling alley glue up get a scraper and go to town on the glue then start planing?
|
 #
?
Jun 2, 2010 04:00
#
?
Jun 2, 2010 04:00
|
|


|

|
| # ? May 14, 2024 03:41 |
|
|
Yeah I removed all the glue about an hour ago. There are still about four open cracks on the underside with exposed glue that I'll probably labor over tomorrow. There are nails on the top and bottom of the panel respective to the image, and I'm not sure how to approach this when it comes to sanding down the final product. Tomorrow I'll probably get to work on the metal support.
|
|
#
?
Jun 2, 2010 05:31
|
|

|
wormil posted:I've read of people working with this stuff and it always sounds like a pain in the rear end Same here, everything I have read or heard about bowling alley wood is that it is comprised, at least in half, of nothing but nails. Like, epic nail:wood ratios.
|
|
#
?
Jun 2, 2010 23:08
|
|

|
Figured I would ask here, since it involves wood.. I recently built a set of Cornhole boards using pressure treated pine. Anyway, everything is pretty good on that front, got them all sanded etc. Next up though is the finish. I decided I wanted to stain the wood for a classic/rustic look. Today I went out to get the stuff since my Redsox vinyl stickers should be here tomorrow. I'm going with a redwood oil based stain and then finishing it off with 1 or 2 coats of polycrylic clear coat. Just had a couple questions since I have never stained wood before. 1. After applying a coat of the stain and letting it dry would it be wise to lightly sand the board's surface before applying the next coat of stain? Guy at lowes said the stain would slightly raise the wood fibers and could make the finish kind of rough, but wasn't sure how it would turn out after putting the clear coat on. 2. How should I apply the stain? I bought some bristle brushes that said they were good for stains, some sponge type brush-pad things. I also have some white-cotton cloth I can use to rub the stain on. Should I just brush it on and then wipe excess? 3. I got Miniwax Polycrylic, I'm guessing apply that should be pretty straight forward brushing it on, I do however want to avoid uneven finish from the brush strokes and each bristle not touching as close as the next etc. Would sanding with 800 grit after applying a couple coats be a wise idea? Again, this is for cornhole, so the board need to have some slide to them, but not a lot. thebushcommander fucked around with this message at 19:55 on Jun 3, 2010 |
|
#
?
Jun 3, 2010 19:49
|
|
|
Table top is jointed and cut to size. Scraped it flat, no sanding yet. Still need to fill the knot holes. Edit: The light makes it look way more brown than it is, it's actually almost black. 
|
|
#
?
Jun 5, 2010 02:41
|
|
|
parthenocarpy posted:Yeah I removed all the glue about an hour ago. There are still about four open cracks on the underside with exposed glue that I'll probably labor over tomorrow. Pull em up, get a small crowbar, take that metal bar off and run it through a planer if its flat enough or plane it by hand. You're close! MarshallX, woof, good looking wood
|
|
#
?
Jun 5, 2010 06:47
|
|
|
Not an Anthem posted:Pull em up, get a small crowbar, take that metal bar off and run it through a planer if its flat enough or plane it by hand. You're close! After what someone already said about bowling lane flooring being full of nails, I wouldn't let that board in the same room as my planer, let alone attempt to plane it.
|
|
#
?
Jun 5, 2010 12:20
|
|


|
I should have clarified, there are only two exposed nails on both sides with practically no heads. What I want to do is remove the two outer blocks and pray there isn't a new set of nails directly pounded into the next layer, so it'll produce a nice flat edge free of metal.
|
|
#
?
Jun 5, 2010 13:07
|
|
|
parthenocarpy posted:I should have clarified, there are only two exposed nails on both sides with practically no heads. What I want to do is remove the two outer blocks and pray there isn't a new set of nails directly pounded into the next layer, so it'll produce a nice flat edge free of metal. Don't just pray, get a metal detector and make sure there aren't any hidden things that can ruin a blade. http://www.harborfreight.com/metal-detector-97245.html?utm_source=hftusa&utm_medium=hftusa&utm_campaign=buylink
|
|
#
?
Jun 5, 2010 13:39
|
|

|
Not an Anthem posted:run it through a planer if its flat enough or plane it by hand. You're close! ... To ruining a set of planer knives. parthenocarpy posted:What I want to do is remove the two outer blocks and pray there isn't a new set of nails directly pounded into the next layer And now you know how bowling alleys are assembled.
|
|
#
?
Jun 6, 2010 00:00
|
|
|
If it's any consolation, they may be the cool twisty spiral box nails.
|
|
#
?
Jun 6, 2010 15:45
|
|
|
Completed some of my rails this weekend. 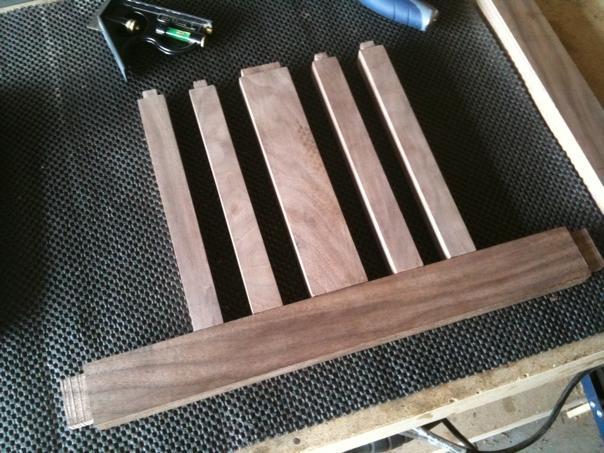 Here is a sketchup image of my final plan, for reference: 
|
|
#
?
Jun 7, 2010 14:18
|
|
|
I spent January 1 through March 23 of this year building a dresser changing table in anticipation of the birth of our first child. I got it finished eight hours before my wife's water broke.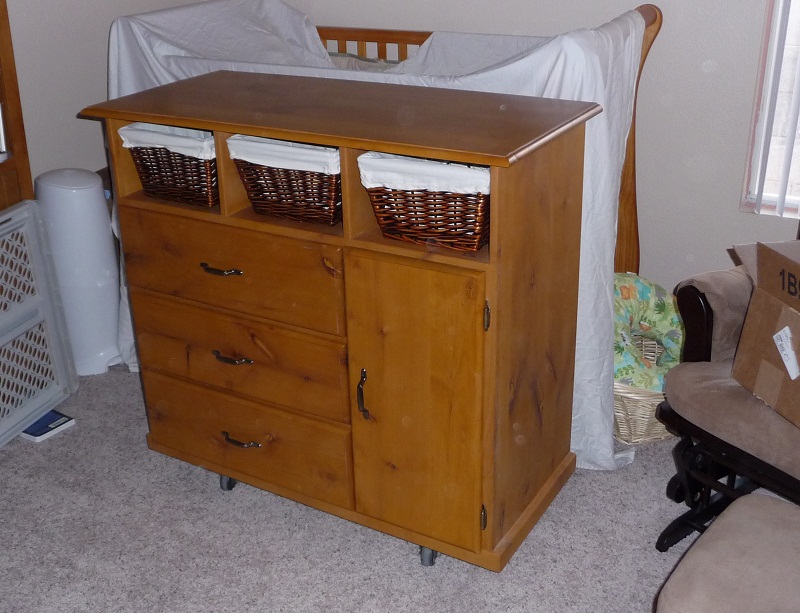 And with some left over planks I built a desktop to replace a crappy glass desk thing we got from my father in law when we moved into our house. I stained it with boiled linseed oil because I didn't feel like screwing around with stain again since putting a bajillion layers of polyurethane was already going to be a tax on my patience. And it started getting hot in the garage (finished this in mid May), so I didn't want to spend any more time out there. 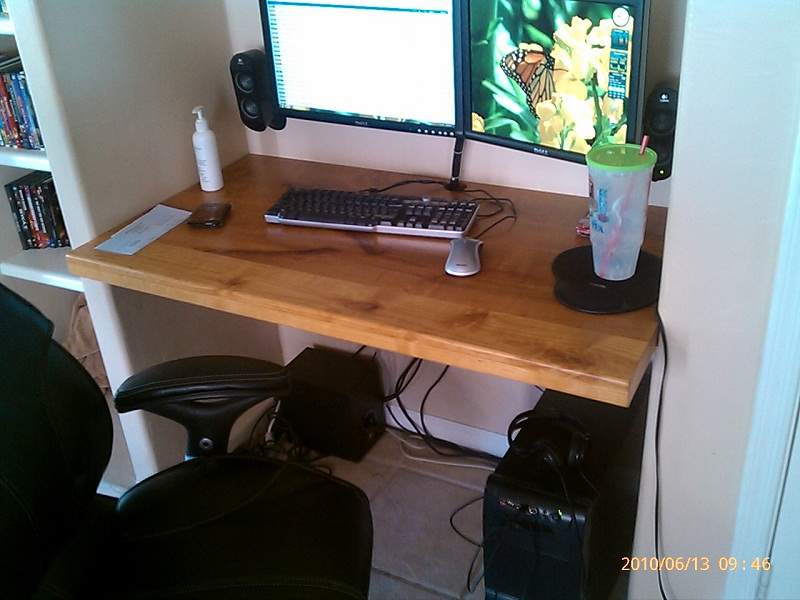 Both were made from rough cut alder, which we joined and planed into workable pieces. I forget how many board feet total we used, but total cost of all materials was around $200. Far cheaper than store bought, far more durable (dovetail joints and everything), and way more sentimental value.
|
|
#
?
Jun 13, 2010 17:55
|
|


|
Just got my first kickback. That was pretty sweet, I guess. Lucky for me, I took it in the chest, right around rib 5, just down and to the right of my sternum, as opposed to the soft white underbelly where it could have done some real damage. I said "OW", hit the kill switch on the saw, and then just sort of stood there. My only real thought was, "Wow, this is going to hurt like a bitch in a few seconds," since I thought there was a real possibility it might have fractured a rib or something. In the end, no, it was actually remarkably mild. I wish all kickback could be so mild.  So, the question is: how best to avoid kickback when cutting with the blade tipped all the way over at a 45? I spent a couple minutes regaining my composure and finished the rest of the cuts without event, but I'm not really sure what I could have done different. Well, except for the one big obvious trick of not standing right behind the loving blade, which I am usually mindful of but I guess I forgot this time. Anyhow, I've been doing this stuff, at least to some degree or another, for like 15 years, and had managed to avoid kickback up until tonight. If I go another 15 years without it happening again, I'm cool with that. I'm thinking take the kickback piece, cut a hole in the middle, and frame it around a picture of the wound on my chest. Hang it on the wall in the shop. [edit] Just had the thought that I probably could have avoided the kickback completely by putting the fence on the opposite side of the blade, so that the blade angled up and AWAY from the fence. Damnit. Bad Munki fucked around with this message at 04:55 on Jun 14, 2010 |
|
#
?
Jun 14, 2010 04:20
|
|


|
Bad Munki posted:[edit] Just had the thought that I probably could have avoided the kickback completely by putting the fence on the opposite side of the blade, so that the blade angled up and AWAY from the fence. Damnit. I've always set up so that the cutoff piece falls "under" the blade and my fence/work piece is "over" the blade. On a left tilt saw, this means the fence is to the right of the blade. I've always been told you don't want to tilt your blade towards your fence. For that reason I've always wondered why right-tilt saws exist, because it seems like you'd want them always tilting left so you can utilize the capacity of the saw. Glad to hear you're alright.
|
|
#
?
Jun 14, 2010 11:40
|
|
|
That's why I went with a left tilt saw. Really there are only a few simple things to help prevent kickback. A. Make sure your stock is perfectly straight on one edge and has a flat face. B. Use feather boards when you can C. Use a guard with anti-kickback pawls if you can D. Use a splitter when you can E. Buy a saw with a riving knife, that tilts and lower/raises with the blade F. Keep 100% focused when making a cut. It's way too easy to get distracted for a moment (and that's all it takes to gently caress yourself up permanently) especially if you don't have proper outfeed,infeed, and sidefeed supports set up. Worrying about where the piece is going to end up or having to worry about increasing downward pressure as the rear end end of the workpiece tries see-saw it's way to the floor is bad, bad mojo. G. Be confident in your stance and feeding method. Nonchalance is dangerous, but shaky hands can be even more so. H. If you're going to be crosscutting short pieces, make a crosscut sled. It's a lot safer by far than trying to fiddle with a wobbly stock miter gauge. Plus, you can mount a toggle clamp on the back fence so your hands don't even come near the blade. The table saw is dangerous even when you adhere to all the safety protocols. It's the only thing in the shop that still makes me nervous when I first turn it on. Just take a second to think about every cut you make with it, and what can happen if you don't. I would not be a happy boy without one or more of my fingers.
|
|
#
?
Jun 14, 2010 19:13
|
|

|
Yeah, in my case it was a matter of tilting the blade towards the fence, and just at the end of the cut, my mind flipped to something else for a second and I must have loosened the pressure on the board or jiggled it or something. Fortunately, I was using a secondary device to push the board through, so my hand was fairly safe at all times. But man oh man, with that blade tipped over, it really grips the board when it throws it. The rib which took the brunt of the hit is fairly sore today, but to be honest, I've taken much worse hits before (not in the shop, of course.) All in all, I'd say I got drat lucky with how/where it hit me. I'm rather glad it's only as sore as it is. ") Next time, fence is going on the other side. And the next saw will be a nicer, newer one with more safety features. This one is pretty drat old, and was built before a lot of those things became common or maybe had even been invented yet.
|
|
#
?
Jun 14, 2010 20:51
|
|
|
Bad Munki posted:And the next saw will be a nicer, newer one with more safety features. This one is pretty drat old, and was built before a lot of those things became common or maybe had even been invented yet. I had a pretty bad scare once as a new home owner on a $75 craftsman table saw that I had no business trying to work with. After that I just put it away and saved my pennies until I bought a contractor "saw stop" with a lot of the extras like the cast iron wings. Overall I'd say buying a very very nice table saw is well worth it. It makes me more willing to do more projects and I hopefully will never have to buy another table saw in my life time. So far, I've never triggered the brake but since losing a finger would seriously gently caress up my real job (computer programmer), the cost was well worth it.
|
|
#
?
Jun 15, 2010 01:18
|
|

|
Sup, fellow programmer   As it stands now, I'm not any more afraid of the saw than I was before (I was already quite wary of the thing) it's just now, I had some sense knocked into me regarding a few safety steps I knew, but had apparently forgotten. It's one of those things where looking back, I think, "Damnit, yes I knew not to stand right behind the work piece, and yes I knew not to tip the blade that way, and yes I knew to push the piece all the way clear before relaxing or thinking about other stuff," etc, etc. I think the biggest thing was to get right back on it and finish my cuts (once I sorted myself out, physically and mentally.) But yeah, definitely looking forward to a nicer saw than my 1970's-era rockwell craigslist special. It's a good, solid, super-heavy saw, and I like that about it, but it sure is missing a few things I'd like to have.
|
|
#
?
Jun 15, 2010 05:59
|
|
|
Anyone have any tips on how I can replicate this cut?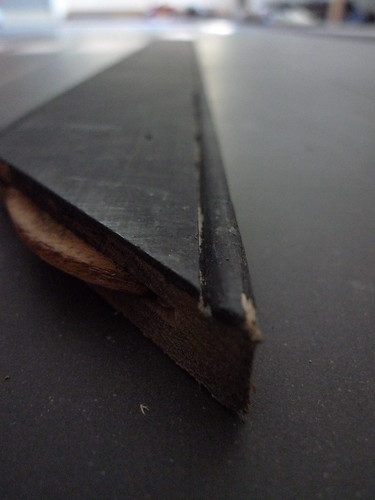 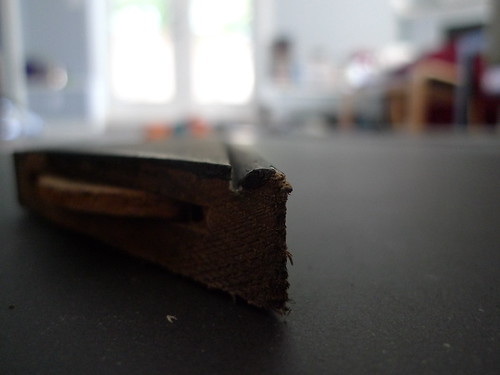 It seems to be made out of a 1x? comb-faced fascia material. I'm assuming it was run through a table saw to get those two lines, but how did they round the outside edge? Just a orbital sander, or some type of router bit?
|
|
#
?
Jun 16, 2010 02:51
|
|
|
I believe it is called a beading bit on a router table
|
|
#
?
Jun 16, 2010 02:56
|
|
|
Barn Owl posted:I believe it is called a beading bit on a router table Cool thanks, I'll look into that. I'm not much of a woodworking guy, most of my background is in construction, but how did they get a router bit to hit one side and not the straight edge? Just a really small bit? It's probably hard to tell from the picture but the gab can't be more than an 1/8".
|
|
#
?
Jun 16, 2010 03:00
|
|
|
Well specifically it looks like an edge beading bit. A router table has the bit spinning on the z axis. Imagine the outer edge of that frame flat down on the table. The face of the frame against the fence. The bit is just the negative of the profile.
|
|
#
?
Jun 16, 2010 04:08
|
|
|
So if I only have access to a router and a table saw a SOL?
|
|
#
?
Jun 16, 2010 04:10
|
|
|
Reggie Died posted:So if I only have access to a router and a table saw a SOL? You buy a beading bit with a bearing. http://www.rockler.com/product.cfm?page=2126 
|
|
#
?
Jun 16, 2010 04:42
|
|

|
So I built a stratocaster. I need to put a finish on the body. Its a Swamp Ash body, and I want to be able to see the grain/have it look natural. Ideally I just want to slap on a coat of oil or stain and have it be done, but after doing a bit of research looks like it will not be that simple. How should I finish the body? Tung oil? Tru-oil? Colortone liquid stain? "Fresh sand, a layer of sanding sealer. then a layer of grain fill. another layer of sanding sealer, then a final layer of grain fill to make it as flat as possible. then spray it with a gloss or a stain."? (this is what a friend told me to do). I don't want the finishing process to take forever or be to in depth. But I obviously want my guitar to look good.
|
|
#
?
Jun 17, 2010 06:51
|
|

|
Advice needed: I like reusing scrap wood (pallets, fences boards, etc) and often need to attach multiple boards on end to form a desired width (ie taking three 1x4s to make a 1x12) What's the "best" method for joining pieces like this? (and I use quotes around best because I do understand the subjective nature, just looking for some tips and ideas)
|
|
#
?
Jun 17, 2010 07:15
|
|

|
What tools do you have?
|
|
#
?
Jun 17, 2010 15:23
|
|
|
iEatFish posted:So I built a stratocaster. I need to put a finish on the body. Its a Swamp Ash body, and I want to be able to see the grain/have it look natural. Ideally I just want to slap on a coat of oil or stain and have it be done, but after doing a bit of research looks like it will not be that simple. Being pretty new and inexperienced I have no advice for this. But I would like to build guitars at some point and have been bookmarking information for future reference - I did see someone link this forum about this topic:http://reranch.com/reranch/index.php [The Guitar Refinishing and Restoration Forum] Might be worth looking at if you haven't.
|
|
#
?
Jun 17, 2010 16:37
|
|

|
Barn Owl posted:What tools do you have? I have a drill, circular saw, table saw and miter saw. Possibly looking to expand for the right tool
|
|
#
?
Jun 17, 2010 18:51
|
|
|
iEatFish posted:So I built a stratocaster. I need to put a finish on the body. Its a Swamp Ash body, and I want to be able to see the grain/have it look natural. Ideally I just want to slap on a coat of oil or stain and have it be done, but after doing a bit of research looks like it will not be that simple. There are a few different products you can use to fill the grain. If you have a good woodworking store nearby (not lowes or home depot) they should carry an oil or water based grain filler. You can also use clear epoxy as a grain filler it can give the grain a sort of 3D look since you can see down into it. Tru-oil or Tung oil can be used as a grain filler too you keep the surface of the wood wet with the oil and use a fine grit sandpaper to create a slurry you force into the grain and scrap flush with the surface. Come over to the ReRanch forums and post a pic of your build they'll get you going in the right direction.
|
|
#
?
Jun 17, 2010 20:23
|
|
|
iEatFish posted:I don't want the finishing process to take forever or be to in depth. But I obviously want my guitar to look good. I would definitely recommend filling the grain and other posters have pointed out a few methods. Ash is a very open pored wood and filling the pores will give you a smooth finish and can also add some interesting character. dwoloz posted:Advice needed: Is the product intended to last for a long time or need strength? Are looks important? The best way to edge join wood is to run the edges through a joiner, or hand plane them, and glue them together with clamps. Pocket hole screws are a popular, inexpensive, and easy mechanical fastener that will do the job. Dowels will work. Another alternative is a biscuit joiner + biscuits. The very simplest way is with battens.
|
|
#
?
Jun 17, 2010 23:51
|
|
|
dwoloz posted:table saw Do you have a dado stack for it? Tongue and groove would work too I believe. Most of my learning came from myself in highschool so there may be something I missed. I just wish the instructor had more time to help those of us that cared than keeping rednecks from breaking everything.
|
|
#
?
Jun 18, 2010 01:27
|
|
|
Our high school was without a shop so consider yourself lucky you got anything. I'm learning it all now later in life and still not very sharp at it (I had to look up what a dado and batten even was; suffice to say, no I don't have a dado stack yet). I'm working right now on a beehive project that requires neither aesthetics nor load bearing strength, just function. Seems like a hand planer would be a wise investment (and some clamps) Thanks for the suggestions so far Edit: Can a dado stack be faked by making many successive cuts next to each other? dwoloz fucked around with this message at 04:19 on Jun 18, 2010 |
|
#
?
Jun 18, 2010 04:08
|
|
|
Yep, it just won't generally be as pretty, and for wider ones, it'll take forever. I do it all the time when I've feeling too lazy to swap blades, though, and I don't care how it looks. Not that it'll necessarily look bad, just probably not as nice. Of course, you can always do two perpendicular cuts which meet in the corner instead of a whole bunch of parallel cuts, too. That works well and is fairly pretty. I always forget about that technique. Not so great if you're trying to put a rabbet in the end of a long board, though.
Bad Munki fucked around with this message at 05:48 on Jun 18, 2010 |
|
#
?
Jun 18, 2010 05:45
|
|
|
dwoloz posted:Edit: Can a dado stack be faked by making many successive cuts next to each other? You can make the cuts about 1/8" apart and knock them out with a hammer, then clean up the jagged dado with a chisel. I do this all the time.
|
|
#
?
Jun 18, 2010 06:20
|
|
|
Anyone have any recommendations for circular saws? I don't have the space for a table saw, nor for the wallet to go with the one's I want, but I do need to rip things more than often. I'm going to buy one of the 50 inch clamp guides to go along with it, which would will be very handy to use along with my router. edit: This is the one I've been eying: http://www.amazon.com/Milwaukee-6390-21-4-Inch-Tilt-Lok-Circular/dp/B0000222UX/ref=sr_1_1?ie=UTF8&s=hi&qid=1276908544&sr=1-1 elegant drapery fucked around with this message at 02:00 on Jun 19, 2010 |
|
#
?
Jun 19, 2010 01:51
|
|
|
Carta posted:Anyone have any recommendations for circular saws? Probably fine. In the $100-150 range, I don't think there are many differences in 15 amp saws. I bought the Porter Cable, not sure of the model but it was around $130 and I've never been disappointed. I chose it because it was the lightest saw available and was tops on all the reviews at that time (~12 years ago). The Hitachi is in that price range and has a brake, which is a really nice feature.
|
|
#
?
Jun 19, 2010 21:35
|
|
|
Carta posted:edit: This is the one I've been eying: That one was $86 a month or so back. It works pretty well so far. Pretty much a steal at that price, imo.
|
|
#
?
Jun 20, 2010 09:45
|
|

|

|
| # ? May 14, 2024 03:41 |
|
|
I'm considering getting into woodworking now that I have the space to do so, and am wondering what is required for an initial set up. My father-in-law recently decided to sell a bunch of his equipment, and I am thinking about picking some up and would like a bit of advice. He is selling: Miter saw Scroll saw Table saw Belt/disk sander 12 1/2" Planer Industrial grade band saw Radial arm saw I've been reading about each piece and it seems that with the radial arm and the scroll saw I can basically perform the same tasks as if I also had a band saw, a table saw, and a miter saw. I'm really new to all this, and it's hard to get advice from my wife's dad because we live a few states away and we work on opposite schedules.
|
|
#
?
Jun 25, 2010 07:41
|
|

