

|
Dakana I really don't like the first one. The couple probably does but when I look into the grooms shirt it's like looking into the sun. If you like the exposure on the face, keep it, but burn his shirt so you can see some definition in it... wrinkles, folds, buttons. Right now they're barely visible.
|
 #
?
Jul 10, 2010 15:04
#
?
Jul 10, 2010 15:04
|
|


|

|
| # ? May 16, 2024 09:25 |
|
|
JaundiceDave posted:For the one with the lightning and the city, I'd run a -20% or so saturation brush over some of the buildings. With a shot like this, it's good to have a dramatic contrast between the sky and foreground with the intensity of their color. I'm not quite sure I understand how the Lightroom 3/Flickr syncing works. It seems to take forever, as if it's reuploading my photos, each time I hit the publish button. It updates all the titles, captions and tags at least, which is pretty cool.
|
|
#
?
Jul 10, 2010 15:10
|
|
|
Penpal posted:Dakana I really don't like the first one. The couple probably does but when I look into the grooms shirt it's like looking into the sun. If you like the exposure on the face, keep it, but burn his shirt so you can see some definition in it... wrinkles, folds, buttons. Right now they're barely visible. I think the whole photo might look better -1EV with a selective exposure brush on the faces to brighten them up a little. I'm thinking in Lightroom terms of course. And this is just a guess. As for the processing, except for the exposure on the first one I think they're all amazing. I love the warming.
|
|
#
?
Jul 10, 2010 18:18
|
|


|
There's a friend of many of my friends who is a photographer, and posts all her sets on facebook, and I've noticed nearly all her shots are as bright as dakana's first one. I always want to comment on it, but don't, since most of the time it's on pictures of friends' newborns or their weddings.
|
|
#
?
Jul 10, 2010 21:35
|
|
|
What's the "Correct way" to do HDR? I went out shooting the sun-rise this morning and ended up trying out the Auto-Exposure Bracketing while I was shooting some trees in the fore-ground with the sun-rise in the background. What's the best way to combine the 3 shots into one great image? HDR? Using Layers and Blending modes?
|
|
#
?
Jul 12, 2010 13:00
|
|

|
If the range is not too crazy, this works fine (CS3, so things might not be 100% the same in 5).
|
|
#
?
Jul 12, 2010 13:33
|
|

|
Most folks in the Dorkroom prefer exposure blending to typical HDR. Here is a decent primer on the process. http://photodoto.com/exposure-blending-tutorial/
|
|
#
?
Jul 12, 2010 22:01
|
|
|
Thanks for all of the feedback, guys. I feel a lot better and am pretty excited with the results.Penpal posted:Dakana I really don't like the first one. The couple probably does but when I look into the grooms shirt it's like looking into the sun. If you like the exposure on the face, keep it, but burn his shirt so you can see some definition in it... wrinkles, folds, buttons. Right now they're barely visible. And now I'm wondering if maybe my monitor's brightness is a bit off. I'll go back and re-do that one, but the shirt and dress aren't oppressively bright on my screen.
|
|
#
?
Jul 13, 2010 04:54
|
|
|
Moist von Lipwig posted:These all look excellent except I think the first one could afford to lose a half stop of brightness, it's pushing the boundaries of zone IX. Agreed. The white shirt is bleeding into the background a little too much.
|
|
#
?
Jul 13, 2010 04:58
|
|
|
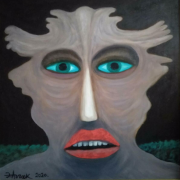
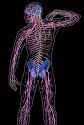
How does this look? Being home alone leaves you no option but to practice on yourself, but after and hour plus staring at my own face I think I'm about to 
|
|
#
?
Jul 13, 2010 16:25
|
|

|
 My girlfriend was using a Canon 20x super-zoom from the 300-level stands. They seem salvageable. I didn't want to bring my PEN in case security decided the old giant lens I'd be using makes the camera too "professional." (But photography with "non-professional" equipment was wholly encouraged.)
|
|
#
?
Jul 13, 2010 22:57
|
|
|
fronkpies posted:How does this look?
|
|
#
?
Jul 13, 2010 23:13
|
|
|
fronkpies posted:How does this look? On my laptop it looks fine...here on my crt it's an underexposed muddy mess.
|
|
#
?
Jul 13, 2010 23:16
|
|

|
fronkpies posted:How does this look?
|
|
#
?
Jul 14, 2010 00:37
|
|
|
fronkpies posted:How does this look? It's a pretty big improvement, the only thing I'm wondering is, why aren't you wearing a shirt? It'd be one thing if you had more of your body in the shot, but to me that just says "Hey Ladies, I do photography naked"
|
|
#
?
Jul 14, 2010 00:58
|
|
|
unprofessional posted:Looks like CGI, to be honest.
|
|
#
?
Jul 14, 2010 03:25
|
|


|
Did you hit it with the Draganizer action?
|
|
#
?
Jul 14, 2010 04:35
|
|
|
unprofessional posted:Looks like CGI, to be honest. GWBBQ posted:I was thinking "like a CGI render." Too smoothed out and the contrast looks wrong in a way I can't quite describe. I think you started too dark and smoothed it out too much. Yer im thinking this now I have been back and looked at it a few hours later. About the smoothness though, the focus isnt spot on so it was pretty soft out of the camera. evil_bunnY posted:Why's your original (I'm guess out of camera) so underexposed? Push it til you're just about to clip. Just trying to practice post on different stuff, I underexposed this and clipped the shoulder and background on purpose so I could have a go at rebuilding that stuff and getting it right, not that I would take something that underexposed anyway, but just incase. AtomicManiac posted:It's a pretty big improvement, the only thing I'm wondering is, why aren't you wearing a shirt? It'd be one thing if you had more of your body in the shot, but to me that just says "Hey Ladies, I do photography naked" Two reasons for this, it was a hot and sweaty day, and rebuilding the shoulder thing. Really need to get my monitor calibrated, might just rent a pantone from calumet for the day.
|
|
#
?
Jul 14, 2010 08:20
|
|
|
Need to get a better post processing system down and looking at Kelby's latest Lightroom 3 Book especially for the 7 point system. Anyone have any feedback about this book or his 7 point system in general on Lightroom?
|
|
#
?
Jul 15, 2010 01:25
|
|
|
fronkpies posted:How does this look? Retouching looks pretty good to me, maybe a tiny bit soft on the skin but it doesn't really stick out to me unless you really look. Your shoulders look weird - did you flip them to get your head centered? It looks like you have no collar bone. Nice image though - I like that light.
|
|
#
?
Jul 15, 2010 03:24
|
|

|
calcio posted:Need to get a better post processing system down and looking at Kelby's latest Lightroom 3 Book especially for the 7 point system. Anyone have any feedback about this book or his 7 point system in general on Lightroom?
|
|
#
?
Jul 15, 2010 05:16
|
|

|
SirRobin posted:Kelby's stuff's OK, though he has a disturbing habit of telling people to flatten images in photoshop waaaaay too often (ie: at all). For my money, if you want to learn what Lightroom does and how to drive it, Martin Evening is the writer to look for. Thanks for this. I bought LR3 as soon as it came out after having used the Beta for a few month but I've just been playing with it and not really using it "properly" with no real workflow to speak of. I had a look at Scott Kelby's site and video advert for his LR3 book and it seemed like it might be a bit easier to get into, I flicked through his digital photography book a while back. I ended up buying Martin Evening's book off amazon based on this recommendation and since its already out so hopefully I'll actually learn how to use LR3 properly.
|
|
#
?
Jul 15, 2010 14:25
|
|
|
Nevermind. Just needed an update.
AtomicManiac fucked around with this message at 04:33 on Jul 16, 2010 |
|
#
?
Jul 16, 2010 04:23
|
|
|
SirRobin posted:Kelby's stuff's OK, though he has a disturbing habit of telling people to flatten images in photoshop waaaaay too often (ie: at all). For my money, if you want to learn what Lightroom does and how to drive it, Martin Evening is the writer to look for.
|
|
#
?
Jul 16, 2010 22:32
|
|
|
What settings can I change to make CS5 and LR3 run better on my old outdated macbook? I probably won't be able to upgrade my computer for another 6 months but I'm just looking for a way to make this bearable in the mean time.
|
|
#
?
Jul 20, 2010 23:35
|
|
|
SirRobin posted:Kelby's stuff's OK, though he has a disturbing habit of telling people to flatten images in photoshop waaaaay too often (ie: at all). For my money, if you want to learn what Lightroom does and how to drive it, Martin Evening is the writer to look for. Is flattening images bad? I use gimp, and it doesn't let me save raw as a jpg unless I flatten it. I'm just getting into photo retouching and manipulation, and all this stuff is just mind boggling.
|
|
#
?
Jul 21, 2010 03:19
|
|

|
Flattening the image is destroying all the data and changes you made, pretty much zero reason to ever do it to your master file since you can just export it to something like TIFF/JPEG to get a smaller file size without the layers.
|
|
#
?
Jul 21, 2010 03:38
|
|
|
I just upgrade to CS5 recently and I saved some photos today and after I uploaded to my site I noticed that the uploaded ones look super washed out. It looks like CS5 is saving them as Adobe 1998 of sRGB. Would this be causing that much of a difference, and why is is saving in Adobe instead of sRGB like CS4 has been doing the entire time Ive had it?
|
|
#
?
Jul 21, 2010 11:27
|
|


|
Bojanglesworth posted:why is is saving in Adobe instead of sRGB like CS4 has been doing the entire time Ive had it? I'm going to go waaaaay out on a limb here and guess it's because you haven't told it to save as sRGB. Check your colour space settings.
|
|
#
?
Jul 23, 2010 11:55
|
|
|
I need some Lightroom help right for a problem that's been driving me crazy. All of a sudden my Import Dialog screen isn't rendering previews properly for images still on the camera. The thumbnails are really tiny and clicking on them does not let me see the full-size previews like it did before. I suspect this started when I imported a video from my phone since the import thumbnails all have black bars as if they all have a strict aspect ratio.
|
|
#
?
Jul 28, 2010 01:39
|
|

|
Is there a way to collapse a mask into one step in an images history. I'm working with an image and the mask I'm making is chewing up all kinds of memory. I don't need to keep every single step of the mask!
|
|
#
?
Jul 28, 2010 03:07
|
|

|
TheAngryDrunk posted:Is there a way to collapse a mask into one step in an images history. I'm working with an image and the mask I'm making is chewing up all kinds of memory. I don't need to keep every single step of the mask! Make a snapshot before the mask and after it is applied. Then you can purge the history if you want.
|
|
#
?
Jul 28, 2010 23:15
|
|


|
8th-samurai posted:Make a snapshot before the mask and after it is applied. Then you can purge the history if you want. Thanks. I knew there must be an easy way to do that. Edit: Hmmm...that did seem to help, but not as much as I was hoping. I guess the mask itself still takes up a lot of memory. TheAngryDrunk fucked around with this message at 04:19 on Jul 29, 2010 |
|
#
?
Jul 29, 2010 04:14
|
|
|
I know this has been asked a few times, but I can't seem to find the answer in here from a quick flick through - what is the best way to merge LR catalogues? I have an old catalog on my old PC, which I recently started working with again. I also have a copy of it on my laptop, with much newer photos on it. I need to merge, because there are changes in both that I don't want to lose. The one on my laptop is now a LR3 catalog, I'm guessing I'll need to wait until I have a proper internet connection again and upgrade to LR3 on my PC?
|
|
#
?
Jul 30, 2010 14:30
|
|

|
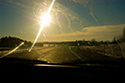
I decided to take a crack at some of this the other day. Below is the original image I started with, on which I had hoped to darken the sky while bringing up the exposure on the foreground. My first attempt involved quick selecting the sky in Photoshop, cutting down the low levels, then inverse selecting the buildings and bringing up the exposure. Unfortunately, doing so revealed a garish green fringe around the top of the roof. I had some success trying to desaturate it, but it still left a very noticeable demarcation between the differently adjusted areas. I must have reprocessed this miserable image 10 times trying to get it to go away, refining and feathering my selections and bumbling around with masks, before I finally got something that looked passably like what I had in mind:  I finally ended up just making a duplicate layer, masking it, then making my adjustments and fudging around with the erase tool for about 20 minutes. Any comments or advice? This is the first time I've really had to experiment with Photoshop to get an image to behave, so any words of wisdom or sycophantic praises are welcome.
|
|
#
?
Aug 1, 2010 13:27
|
|


|
Future advice would be to bracket a couple more exposures, align the layers in Photoshop and then use masks to combine the layers.
|
|
#
?
Aug 1, 2010 16:02
|
|
|
TheAngryDrunk posted:Thanks. I knew there must be an easy way to do that. Masks are just alpha channels, it's not really adding much to the file size.
|
|
#
?
Aug 1, 2010 17:51
|
|
|
brad industry posted:Masks are just alpha channels, it's not really adding much to the file size. It's not changing the file size much, but memory usage goes crazy when I'm editing this file. It's well over 1GB when editing it. TheAngryDrunk fucked around with this message at 05:52 on Aug 2, 2010 |
|
#
?
Aug 1, 2010 22:11
|
|
|
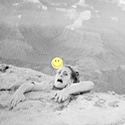
Is there any way to salvage some of these photos in post processing? I had to bump up the ISO cause I was shooting at night. They just dont look...normal.  Click here for the full 766x1024 image. I dont know how to even begin fixing it in lightroom besides playing with sliders. Or this one -  Click here for the full 1024x591 image. This one is fine, except I had just shot a bunch of pics inside a darkish-room, So the ISO is 1250, and its noticeably noisy. Anything I can do? I have RAWs of both. Link to SA Mart thread since I might need some major help with these. http://forums.somethingawful.com/showthread.php?threadid=3335316 Saint Celestine fucked around with this message at 07:56 on Aug 4, 2010 |
|
#
?
Aug 4, 2010 07:45
|
|

|

|
| # ? May 16, 2024 09:25 |
|
|
Saint Celestine posted:Is there any way to salvage some of these photos in post processing? I had to bump up the ISO cause I was shooting at night. Tweak white balance and tint - that should help with the funky colorcast.
|
|
#
?
Aug 4, 2010 12:30
|
|
