


tuna posted:Yeah, I don't know you though so we've probably not met yet I've wanted to work at Blur since I started pursuing 3D until recently. I talked to a few people who work there and I'm starting to reconsider. I've been looking at Sony Santa Monica (now "Santa Monica Studios" I think?). I'm going to try for modelling/texturing somewhere, preferably character. Might divide up my portfolio between that and real time game effects work. Still have a year left of school and lots of work to do inbetween now and graduation. Would you say the working conditions vs. the pay is worth it? And nope, I've never seen the studio other than an old video that gave a tour of the place, looked like a dream studio when I saw it in that. ceebee fucked around with this message at 10:12 on Aug 29, 2010 |
|
 #
?
Aug 29, 2010 10:05
#
?
Aug 29, 2010 10:05
|
|
")

|

|
| # ? Jun 5, 2024 17:26 |
|
|
I can't really say what it's like for the modeling department but I've heard its quite good. Obviously the bulk of the work we do is realistic characters with giant muscles and shoulder pads, so if you do apply, certainly cater for that (and hopefully you like doing that sort of stuff). Modeling is also obviously one of the earlier stages of production on a cinematic so you won't be as exposed to crunches as later-pipeline stage departments like effects when setbacks happen, so that definitely helps when it comes to the quality of life scale from what I've seen. You'll still be busy though! However, this is the only place I've worked in LA, so I don't have much to compare it to in my own experience. From anecdotes I've heard from friends working at Method/R&H/Sony, Blur has a nicer balance between good/bad projects (at least the bad ones don't last long). Ultimately it does come down to luck and how efficient you are as a production artist, so keep that in mind as well. Also there's no contracts and there are very relaxed policies on almost everything. If you get your job done and done well, nobody is going to care how or when you do it. This is really really cool in an ever increasing "corporate policy" atmosphere a lot of other places have.
|
|
#
?
Aug 29, 2010 10:32
|
|

|
Comicon Challenge 2010 has begun! I really wish they didn't throw this during my finals and when I have to move out of my current place and find a new one. I probably shouldn't enter this year :[
|
|
|
#
?
Aug 30, 2010 02:41
|
|
|
I've got a beginner question about character modeling. I'm trying to model a character posed on a turntable, not for animation. Do you start off modeling the character posed right off the bat, or do you get it in a T pose and move it into a more natural stance?
|
|
#
?
Aug 31, 2010 00:03
|
|
|
Almost always model a character in a T pose or something close. If the 3d character needs to be rigged or is symmetrical (which it almost always is for production anyway) then a T pose is helpful for riggers and modellers. Some people position the arms hanging more loosely by the sides because it feels more natural while modeling and most characters aren't putting their arms above their heads that much anyway. Maybe someone who actually works with characters in production could add more
|
|
#
?
Aug 31, 2010 00:22
|
|

|
Yeah I think most studios are doing the 45 degree "relaxed" pose these days. Especially now that they're blending normal maps for clothing wrinkles and such. For me it's harder to model in the 45 degree pose since the biggest problem areas for me are the armpits and inbetween the legs. The traditional T pose makes this a bit easier.
|
|
|
#
?
Aug 31, 2010 01:52
|
|
|
But it deforms better in the relaxed pose, doesn't it?
|
|
#
?
Aug 31, 2010 02:01
|
|


|
I believe so. There would be less compression in a relaxed pose than if you model it in T pose and then put it in relaxed pose. Plus like Eoin said above most of the time they won't be putting their arms up over their head.
|
|
|
#
?
Aug 31, 2010 04:11
|
|
|
Wow, thanks for the answers! I'm surprised how active this thread is. I was expecting maybe one vague reply in a week.
|
|
#
?
Aug 31, 2010 04:17
|
|
|
For me t-poses are easier to model and rig, but the relaxed pose looks better in the end because it deforms better.
|
|
#
?
Aug 31, 2010 04:39
|
|

|
I think you also get a feel for the body a bit more in a relaxed pose, although obviously if you're experienced then you'll know what the T pose will look like. Plus it stretches the mesh and textures less.
|
|
#
?
Aug 31, 2010 08:59
|
|
|
Most arms are rarely held out straight to the sides anyway. Model them like that and most of the time you'll just get the shoulders being stretched out into a relax pose that you didnt model for.
|
|
#
?
Aug 31, 2010 09:05
|
|


|
I'm getting some more shots rendered. I have about 7 rendered now out of maybe 70 for this scene. I still have a lot of compositing to do though. Click for biggie. Oh and also here is a little fan I whipped together for a few shots. 
|
|
#
?
Aug 31, 2010 16:17
|
|
|
Hinchu posted:Oh and also here is a little fan I whipped together for a few shots. drat, that looks great, I love the cartoony style you use!
|
|
#
?
Sep 1, 2010 06:46
|
|

|
Tw1tchy posted:I really like the "cartoony" nature of it, yet still a fairly realistic style. Either way, looking good, and I'd love to see it when/if it's done. Tw1tchy posted:drat, that looks great, I love the cartoony style you use! Hey thanks for the kudos. I find it funny that you all describe it as cartoony. I struggle so much with being too literal in my drawings, and yet some of the CG stuff I do is describe as cartoony. I did however have a moment recently where I thought "gently caress my drawing" as I thought my animation stuff is where I have more fun and feel more free. Drawing sometimes I feel too encumbered.
|
|
#
?
Sep 2, 2010 02:31
|
|
|
I modeled a wheel (Advan TC2). It took me forever to figure out how to get the lug nut holes to cut into the wheel spokes properly without doing booleans, but I figured it out after a little while. Yay! And yes, I know the backs of the spokes are hollow still. 
|
|
#
?
Sep 3, 2010 06:21
|
|

|
Just got to a little milestone in my Houdini rigging, finally have my character's rig in a good shape to start testing rig control ideas. http://www.puppetstring.com/hdn_rig_ui.swf (Edit) Thanks, a computer tuna fucked around with this message at 18:19 on Sep 3, 2010 |
|
#
?
Sep 3, 2010 06:29
|
|
|
Edit: Ignoring this post since I figured it out.
Aruki fucked around with this message at 09:06 on Sep 3, 2010 |
|
#
?
Sep 3, 2010 08:53
|
|
|
tuna posted:Just got to a little milestone in my Houdini rigging, finally have my character's rig in a good shape to start testing rig control ideas. Your link is missing a p 
|
|
#
?
Sep 3, 2010 17:55
|
|

|
something i'm working on right now Click here for the full 1024x576 image. based on this car 
|
|
#
?
Sep 4, 2010 08:44
|
|
|
cmasterflex posted:something i'm working on right now
|
|
#
?
Sep 5, 2010 02:34
|
|

|
I dunno if this is the best place to ask, but does anyone know what's going on with the new version on Cinema 4D? I was looking to buy the edu version of 11.5 (picked it up at a trade show) and while I was waiting for my academic proof to arrive, version 12 was released. But now they've changed the setup so there's no more modules, so now I'm kinda stuck. Do I try to convince the academic store to sell me 11.5 and stick with that, since that's what I've been learning in the demo I have, or do I get the new version even though I can only afford (maybe) the bottom-end version, which I can no longer upgrade with modules?
|
|
#
?
Sep 5, 2010 17:36
|
|

|
infiniteseal posted:I dunno if this is the best place to ask, but does anyone know what's going on with the new version on Cinema 4D? I was looking to buy the edu version of 11.5 (picked it up at a trade show) and while I was waiting for my academic proof to arrive, version 12 was released. But now they've changed the setup so there's no more modules, so now I'm kinda stuck. Do I try to convince the academic store to sell me 11.5 and stick with that, since that's what I've been learning in the demo I have, or do I get the new version even though I can only afford (maybe) the bottom-end version, which I can no longer upgrade with modules? Bottom end of V12 (Prime) does not have global illumination, which is pretty much advanced renderer
|
|
#
?
Sep 5, 2010 19:44
|
|


|
Got a problem with exporting objects from Max as 3DS files. We're using Google Sketchup and it only seems to import 3DS files sp OBJ, FBX, WDF etc are all out of the question. The problem is when you export a mesh, it exports seemingly fine, no errors, but you load it back in and max has a little check box that says "convert units". If you keep this checked it will bring the 3ds mesh in TINY. The scale is totally wrong. I had to type in 3950 in to the scale imput to get it to a similar size. Now if you uncheck Convert Units its the correct size, however Google Sketchup doesn't give you this option. So it looks like its exporting the unit scale completely wrong. Any ideas? Edit: Worked out that max is exporting it as inches as when you import the 3ds with max's unit setup set as inches it imports normal size. What the hell is going on?? enginedriver fucked around with this message at 12:22 on Sep 6, 2010 |
|
#
?
Sep 6, 2010 11:39
|
|
|
Inches? That's hilarious
|
|
#
?
Sep 6, 2010 18:00
|
|
|
I'm in the very early stages of modeling and might be what you would call flow blind. It's funny how I can brainlessly follow complex tutorials and achieve outstanding results, but ask me to model a simple machete and...  Where am I going wrong? Why doesn't the flow look quite right? Where can I learn how to achieve proper flow in my meshes? Why am I such an embarrassment? 
|
|
#
?
Sep 6, 2010 18:41
|
|
|
Looks pretty good to me  All I can say is reference reference reference. Spin it, rotate it constantly, render it, keep checking until it feels right. Only thing I'd possibly do is tuck in the underside of the blade a little bit so It's more weighted at the tip. Unless flow means something entirely different and I'm a moron.
|
|
#
?
Sep 6, 2010 18:45
|
|
|
If you have reference it can also help to draw edges on top of it to give you an idea of the topology.
|
|
#
?
Sep 6, 2010 18:57
|
|
|
FidgetWidget posted:I'm in the very early stages of modeling and might be what you would call flow blind. It's funny how I can brainlessly follow complex tutorials and achieve outstanding results, but ask me to model a simple machete and... What is giving you problems in the mesh flow? Are you subdividing this? Because your point going to fall apart and your blade is going to smooth up because you don't have control edges along the blade's bevel, etc, but I'm not really sure what you feel the problem is.
|
|
#
?
Sep 6, 2010 20:37
|
|
|
Hey guys, looking for a little critique. I'm still just learning Maya, but one thing I've been having trouble with is getting the outside environment/sky to blend in with everything else, whenever I use an HDRI sphere or anything, it just looks like a picture in the sky over the models. Argh. Click here for the full 1280x720 image. And also, messing around with Maya and After Effects, in case I ever need to sell out to the man and start doing Ipod commercials or something. Really low render settings, because ughhh 2730 frames. http://www.youtube.com/watch?v=Wm5JM_Q5ZzE I read something about rendering with the cmd line for faster rendering, anybody have any experience with that?
|
|
#
?
Sep 6, 2010 21:19
|
|

|
SVU Fan posted:
One thing which really bothers me is the reflection in the floor. It is completely round(except for the gaps), which implies that all the planks in the floor are perfectly level, which they really wouldn't be.
|
|
#
?
Sep 7, 2010 14:16
|
|

|
This is out of pure curiosity, but I'm wondering what software everyone uses and if anyone has converted and if so from what to what? I'm a max and zbrush user myself.
|
|
#
?
Sep 8, 2010 05:24
|
|

|
Imajus posted:This is out of pure curiosity, but I'm wondering what software everyone uses and if anyone has converted and if so from what to what? I'm a max and zbrush user myself. I have a few friends with different programs that I tried before getting them myself, and cinema 4D was my starter for a few years, since I tried 3dsmax and didn't like it too much because it's so.. different to what I was used to, but I recently got the maya trial and I'm loving it so far, and it could be my new program of choice. Oh and of course zbrush is just the go-to for sculpting.
|
|
#
?
Sep 8, 2010 05:32
|
|
|
SVU Fan posted:
Yeah the floor stands out pretty badly. If you can Photoshop up quick bump and spec maps for those textures, it really makes big difference. Also I have no idea where that reflection is coming from, it all feels very cluttered. It kinda looks like you're using an extra fill light from behind the camera to fill in those shadows and if you are, you should turn the spec off on those lights. It's also way too bright. The colours are horrible too but I'm not going to get into that. As for blending the sky and the foreground, there are tons of ways to do it, but personally, if I have two distinct elements like that, I render them separately and composite them afterwards.
|
|
#
?
Sep 8, 2010 10:32
|
|
|
Imajus posted:This is out of pure curiosity, but I'm wondering what software everyone uses and if anyone has converted and if so from what to what? I'm a max and zbrush user myself. I started on Max, learned and used it at uni/for my portfolio for about four years. Then I got a job using XSI and have been using it for just over a year(and man, how much and how fast have I learned just from using it every day at work!), and it looks like I'll be switching to Maya soon. I still like Max better than XSI I think, but I'll be interested to compare them to Maya. For sculpting I mess about with Sculptris because zBrush confuses and intimidates me, and I'm yet to need hi-res sculpted models for work... yet 
|
|
#
?
Sep 8, 2010 20:00
|
|

|
trying to learn making real-time assets & rendering realtime gfx, lot's to learn, especially how to unwrap and get rid of the seams... High poly sculpt can be seen in the Zbrush daily thread...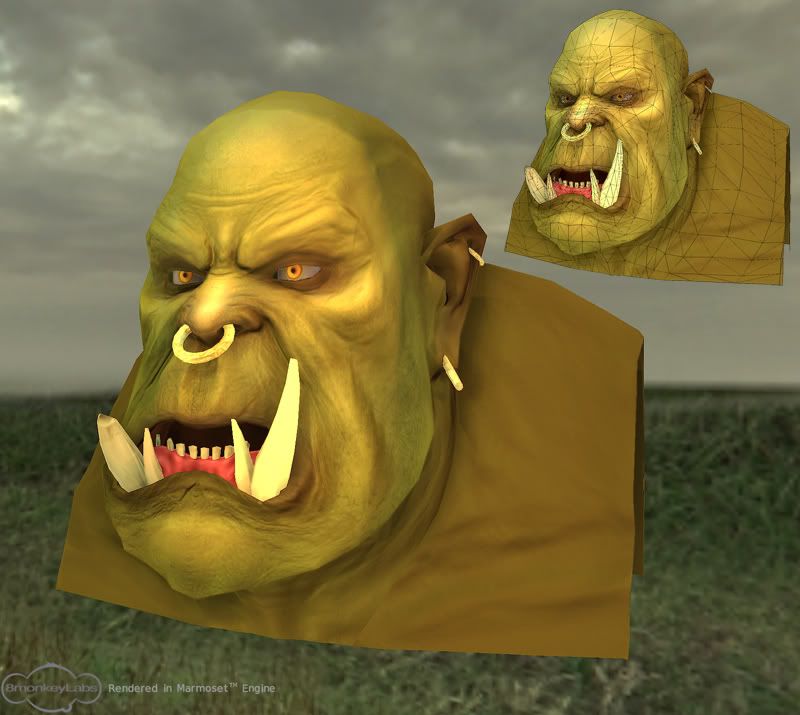
|
|
#
?
Sep 8, 2010 22:50
|
|

|
Looking good so far. The two things that I think need to most work right now are the macro detail and color variation. I see a lot of good micro details there with the wrinkles, but they're also very dominant right now; I'm not getting a good impression of the overall shapes going on with his face. Play with the shade, and use some variation for the different areas of his face. Most important thing with the shade is to avoid simply using black. Skin is semi-transparent, so try to add some color to the shadows. For color variation, it's a little more challenging, especially since his skin tone is yellow-green. With that said though, his gums are red. That indicates to me that his blood is red, which means you have good justification (and reason) to add some different hues to strategic areas. Add some pink to his lobes, vary the hue in his nose, around the eyes, his lips, etc. It doesn't have to be garish, but a little vitality will go a long way.
|
|
#
?
Sep 9, 2010 20:35
|
|
|
floofyscorp posted:I started on Max, learned and used it at uni/for my portfolio for about four years. I recently had a look at Maya and went BLUH? when I noticed the very simple sounding Material Editor is called Hypershade or something in Maya. Same concepts just that everything is bloody re-labled 
|
|
#
?
Sep 10, 2010 01:59
|
|


|
If Vitaly can use XSI for game art no reason you couldn't either. These days most of the work is done in ZBrush/Topogun/Photoshop anyways. Unless it comes to hard surface stuff. I was watching his Gnomon video where he makes a Gears of War-ish type guy and XSI was looking pretty smooth as far as modeling goes. Although I can't really speak for how good/bad XSI is, I went from Max and am currently using Maya
|
|
|
#
?
Sep 10, 2010 02:21
|
|
|

|
| # ? Jun 5, 2024 17:26 |
|
|
This is odd, I was always under the impression that xsi was much better than max & maya. I only used maya a little but I absolutley hated it. The interface looked and felt so dated - I think this was around max 7/8 time.
|
|
#
?
Sep 10, 2010 13:27
|
|
