|
Just hope it wasn't half-assed converted to an R-12 alternative...
|
 #
?
Oct 16, 2010 05:53
#
?
Oct 16, 2010 05:53
|
|


|

|
| # ? May 10, 2024 07:23 |
|
|
I replaced the clutch master and slave cylinders today on my 1.5 ton paperweight.
|
|
#
?
Oct 16, 2010 06:00
|
|

|
Replaced the driver side window regulator in my 318ti today. I'm really not a good mechanic, and I was planning on bringing it in to a guy, but he flaked out on me this week. My cordless Dremel with some heavy duty cut off wheels did a pretty good job of getting out the rivets I was scared of. Cleaned up the interior, gave it a wash and wax, now I should be good to go on the BMW club fall drive tomorrow.
|
|
#
?
Oct 17, 2010 02:35
|
|

|
Tightened a banjo bolt to stop a horrific oil leak and discovered the #1 injector is leaking at the fuel rail.....
|
|
#
?
Oct 17, 2010 02:49
|
|
|
I just got past the bed-in period on my new brake rotors and went for a test drive on some twisty country roads. My initial reaction is: Wow. The old brakes were rubbish! To pass state inspection, I needed to replace all 4 pads and rotors on my '05 Legacy GT. I went with the DBA Street series slotted (not drilled) rotors, because they seemed to be the most reasonable replacement without going all-out and getting a big-brake kit. I'd never heard of DBA before, but they were recommended on both ScoobyTuner and RallySportDirect and they weren't absurdly expensive, so I figured I'd give them a try. The pads I got were Hawk HPS, which I had heard of and knew would be a pretty good compromise of performance and noise/practicality. I did also flush the brake fluid, but I didn't do that myself because, well, I'm not confident enough for that one. I actually took it to the Subaru dealer for the fluid flush and for a wheel balancing + 4 wheel alignment, so I have some peace of mind that everything I might have screwed up doing the brakes is back within spec. Anyway, the roads were just a little bit wet from a couple days of rain, and I had been agonizing the last few days as I got closer to the rotors being ready for real use. With the stock rotors (I think the car's originals) I was always very careful to brake early and apply pressure very smoothly to gradually build up the braking force before reaching full-pressure. But even doing that, they would eventually shake so hard that not only did the wheel shake violently, but the whole car would vibrate. The new setup is smooth, and so much stronger I was amazed. The first corner I came to I just smoothly applied the brakes from about 60 and where the old setup would have just started to drop speed, the new setup threw me forward in the seat, nearly jamming the bottom of the wheel into my gut (and I'm a skinny guy, 5'10" 140 lbs). After getting used to the vastly increased braking force, I found I was able to use a lot less pedal, slow down much faster, and all perfectly smooth, vibration-free, and almost silent. At the end of the test I went to an unused shipping depot, which has a long (1/5 mile, I'd guess) stretch of pretty smooth tarmac in the back (not visible from the road) where I assume they used to line up dozens and dozens of trucks to pick up their loads. Well, I came to a stop just behind the building and did a single clutch-dump (I had used this place to do a few 0-60 tests after upgrades before) let the car get up to 80 mph (basically just into third gear) and then jammed on the brakes without down-shifting to simulate a bad 'panic' situation. Again, I was amazed at how smooth and uneventful everything was. The car launched me forward, of course, but everything stayed straight and I was from 80 down to 10mph so fast I almost didn't get the clutch in fast enough to keep it from stalling. Satisfied, I came home, apologized to my tires and decided to finally fix a green scratch the front bumper received from another car in a university parking lot. Now I only wish I had taken the time to paint the calipers while I had everything apart. I've never been one who really cared what the brakes looked like, but with the slots I think these do look pretty cool, and I definitely like how well they work, so maybe they deserve and little attention. I'll have to ponder it over. Panoplied Platypus fucked around with this message at 03:57 on Oct 17, 2010 |
|
#
?
Oct 17, 2010 03:36
|
|

|
The tops of my Subaru XT's bumpers showed sun and battle damage, so I repainted them with Plasti Dip, the rubberized coating that VWvortex users spray on their emblems & flat bill hats. The bumper tops were painted like this from the factory. Removal of the tape requires scoring with a razor blade first which isn't difficult.  Mad Tyte JDM panel gaps! 
|
|
#
?
Oct 17, 2010 22:14
|
|
|
I just now wrapped up replacing the inner and outer tie rods on my Escort. I used the Harbor Freight Inner Tie Rod Tool which made the job a breeze. It took longer to break the outer arts free than it did to finish he rest of the job on each side. Gonna take it in for an alignment tomorrow, get some new tires and I should be ready for winter.
|
|
#
?
Oct 18, 2010 00:15
|
|

|
Halfway through suspension swap. Fronts done. Thank god for impact wrenches. Gonna go watch Mad Men and take a nap, and maybe start on the rear. ~*~The Life~*~
|
|
#
?
Oct 18, 2010 02:59
|
|

|
Got most of the way through prepping the SVX engine for removal so the head gasket can be changed. Everything is ready to go except the bellhousing bolts, motor mount bolts, and the exhaust. Called it quits for today when I couldn't get the exhaust heat shield bolts out and it was getting dark anyway. Secondary projects to be done during the week include rebuilding the PS pump, grinding the rust off of the PS fluid reservoir, and repainting it; polishing up a spare intake manifold to be installed on #1 for bonus  points; and wetsanding and polishing the headlights on both cars. I did both sets of headlights last night. points; and wetsanding and polishing the headlights on both cars. I did both sets of headlights last night.I also need to swap transmissions between SVX #1 and #2 also, but that's secondary to the HG being done. SVX #1 also needs to have both doors swapped with the good shells I have in the house - all the guts need to be swapped over, and the half-windows cut out of the old and attached to the new. SVX #2 also needs a new brake hardline, and at least one fuel hardline which will require dropping the tank. Main goal is to at least get #1 roadworthy and ready for winter. I'm running out of time, it's going to get too cold to work on them soon... 
|
|
#
?
Oct 18, 2010 03:34
|
|
|
I replaced the wheel bearing assembly on the drivers side of my 96 mercury sable today, and ended up having to replace the ball joint along with it. It took all day but I got it all done!
|
|
#
?
Oct 18, 2010 03:41
|
|

|
Finally got around to investigating why the handbrake on my MG had been engaging so far up since I got the car. I only expected to adjust the cable to compensate for 30 years of stretching. First, though, I pulled off the drums just to have a peek, and found almost-new pads, but whoever installed them apparently didn't realize its not a self-adjusting setup, and the adjusters were about 5 full turns away from where the should be. Sooo, I've been driving around for two years with barely-working rear brakes. As a bonus, that's all it took to fix the handbrake.
|
|
#
?
Oct 18, 2010 20:21
|
|

|
Can't claim credit for the labor but, over the past week the following has occurred: Got my sway bars (F+R) and end links installed. Oil change, cabin air filter change. oh, and one other thing... Where would you stick a boost gauge on a daily driver in a legacy gt? The answer is simple! Underneath the clock! http://www.youtube.com/watch?v=pXWys_u3yOI
|
|
#
?
Oct 19, 2010 02:15
|
|

|
I recieved my Camcon about a month ago but was hit with a bout of unemployment and decided not to install it until I had a job again. Well good news for me, I installed it today! I am a complete noob when it comes to crimping, splicing, and general wiring but I was able to install the unit in about 3 hours and have gotten no CELs or engine fires in the process! The male/female crimpers were probably the most problematic but with some ingenuity and some anger I was able to get everything tapped and installed. I still need to get everything heat shielded and permanently installed plus drill a proper hole through the firewall but I will try to post my impressions once I start tinkering with the actual settings in the next few days. I will be trying the settings suggested by Power Enterprises first before anything. Have some pictures! Hurray it came in! Fresh from Japan. The rare Camcon VVTI Controller.  First thoughts- "Oh my god what have I gotten myself into!?"  My handy dandy wiring chart. Also super blurry.  Success! No CELs and no fire in the engine bay!  True pros hang their piggybacks through the passenger window during the test drive. Way too tired to drill a proper hole through the firewall tonight. 
|
|
#
?
Oct 20, 2010 05:51
|
|


|
So have you set the cam changover point at <500rpm over idle?
|
|
#
?
Oct 20, 2010 06:40
|
|

|
2ndclasscitizen posted:So have you set the cam changover point at <500rpm over idle? Haha no. I was just making a test run to make sure all of the wiring/the unit was installed correctly. I'll be adjusting the timing around the 2000-6000 rpm range per the manufacturer's suggested setup though. Edit/Last Update: I was able to install the wiring through a grommet so no drilling! Running fine. 
Conelrad fucked around with this message at 14:26 on Oct 20, 2010 |
|
#
?
Oct 20, 2010 12:56
|
|
|
I finally saw sense and replaced the gaffer tape and plexiglass sunroof replacement panel on my Golf with a proper bit of drilled and bolted aluminium. Feels much more secure, and much less likely to fly off when I'm going 100mph.
|
|
#
?
Oct 20, 2010 13:16
|
|

|
I've been having occaisonal steering wheel/pedal judder under braking on my IS200, and it went away after putting new pads/discs on but it's come back again. Coupled with the previous owners terrible attempts to paint them and feeling like a challenge, I've decided to refurbish and repaint all my brake calipers. I've bought a second hand caliper and today I spent a few hours taking it apart. I think its fairly common problem for this car that the lower slider pins and pistons become corroded and this has been the case with my 'practice' caliper as it took a lot of swearing to free them. It makes me wonder what the ones on the car are like.  Click here for the full 1200x800 image.  Click here for the full 1200x800 image. Hopefully this piston will clean up ok.  Click here for the full 1200x800 image.
|
|
#
?
Oct 21, 2010 21:22
|
|

|
For a while my MG has had a problem where pressing the brake pedal before the engine had warmed up would kill it. I figured there was a short somewhere between the ignition system and brake lights, but I never got around to fixing it. Today I was due for a bi-annual safety inspection, and since the shop I went to wasn't very busy, 4 guys came over and helped me track it down while we talked about the car. Not bad for $12, and despite all that time under the hood, no one noticed all the missing emissions equipment! I love this state.
|
|
#
?
Oct 22, 2010 00:08
|
|
|
Changed the driver's side front brake caliper and put new pads on a neighbor's ride of which said neighbor is struggling to make ends meet and needs the car to get around. Since it used to be my dad's ride, I told him I knew the ins and outs of that car and could get the pads for free since they were lifetime warranty under my dad's name. As soon as I took the wheels off, I saw why the pedal went to the floor and why there was a little brake fluid around the tire: the pads were so worn that the inner pad completely disintegrated and fell out, leaving the piston to extend all the way out and rub the rotor which caused it to disintegrate, as well. Good thing it happened just down the street from his house, so there wasn't any damage to the rotor that I could find. $18 later and free brake pads and the old girl brakes like a dream now. Didn't charge him anything since it was a piece of cake and I had no intention of charging him anyway, so life is good for both of us. It's a '92 Explorer for reference, and man, I forgot that they use giant pins instead of bolts to secure everything on the front brakes 
|
|
#
?
Oct 23, 2010 04:27
|
|


|
First, changed my brake light switch. Now my back hurts. You have to do an unbelivable amount of bending and twisting to actually get a good view of this thing. Click here for the full 1200x1600 image. In order to get the old one out I had to break it. Plastic tabs are nice for assembly but they suck poo poo when you're trying to get something out in a tiny hard to reach space. Then I changed my plugs. Can't believe how easy it was, I think changing the brake light switch took longer.  Click here for the full 1600x1200 image. Old plugs.  Click here for the full 1200x1600 image.
|
|
#
?
Oct 23, 2010 22:05
|
|

|
I recorded myself driving for no other reason than I wanted to see what it looked like. The wind today made the audio unlistenable so I replaced it with an old Blockhead beat. http://www.youtube.com/watch?v=j38v8SpEI3g&fmt=22
|
|
#
?
Oct 24, 2010 00:41
|
|

|
kylej posted:I recorded myself driving for no other reason than I wanted to see what it looked like. The wind today made the audio unlistenable so I replaced it with an old Blockhead beat. loving A, that is so listenable and makes the video hypnotic. Nice.
|
|
#
?
Oct 24, 2010 01:37
|
|
|
Replaced a bad brake line, replaced a bad accelerator linkage support bushing thing, and rebuilt the electric moonroof switch in my newly purchased Mercedes 240d. Things I learned: 1: Mercedes W123 chassis vehicles are actually pretty easy to work on, just as I've been told. 2: Just because you "fixed" something, doesn't mean it actually works any better than when it was "broken". 3: Some of the electrical switches in my car have bearings. Edit: Oh yeah, in preparation to go to war with the nature around my house, I have performed a major servicing on my Stihl BG85 leaf blower/vacuum. This included a carb cleaning and tune, new spark plug, new impeller and new air filter. This year, I will beat the leaves, I swear it. trouser chili fucked around with this message at 02:03 on Oct 24, 2010 |
|
#
?
Oct 24, 2010 01:49
|
|
|
Started cleaning out the new Charade, topped up the power steering, and put on a new lever-type radiator cap. Rocky got the muffler put on, just need to connect it to the rest of the tailpipe. Race Charade got warmed up (I do it every day now). Waiting on clutch and fluids for racing in December!
|
|
#
?
Oct 24, 2010 04:46
|
|

|
Replaced a burnt out headlight on my NA, stupid sealed beams. I really need to get the Hella ecodes, but broke right now. Also removed front plate bracket, cut myself in the process trying to get a rusted on nut unstuck. Sprayed it with some wd40 and then spent about 10 minutes removing because the threading was toast and as I got to the bottom third of the bolt the nut became too stripped. Had to finish the job with a pair of pliers. Oh and discovered my CAS 0-ring is leaking...
|
|
#
?
Oct 24, 2010 07:03
|
|


|
Painted my car today. Went with a nice two tone black and brown scheme. Looked like this:  Click here for the full 1024x768 image. Now looks like this:  Click here for the full 1024x768 image. Had my first go at a motorkhana event today ") . I was on a day license so I wasn't timed. Probably a good thing too considering how slow I was. It's a dirt field, and it was raining. We were driving on mud after the first run. The only run of mine I recorded was the first run of the second course (offcentric), which wasn't exactly my favourite. Excuse the music, I couldn't get avisynth to save the audio. . I was on a day license so I wasn't timed. Probably a good thing too considering how slow I was. It's a dirt field, and it was raining. We were driving on mud after the first run. The only run of mine I recorded was the first run of the second course (offcentric), which wasn't exactly my favourite. Excuse the music, I couldn't get avisynth to save the audio.The third course was much more manageable with the conditions, and some of the 4wd guys were flying through it (no idea what the last car was, it was an open fwd thing). By the end of the day we'd hosed the bottom of the queue something severe.  Click here for the full 2048x1536 image.
|
|
#
?
Oct 24, 2010 13:19
|
|


|
Timing Belt change on my IS300. I had heard the Toyota 2jz had the mother of all crank pulley bolts but I could not have prepared myself for what awaited me. I had everything stripped down to that in about half an hour and thought the job was going smoothly...fast forward 8 hours and I was cutting a slice out of the head of the bolt as a last resort. First we thought okay 5th gear e-brake on lets give it hell, held the pulley with a belt and put a 5 foot cheater bar on it...well that ended up breaking the belt. Now in order to keep the pulley from moving we had to built a SST out of steel scrap and started jacking on the breaker bar, but this didn't have enough travel. Our improvement on that idea was to hook onto the breaker bar and pull up on it with a 1 ton rafter mounted chain hoist. 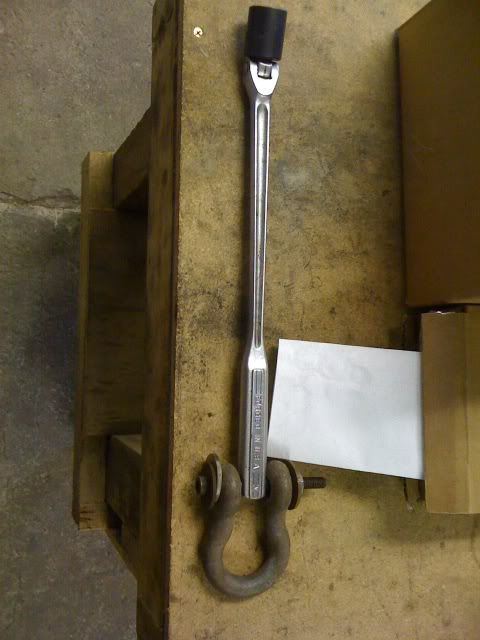 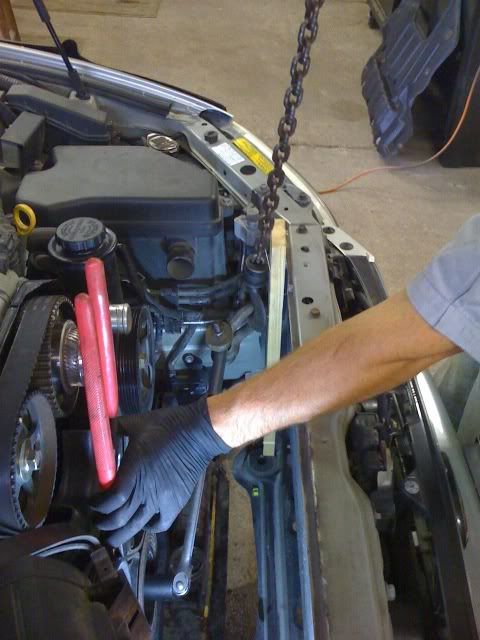 This worked well enough that it actually broke the craftsman breaker bar. 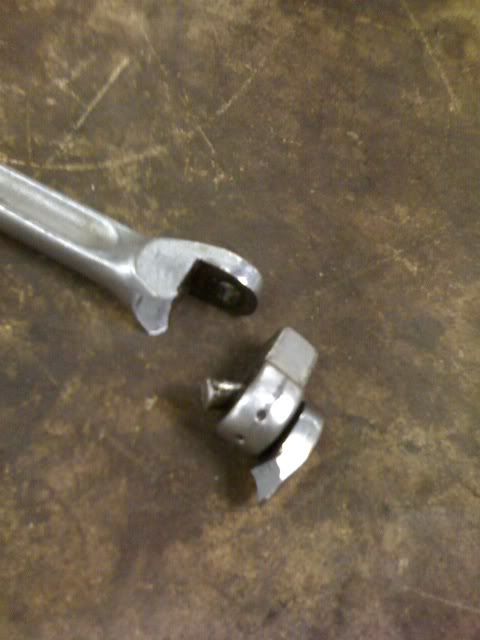 We had a 3/4" breaker bar that we continued to use but eventually it broke one of the bolts off holding the SST in the crank pulley and an impact socket. By now it was past midnight and we had to resort to putting a big slice in the head of the bolt. Fortunately there was enough play in the condenser after unbolting it that I could get an impact on there without removing it. Here is a picture of the SST and some of the carnage.  Some maniac Japanese masochist with a 1300lb impact wrench must have really hated working that part of the assembly line, I met my match last night. The worst part is even though this timing belt has 100k miles on it, it looks brand new.
|
|
#
?
Oct 24, 2010 14:34
|
|

|
Changed the rear discs and pads on the Golf, which desperately needed doing. It looked like they'd not been touched since the car was made, and we spent almost an hour on one of the caliper bolts which had rusted itself to the bracket. All done now though. Also popped a strut brace in the front, I've noticed a difference already, feels a lot more solid when turning in hard.
|
|
#
?
Oct 24, 2010 19:08
|
|
|
Cyberpope v2 posted:Working on replacing my fuel pump on a third gen Camaro. It's basically the worst of the worst of GM 80s engineering. Tank stuck up under the rear axle, filler neck 15 feet long. You could do what the previous owner of mine did and just cut an access hole behind the rear seat.  Currently in the middle of a weeks-long tuneup of my '84 Camaro Z28. Already changed the motor oil, replaced the gear oil in the tranny, took out the old spark plugs and installed the new ones. Had to quit for the day due to needing new plug wires since the old ones came apart. Still got a fuel filter, belts, PCV, coffee colored brake fluid, a leaky waterpump and horribly dry-rotted tires to address.
|
|
#
?
Oct 24, 2010 22:12
|
|

|
Changed the power steering return lines on the Altima today. Well, most of them. I got 3 of the 4 rubber lines done, there's 1 left that I can't get to without getting the car at least up on ramps or jackstands. Several feet of 3/8" and a foot of 5/8" hose later, it's no longer leaking. Well, much. The one hose I couldn't get to is damp around the clamp I could see, but at least it's not loving dripping like another hose was. Also, found out I didn't position the catch tray right when I started yanking hoses.... and the cardboard I laid down under the car soaked through. Anyone have suggestions on how to get a shitton of power steering fluid out of a concrete driveway?  Now I just need to do the $@!*# motor mount and I'll be happy. Noticed the bolts holding said motor mount to the engine were basically finger tight. 
|
|
#
?
Oct 25, 2010 00:25
|
|
|
Ephphatha posted:Painted my car today. Went with a nice two tone black and brown scheme. I also took my car to an event, a regular on-pavement autocross. This time, I wasn't the worst! That honor went to a Geo Metro 5-door.  Metro 1 by Execudork, on Flickr It was pretty crowded down at the bottom (class H-stock), and I was not able to defeat my main rival, a Honda Accord: 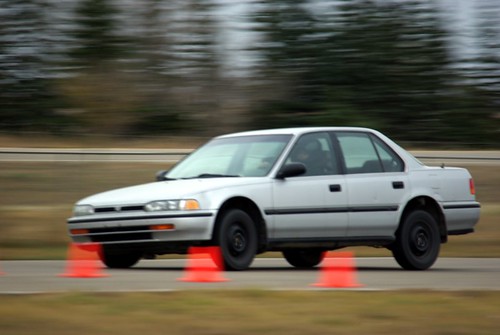 Honda Accord 1 by Execudork, on Flickr  Full set's here if anyone's interested: http://www.flickr.com/photos/49837331@N06/sets/72157625110522401/with/5112557991/
|
|
#
?
Oct 25, 2010 03:58
|
|

|
I cleaned out my crankcase vent/PCV on my e36 and planned to replace the hoses connected to it. The interesting thing is, when buying the hose that goes from the valve cover to the CCV, it comes with a second hose attached to it, which goes from the area just under the CCV to down behind the block somewhere. Ostensibly these hoses are supposed to be installed while attached together, as they are perfectly positioned relative to each other and somebody really did not want me separating them (glued together, wrapped in electrical tape, topped with a 3-inch length of 1mm heatshrink). A not-unreasonable assumption might be that this second line is the return line for the separated oil. It is also a fact that the HVAC intake/plenum needs to be removed to get at this second line, and also a fact that the main wiring harness goes across the plenum. Basically a pain in the rear end to get to. I do all this and finally get a peek at the block end of the second hose. A Y-splitter, connecting to . . . a coolant line? For an entire daft minute I stare at it wondering at the purpose of injecting ventilated engine oil into the cooling system. Eventually it hits me that the second hose is just a plain old coolant line. Why is it sold welded to the CCV vent hose? Where is the actual oil return line? How did they put a coolant passage inside the 1cm of aluminum that holds the CCV? 
|
|
#
?
Oct 25, 2010 04:48
|
|

|
ExecuDork posted:I had never met the term "motorkhana" before. I should have watched your second video first, I couldn't figure out what the hell was going on from the passenger seat of your car. I guess the idea is to go around the pylons in a set way in the fastest possible time? Do you get points for big mud sprays or spinning out? If it wasn't pissing down rain there'd be a point to trying to do it fast, the aim is usually to complete the prescribed course in the shortest time. The blcc members were having a serious go of it. One of the juniors (a guy who was a few weeks short of his 13th birthday) managed to come third overall, only being beaten by an impreza and the mini moke in the second video. Wish I had've got a video of him going around, he was insanely quick and consistent throughout the entire day. The results are here. CAMS seem to use motorkhana as a blanket term to cover all short course skill events (gymkhana, autokhana, anything where speed is not a goal).
|
|
#
?
Oct 25, 2010 10:40
|
|
|
Today, I will be hopefully completing the clutch and gearbox replacement on my VW Polo. Every part of removing the original gearbox has been filled with things either being missing, impossibly tight, or not where they're supposed to be. I hope today goes better, wish me luck.
|
|
#
?
Oct 25, 2010 12:33
|
|

|
tonedef131 posted:Hard to remove pulley bolt story. My friend and I went through this same problem with his VR6 that was out of the car. We tried pretty much everything we had on it including using the leg from the engine crane as a cheater bar. It also made it more fun trying to hold the engine from turning, as in the whole engine plus the flywheel, since it was out. We weren't able to get it so we had to lift the engine, just the two of us, into the back of his Explorer and drive it to a friends shop who had a 2000 lb/ft impact to get the drat thing off. Also, VR6s with the crank still in them are loving heavy.
|
|
#
?
Oct 25, 2010 12:48
|
|


|
Best way to get crank bolts off, if they're threaded right and the engine goes the right way, is to set up your breaker bar and then bump the starter. Bolt comes right off.
|
|
#
?
Oct 25, 2010 21:24
|
|
|
Installed new wiper blade refills and put on a fresh coat of Rain-X. While I'm used to the rain in the Pacific Northwest, we generally get steady constant light rain and few full on showers, but the last couple of days it's been raining HARD on and off. Turns out we are right in the middle of the "Cold and Wet" section of this years predicted La Nina effects.
|
|
#
?
Oct 26, 2010 02:54
|
|

|
Godfuckingdamnit Nissan, why do you have to use such horrible, horrible hose clamps? I chased down my power steering leaks yesterday. Well, I thought I did. I did indeed get them fixed, only to have another one pop up. When I woke up today the liquid contents of my power steering fluid were all over the driveway. Huge mess. The culprit? Not a hose, but a stupid goddamn clamp that was loose. The small stretch of rubber hose that connects the steering rack's return line to the cooler, about 2 or 3 feet of hose. I don't have jackstands. I don't have ramps. Hell I don't have a jack that's good for anything but changing a tire, so the only way I could get to that loving clamp was from above. The only way to get to it from above was by wedging my hands between the intake manifold and firewall. I was able to get a little bit of breathing room by unbolting the power steering cooler, but not much. As you can see, I gave up trying to even get the remaining half of the clamp off, it's just laying there. I don't loving care, because I got a new clamp in there and it loving stopped leaking, so there.  Click here for the full 1024x667 image.
|
|
#
?
Oct 27, 2010 00:10
|
|
|
I took the day off work so that I could hopefully get this loving engine out while it was at least kind of warm outside. First, I needed to figure out how to separate the engine from the transmission. I ended up using a 1" chisel sharpened to a knife edge and a 4 lb hammer. All I needed to do was place the chisel in the seam, and start wacking.  It finally broke apart and I was able to get the engine free of the trans. It finally broke apart and I was able to get the engine free of the trans.  Now, however, I had a new problem - how to clear the hood to get the engine free?   Problem solved. Now, time to actually hoist it out...  So far so good...but why are the trans cooler lines on the right side coming up with it? I know I undid both bolts holding them on...   Oh God Damnit. EMISSIONS poo poo Oh God Damnit. EMISSIONS poo poo STUFF TO BUY: 1) Transmission cooler hardline, passenger side After dropping the motor down and unhooking that stupid now-hosed trans cooler line, I was now ready for take 2. This time, things went a little more smoothly, and it FINALLY came out.   Looks like I'm gonna need to do a little cleaning up. Looks like I'm gonna need to do a little cleaning up. Engine is now on the stand. Now it's time to start the teardown procedure so I can get the heads off.  Wait, what? What the gently caress is this poo poo?   WHY THE gently caress IS MY CRANK PULLEY EATING THE PLASTIC? Does anyone know how to fix this? Also, a captive nut broke out of the rear section of the timing cover plastic on the passenger side when I tried pulling the bolt out.  STUFF TO BUY: 1) Transmission cooler hardline, passenger side 2) Timing cover, center section 3) Timing cover, passenger side rear Cams look good, on the passenger side at least.  I got as far as removing the cams in the passenger side head before throwing in the towel for tonight. The head bolts require a 12 pt 14mm socket to remove, and the only one I have here that fits is a 3/8" drive. The breaker bar + extension + socket assembly I was using was flexing a lot more than I like when I attempted to remove the first one. Will try this again when I have a proper 1/2" drive 14mm 12pt socket.
|
|
#
?
Oct 27, 2010 02:16
|
|
|

|
| # ? May 10, 2024 07:23 |
|
|
I made a coilover adjustment: http://picasaweb.google.com/lh/photo/ZMx5wVwyEvLHZvC9Yrxa9Q?feat=directlink
|
|
#
?
Oct 28, 2010 05:32
|
|