

|
Martytoof posted:Well, while we're sort of talking about Lightroom, is there any way to operate on a single stack of photos in Library's Grid view? ..or survey view, or a temporary collection! Lightroom is awesome like that.
|
 #
?
Oct 22, 2010 14:17
#
?
Oct 22, 2010 14:17
|
|

|

|
| # ? May 16, 2024 20:31 |
|
|
This isn't quite a post-processing question, but I wasn't sure which thread to ask in: What's the resolution generally considered necessary for prints of a certain size? In particular, I'm concerned with 8x10s and 11x14s.
|
|
#
?
Oct 23, 2010 20:20
|
|

|
Wouldn't that depend on the DPI of the output device?
|
|
#
?
Oct 23, 2010 21:14
|
|
|
TequilaJesus posted:This isn't quite a post-processing question, but I wasn't sure which thread to ask in:
|
|
#
?
Oct 23, 2010 21:48
|
|
|
Most inkjets are 240. 300 is for pretty critical stuff. 150 is usually fine for anything decently sized that you are not going to stare at from 2 inches away. Actually if you want to do an experiment print the same image at 11x14ish at 150, 240, and 300 and see if you can tell them apart (if the file is clean it will be really really hard).
|
|
#
?
Oct 24, 2010 01:41
|
|

|
brad industry posted:Actually if you want to do an experiment print the same image at 11x14ish at 150, 240, and 300 and see if you can tell them apart (if the file is clean it will be really really hard). If you want to be cheap, just order 4x6" crops from each ")
|
|
#
?
Oct 24, 2010 14:55
|
|
|
Don't know if this is of any use to the OP but if you want to add a goon-written tutorial for beginners that introduces proper D&B work for skin; http://www.dmd-digital-retouching.com/blog/retouching-in-photoshop-basics/
|
|
#
?
Oct 25, 2010 19:35
|
|

|
flyingbathtubpirate posted:Don't know if this is of any use to the OP but if you want to add a goon-written tutorial for beginners that introduces proper D&B work for skin; I will buy you a horse if this is good. I've been trying to get better at d/b skin retouching and just feel like I've taken a huge step backward from using slight blur layers/masks. No mention of the healing brush? I find it pretty useful to take care of obvious blemishes/spots -when you're dodge and burning are you doing it in a soft light/overlay layer or directly onto the image? -You're a really good retoucher, some of your portfolio samples were terrible before you started. Paragon8 fucked around with this message at 14:42 on Oct 30, 2010 |
|
#
?
Oct 30, 2010 14:32
|
|

|
When retouching people I usually kind of go in this order: remove blemishes/lines/etc (clone/heal/patch), Liquify, then go back and do dodge/burn and color work. If you do it before the pixel manipulation stuff you'll be redoing your masks every time you make a change.
|
|
#
?
Oct 30, 2010 19:40
|
|
|
I've been looking at various retouching tutorials - http://everythingsmagic.deviantart.com/art/Dodge-and-burn-tutorial-124450837?offset=30#comments I found that - does that look decent? There seems to be a pretty big split on actually using dodge and burn or using curve adjustment layers which confuses me no end. I think my main problem is that after spending more than an hour doing anything on an image I end up hating the image and want to give up. 
|
|
#
?
Oct 30, 2010 20:00
|
|
|
Any good guides to or tips for color management when saving for web use? I just installed a new monitor driver, and everything I edit in sRGB in LR/CS5 is coming out blue when I'm viewing it in web browsers. I've tried messing with the color management profiles and embedding the profile when saving, but nothing's worked so far.
|
|
#
?
Oct 31, 2010 02:55
|
|

|
Paragon8 posted:I've been looking at various retouching tutorials - For what 99% of people require, that's just a method of doing in 6 hours what clone/heal/patch will do in 6 minutes.
|
|
#
?
Oct 31, 2010 08:39
|
|
|
Cyberbob posted:For what 99% of people require, that's just a method of doing in 6 hours what clone/heal/patch will do in 6 minutes. I don't think you can really equate the two in terms of actual result. I use clone/heal/patch a lot and it up close it isn't that satisfactory in preserving skin texture detail. I would really like to learn more about high end retouching. It's good to learn new methods and refine your workflow even if it means I still do a lot with clone but add some d/b to finish it off.
|
|
#
?
Oct 31, 2010 12:14
|
|
|
Paragon8 posted:I've been looking at various retouching tutorials - I moderate a board with Laura, she's good and that's pretty much the best way to do it. I mainly wanted to introduce D&B in concept for beginners in that article, but I prefer curves over soft light/overlay because you can control the over/undersaturation issues. In addition to those steps, clip a hue/sat adjustment over both your dodge and burn curves. If you're seeing over-saturation or colour shifts in your dodging or ashy undersaturation in your burning you can adjust either.
|
|
#
?
Nov 1, 2010 15:25
|
|
|
flyingbathtubpirate posted:I moderate a board with Laura, she's good and that's pretty much the best way to do it. I mainly wanted to introduce D&B in concept for beginners in that article, but I prefer curves over soft light/overlay because you can control the over/undersaturation issues. What I'd be especially interested in is more in between photos. It seems like a lot of these tutorials sort of just get you started and then go "six hours later, this is what we get" - and it's incredibly discouraging when you're minutely dodge and burning and not seeing that much of an effect. I know it's about patience but it'd be nice to see what it looked like after 1 hour or after 2 hours and if I'm on the right time frame.
|
|
#
?
Nov 1, 2010 16:07
|
|
|
Paragon8 posted:What I'd be especially interested in is more in between photos. It seems like a lot of these tutorials sort of just get you started and then go "six hours later, this is what we get" - and it's incredibly discouraging when you're minutely dodge and burning and not seeing that much of an effect. I know it's about patience but it'd be nice to see what it looked like after 1 hour or after 2 hours and if I'm on the right time frame. If it�s taking you even an hour to do all that, you need to A. buy a tablet, and B. practice more. It�s time consuming yes, but not 2 hours. Learn the hotkeys, buy a tablet, practice more.
|
|
#
?
Nov 1, 2010 17:02
|
|

|
poopinmymouth posted:If it�s taking you even an hour to do all that, you need to A. buy a tablet, and B. practice more. It�s time consuming yes, but not 2 hours. Learn the hotkeys, buy a tablet, practice more. Yeah, I know. I do have a tablet and it's making things so much easier. I think it's just taking me a while now just in getting a feel for what tools are effective for me and messing around with different techniques. I do feel like I'm turning a corner with just understanding everything - it's just a matter of marshalling that into actually sitting down and working on an image consistently.
|
|
#
?
Nov 1, 2010 18:20
|
|
|
Paragon8 posted:http://everythingsmagic.deviantart.com/art/Dodge-and-burn-tutorial-124450837?offset=30#comments What's the point of the black 50% soft light layer ?
|
|
#
?
Nov 1, 2010 20:06
|
|
|
Cross_ posted:What's the point of the black 50% soft light layer ? I'm not sure. That's why I like flyingbathtub pirate's tutorial a lot - he does a lot to explain the why of things. Most other ones are "do xyz" - I do know in tutorials that actually use the dodge and burn tools a soft light layer is used but is directly drawn on by dodge and burn.
|
|
#
?
Nov 1, 2010 21:10
|
|
|
poopinmymouth posted:If it�s taking you even an hour to do all that, you need to A. buy a tablet, and B. practice more. It�s time consuming yes, but not 2 hours. Learn the hotkeys, buy a tablet, practice more. Depends, if you're working on major commercial and high end fashion/beauty work if it takes you less than 3 hours you've missed something. It's serious overkill unless you're going for advertising contracts and major publications but for my current client I've spent around 6 hours on one shot and expect to spend 2 more, and that's a pretty quick job with good skin and lighting. Paragon8 posted:I'm not sure. That's why I like flyingbathtub pirate's tutorial a lot - he does a lot to explain the why of things. Most other ones are "do xyz" - I do know in tutorials that actually use the dodge and burn tools a soft light layer is used but is directly drawn on by dodge and burn. I use curves with clipped hue/sat for pixel level work and grouped above that I use a 50% soft light layer for carving, so that's your shadow/highlight restructuring. You can actually do all your D&B work with the standard tools if you prefer on a regular stamped layer then use Apply Image to transform it into a 50% grey layer. Just select your D&B'd layer, hit Image>Apply Image, set Layer to Background (or whatever your last 100% opacity working copy is called) Blending: Add, Scale: 2, Offset:0, check Invert, press OK. Set it to linear light and you can continue to work on it the same way you would with any 50% neutral (edit: I know this works in 16bit, if anyone has any problems using 8 let me know and I'll figure it out). multicore fucked around with this message at 22:31 on Nov 1, 2010 |
|
#
?
Nov 1, 2010 22:13
|
|
|
flyingbathtubpirate posted:Depends, if you're working on major commercial and high end fashion/beauty work if it takes you less than 3 hours you've missed something. It's serious overkill unless you're going for advertising contracts and major publications but for my current client I've spent around 6 hours on one shot and expect to spend 2 more, and that's a pretty quick job with good skin and lighting. I've always kind of wondered about how much of a team effort goes into this stuff. Does a producer freelance out the photographer, hair/makeup, and retoucher? Or do you belong to one production house?
|
|
#
?
Nov 1, 2010 22:14
|
|

|
AIIAZNSK8ER posted:I've always kind of wondered about how much of a team effort goes into this stuff. Does a producer freelance out the photographer, hair/makeup, and retoucher? Or do you belong to one production house? Generally the photographer gets the contract for a product campaign/editorial/whatever and pays his own team.
|
|
#
?
Nov 1, 2010 22:28
|
|
|
flyingbathtubpirate posted:Generally the photographer gets the contract for a product campaign/editorial/whatever and pays his own team. Yeah, and if they hire an independent retoucher it could be anyone. The photographer I'm working with is getting images retouched in South Africa, Sweden and some other random place. I'm going to drop you an email if you don't mind - I assume it's on the blog?
|
|
#
?
Nov 1, 2010 22:48
|
|
|
Paragon8 posted:Yeah, and if they hire an independent retoucher it could be anyone. The photographer I'm working with is getting images retouched in South Africa, Sweden and some other random place. No problem Holmes, you'll find it on the contact page. fake edit: I don't know why I haven't been posting in this sub-forum before, if only for the unrivalled joy of calling a potential client Holmes and it being in any way acceptable 
|
|
#
?
Nov 1, 2010 23:15
|
|
|
flyingbathtubpirate posted:No problem Holmes, you'll find it on the contact page. For real, show us how complicated this stuff is so we can be convinced to hire you.
|
|
#
?
Nov 2, 2010 01:09
|
|
|
AIIAZNSK8ER posted:For real, show us how complicated this stuff is so we can be convinced to hire you. Oh man, you don't want to open that can of worms. You will not be happy with your post ever again. It's like that photography skill graph that makes its rounds. Just when you think you're kinda good at retouching you discover you're barely scratching the surface.
|
|
#
?
Nov 2, 2010 01:14
|
|
|
A quick question about printer proofing: I just proofed a bunch of photos through Photoshop using the tutorials at dry creek. When I first load the proof the photos usually get a bit washed out and lose contrast. Supposedly this is normal because Photoshop is compensating for the brightness of paper, true darkness of ink, etc. The next step after that is to add the contrast and color saturation back. I can do this easily using levels and curves such that the printer proofed image looks similar to the original. The confusing part comes at the very end when I actually convert to the printer profile - the image gets super contrasty and hyper saturated compared to either the original, or the unconverted printer proofed file. Is that normal? I assume it is because when it gets sent to the printer it will lose some of that contrast and saturation through the process. I am working on a calibrated monitor, by the way.
|
|
#
?
Nov 2, 2010 05:20
|
|
|
Are folks generally happy with their B&W conversions in Lightroom? I can never get anything I'm happy with and always end up exporting to Photoshop. My workflow in photoshop is rarely more complicated than a B&W conversion layer with curves above it to get the desired contrast so I feel like I should really be able to come up with something I like more in Lightroom. I'm assuming my issue is that the curves adjustment in lightroom is happening before the B&W conversion and not after.
|
|
#
?
Nov 2, 2010 06:26
|
|
|
Originally/Generally isn't one purpose of hiring a MUA to ensure that your subject's skin/hair doesn't look like poo poo so you don't have to spend 8 hours making it look better? In addition, the way you light your subject determines highlights/shadows as well as skin tone and the detail of the skin (after the MUA has had their way with things) so why not adjust the lighting a bit and save yourself a ton of time in post? I can see spending a lot of time for major edits or composites with other files/digital artwork, but I'd think fashion/beauty wouldn't always need to be that complicated. Really though, I can't really have a valid opinion without seeing a before/after and I'd never really feel right asking someone to post that despite my curiosity. Edit: Sorry- I just checked out some of the examples on your website and while you do a very nice job, the reason some of those images needed so much work is because the photographer was sloppy as gently caress when taking the image. They could have saved a lot of time with proper exposure, light placement, and composition. RangerScum fucked around with this message at 16:07 on Nov 2, 2010 |
|
#
?
Nov 2, 2010 15:31
|
|
|
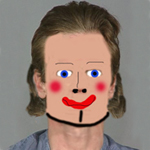
RangerScum posted:Originally/Generally isn't one purpose of hiring a MUA to ensure that your subject's skin/hair doesn't look like poo poo so you don't have to spend 8 hours making it look better? Good point about my portfolio, it's pretty out of date to be honest. Most of my last 6 months of work with some seriously awesome photographers is in embargo land until it's published, so the whole site gets an OHSHITSON update in January. Even without unnecessary mistakes, great skin, lighting and a $10 sweeping brush so I don't have to sweep your floors for you (imagine the savings! ) the hours are spent zoomed in to 300% making sure a thread of pixels isn't darker than the next.This is a tiny crop of a wide shot;  Those lines or 'threads' running vertical on the cheek, that coffee bean looking light ring and those uneven mottled pixels on the nose are unacceptable. Srsly.
|
|
#
?
Nov 2, 2010 16:37
|
|
|
flyingbathtubpirate posted:Good point about my portfolio, it's pretty out of date to be honest. Most of my last 6 months of work with some seriously awesome photographers is in embargo land until it's published, so the whole site gets an OHSHITSON update in January. I know this is what your client's want, and that if they didn't deliver photographs like that, someone else would. Buuuuut, Do you ever feel like this is basically masturbation? If not even super models can be photographed without 7 hours of pixel level retouching for skin so flawless a spider's feet couldn't cling to it? That's not a real person at that point, why do so many people want to look at it? I'm all for removing blemishes, unsightly wrinkles, etc. I do it on all my photos, but seriously? At some point isn't it too much?
|
|
#
?
Nov 2, 2010 17:02
|
|
|
poopinmymouth posted:I know this is what your client's want, and that if they didn't deliver photographs like that, someone else would. Buuuuut, Do you ever feel like this is basically masturbation? If not even super models can be photographed without 7 hours of pixel level retouching for skin so flawless a spider's feet couldn't cling to it? That's not a real person at that point, why do so many people want to look at it? Sure, it's massively over the top for the huge majority of photography. I deal with a lot of portrait and glamour photographers who don't want or need a day's work per image, and I wouldn't even dream of suggesting it. But while there's a market for it, and I honestly love hours of tiny pixel-related problem solving I'll keep providing it. It's growing a lot though, while the low-mid-tier market is oversaturated with guys with Photoshop and a hobby that makes them a handful of change every week, there's been a pretty noticeable renaissance of 'what do you mean blur looks crap I've been using it for fifteen ywait a minute it DOES! OGODALLTHISTIME'  More and more amateur photographers who work with models with aspirations to commercial and editorial publication are treating high end retouchers as a team member rather than hitting surface blur or sending it to a guy who hits surface blur for 2 bucks an image. More and more amateur photographers who work with models with aspirations to commercial and editorial publication are treating high end retouchers as a team member rather than hitting surface blur or sending it to a guy who hits surface blur for 2 bucks an image.
|
|
#
?
Nov 2, 2010 18:50
|
|
|
BeastOfExmoor posted:Are folks generally happy with their B&W conversions in Lightroom? I can never get anything I'm happy with and always end up exporting to Photoshop. My workflow in photoshop is rarely more complicated than a B&W conversion layer with curves above it to get the desired contrast so I feel like I should really be able to come up with something I like more in Lightroom. I'm assuming my issue is that the curves adjustment in lightroom is happening before the B&W conversion and not after.
|
|
#
?
Nov 2, 2010 21:06
|
|
|
Hotwax Residue posted:I've been trying out Silver Efex Pro lately, it's really good if you do lots of B&W.
|
|
#
?
Nov 3, 2010 05:29
|
|
|
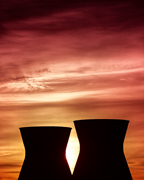
So I sat down tonight and decided I wanted to try something a bit more out there in terms of processing with a portrait shoot I did with Andrew WK over the summer and aim for something sort of cinematic in the ways of Sin City over the top styling. Feedback is appreciated.
|
|
#
?
Nov 3, 2010 06:22
|
|
|
OK, I am throwing around a couple of purchase ideas. I currently have a bottom bin Dell 22" LCD that I am using. I am throwing around the idea of replacing (or adding) one of the Dell 24" IPS panels for better color, etc. The other idea is getting a tablet for touch ups within photoshop. What would you guys go with first? Where am I going to see the biggest improvement? Currently my mouse is driving me a bit nuts, but I am unsure of what tablet would be good for me (prefer to spend as little as I can, but still get a GOOD product). Suggestions?
|
|
#
?
Nov 3, 2010 14:40
|
|
|
rockcity posted:So I sat down tonight and decided I wanted to try something a bit more out there in terms of processing with a portrait shoot I did with Andrew WK over the summer and aim for something sort of cinematic in the ways of Sin City over the top styling. Feedback is appreciated. Top half looks okay to me. Maybe add some droplets to his arms or something. Bottom looks too fake- more like fog instead of rain.
|
|
#
?
Nov 3, 2010 19:07
|
|
|
Cross_ posted:Top half looks okay to me. Maybe add some droplets to his arms or something. Bottom looks too fake- more like fog instead of rain. That was sort of the idea with the bottom looking like fog. Just a really ugly storm, like when the ground is hot and the rain is cold so you get that low lying fog.
|
|
#
?
Nov 3, 2010 23:52
|
|
|
I would lighten the rain to at least make it look like it's catching light. Right now it just looks like some scratched up texture overlaid.
|
|
#
?
Nov 4, 2010 01:39
|
|

|

|
| # ? May 16, 2024 20:31 |
|
|
rear end is my canvas posted:I would lighten the rain to at least make it look like it's catching light. Right now it just looks like some scratched up texture overlaid. That's a good idea. I was thinking about doing something about that. I'll give that a shot.
|
|
#
?
Nov 4, 2010 01:41
|
|