


|
Paintin' dis poo poo! 
https://instagram.com/mutatedjellyfish/
|
 #
?
Nov 26, 2010 22:28
#
?
Nov 26, 2010 22:28
|
|


|

|
| # ? May 30, 2024 06:46 |
|
|
Hello 3d art goons. It's shameless plug time. I hope this is an appropriate place for this, if not please don't ban me. I develop and sell this utility called SMAK. It's an ambient occlusion and normal map generator. It can load up huge models, (1 million+ quads) and bake the normal details down to low-res models with UVs. While taking a break from Digitanks (my usual project) I've been working on and just released a new version of SMAK. The price is $30 but since it's still in beta it's at a $15 discount. Here's the website for those who are interested: http://getsmak.net/
|
|
#
?
Nov 26, 2010 23:54
|
|
|
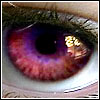
mutata posted:Paintin' dis poo poo! Nice. What packages you using? I've decided I have a love-hate relationship with painting UVW maps, and on that note, I'm going to call this finished:   There's a bit of texture blurring, and I'm not altogether happy with the copper fuses at the front and rear, but I might tweak those when it's time to start rendering shots of this thing. I've been spending close to three years noodling away at these 3d assets for this short, and I've decided it's better to get them into "good enough" territory than try to make them perfect. Otherwise the drat thing will just never get finished.
|
|
#
?
Nov 27, 2010 07:34
|
|
|
schmuckfeatures posted:Nice. What packages you using? I modeled her in Maya and I've painted her entirely in 3d Coat so far. It's my first time working in that one. I've never used Bodypaint, but I already like it a bajillion times better than zbrush's polypaint. https://instagram.com/mutatedjellyfish/
|
|
#
?
Nov 27, 2010 08:55
|
|
mutata posted:I modeled her in Maya and I've painted her entirely in 3d Coat so far. It's my first time working in that one. I've never used Bodypaint, but I already like it a bajillion times better than zbrush's polypaint. How is 3D Coat's texturing? I saw some guy on polycount who had an amazing character textured fully diffuse in 3D Coat, I haven't picked it up yet but I'm definitely considering it.
|
|
|
#
?
Nov 27, 2010 08:58
|
|
|
ceebee posted:How is 3D Coat's texturing? I saw some guy on polycount who had an amazing character textured fully diffuse in 3D Coat, I haven't picked it up yet but I'm definitely considering it. Murph, right? He's my classmate irl here at university. ") It's great, if you can paint. It's essentially exactly like painting with a solid brush in Photoshop with transparency tied to pen pressure. The step up it has from zbrush are the layers, the direct .psd import/export (with layers and blending modes) and the fact that it's all per-pixel instead of vertex-based. ie, you can import a mesh and paint right on it without dividing it to millions of polys. It's great for extreme low-res stuff like this girl (she's less than 1500 polys which would just turn into a doughy mess in zbrush). It's great, if you can paint. It's essentially exactly like painting with a solid brush in Photoshop with transparency tied to pen pressure. The step up it has from zbrush are the layers, the direct .psd import/export (with layers and blending modes) and the fact that it's all per-pixel instead of vertex-based. ie, you can import a mesh and paint right on it without dividing it to millions of polys. It's great for extreme low-res stuff like this girl (she's less than 1500 polys which would just turn into a doughy mess in zbrush).I haven't tried any of its normal painting feature (you can set a depth to the brush along with transparency and such) because I figure I'd just do that in zbrush if I wanted to. It does have a sculpt section, though I haven't tried it. Retopo is quick and easy as well (though I admit I've never tried any other retopo program). But yeah, painting in there is about as common sense and raw as you can get. You pick a color, and then you paint that color on, no nonsense.
|
|
#
?
Nov 27, 2010 09:36
|
|
|
mutata posted:I modeled her in Maya and I've painted her entirely in 3d Coat so far. It's my first time working in that one. I've never used Bodypaint, but I already like it a bajillion times better than zbrush's polypaint. Thanks for recommending that program to me. I've been trying it out today and it's really, really good. It totally takes the pain-in-the-assedness of UVW mapping out of the equation, which is such a huge relief. I've been using it to work on my pumpjack model... just the walking-beam part (the upper bit, that is) so far, and it's a bit on the contrasty side since I'm getting used to 3d-Coat's lighting, but it's really sped up my texturing workflow.   Those are a couple of quick renders of how it's helped so far. Edit: And this is feeling a bit more like it:  OK, I'll stop clogging up the thread til I've made some more progress. Wanna see if I can finish this thing this weekend. schmuckfeatures fucked around with this message at 20:08 on Nov 27, 2010 |
|
#
?
Nov 27, 2010 18:51
|
|
|
The rust/metal doesn't look right:  It looks like it's rusting in random places, try to make some areas look different than others so it doesn't look like a randomly applied texture.
|
|
#
?
Nov 27, 2010 21:12
|
|

|
Kingsbury posted:rust Good point. I'm toning it down as we speak. I kinda wanted to add some scratches to the edge too, but it didn't feel right somehow. There's not really anything that would get scratched on that part of the machine, and none of the reference photos I found had scratches there either.
|
|
#
?
Nov 28, 2010 02:55
|
|
|
I remember seeing a great tutorial somewhere, I forgot where it was but the basic gist was to render out an ambient occlusion map and use that as a mask for a rust texture. That way rust appears in all the little nooks and edges instead of in random places! There was also a tutorial like that for dust, in that you shine a red light down on an object and bake it into a material which you use for a dust mask. I really like nifty uses of things like this 
|
|
#
?
Nov 28, 2010 03:23
|
|

|
I'm no artist but I've done some skinning and I think you could also do with some dodging on the creased edges. By that I mean light lines along the edges that are > 90 degrees. It helps the corners stand out which helps define the shape better, and it makes it look like the texture belongs on the object more. edit: oh I see you already have that on some other parts. Vino fucked around with this message at 04:19 on Nov 28, 2010 |
|
#
?
Nov 28, 2010 03:46
|
|
|
Tw1tchy posted:I remember seeing a great tutorial somewhere, I forgot where it was but the basic gist was to render out an ambient occlusion map and use that as a mask for a rust texture. That way rust appears in all the little nooks and edges instead of in random places! With vray it's really easy to do this faux-procedurally - you can use a vraydirt (ao) to mask between two materials (metal/rust), add a grunge map in the radius so it's not a smooth edge and set it to only work in a certain axis so it drips down realisticly. It's fantastic.
|
|
#
?
Nov 28, 2010 03:54
|
|

|
cubicle gangster posted:With vray it's really easy to do this faux-procedurally - you can use a vraydirt (ao) to mask between two materials (metal/rust), add a grunge map in the radius so it's not a smooth edge and set it to only work in a certain axis so it drips down realisticly. It's fantastic. Yeah, you can use a Layers effect in Cinema 4D set to simple AO map as the mask and a noise texture that looks like rust for the rust, but I just didn't know if you could do it in other programs so I said the more complicated way.
|
|
#
?
Nov 28, 2010 04:06
|
|
|
s'up thread. long time no post.   some wires too  Click here for the full 1000x737 image. I just jacked up the spec just for looks right now, the normal and spec will probably be subdued a lot by the time it's finished.
|
|
#
?
Nov 30, 2010 02:18
|
|


|
Hey guys, how could I accomplish getting something similar to all of the details in the walls and roofing of this picture below? I use Maya and started just extruding the poo poo out of it but it got really really messy. Is there any easier way using displacement maps or something, or how is that normally handled? Thanks for any help  Click here for the full 1024x658 image.
|
|
#
?
Dec 1, 2010 05:29
|
|

|
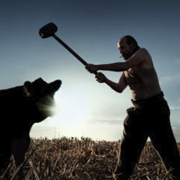
Playing around with some visual ideas for a live action short I might be working on with some friends. These aren't finished renders, just visual ideas to get the creative juices going. 
|
|
#
?
Dec 1, 2010 06:09
|
|
|
After hundreds of hours of work, and foregoing showers and sleep, I finally finished the animation which used the assets I posted earlier in this thread: https://www.youtube.com/watch?v=HPt2JCqJi5o I have about 5 days left before I need to turn this in for my modeling and animation course. I'm considering re-rendering in 720p before I do so...there are several changes I'd like to make, but I figured I would also try to get some feedback from you goons before I do so. So, what can I improve upon before the final turn-in?
|
|
#
?
Dec 2, 2010 05:49
|
|
|
Hey, looks pretty good! I think some of the criticisms from earlier still apply though; the animation looks a little floaty and forced. Also, I think you could really benefit from looking at some reference material, or even filming the scenes yourself in real life, and using that as reference. In the opening shot for example, after he notices the sign, when he double takes and walks backwards, it looks like you literally just took the frames from the forward walk and reversed them, which looks really awkward. Also, get some sound effects and music in there!
SVU Fan fucked around with this message at 09:08 on Dec 2, 2010 |
|
#
?
Dec 2, 2010 06:29
|
|
|
Cool. Here's some random comments in addition to what SVU said: -You did a good job on the part where he runs off screen to grab the axe. Try to make your animation more snapy like that in the other parts or just in future animations. At the same time, whenever you have holds, put very little animation in there so it doesn't look like a statue. You can just bend your animation curves a little or you can place one inbetween that is very slightly off and it will give it a lot more life. -I don't mind the walking backwards as much as the part when he stops. It looks like everything is just sliding back to a standing pose. Like SVU said, some reference can help. -More anticipations. A lot of your movements are going straight to the action. With some anticipation you can give them more "punch". -When you do facial animation try to move the head a little bit to emphasize the face (although not too much or you won't be able to read the expression). You can even try some squash and stretch if it's cartoony. -If you want to spice it up, be more adventurous with your cameras. Right now all of them are either side shots or front shots. Good job, keep it going!
|
|
#
?
Dec 2, 2010 07:36
|
|

|
Crappy posing rig and a quick export to Marmoset. FINISH MODE GO https://instagram.com/mutatedjellyfish/
|
|
#
?
Dec 2, 2010 10:49
|
|
|
Chernabog posted:Cool. Here's some random comments in addition to what SVU said: Thanks everyone for the positive comments and also the crits. I agree that the animation in the first scene is pretty weak, it was really hard to not make his feet kind of slide whenever I moved him forward. I created a walk cycle in place, and then tried to move him forward at the proper times. Is this a bad way to try to animate someone walking? In the 720p aspect ratio his feet will be more cut off anyway, so hopefully it will be less obvious that it's not quite right. I found it difficult to find good reference footage for the walk cycle, because well, everyone walks differently and I couldn't find someone with the right "attitude" to their walk to use as reference. I probably should have just tried to film myself doing it the way I wanted, but alas, time constraints. Doing a final cut tonight, I may post the HD version when it's done.
|
|
#
?
Dec 3, 2010 07:11
|
|
|
mutata posted:Crappy posing rig and a quick export to Marmoset. The texturing job looks pretty nice man. Are you creating any additional bump/spec maps as well? It would be really nice to see this in the game engine with proper shaders, lighting, and AA.
|
|
#
?
Dec 3, 2010 07:17
|
|
|
Mazdrol posted:The texturing job looks pretty nice man. Are you creating any additional bump/spec maps as well? It would be really nice to see this in the game engine with proper shaders, lighting, and AA. I'll be doing a spec for the D-War submission (they don't allow normals) but I'll be doing a normal for a class that I'm using her as a final project for. Hopefully I'll be able to pull off some non-crap normals. Edit: Thanks, by the way! mutata fucked around with this message at 08:34 on Dec 3, 2010 |
|
#
?
Dec 3, 2010 07:29
|
|
|
Particle flow! Also did an animation, and played some of my music over it: http://vimeo.com/17436187 This is fun. This particular one is a bit messy, but I might start doing this more
|
|
#
?
Dec 3, 2010 14:17
|
|
|
  Should probably start using Object Space Normal mapping for environment stuff, but I really am just used to working with and editing Tangent space normals. GeeCee fucked around with this message at 22:07 on Dec 3, 2010 |
|
#
?
Dec 3, 2010 22:03
|
|
|
Here's my DW entry, fighting for 3dtotal which mean Mutata is my enemy! Anyway I modeled in blender, painted diffuse in 3dcoat and photoshop. Trying to get my presentation together.
|
|
#
?
Dec 4, 2010 00:43
|
|

|
^^^ Cool but it's hard to see the character on that layout. In fact I thought that the tower was part of him at first. Mazdrol posted:Thanks everyone for the positive comments and also the crits. I agree that the animation in the first scene is pretty weak, it was really hard to not make his feet kind of slide whenever I moved him forward. I created a walk cycle in place, and then tried to move him forward at the proper times. Is this a bad way to try to animate someone walking? In the 720p aspect ratio his feet will be more cut off anyway, so hopefully it will be less obvious that it's not quite right. I found it difficult to find good reference footage for the walk cycle, because well, everyone walks differently and I couldn't find someone with the right "attitude" to their walk to use as reference. I probably should have just tried to film myself doing it the way I wanted, but alas, time constraints. Usually you don't want to have cycles in film unless you don't have enough time or unless you can get away with it without it making a difference. In games it is the only way to go. Reference shouldn't really take too long. With a digital camera you can get some decent footage in like 5 or 10 minutes.
|
|
#
?
Dec 4, 2010 02:41
|
|
|
Just finished through my 3D Animation class at Central Ohio Technical College. Went from knowing nothing at all about 3D to being able to build this as a final: http://www.youtube.com/watch?v=FQXWTyx0PRs We used Cinema 4D throughout the course and will continue to use it in 3D Animation 2.
|
|
#
?
Dec 4, 2010 04:00
|
|
|
 I thought the tower roof was a cool skirt thing the character had. I thought the tower roof was a cool skirt thing the character had.
|
|
#
?
Dec 4, 2010 04:04
|
|


|
Chernabog posted:^^^ That's most likely true, but I guess it seemed to me that it was better to just "get something done" rather than "do it right" at this point since I have so little time left...I'll try to do it right using reference next time. Lurian posted:Just finished through my 3D Animation class at Central Ohio Technical College. Went from knowing nothing at all about 3D to being able to build this as a final: The first 3-D class that you take is always the hardest. The first thing I made in Maya looked terrible compared to this, so congrats. With that said, there are some things that I think you could improve upon... - Something looks wrong with the fog as the camera moves through it, like it changes too rapidly or has too much variation in it as the camera moves through it. It needs to be more even and less patchy. - Everything appears to be raytraced, and it shows. The reflection in the glass is too perfect, and all of the shadows have perfectly hard edges. Try blurring the reflections, almost all real world reflections have some degree of blur. Almost all real world shadows also have a penumbra region where it gradually transitions from light to dark. I'm not familiar with C4D, but it should have features in its renderer to do these effects as they are pretty standard. - There is no bounce light illuminating the shadowed areas in the scene whatsoever, which would also not happen in real life. Even if you aren't rendering with physically accurate global illumination, you should still fake it with some extra non-shadow casting lights. It just looks better. - I'm not sure every object in your scene that should be casting shadows is doing so, but it's hard to tell since sometimes the position of the light source is ambiguous. Look into rendering with ambient occlusion, it will make your objects appear more grounded and part of the scene. - A lot of your textures look too flat, and the models too hard-edged. A good example of this is the mayan temple on the table. Try adding some beveling to the edges to alleviate the hard-edged polygonal look. I also think the bricks on the temple could benefit from a displacement map. Just remember, the more stuff you make in 3-D the better you will get...good luck! Also, here's the HD version of my animation, also with sound effects and music. Personal and class information is removed from the beginning to protect the innocent: https://www.youtube.com/watch?v=pJeFZRSX0pw
|
|
#
?
Dec 4, 2010 07:56
|
|
|
I appreciate the tips. The fog was definitely something that was a last minute addition. Nothing individually moved (which will be what we get into in Animation 2), so the only thing moving was the camera. I definitely agree about all of your points; just don't know enough about what to do and what not to do. Thanks for checking it out, and your animation is pretty rad.
|
|
#
?
Dec 4, 2010 19:00
|
|
|
I think this is as good of a place to ask as with any, but does anyone know any good, free, mac-compatible modelling software? I tried using blender but its interface is too confusing and lovely for me to work with.
|
|
#
?
Dec 4, 2010 20:04
|
|
|
Have you tried blender 2.5 it's a huge improvement on the previous 2.49 version, the interface is completely different. Blender really is the best of the opensource modeling programs. You can try Silo, it's not free but it's cheap.
|
|
#
?
Dec 4, 2010 20:21
|
|
|
Imajus posted:Have you tried blender 2.5 it's a huge improvement on the previous 2.49 version, the interface is completely different. Blender really is the best of the opensource modeling programs. You can try Silo, it's not free but it's cheap. Its probobly the fact that I have to use a mac that its so horrible. One button... ONE BUTTON!
|
|
#
?
Dec 4, 2010 20:23
|
|
|
Why aren't you using a real mouse? I don't know any serious Mac users who keep the Apple mouse. As said, though, Blender is the only good free 3d package on OSX. The new interface is better, but it's still Blender. I keep breaking the UI in the first few minutes and can never figure out how to get it back without restarting, haha. Another fairly cheap(for a 3D app) is Cheetah3D. It's very straightforward and uncluttered. Basically the exact opposite of Blender. I love using it, but it is missing some features you may be used to in other packages.
|
|
#
?
Dec 4, 2010 21:04
|
|

|
DefMech posted:Why aren't you using a real mouse? I don't know any serious Mac users who keep the Apple mouse. The horrible thing is that its at a computer lab. Blender is really nice, but I find its interface confusing. This is probobly one of thoose cases where there arnt many options. Woo... 
|
|
#
?
Dec 4, 2010 21:17
|
|
|
You can probably just buy a USB mouse and bring one in to the lab, I'd be surprised if they would mind.
|
|
#
?
Dec 4, 2010 21:55
|
|
|
I don't know if this is a painted weight issue, but when I rigged a human hand in maya using bones, When I use the rotate tool on the bones, the fingers lose their shape, rather than maintaining their thickness they just get squashed. Could it be the weights are not painted properly? or perhaps should I use IK handles?
|
|
#
?
Dec 5, 2010 00:37
|
|

|
Edgar posted:I don't know if this is a painted weight issue, but when I rigged a human hand in maya using bones, When I use the rotate tool on the bones, the fingers lose their shape, rather than maintaining their thickness they just get squashed. Could it be the weights are not painted properly? or perhaps should I use IK handles? It doesn't sound like IK handles would solve your problem. How are you rotating the fingers? Normally fingers only rotate in two axes, if you are rotating them around the axis that goes from the base to the tip of the finger I would expect the result you are getting. If you are rotating the fingers within a realistic range of motion, it might very well be a weight painting issue. If the finger is collapsing like a hollow tube then that is a problem with your weights. Try painting the weights in the flexed pose for the finger, until the model no longer looks like it is getting squashed. If you are using Maya 2011, you may also want to check out Dual Quaternion skinning, which is supposed to have better volume preservation.
|
|
#
?
Dec 5, 2010 03:35
|
|
|

|
| # ? May 30, 2024 06:46 |
|
|
Helios127 posted:I think this is as good of a place to ask as with any, but does anyone know any good, free, mac-compatible modelling software? I tried using blender but its interface is too confusing and lovely for me to work with. Blender is hard to get into, but once you get over the learning curve it is possible to work incredibly quickly with its hot key system. Like others have said, 2.5x is also supposed to have improved the interface, although I haven't tried that version. You might also want to check out Wings 3D, there is a guy I know who is really into it and can make some pretty impressive models. Check it out here: http://www.wings3d.com/
|
|
#
?
Dec 5, 2010 03:43
|
|