


|
Regarding the headbadges... You'll probably also used to use a different metal. You will have to build some type of a small melting furnace, but this is easy and can be done practically for free. The hardest part for you is going to be making your pattern and then mastering your mold making technique.
|
 #
?
Nov 30, 2010 14:48
#
?
Nov 30, 2010 14:48
|
|


|

|
| # ? May 23, 2024 12:26 |
|
|
You could probably also carve what you wanted out of wax, coat it in plaster, melt out the wax, and then fill with solder (tin) that you melt in a steel cup with a torch. As far as the wastercooler tig, my tig torch has never once gotten too hot to use. Maybe if youre welding all day it's different. AnomalousBoners fucked around with this message at 15:38 on Nov 30, 2010 |
|
#
?
Nov 30, 2010 15:34
|
|

|
Isn't pewter similar to Solder? Pewter has lead in it, right?
|
|
#
?
Nov 30, 2010 15:56
|
|
|
Yea pewter and solder are both mostly tin.
|
|
#
?
Nov 30, 2010 18:13
|
|
|
AnomalousBoners posted:As far as the wastercooler tig, my tig torch has never once gotten too hot to use. Maybe if youre welding all day it's different. That being said, you glossed over the main question which is what machine to buy? Miller Syncrowave 200 or Lincoln Precision TIG 225? I can get both for the same price, basically.
|
|
#
?
Nov 30, 2010 18:13
|
|
|
I remember wanting a Miller but I have no idea why that was. I think I could get them cheaper at the time I was looking ~4 years ago.
|
|
#
?
Nov 30, 2010 18:32
|
|
|
Miller. Only Miller for me. Also, watercooled rigs mean that you can usually get a longer duty cycle out your tig. Correct me if I'm wrong.
|
|
#
?
Nov 30, 2010 18:52
|
|

|
Tig uses shielding gas, right? I wonder why no one's ever thought of using the cooling effect of gas expanding to cool the components of the welder that see a lot of current thus heat. Maybe just a couple coils of copper tubing en route to the hose that leads to the electrode. edit: Cursory 'pedia-ing results in GTAW - Gas Tungsten Arc Welding, or TIG - Tungsten Inert Gas. I love learning stuff. 
whose tuggin fucked around with this message at 04:26 on Dec 1, 2010 |
|
#
?
Dec 1, 2010 04:23
|
|
|
Oh yeah we do use torches cooled by the shielding gas in the automatic mig welding field, but the torches are pretty expensive. I don't think pure argon expanding to flow at 15 cfm creates that much cooling. Honestly that's not enuff airflow to cool a atom processor. Co2 from liquid to gas maybe, but you can't use that for Tig welding. http://www.fronius.com/cps/rde/xchg/SID-BF000BA9-5431FAB9/fronius_usa/hs.xsl/3022_2885.htm "The manual and machine welding torches are available in gas-cooled and water-cooled versions. Gas-cooled welding torches are cooled by the shielding gas which flows through, while water-cooled welding torches also have effective liquid cooling using a pump and heat exchanger. For welding currents of 300 A and above, water-cooled welding torches are standard." The Scientist posted:Tig uses shielding gas, right?
|
|
#
?
Dec 1, 2010 06:00
|
|
|
AnomalousBoners posted:You could probably also carve what you wanted out of wax, coat it in plaster, melt out the wax, and then fill with solder (tin) that you melt in a steel cup with a torch. Doesn't plaster get insanely hot as it cures? Does the wax survive that?
|
|
#
?
Dec 1, 2010 06:02
|
|


|
I wasnt aware of that and havent ever used plaster but you burn out the wax before pouring in the metal anyway. It is common to use plaster to take the place of wax.The Scientist posted:Tig uses shielding gas, right? Its not really a hose that leads to the electrode. The electrode is in a collet which is held by a rigid often plastic torch which the line of gas flow into The coils would have to spiral around in the torch and I'd much rather have a torch that I need to let cool off (and can just switch out torches while it does) than be welding with an annoyingly heavy one. AnomalousBoners fucked around with this message at 06:07 on Dec 1, 2010 |
|
#
?
Dec 1, 2010 06:04
|
|
|
Oh, I definitely thought it was the transformers that were the part you have to keep cool. I didn't even think about the electrode. But the water cooling doesn't cool the electrode, does it?
|
|
#
?
Dec 1, 2010 12:03
|
|
|
No, the electrode is tungsten, it won't melt. Inert gas flows over it to shield the arc and prevent what would otherwise be extremely fast oxidation in the weld puddle. The water cooling cools the actual part of the torch that you hold. It is pretty common to TIG weld without a gloved hand holding the torch. This is also the only manly way to get an artificial tan. Also I don't think TIG welders have transformers anymore, I think most/all machines went to inverters so that they aren't the size of busses. I could be wrong on this point, however.
|
|
#
?
Dec 1, 2010 12:46
|
|
|
If the cooling system in the torch fails, the Tungsten can start to overheat and melt, actually. I haven't personally experienced this, however. At a melting point of 6192 degrees F, it is possible for an arc with enough amps to melt, but difficult.AnomalousBoners posted:It is pretty common to TIG weld without a gloved hand holding the torch. This is also the only manly way to get an artificial tan. AnomalousBoners posted:Also I don't think TIG welders have transformers anymore, I think most/all machines went to inverters so that they aren't the size of busses. I could be wrong on this point, however. I haven't figured out how it works yet, but apparently this Lincoln Precision TIG I'm looking at is a transformer/inverter hybrid, which is why it can put out 30 more amps, with less input power then the Syncrowave.
|
|
#
?
Dec 1, 2010 14:06
|
|
|
Jr. posted:Doesn't plaster get insanely hot as it cures? Does the wax survive that? Plaster gets warm, but not insanely hot. I would say it gets around 90-95 degrees while it kicks. Wax melts at like 140 degrees. If you want to make a proper mold anyway, you would first use a rubber mold around the thing you want to cast and then use the plaster as a "mother mold", so the plaster wouldn't be directly on the wax. Wax would be such a bitch to get off the plaster, even when using a release agent.
|
|
#
?
Dec 1, 2010 21:28
|
|
|
ASSTASTIC posted:Plaster gets warm, but not insanely hot. I would say it gets around 90-95 degrees while it kicks. Wax melts at like 140 degrees. When you are doing lost was casting this is a non-issue, you invert your mold inside a toaster oven and bake to 450 for an hour, no wax remains, what little wax did not drain out is absorbed into the pores of the plaster, actually making a more liquid-tight seal for the liquid metal you will pour in.
|
|
#
?
Dec 1, 2010 23:11
|
|

|
There's this place here in FLorida called "Hobby Town USA" (a hobby shop, duh) and the sell these like miniature mold making and casting sets... They're primarily for resins and epoxies and propylenes, but I think I remember seeing this tube of pastes-like stuff with metallic flakes in it the was some kind of aluminum(aluminium) resin, or maybe it was the word "alumina" which is coming up on my spell checker when I spell aluminum the English way. Anyway, I was gonna recommend it as a possible alternative considering casting metal for bike emblems would be such a pain in the rear end without already having a setup of some kind, but the first 10 minutes I spent trying to find it, the Hobby Town USA website kept giving me a SQL error after just trying to get to their homepage, then I spent 20 minutes sifting through an impressive list of adhesives before I realized I was never gonna find it and that I was starting to miss the sun... Anyway, Plan B: buy a space blanket. Vacuum-form it over a mold made out of resin, plastic, clay, wood, whatever. Electro-plate the formed space blanket. Repeat the electro-plating until you have a hollow emblem. NEXT (This whole thing is starting to remind me of when I was in cub scouts and I was making a pinewood derby car. I let my dad take it to work with him - at the time he worked in the building where they prepare payloads to go in the cargo bay of the shuttle or Delta rockets - so we could add some weight to it. When he brought it back, it had a hollowed out cavity at the bottom, which was filled with solder that had been drilled out so that it weighed precisely the maximum weight a la the rules, based on a NASA calibrated scale. I still only got 2nd place though; I lost to some redneck  ) )
|
|
#
?
Dec 2, 2010 00:07
|
|
|
Jr. posted:Ooohkay, I didn't think I'd be back, but hey. One possibility: look around online for something called "silver art clay". One info page- http://www.artclayworld.com/what_is_art_clay.php It is a clay you sculpt into whatever shape you want, then you heat it (gas stovetop or propane torch) and the clay melts/vaporizes out leaving only real, actual silver. There is some shrinkage so it may not work perfect, but since you can hand-mold and work it before it's fired, it is easy and fairly cheap to try. (they make gold art clay too, but it's roughly 50-60X more expensive per ounce, as is gold) If the shrinkage prevents you from getting the perfect contour to fit against the head tube, just fill in the space in-between with some colored epoxy. ~
|
|
#
?
Dec 2, 2010 00:48
|
|
|
Linux Assassin posted:When you are doing lost was casting this is a non-issue, you invert your mold inside a toaster oven and bake to 450 for an hour, no wax remains, what little wax did not drain out is absorbed into the pores of the plaster, actually making a more liquid-tight seal for the liquid metal you will pour in. When I did large scale lost wax casting in college, we used a 1:2 mix of sand:plaster in order for the mold to keep its rigidity when pouring metal into it. Granted, we were casting bronze and aluminum. But one thing you have to remember is that when you heat up plaster, it will being breaking down. We always had to reinforce our molds with chicken wire to make sure they didn't break apart after removing from kiln. Also, our burnout time was 5 days of a 1100 degree kiln. Literally. Since you guys are thinking tin/solder, I wouldn't suggest a a 1:2 ratio of sand/plaster, but something ballpark (less sand). Make sure you use a face coat of plaster on the wax piece before you start with sand/plaster because you are going to get air bubbles on your casted piece. I've never casted tin/solder so I cant tell you how clean up would be for those as well, but cleaning up bronze/aluminum after a pour was a sonfabitch because the plaster would stick to the piece. Not easy clean-up. One of my favorite techniques was furan sand casting where you could cast iron, bronze, and aluminum no problem. It would clean up real easy too since when you casted into it, it would basically break down the furan. I don't suggest doing this technique without proper training though as the catalyst used can easily cause chemical burns on the skin. I've got the scars to prove it.
|
|
#
?
Dec 2, 2010 00:48
|
|
|
http://www.weldingtipsandtricks.com/ This video series is pretty drat cool. https://www.youtube.com/watch?v=5u4Efn1twUo According to this first one, what he refers to as "pulse on time" and specifies is also called "pulse width" is what I traditionally think of as "Duty Cycle": the ratio of pulse duration (the part of the waveform of a square wave when the current/voltage is "on" [1] as opposed to "off" [0]) to the waveform's period - that is, the length, in time, that it takes to complete one cycle. When we're talking a square wave, its pretty simple. The ratio that there's a difference in voltage between the two electrodes or current flowing through them verses the total time of a single cycle - on time + off time. I guess, as it applies to welding, duty cycle is used in a more literal sense. Duty cycle is the ratio of uptime versus downtime required for cooling. Anyway probably none of that made sense but check out the vidya's there awesome.
|
|
#
?
Dec 2, 2010 05:54
|
|
|
Pulse time and duty cycle are not at all the same thing when talking about welding
|
|
#
?
Dec 3, 2010 04:26
|
|
|
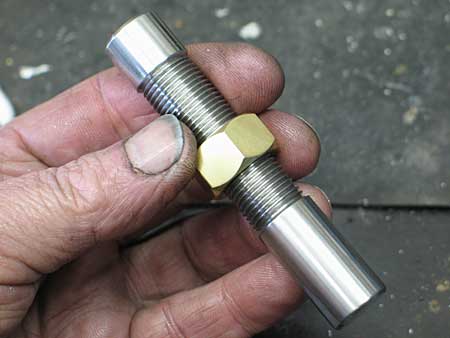
Almost done my yearly course at SAIT. This time it's introduction to machinist. I made a cheap little drill point gauge, and this neat little c-clamp.  I'm going to try to make a mini mandrel cone on the lathe in the last few classes.
|
|
#
?
Dec 3, 2010 07:47
|
|


|
Wow, that's awesome. Did you cut the threads yourself? I've been imagining what I'd probably try to make first if given access to a good mill and/or lathe. I think a set of plug gauges, a good set of complete parallels, maybe some awesome tool posts for a bench grinder, maybe jigs/vices/clamps depending on whatever pressing need I see ATM. Mostly stuff that would make it easier to build other stuff. Anyway, cool. 
|
|
#
?
Dec 3, 2010 18:25
|
|
|
Hey thanks ") I drilled and tapped all the holes, but not the clamping, uh, I don't know what you would call it, the bar? the jaw thread? Either way, that was just some ready rod / allthread that we cut down and machined as necessary. Threadcutting is for the advanced class. So maybe next year.
|
|
#
?
Dec 3, 2010 20:31
|
|
|
 http://www.frets.com/HomeShopTech/Projects/CaptiveNut/captivenut.html I made one of these a couple weeks ago as a gift. Nothing too tricky. I added some forming on each end of the threads to keep the edges of the nut from digging into my nice pretty finish. Showed it off over thanksgiving and got demands for several more. 
oxbrain fucked around with this message at 20:48 on Dec 3, 2010 |
|
#
?
Dec 3, 2010 20:40
|
|

|
oxbrain posted:
This is awesome. It took me forever to figure out why its so cool. Here's a question: was the threaded rod inside cut on the lathe, or was it one of those threaded rods you can buy at like Lowe's? I would figure that one of the store-bought, zinc plated rods would have too much slop to make an invisible seam like that? Everyone post more pics of stuff they've made. They're awesome, and this thread needs some action. There's a good reason why I'm digging this thread so much right now:  Click here for the full 640x480 image.  Click here for the full 640x480 image.  Click here for the full 640x480 image.   Click here for the full 640x480 image. Had to move, no room for my workbench. 
|
|
#
?
Dec 4, 2010 01:44
|
|
|
http://www.backyardmetalcasting.com/oilburners09.html How does this burner design stack up? It looks stupid-simple to build compared to others, doesn't need much in the way of machine-tool resources, can run off of either waste oil or propane and it's apparently able to melt iron. Also, where does one get a tuyere? They're referred to in most furnace designs but only in passing and I'd have no idea where to get one.
|
|
#
?
Dec 4, 2010 01:58
|
|

|
So I need a swage block for a few projects that I have been commissioned to do, so I bought one!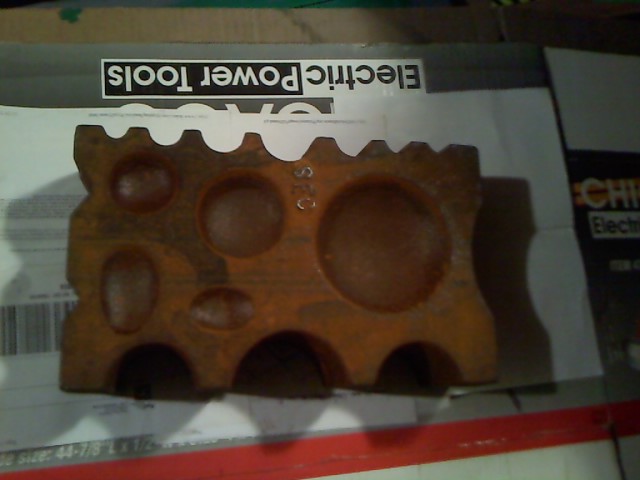 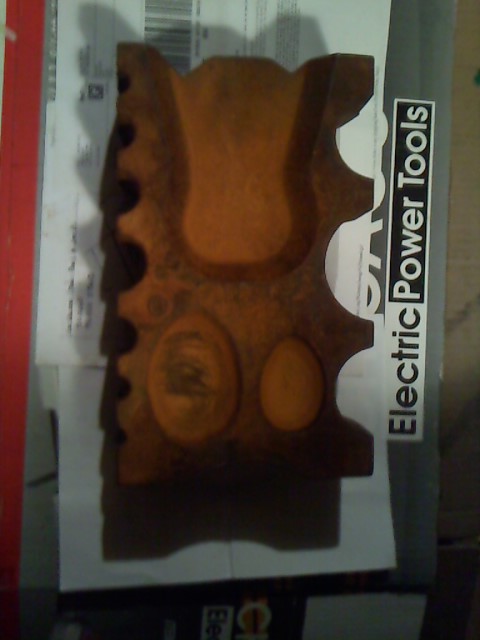 I have been wanting one for some time now, so I am glad to finally get one!! Can't wait to clean it up and start forging.
|
|
#
?
Dec 4, 2010 02:00
|
|

|
Just came back from a trip out to Coatesville, PA. There is a Miller Syncrowave 180 out there with less then 50 hours on it that the owner is willing to sell to me for $1k even. (I talked him down from $1300). There is a 99.9% chance I'm going back up there tomorrow afternoon with some cash.Ambrose Burnside posted:http://www.backyardmetalcasting.com/oilburners09.html Ambrose Burnside posted:Also, where does one get a tuyere? They're referred to in most furnace designs but only in passing and I'd have no idea where to get one. I kid, I kid. The tuyere is simply the hole the burner enters the furnaces at. A tangential tuyere is one where it enters the furnace on an angle so the flames hits the side of the furnace, causing a swirling action around the crucible.
|
|
#
?
Dec 4, 2010 02:18
|
|
|
Slung Blade posted:Threadcutting is for the advanced class. So maybe next year. I thought those threads looked too neat for a die. Thread cutting is one of the hardest things to get right on a lathe, but once you master it it's great, especially for buttress threads. You'll notice an indicator on the saddle turns. that's what tells you to mash the z-feed when you are cutting threads, don't take your part out. The Scientist posted:Here's a question: was the threaded rod inside cut on the lathe, or was it one of those threaded rods you can buy at like Lowe's? I would figure that one of the store-bought, zinc plated rods would have too much slop to make an invisible seam like that? It was cut on the lathe, you can see the radius where the guy hadn't undercut the threads so the two parts would mate flush. That has to do with the indicator mentioned above too if you want the OD threads to mate so you can lock the nut over the parting line. E: ooh I see, he cut the threads with the two parts assembled. Neat, but slightly dangerous if one end were to jam on something. I wouldn't do it that way for fear of breaking off the joined parts. unfortunately that's the easiest way to do it, otherwise it takes trial and error. Samuel L. Hacksaw fucked around with this message at 02:21 on Dec 4, 2010 |
|
#
?
Dec 4, 2010 02:19
|
|

|
The Scientist posted:This is awesome. It took me forever to figure out why its so cool. Found a picture of the one I made. I need a better camera.  I made the threaded rod inside for practice single point threading. I also single pointed the outside threads, but only to about +0.010 and then broke it apart and finished it with a die. I was worried about going too deep single pointing, but after playing with it some I want the threads loose anyway. The next one is going to be all single point, and hollow in the center to fool people who've seen that page. Plunge threading isn't too difficult as long as you leave yourself some setback on either end and go slowly. The problem comes when you grab the feed lever instead of the half-nut lever and it happily plows the tool into the part while you're in a panic looking for the nearest kill switch.  I just finished my first quarter of machining. So far I've ground the gears on a mill twice in as many minutes and crashed the lathes twice, but only enough to wreck my part each time. Somehow I'm still getting an A and the instructor gave me a recommendation to an employer. 
|
|
#
?
Dec 4, 2010 04:44
|
|
|
Put it together with some Locktite. I forget if blue or red is the stronger one. Less chance of a casual observer discovering "The Secret".
|
|
#
?
Dec 4, 2010 04:50
|
|
|
oxbrain posted:
You have a wonderful website. I'm loving all the tips and tricks you have there.
|
|
#
?
Dec 4, 2010 04:57
|
|

|
dv6speed posted:Put it together with some Locktite. I forget if blue or red is the stronger one. blue needs a breaker bar, red needs a torch.
|
|
#
?
Dec 4, 2010 04:57
|
|
|
Machining the ends as the last step locked it together to the point where you'd need pliers to unscrew it.jovial_cynic posted:You have a wonderful website. I'm loving all the tips and tricks you have there. Not my site, that's just where I found the project. oxbrain fucked around with this message at 05:18 on Dec 4, 2010 |
|
#
?
Dec 4, 2010 05:16
|
|
|
Random Number posted:blue needs a breaker bar, red needs a torch. Is this if the threads are cut on a lathe instead of with a die? Although, it could just be my taps and dies. I think I got 'em at Northern Tools for $13.99, and no one screw I've ever threaded with the die ever fits a hole I've tapped with the same size tap... (I do know about turning it back a 1/4 turn [or usually more] every full turn, and I use some oil as cutting fluid) I used some blue on a bolt and nut in the axle of my tractor, where a locking pin should have gone. I'm sure it'll be alright, but there's nothing like the vibrations of a 3 piston diesel engine + the rattling of a bush-hog on the back to vibrate nuts loose. It routinely loosens nuts in excess of 1-1/4", even ones that are under tension. But whatyagonnado 
|
|
#
?
Dec 4, 2010 05:36
|
|
|
The Scientist posted:Is this if the threads are cut on a lathe instead of with a die? A good set of taps and dies is like 10x the price of yours at least. It is your taps and dies.
|
|
#
?
Dec 4, 2010 06:22
|
|
|
The Scientist posted:Is this if the threads are cut on a lathe instead of with a die? It applies to either, threads cut on a lathe will generally have an interference more in line with ASE or whatever your standards system is. I think it's around 70-75% interference against the surfaces, I'll look in my machinists handbook later to see. Threads cut with a tap and die generally have cracked surfaces and the tips of the threads generally crack off due to it being a forming process rather than the lathes cutting process. these threads have 55-65% interference, depending on tap drill/OD size (generally with hand tapping you want to use the larger drill and smaller OD to lessen the chance of snapping the tap or breaking the die, with power tapping or machine cutting use the largest size for the best interference.) I would say on any machine that vibrates (and that you can use a torch on) use the red, It's better to spend an extra 10 minutes taking it apart than having poo poo start vibrating off in the middle of a field. Red locktite is a LOT stronger than blue. And it kinda smells good. E: Get some Mik-O-Cut for threads, it's pretty awesome. Hand tapping with straight flute taps is 1 turn in, 1/2 turn out, with a spiral pattern tap just run it till it bottoms and be aware of how much it's flexing. Spiral pattern flutes mean it's designed for power tapping, Hy-Pro are pretty good, get an MSC magazine to order this stuff. E2: I'm not a mechanic but I would replace that axle set up with red lock-tited nut and the locking pin, just to be safe. Samuel L. Hacksaw fucked around with this message at 15:15 on Dec 4, 2010 |
|
#
?
Dec 4, 2010 15:12
|
|
|
Well hello, gorgeous!   It's time to give the shop it's Christmas presents a little early. I found a Miller Syncrowave 180 SD on Craigslist. This machines time and cycle counter shows less then 5 hours of use and less then 60 on/off cycles. Guy wanted $1300 and I talked him down to $1000. Came with foot pedal, gas regulator, air cooled torch, spare torch parts, tunstens and some TIG consumables. The machine can do 180 amps output. It also has High Frequency AC for arc starting and aluminum welding. I also picked up an argon bottle, Metabo angle grinder, Tillman TIG gloves, and a propane space heater from the LWS. Not pictured is a new auto darkening hood that was on sale at Harbor Freight. AbsentMindedWelder fucked around with this message at 00:39 on Dec 5, 2010 |
|
#
?
Dec 5, 2010 00:29
|
|
|

|
| # ? May 23, 2024 12:26 |
|
|
Omg dude. You'd better lock your garage up nice and tight, though. Tell me where you live and I will literally pull a Caine and Abel on you RIGHT NOW for that thing. So I guess you'd have to get a wire feed to be able to use it for MIG? Or can you use a GTAW for MIG? Could you use a GTAW machine for stick? Awesome find. Congratulations, and kudos for managing to save up for it plus all those accessories. What does LWS stand for? Post some pics of awesome stuff you weld. I expect to see some aluminum cans and razor blades. Also, how's the lathe?
|
|
#
?
Dec 5, 2010 01:35
|
|