

|
Fix posted:
Thats a loving incredible paintjob
|
 #
?
Dec 14, 2010 03:21
#
?
Dec 14, 2010 03:21
|
|


|

|
| # ? Jun 6, 2024 21:30 |
|
|
PaintVagrant posted:Thats a loving incredible paintjob Too good, I think. Remember when John Blanche's Femme Militant line catalog was done with 'digital painting' (using photoshop to colorize b&w images of the figures) and then look at the graphic arts that went into that image's background and layout. Also you can see the 'brushstrokes' on the left part of his skirt.
|
|
#
?
Dec 14, 2010 03:39
|
|


|
Captain Invictus posted:It needs more random and haphazardly-placed stitches and arms sticking out everywhere, but otherwise that looks like an absolutely perfect Hellpit Abomination model, what's your beef with it? Pretty much what everyone else said. For the price, you should be getting something a lot more detailed and interesting than a big blob with a few ugly heads sticking out. I could see that thing running around $40-50 or something, but $85 is ridiculous.
|
|
#
?
Dec 14, 2010 04:59
|
|

|
So I'm just starting to get into Warmachine, and I've gotten most of the material I need to start painting. If I understand the process correctly, the general order of doing poo poo is: 1. Removing Mold Lines or Flash marks or whatever the gently caress they're called 2. Gluing poo poo together 3. Priming 4. Base Coat 5. Shading 6. Highlights 7. Details 8. Base Is this correct? I actually had a few questions about priming... I'm not 100% sure this is the right thread for this but I sure hope it is! I have a Protectorate of Menoth model, and I was curious if I should prime it Black or White. From what I understand, Black tends to look better if you're going for a more "realistic" look, whereas White is better for a brighter look. Since I was going to use the Menoth colors, White and... Maroon and Gold I guess, I thought it would be right to prime it white. But the Warmachine rules I noticed used a Menoth model as an example and they primed it black, so I'm not sure if I totally understand priming in that regard. Also, with regards to priming, I read a guide online that said you shouldn't prime if its too humid outside and that you should be looking for a certain temperature to prime, but right now its the dead of winter, is that a problem? Sorry, I'm sure these questions are very dumb but I'm actually having a surprisingly hard time finding a very simple down to earth guide to painting models. The links in the OP were nice but seem to be mostly of more complicated poo poo whereas I'm obviously kinda looking for something a bit more simple. I've been mostly using the Warmachine rules books for reference along with this site: http://blog.brushthralls.com/
|
|
#
?
Dec 14, 2010 07:35
|
|

|
Your order is pretty much correct, though some will tell you to paint your base first so you don't get basing paint (tends to be sloppy drybrushing) onto your painted model. Those people are, of course, wrong. Basing-lasters rule, basing-firsters drool. Live on the edge! Black undercoat is easier if you are just starting out because everything you don't put paint on looks like it's in shadow by default, whereas you'll have to go in and darken the internal areas on the model by hand if you prime white. It's like training wheels. If you're working with lighter, brighter color schemes though, white primer cuts your work in half, because you don't have to build up so many layers to get the color you want. Priming in the cold is a problem. One solution is to keep the spray can inside, shake it up (do not shortcut yourself here-always shake the can for two solid minutes the first time), go outside and prime a few models quickly, and when the can starts to get cold bring it all back inside to warm up again before continuing. If it's flat out freezing out there, you're probably going to have to come up with another solution, like gesso. Fix fucked around with this message at 08:02 on Dec 14, 2010 |
|
#
?
Dec 14, 2010 07:59
|
|


|
I base first, and I live on the edge plenty..  Ever nod off while painting your 147th model in a row and smear metallic paint all over your 5-step layered base? That's harcore, man.  Actually, my fantasy elves will be based-last. I can't imagine doing static grass or flocking any other way.
|
|
#
?
Dec 14, 2010 08:10
|
|


|
Tadhg posted:Actually, my fantasy elves will be based-last. I can't imagine doing static grass or flocking any other way. Yeah, I normally put the sand down, prime the model, paint/drybrush the rim of the base/sand. Then I paint the model. Then I put down flock/grass at the very end.
|
|
#
?
Dec 14, 2010 09:39
|
|
|
It's probably just a matter of how I hold my models while painting, but I can't do it in that order. I know people stick their based models to an old paint pot or a cork to hang onto or whatever, but I use alligator clips on flying stands, which means I can't put models into the slotta bases after the sand is already down. I just really prefer how the models hold in this rig. Maybe I gotta build a new thing.
|
|
#
?
Dec 14, 2010 09:56
|
|
|
I've always painted my models glued to their bases. No other way makes sense to me. I just can't get the hang of it.
|
|
#
?
Dec 14, 2010 10:09
|
|
|
I've gotten into the habit of cutting off the bottom tabs on most slotted models and drilling holes for pins to insert into bases. 
|
|
#
?
Dec 14, 2010 10:12
|
|

|
Sole.Sushi posted:I've gotten into the habit of cutting off the bottom tabs on most slotted models and drilling holes for pins to insert into bases. No. That'd be awful.
|
|
#
?
Dec 14, 2010 10:14
|
|
|
Fix posted:No. Fix posted:magnets Fix posted:magnets Fix posted:drill drill drill Fix posted:more magnets  Sole.Sushi posted:I've gotten into the habit of cutting off the bottom tabs on most slotted models and drilling holes for pins to insert into bases. Seriously though, this is pretty much the best way to base metal models. A little tip, though: take your pliers and bend a piece of paperclip slightly longer than the width between the model's feet into a flat-bottomed U shape, and then glue it through holes drilled into the bottom of the base where the model's feet will go, prongs-up. Drill the feet, snip the excess paperclip material and glue your tiny pewter man to his new base. For added strength, use some epoxy on the bottom to hold the paperclip in place so that it doesn't wiggle loose or anything. Silhouette fucked around with this message at 10:41 on Dec 14, 2010 |
|
#
?
Dec 14, 2010 10:36
|
|


|
In fairness, I also think the larger magnet project was a total mistake and warn off anyone I hear of attempting the same thing, because goddamn. And the best way to base slotta models is slotta bases. It's solid and unless you're doing overheight bases, is just as simple. But what do I know? I chiseled slotta bases out of travertine for my magnet marines.
|
|
#
?
Dec 14, 2010 10:48
|
|
|
Oh hell no, your magnetized marines are loving killer.
|
|
#
?
Dec 14, 2010 10:49
|
|
|
You seriously wouldn't say that if you ever tried to move them around a game board. Arms falling off all over the place, backpacks flipping around. It's dumb as a gently caress.
|
|
#
?
Dec 14, 2010 10:51
|
|
|
Fix posted:Arms falling off all over the place, backpacks flipping around. [yakitysax.mp3]
|
|
#
?
Dec 14, 2010 14:26
|
|


|
Hell Diver posted:Pretty much what everyone else said. For the price, you should be getting something a lot more detailed and interesting than a big blob with a few ugly heads sticking out. I could see that thing running around $40-50 or something, but $85 is ridiculous.
|
|
#
?
Dec 14, 2010 15:10
|
|


|
Fix posted:Your order is pretty much correct, though some will tell you to paint your base first so you don't get basing paint (tends to be sloppy drybrushing) onto your painted model. Ah ha! Thanks. So do people just... not prime during the winter months? I guess I chose the wrong time of year to get into Warmachine, since its like 0 to 10 degrees outside. I wonder if the underground parking garage under my apartment is well ventilated enough... What exactly is Gesso? And are there any other solutions that I can follow? I guess Gesso is a mixture of paint and chalk which can also be used to prepare models, do I just hand paint it on I guess then? Seems like a pain in the rear end, but...
|
|
#
?
Dec 14, 2010 16:56
|
|
|
You can prime in winter. Just get the models ready, keep the can and models indoors. Step outside quick, prime, then bring it all inside asap. Or leave it in a garage or something while it dries. The cans temperature is the important part. Last year I did a huge amount of commission work over winter, and primed and varnished through sub 20 degree weather a lot.
|
|
#
?
Dec 14, 2010 17:02
|
|
|
Gesso is used as a base for tons of art stuff, its essentially a primer. You can get it from basically any art store, craft store, or places with a reasonable selection in that department. Generally its like a thick acrylic paint, but it contracts as it dries in a different way - basically, you can paint it on pretty liberally and once it dries it will shrink into the details and not mess up the whole miniature. This doesn't mean you should dip your figures in it or anything, though. The bad news is that it takes about 24 hours for gesso to really cure, and it can be quite fragile. I gesso prime pretty much everything, and I find that it will rub off the points of weapons/spikes of the edges of blades/etc with very little handling, so be careful. It generally comes in black, grey, and white. I use black, but a lot of people have complained about the coverage and quality of the white gesso. While black is move forgiving as a primer, you might consider using a grey gesso for Menoth with all the white involved. Edit: Also, regarding your order, I actually paint many miniatures in pieces and then assemble them once they're painted. This can be a pain, but I hate struggling to reach inside an arm or under a shield. Some people feel that if you can't get a paintbrush in there, no one will see it anyway, but I am insane and the knowledge the backs of my shields are unpainted gnaws at me when I lie in bed at night. Consider how the miniature goes together before deciding to do this, sometimes it doesn't really help at all. Ashcans fucked around with this message at 17:07 on Dec 14, 2010 |
|
#
?
Dec 14, 2010 17:05
|
|


|
So, there's something aesthetically off about marine backpacks to me, especially since I'm building hit and run mercs in stolen power armour. They seem too bulky and disproportionate to me. Anyone have any pics or suggestions for alternative packs?
|
|
#
?
Dec 14, 2010 18:08
|
|


|
PaintVagrant posted:You can prime in winter. Just get the models ready, keep the can and models indoors. Step outside quick, prime, then bring it all inside asap. Or leave it in a garage or something while it dries. The cans temperature is the important part. Alternatively, just prime in an enclosed space near an open flame--you'll stay warm, and you won't have to worry about a draft!
|
|
#
?
Dec 14, 2010 19:08
|
|
|
The Blue Pyramid posted:So, there's something aesthetically off about marine backpacks to me, especially since I'm building hit and run mercs in stolen power armour. They seem too bulky and disproportionate to me. Anyone have any pics or suggestions for alternative packs? You could cut the antenna off an IG Vox. Metal backpack much more in line with "mere mortals" gear than the power armor pack. Cadian on the left, Catachan on the right.  Click here for the full 1024x768 image.
|
|
#
?
Dec 14, 2010 19:20
|
|
|
The Blue Pyramid posted:So, there's something aesthetically off about marine backpacks to me, especially since I'm building hit and run mercs in stolen power armour. They seem too bulky and disproportionate to me. Anyone have any pics or suggestions for alternative packs? The backpack contains the power plant though!  If you want to stay with fluff (I.E. power plant on the back), maybe do it like marines from Starcraft? It's pretty much built into the back of the armor, just behind the shoulders. Otherwise, gently caress it and go for the Catachan backpack. Looks cool.
|
|
#
?
Dec 14, 2010 20:24
|
|
|
But if he went with the Cadian vox, he could get a cool "Ghostbusters" aesthetic going. And They Shall Not Be Afraid of No Ghost
|
|
#
?
Dec 14, 2010 20:48
|
|
|
Can I get some tips on putting a flat matte varnish on my figs to protect my precious paintjobs? 1) What is a good coating to use, how much will it run me, and where can I get it (my LGS doesnt carry any)? 2) Is there a specific technique for spraying akin to how you're supposed to spray on primer? Short blasts? From what distance? 3) Is there an amount of time after spraying I should let them sit? 4) Other critical information I seem to be missing?
|
|
#
?
Dec 14, 2010 20:50
|
|

|
Joebungaloe posted:Can I get some tips on putting a flat matte varnish on my figs to protect my precious paintjobs? 1) I exclusively use Testors matte varnish. It's kind of pricey, but completely worth it. You can pick it up at any model train or hobby shop (Hobbytown USA, etc.) or from the internet. 2) Short bursts in a sweeping motion work best. NEVER focus the spray on the model for any length of time, keep the can moving always. Do so from a distance, 8-12 inches away. 3) If you can, let them sit for about 30 minutes. If you plan on doing multiple layers, let them dry out for at least 1 hour before applying another layer. If at all possible, give each coat 24-36 hours to fully cure before putting on another layer, though it's no biggie if you don't. 4) if it fogs up on you, don't fret: get yourself some clear coat, spray over it, wait for it to dry, then re-matte. Remember, NEVER seal in humid conditions.
|
|
#
?
Dec 14, 2010 21:41
|
|
|
Here's some Imperial Fists I've been painting: 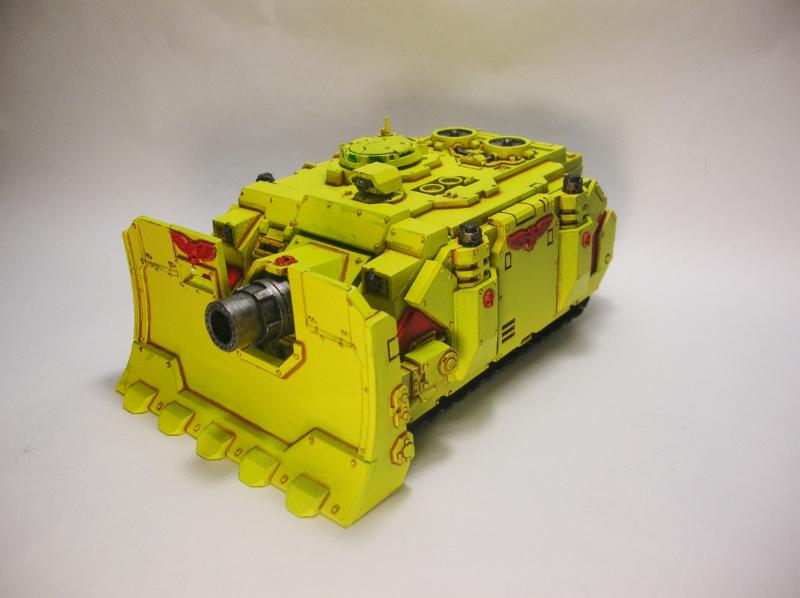 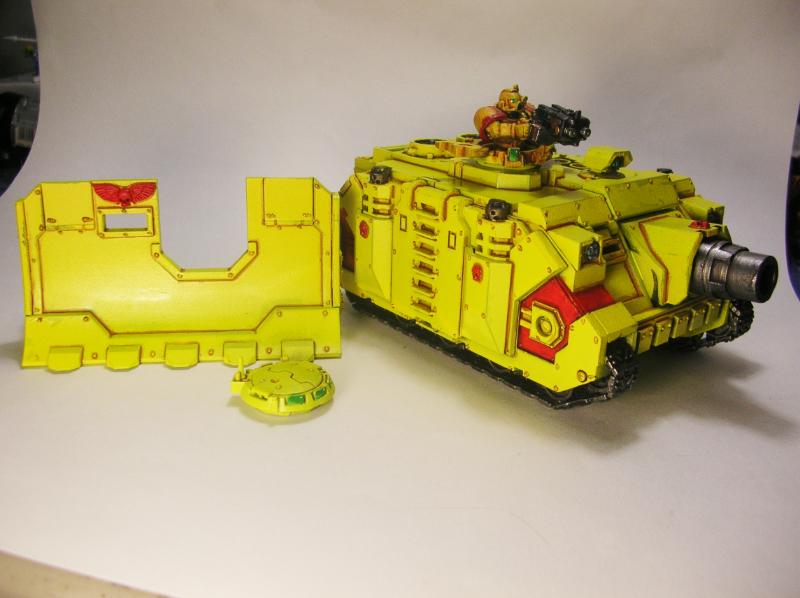 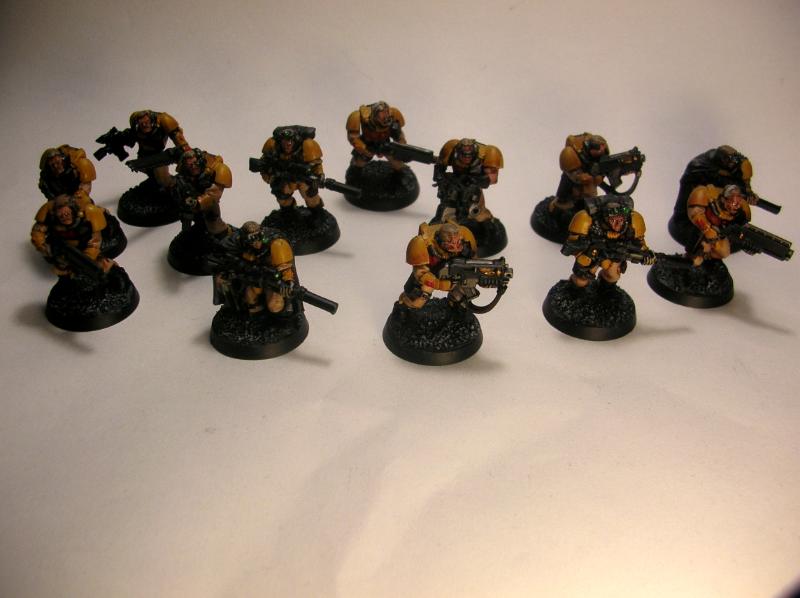 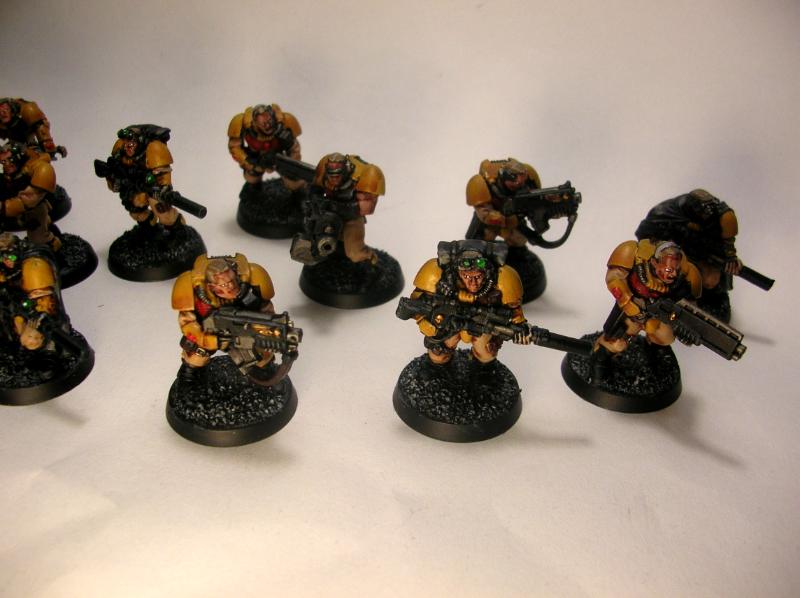 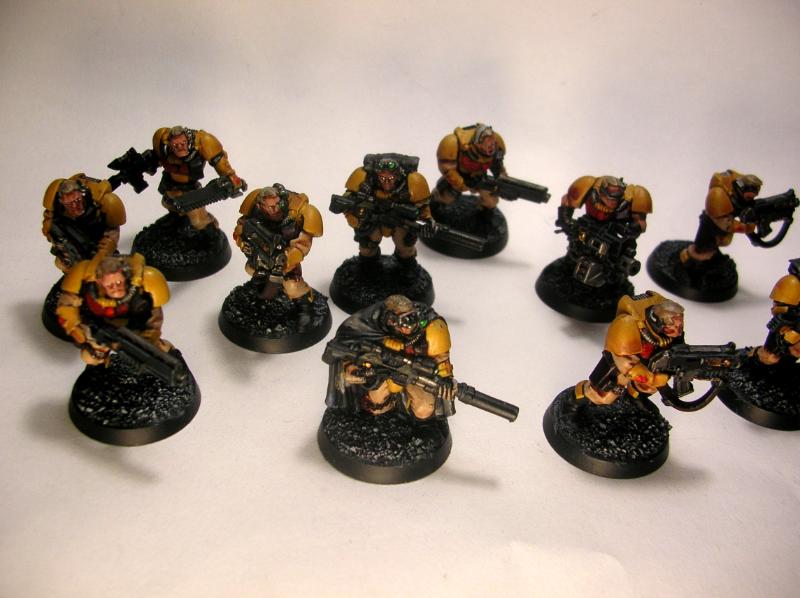 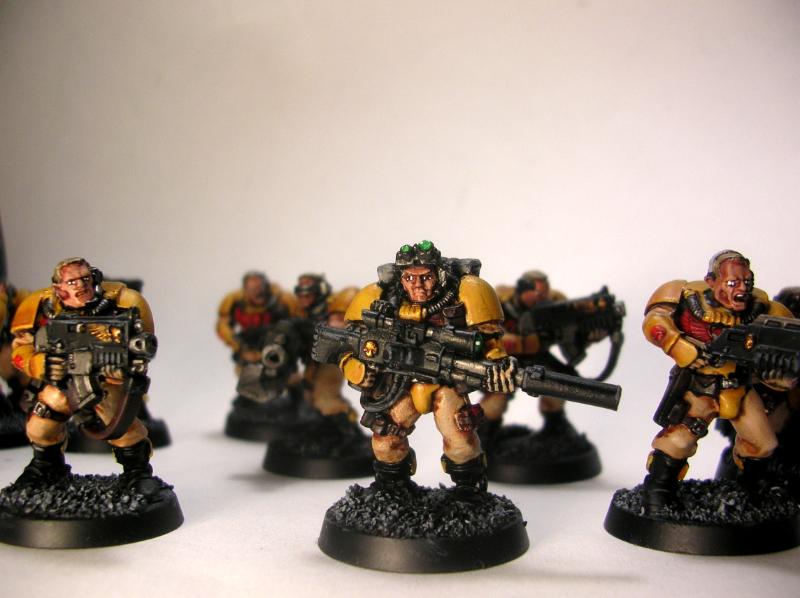 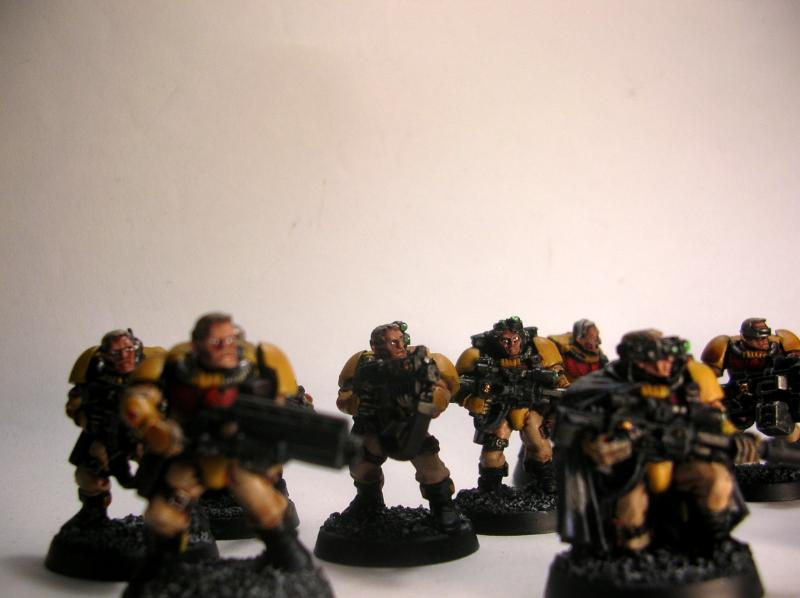 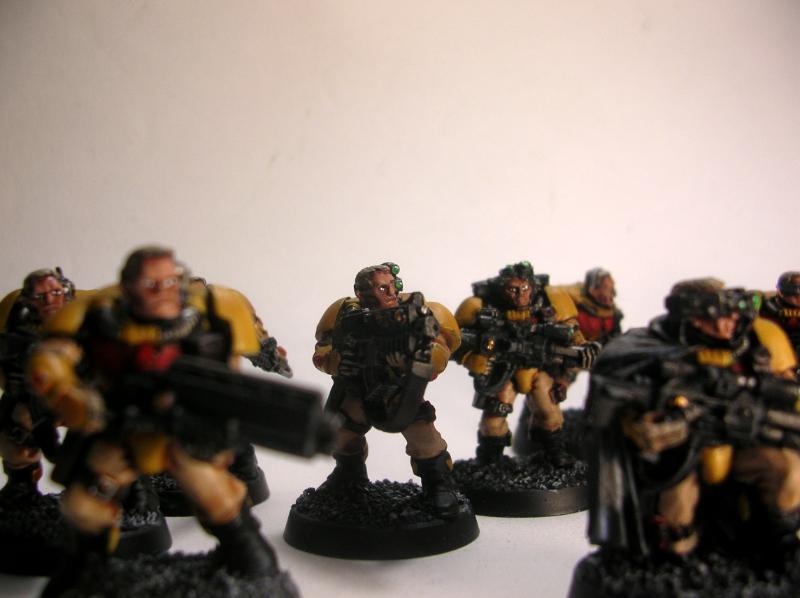 And here's the big yellow washing machine: 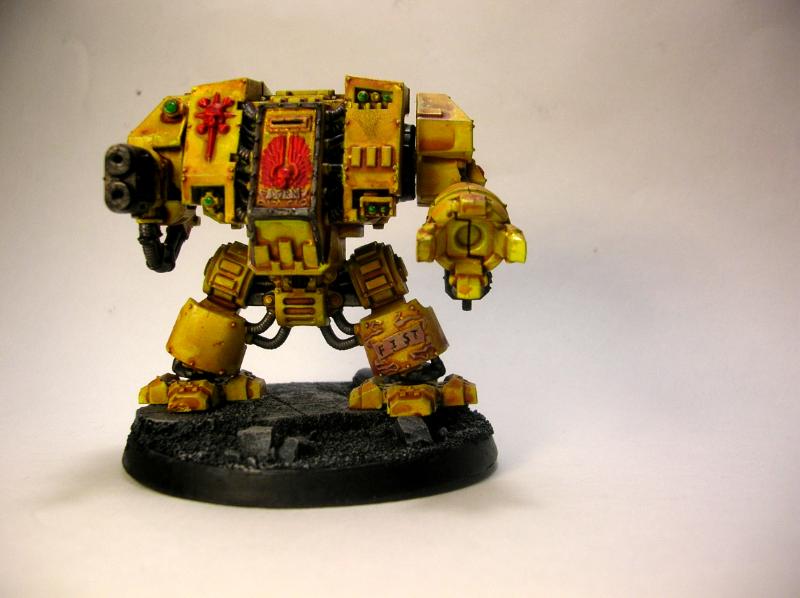 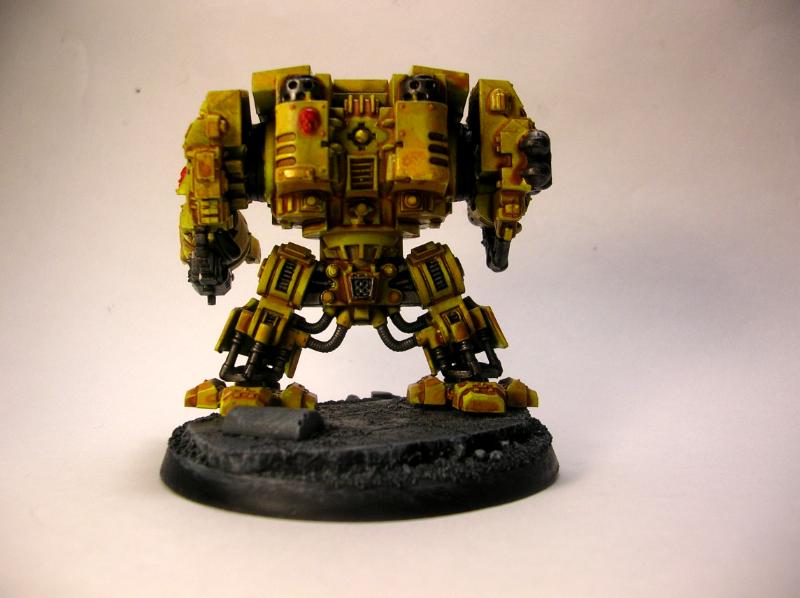 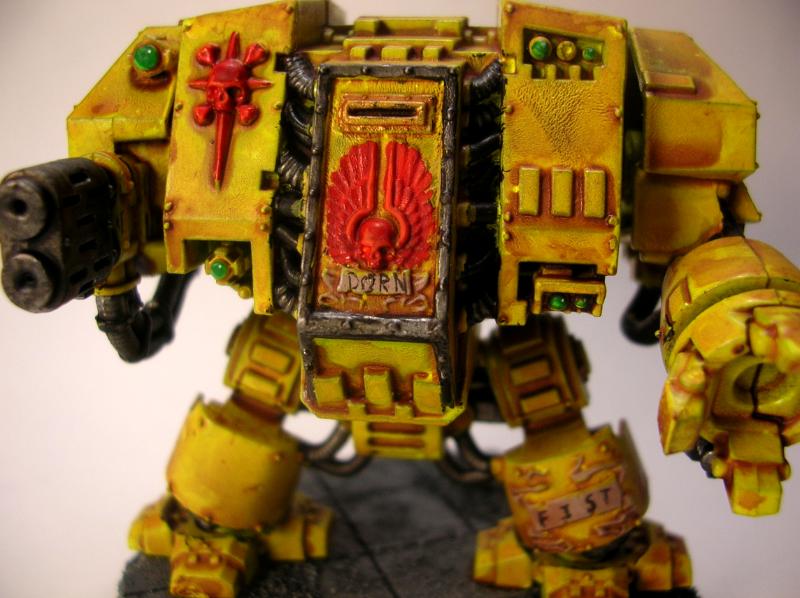 Next up: Bikers and characters!
|
|
#
?
Dec 14, 2010 22:38
|
|

|
Why is the tank luminous yellow and the marines a more orangey/yellow?
|
|
#
?
Dec 14, 2010 22:53
|
|

|
Woohoo! I'm gonna go to a two-day masterclass seminar taught by this guy. I hope lesson one is "stop being so goddamn stupid with your project choices."
|
|
#
?
Dec 14, 2010 22:58
|
|
|
SRM posted:Here's some Imperial Fists I've been painting: How many points does a pintle storm bolter cost for a paint pot?
|
|
#
?
Dec 15, 2010 00:09
|
|

|
Fix posted:Woohoo! I'm gonna go to a two-day masterclass seminar taught by this guy. I hope lesson one is "stop being so goddamn stupid with your project choices." My wife and I took his 4 hour class at Gen Con this year and had a blast. He is a very nice guy and taught alot in only a 4 hour class. edit: he was actually working on this while we painted http://www.akaranseth.com/blog/gallery/fantasy/boelg.htm Also the Gen Con class was his master class I cramed into 4 hours to get an idea of how crazy it was. Backno fucked around with this message at 00:35 on Dec 15, 2010 |
|
#
?
Dec 15, 2010 00:25
|
|

|
 Click here for the full 800x598 image. Is it just me, or do those scouts look a little bit like they're just wearing Speedo's?
|
|
#
?
Dec 15, 2010 00:32
|
|
|
Calico Noose posted:
The cod piece is the first section of the power armor that an initiate receives.
|
|
#
?
Dec 15, 2010 00:51
|
|

|
Calico Noose posted:
I never realized how ridiculous the crotch armor was on these guys until I painted this squad. It's almost as bad as the time I mixed up the backpacks and codpieces on the old Starship Troopers plastics and ended up building "The Cod Squad"
|
|
#
?
Dec 15, 2010 01:45
|
|
|
Sole.Sushi posted:1) I exclusively use Testors matte varnish. It's kind of pricey, but completely worth it. You can pick it up at any model train or hobby shop (Hobbytown USA, etc.) or from the internet. I want absolutely no shine on my models, however, I understand that putting on a glosscoat or two before putting down Testors Dullcote (is this what you're talking about when you say their matte varnish?) will help protect my minis better. Should I risk glosscoats before putting down a flat matte? Is dullcote and the matte varnish you are mentioning the same product, because I can't find the matte varnish on the testors website easily. Edit - Also, because my LGS doesn't carry any varnish, is the warstore the best deal online to get it?
|
|
#
?
Dec 15, 2010 01:56
|
|
|
Anyone know where the cheapest place for bases is? I'm making card stand ups for bloodbowl and I used up all my spares in a hurry. GF9 has econo bases but they want $10 for shipping. But I guess 25$ for 250 bases is about as cheap as it gets. Is there any easy way to crank out a couple hundred that doesn't require a drill press?
|
|
#
?
Dec 15, 2010 03:20
|
|

|
Consider me a Gesso convert. I just based 9 Kabalite Warriors, 4 Wolf Guard termies, and a Raider last night. Took a little while but it really gives a nice flat matte coverage just like if I sprayed-based them. The biggest problem was the Raider, trying to get down into the grating and back on the engines is a pain in the rear end. I also snapped a few of the spears trying to pull the sail section out because I'm an idiot and forgot to remove them first. Thankfully they were the plain ones and not the cool spears with all the skulls on them. Also gessoing anything that's not on a base is pretty bad. I don't really have anything to mount the crew/hangers-on with, so I just ended up with solid black finger tips. E: After looking at that master class guy's webpage I found this. That's it. That's the internet summed up in a single model. Hell Diver fucked around with this message at 04:37 on Dec 15, 2010 |
|
#
?
Dec 15, 2010 03:53
|
|
|
Can't believe I'm saying this, but I'm actually out of purity seals. Anyone have any they'd be willing to send my way? Have plenty of bits for trade.
|
|
#
?
Dec 15, 2010 05:51
|
|

|

|
| # ? Jun 6, 2024 21:30 |
|
|
Backno posted:My wife and I took his 4 hour class at Gen Con this year and had a blast. He is a very nice guy and taught alot in only a 4 hour class. Do you feel like what you learned was genuinely helpful to your painting? I'm wondering if it's the sort of stuff that you only really use when you're painting display models, or if there's any general rule techniques that can be useful for regular army painting.
|
|
#
?
Dec 15, 2010 07:52
|
|