


|
The Scientist posted:Also, dv6, lookin' good, that's a hell of a setup. Do you think you'd be able to make any of that money back with such a nice rig at home? Edit: In the new year, I'll be getting a business license and the whole 9 yards. AbsentMindedWelder fucked around with this message at 06:49 on Dec 15, 2010 |
 #
?
Dec 15, 2010 06:43
#
?
Dec 15, 2010 06:43
|
|


|

|
| # ? May 25, 2024 10:20 |
|
|
Steel will burn before it gets too hot to quench, especially since the "burn" temp decreases as the carbon content increases. Cracking is really more a function of brittleness, and the geometry of the piece. Uneven cooling when quenching can cause stresses in the metal that can result in cracking, this can be caused my quenching too fast as well. Which is why you might use oil, which is slower than water. Smaller pieces are easier to quench. There are also exotic steels that cannot be water quenched and must be oil, or or even air quenched.
|
|
#
?
Dec 15, 2010 07:10
|
|
|
Right, what I've read recently is that the very nature of HSS that makes it good for tools is that it holds its hardness at much higher temperatures - which I guess is also a property that changes the quenching characteristics. Let me see if I remember this right; because it holds its temper at higher temperatures, it also takes a higher quenching temperature in order to reach that phase change point. That's correct, isn't it? This article is where I first got the notion that you could be able to predict not only the temperature at which it is optimal to bring the metal to just before quenching in order to get that desired phase change, but also that you could predict at what temperatures and/or in what quenching mediums a piece is likely to warp and/or crack. http://www.dfoggknives.com/waterhardening.htm Also, are these properties that we're discussing the reason that you use tungsten in a TIG electrode, and use "cyro-forged" (I think that might just be a trademarked marketing term) cobalt drill bits? Like maybe the tungsten maintains its hardness at incredible temperatures, and the same with the cobalt bits? I guess tungsten is incredibly hard, too. I wonder why we don't use that in drill bits and tools.
|
|
#
?
Dec 15, 2010 09:01
|
|

|
Cryoforged is absolutely a marketing term. Its a portmanteau of two completely seperate processes one of which quite uncommon to drill bit manufacture the other completely unrelated. (Cryogenics and forging respectively) Your cobalt questions are addressed here: http://en.wikipedia.org/wiki/High_speed_steel I believe you select what medium to quench your tool in based on what tool steel alloy youre using. E.G. O1 tool steel is oil, A2 is air, etc. When using steel that follows SAE designations (e.g. 1020) I am not sure though. HSS is called that because you could run it at higher speeds (RPM wise) than the carbon steel drill bits that were used previous and which are almost nonexistant today. Today's high speed steel would be cobalt drill bits (M42) which can be run at higher speeds than HSS bits can. Cutting velocity directly affect heat even if the same volume of chips are being removed. (It'll be a hell of a lot higher for a thinner chip [slower feed] and higher RPM actually) If you're interested in understanding forces at the cutting tool and how changes affect them (a very useful concept in machining) check out the book Fundamentals of Tool Design on Google Books. there is a chapter dealing with this and includes some very very important info on things like nose radius, rake angle, resultant cutting force vectors and the reason behind the + change in velocity = + change in heat thing I just mentioned. I read it on google books for a paper I wrote and ended up buying the older edition. Very good purchase at $20: http://www.amazon.com/Fundamentals-Design-Society-Manufacturing-Engineers/dp/0872634906 AnomalousBoners fucked around with this message at 09:41 on Dec 15, 2010 |
|
#
?
Dec 15, 2010 09:32
|
|
|
The Scientist posted:Right, what I've read recently is that the very nature of HSS that makes it good for tools is that it holds its hardness at much higher temperatures - which I guess is also a property that changes the quenching characteristics. What makes tool steel good for tools is that it is harder than mild steel. Various exotic alloys can be even harder yet. Hardness means it will resist abrasion, deformation, etc. when struck or scraped or ground against another hard object. Hardness in carbon steel is achieved by heating it until it forms austenite, and then quenching it to 'lock in' that austenite as what is essentially an unstable and unnatural molecular arrangement in the steel. Tempering, then, is a process by which you bring the steel up to a temperature at which it will lose some of its hardness, in a very controlled way. The reason you do this is because, when it comes to hardened carbon steel, hardness and brittleness go hand in hand. Freshly quenched carbon steel is known as being "glass hard"; it is at its hardest, but also brittlest, and thus very prone to breaking or shattering - because it is incapable of even the slightest flexing without breaking. So tempering brings down the hardness a little, in exchange for a little toughness, which is the opposite of brittleness. There is another frequently-used heat treatment, called annealing. To anneal carbon steel, you bring it up to that non-magnetic temperature (just like if you were going to quench it), but then put it in an insulated environment where it will cool down very, very, gradually. Typically sticking it in a box full of sand or pearlite or something works pretty well. This is the exact opposite of quenching in that it allows the steel to gradually cool, all of that austenite to go back to being ordinary pearlite and ferrite, and a new crystalline structure can grow within the current shape of the metal, relieving any stresses that have been created from forging. Typically if a blacksmith is going to work on some carbon steel, he anneals it before doing anything else, to relieve stresses set up from the original creation of the metal or (especially) whatever thing was made of the metal before it was grabbed by the blacksmith for repurposing. quote:Let me see if I remember this right; because it holds its temper at higher temperatures, it also takes a higher quenching temperature in order to reach that phase change point. That's correct, isn't it? Eh... I'm not sure that's quite right, at least for ordinary carbon steels. Any hardened and then tempered carbon steel object is in danger of losing temper beginning at 410 degrees F. Maybe more exotic alloys resist tempering until higher temperatures, in which case that might be true for them? The key thing though is that the temperature at which you quench is much higher than the temperature used to temper. If you bring steel up to that quenching temperature, it has, by definition, lost all of its hardness; it's essentially in a state where atoms can freely migrate through the body of the metal. Tempering (again, for normal carbon steel) is done at temperatures lower than the austenite phase, but hotter than 410 degrees. The exact temperature in a given area of the metal determines the ratio between hardness|brittleness and toughness|ductility. quote:This article is where I first got the notion that you could be able to predict not only the temperature at which it is optimal to bring the metal to just before quenching in order to get that desired phase change, but also that you could predict at what temperatures and/or in what quenching mediums a piece is likely to warp and/or crack. That guy is, at the beginning, discussing a fairly advanced knifemaking technique in which clay is applied to parts of the edges of the metal, after a hardening quench but before tempering. The clay acts as an insulator, allowing the area it covers to cool much more slowly than the area it doesn't cover. In this way, you can leave the very edge of the blade bare; heat to a tempering temperature, and then quench; the blade quenches good and hard, but the spine of the knife cools more slowly, essentially tempering much further into the range of not-brittle-but-quite-tough. Doing this without the clay, you get less of a hard transition between the two, because the whole surface of the blade will cool at about the same rate when you do the secondary quench. You can play with using a point-source of heat (say, a torch) to just heat the blade from the back, allowing the warmth to spread through the metal but then quenching just before it gets to the edge, but it's harder and with some pieces can be impossible. The clay technique can even be used to put a pretty rippling effect into the surface. He goes on to talk about problems with cracking, and he does mention 'high temps' as a source of the problem. I think the actual issue is that when forging metal, you introduce stresses, which you can then relieve with annealing. If you don't anneal, or anneal imperfectly, those stresses remain, and then when you go to quench or temper, the steel can warp as it tries to relieve those stresses. There may also be score-marks from filing or hammering, hard edges, sharp corners, etc. and these are places where hardened steel (made brittle from hardening) differentially cools and the surface cracks because it it shrinking faster than the inside. In other words, cooling the surface of a thick piece too quickly can cause problems; I've never seen this when quenching blades in oil, though. But he's also using words like "shock" that I think are inappropriate (or at least, potentially misleading). I have cracked a thick piece of carbon steel while working it, but always during forging, and always because I kept banging on it after it was too cool to keep working. You can learn bad habits working with mild steel, because it is much more forgiving of being hammered on while black. Carbon steels can 'case harden', that is, the surface can harden just from being hammered and worked, and they are much less tolerant of being worked too cool. A thick piece will cool more on the outside than the inside while forging, too, and the anvil will suck heat out of the piece like the enormous metal heat sink it is. So when working carbon steel, there are rules of thumb about what color to stop hitting the thing and get it back into the fire. quote:Also, are these properties that we're discussing the reason that you use tungsten in a TIG electrode I believe tungsten is used in a TIG electrode because tungsten is a metal that has an extremely high melting temperature. This is also why it's used as the filament in incandescent light bulbs. I don't think it has anything at all to do with carbon steel and/or metal hardening. Tungsten is a metal element sometimes used in steel alloys, but that's a different subject. Then again I am just guessing that that's why it's used in TIG, I don't know much about welding. quote:I guess tungsten is incredibly hard, too. I wonder why we don't use that in drill bits and tools. No, not really. As the article says, pure tungsten is pretty soft and can be cut with a hacksaw, while slightly impure tungsten is extremely brittle. Tungsten Carbide, however, is commonly used to make very very hard and tough and durable drill bits.
|
|
#
?
Dec 15, 2010 10:05
|
|

|
The Scientist posted:... I guess tungsten is incredibly hard, too. I wonder why we don't use that in drill bits and tools. As someone said, they do--tungsten carbide. You can get all kinds of lathe, drill and mill bits made from it. It is much harder and stiffer than either HSS or cobalt steel--you can use a tungsten carbide bit to drill a 1/4" hole cross-ways through a 1/2" cobalt drill bit, and the tungsten carbide bit will still look unused. It is not a cure for everything though. ...it is also more brittle than HSS or cobalt steels, and so carbide drills aren't usually ever used in hand drills, as they will break too easily from being bent. And even in a manual drill press or mill, you can also break them or chip the cutting edges by cross-drilling another hole. ...it stays sharper longer, but when it goes dull the only way to resharpen it is to use a diamond grinder. Aluminum oxide/silicon carbide will not scratch it. ...also tungsten carbide costs a LOT more. For a 1/4-inch drill bit--one made from HSS might cost $1.50, one made from cobalt might cost $3, one made from tungsten carbide will cost up around $30. The only places you can probably buy carbide drills is machinist-supply places. ------ FWIW, many hobby-machinists only ever use HSS tool bits and don't have problems with them. ~
|
|
#
?
Dec 16, 2010 21:09
|
|
|
You only use HSS in hobby milling/drilling because carbide is prone to cracking especially when the surface speed is too low and and the max RPM on manual machines are almost always too low for carbide cutters under 1" diameter.
|
|
#
?
Dec 16, 2010 21:56
|
|
|
Solid carbide tooling also has lovely heat properties and really need through cooling to be of any use. For the majority of application you will be using HSS. the only carbide things you should ever really deal with in hobby work is inserts for lathes if it's like +8' with a chuck capable of holding 10" parts, or inserts for a small fly cutter. For example at work I run a 1.25" fly cutter with 3 inserts at 1300-1500 rpm on Bridgeport milling machines, cobalt steel inserts do pretty good, but the carbide ones loving last forever if you're under 35 Rockwell.
|
|
#
?
Dec 16, 2010 22:26
|
|

|
How Young Leperflesh First Heard of Tungsten Carbide Drills: https://www.youtube.com/watch?v=rQDeU6dHX-c Leperflesh fucked around with this message at 22:48 on Dec 16, 2010 |
|
#
?
Dec 16, 2010 22:45
|
|
|
He pronounced "scarring", "scaring". Is that normal in england?
|
|
#
?
Dec 17, 2010 01:54
|
|
|
Random Number posted:Oh My God... Can you zip those all into one file for desktop background goodness? Only a week and a loving half late! Here are all the images, finally. http://www.megaupload.com/?d=0E4XIR0A
|
|
#
?
Dec 17, 2010 08:19
|
|


|
Slung Blade posted:Only a week and a loving half late!
|
|
#
?
Dec 17, 2010 13:04
|
|
|
Couple of real interesting episodes of PBS's "The Woodright's Shop": Cool filing and cold-smithing techniques from the old days: http://www.pbs.org/woodwrightsshop/video/2800/2806.html Reconstructing a Viking woodworker and copper smith's tool chest, including all the tools, that was found inside a boat preserved in a bog for a thousand years: http://www.pbs.org/woodwrightsshop/video/2800/2812.html This one isn't strictly about blacksmithing/metalwork but its an amazing walk-through of an old steam powered saw mill: http://www.pbs.org/woodwrightsshop/video/2900/2907.html I could watch blacksmithing/metalworking videos all day, so if anyone else has any good ones, please post 'em up.
|
|
#
?
Dec 18, 2010 02:25
|
|
|
I think someone (maybe me, I can't remember) posted this a long time ago. It's a pretty good video. https://www.youtube.com/watch?v=62iHEaE8uzI They've got a really neat way of using an electro-hydraulic log splitter as a little press for forge welding. It's a little janky, but it does the job pretty well, it would seem. Their channel has some neat other stuff too.
|
|
#
?
Dec 18, 2010 07:40
|
|
|
These woodwright videos are fascinating, but god drat this guy is a total spaz.
|
|
#
?
Dec 18, 2010 08:36
|
|
|
Slung Blade posted:https://www.youtube.com/watch?v=62iHEaE8uzI  'Cause I'm curious: What happens to the wire they used to bind the steel billets? It looks like you'd need it until you began welding 'em together. How long would this entire process take, from beginning to end (aside from cosmetic poo poo like the fancy grip)? How much time does the log-splitter deal shave off?
|
|
#
?
Dec 18, 2010 15:17
|
|

|
Ambrose Burnside posted:
The wire usually just gets sloughed off after you weld the billets. Hit it a couple time, make it thinner, and they can just slip off the end if you're careful. If you hit the wire into the billet my mistake, usually it doesn't weld very well since there's oxide on it from the manufacturer. No one fluxes the wire to clean it, so it won't join. It might get stuck in the billet though, which would be pretty ugly. How long would the sword take? Hard to say. Couple days maybe? The kid doesn't have the best hammer technique (I don't mean to put him down, he's better than I am). He did have it forged pretty drat close to the final shape, see how after he had the basic shape, he held the hammer at an angle and made the taper at the edge? Because of the decent forge shaping, the grinding wouldn't have taken too long with a good belt grinder like he had. The log splitter press wouldn't have saved too much time I don't think, I mean, I would use that as an assist in the welding like they did. It gives a nice predictable amount of pressure to join the bars together. It can be hard to do that consistently with a hammer. The thinning process looks like it would take a long time with that press, I don't see a lot of movement in the metal when he's using it. Though it works pretty well for a relatively low pressure press. I'd use it if I had to. I think that handle would take the longest, but I don't know much about wood carving. Looks pretty intricate.
|
|
#
?
Dec 18, 2010 18:39
|
|
|
Leperflesh posted:I believe tungsten is used in a TIG electrode because tungsten is a metal that has an extremely high melting temperature. This is also why it's used as the filament in incandescent light bulbs. I don't think it has anything at all to do with carbon steel and/or metal hardening. Tungsten is a metal element sometimes used in steel alloys, but that's a different subject. That's how it was explained to me. Tungsten is a fairly brittle metal in it's pure state, which is why most tungsten electrodes are alloyed with another material (2% thorium used to be big, but then they changed to cerated (cesium?) electrodes). Apparently with a pure electrode (I keep wanting to call it a Tungsten. drat my class) and when working with steel, tungsten would flake off into the weld, so they added thorium to stop that. Too bad thorium was radioactive, but who cares? It welds good! THEN some namby-pamby people started to say "These welders are getting cancer!" which the reply was "But it WELDS GOOD! Look at manganese! That caused problems, but drat it, IT'S A GOOD MATERIAL!" "BUT... RADIOACTIVE!" "PFT! FINE! Be that way. We'll figure something out, BUT WE DON'T HAVE TO LIKE IT!" And since most industry buys electrodes by the ton, it will be many years before they switch to something different.
|
|
#
?
Dec 18, 2010 20:57
|
|

|
Ambrose Burnside posted:
I'll add to what Slung Blade said. I've actually (tried to) forge a sword-length blade from stock before, and on a different project, I've forge-welded two different kinds of steel together (to make an axe blade). The press doesn't reduce time by a huge amount, but it does allow you to do more work with fewer heats than doing it by hand. And that's good because every heat means scale and lost metal. When I was making a blade, I used a 100lb power-hammer (a pretty ancient trip hammer powered by a modern electric motor, in fact) and it was very difficult to get even strikes; put two heavy strikes on top of each other and you suddenly have a huge dent in the metal that is all but impossible to fix. So that squeezing thing probably gave him a lot more control over pressure applied which I would think makes it easier to be even and consistent. With hammering you'd have even more fine control but when working with carbon steels (I assume at least one of the metals he is welding is carbon steel), and also with forge welding, you absolutely must do your work while the metal is very hot. Once you're into the reds you start getting into the risky area and by a dark red you must stop striking the metal. So (at least for me) it'd take twice as many heats to get the same amount of work done, even if I was doing it more evenly. With an assistant, though; that'd be different. Then you could use a flatter and your assistant can strike with a sledge. That means basically a top tool - it has a handle and looks a bit like a hammer, but it's purpose is to go on top of the metal and be hit by a hammer. If you can do this three-to-four-handed task, you can move just as much metal as with that press, and do it quickly, and probably with more precision. The truth, though, is this: there are numerous techniques that can be effective and the smith should do whatever process he is comfortable with. There isn't really a universal "best way". ...as a novice, going slowly and making mistakes and needing supervision, I made a forge-welded axe blade, largely unfinished and without a handle, in about 8 hours. It is ugly as poo poo and the weld isn't fully closed in a couple places and so it wasn't worth finishing, but doing it again properly wouldn't have taken much more or less time than that. I'd guess when you throw in the pattern welding process, the longer blade, etching, making the crosspiece and pommel, etc. you're looking at a minimum of two or three full days of work. I'd expect a piece like that one to cost a minimum of $1000. Leperflesh fucked around with this message at 21:22 on Dec 18, 2010 |
|
#
?
Dec 18, 2010 21:20
|
|
|
Is there some really good reason I'm not aware of that smiths never use an oxy torch to keep a piece that's been brought up to temp. in a forge, bright yellow or whatever temperature needed, hot? To maybe like just double the time you have to work each heat? I'm thinking that as long as you get it evenly heated in the forge, and turn down the oxygen on the torch so you don't promote oxidation and/or catch the piece on fire keeping a billet at least semi-evenly heated wouldn't be a problem, or would it?
|
|
#
?
Dec 19, 2010 00:18
|
|
|
Been a while since I built anything, but I used to make custom computer cases for my own systems. Preferred medium was sheet aluminum, or found objects I could modify. No welding, but a lot of work with a brake, dremel, files, and a hand nibbler. A few examples, all pics link to more.   The two above were built from old aluminum breadboxes for the curved sections with the rest of the frame being custom built.  The one above was made from left over material from the first one posted. A year or so ago I was playing with a Hackintosh and wanted something appropriate to run OSX. Built the one on the left below.  Quite a few people didn't get what I was doing. Guess I overestimated how many people new of the Mac Pro or G5 tower systems. I still have the WHS box running. The others are all on a shelf with my other projects. Too slow or underfatured to use anymore, but I'm not going to get rid of them. What sucks now is I don't have any good ideas, but I have material and parts for quite a few new systems. I'm also in an apartment, so I'm without a good workspace and all my good tools are in storage.
|
|
#
?
Dec 19, 2010 04:02
|
|
|
This is crossposted from the TFR knife thread. This is the first knife I have attempted to make and go through the whole process from a steel blank. I ordered a section of ground flat O-1 steel and profiled these two blank with a bench grinder, belt sander and files. When I was drilling the holes in the handle of the larger blade I was cramming the bit through and it got too hot so I sprayed some oil on it.  Essentially quenching an oil hardening steel. I almost never got through that one hole. Essentially quenching an oil hardening steel. I almost never got through that one hole.  Click here for the full 1152x864 image. I had intended on using G10 for the handles, but I accidently drilled too large of a hole in the set of scales I had and got impatient waiting on the new ones, so I made these wood grips for it.  Click here for the full 480x640 image. Right now all I have left to do is hardening and tempering. This will be my first time going this far with a blade. My dad has a pile of firebrick behind our shed, I think we are going to rig up some sort of hobo forge to bring this blade up to heat for hardening. 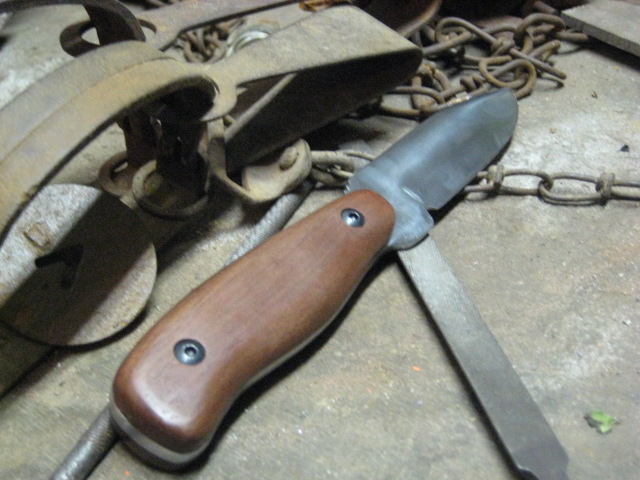 Click here for the full 640x480 image. I tried doing the jimping on this blade with a triangle file. It would have been ok, but I didn't get the spacing equal on all of them. On the larger blade I used an 1/8" endmill and made them on the Bridgeport at work. I had a blast making these things. I'm trying to justify buying a belt sander right now so I can make more of them. 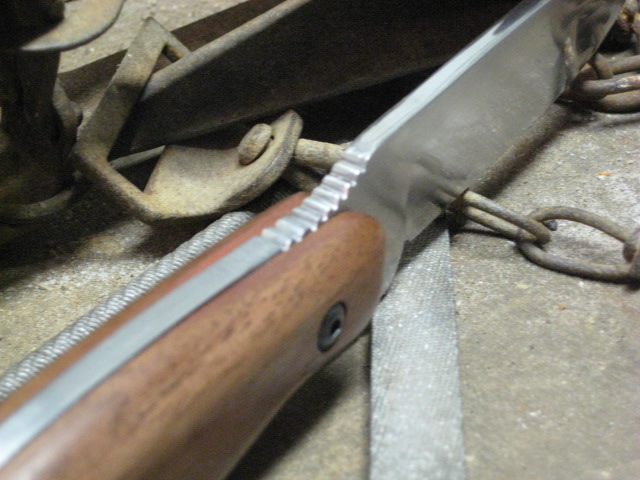 Click here for the full 640x480 image.
|
|
#
?
Dec 19, 2010 04:18
|
|

|
What's so bad about spraying oil in the holes for drilling? Its what I would have done. They probably got pretty hot on the grinder and belt sander too. Have you thought about tempering them? I guess the most common procedure is to get them up to a bright orange, quench 'em in oil, then get them to a semi-dull red, then quench 'em again. Them second normalization imparts just a bit of flexibility in the metal to discourage chips from shearing off. Anybody please correct me if I'm wrong. I'm not even 100% sure you would need to temper tool steel anyway. Plus you got the handles on 'em already so I don't know how feasible it is. They do look very nice. Kudos. What's the protocol for honing a knife on leather? Is that like only for straight razors? 
|
|
#
?
Dec 19, 2010 07:59
|
|
|
waffleking posted:Right now all I have left to do is hardening and tempering. This will be my first time going this far with a blade. My dad has a pile of firebrick behind our shed, I think we are going to rig up some sort of hobo forge to bring this blade up to heat for hardening. Oh, duh didn't even read this part.
|
|
#
?
Dec 19, 2010 07:59
|
|
|
The Scientist posted:What's so bad about spraying oil in the holes for drilling? Its what I would have done. Technically I'd be pretty surprised if he got it hot enough for quenching to do anything. It'd have to be well into the glowing-red-hot zone. That said, the other problem with getting too hot is you start to temper your drill bit - and tempering happens at much lower temperatures (450 degrees F and up, roughly). So while I doubt the knife handle was getting harder, he could easily have been removing the hardness of the drill bit. quote:They probably got pretty hot on the grinder and belt sander too. Have you thought about tempering them? You're confused. That would be tempering them. Remember: bring to glowing red hot & quench = hardening. Bring up to 450F or higher (up to no more than maybe 1100 or so) and quench = tempering. Bring up to glowing red hot and don't quench: annealing. (unless it's an "air quenching" alloy) quote:I guess the most common procedure is to get them up to a bright orange, quench 'em in oil, That'd be a hardening procedure, taking them to "glass hard" = super hard and super brittle: quote:then get them to a semi-dull red, ...completely removing the hardening you just did, and going way higher than any tempering temperature. (If at this stage what you are really trying to do is normalizing, you'd probably do it before hardening, not after.) quote:then quench 'em again. So, another hardening cycle. From a "dull red" you might not be in full austenite phase but since all you did before was harden, I don't see how doing it again at a lower temperature would do much. I suppose it'd be less hard if you didn't go all the way to austenite phase, but not by much? quote:Them second normalization imparts just a bit of flexibility in the metal to discourage chips from shearing off. Ah I see what you're going for, maybe. If by normalizing you mean annealing, you do that by bringing up to temp and then allowing to cool slowly (not quenching). But that obviously is the opposite of tempering. Here's what I think you'd want to do: 1. Normalize. Bring to a nice dull red or hotter, then stick in a box of vermiculite and allow to cool for an hour or four. 2. Harden to glass-hard 3. temper, carefully, using directed heat or an oven. Look at the colors on teh surface as your guide. The instant the color gets to the softness you want to get to (hotter = softer) you quench again. Leperflesh fucked around with this message at 08:31 on Dec 19, 2010 |
|
#
?
Dec 19, 2010 08:28
|
|
|
I'm not sure what it was when I was drilling the hole, because after the first drill bit got dull and I tried sharpening it, I switched to a brand new drill bit and had the same issues. It could have just became work hardened. When I was profiling them on the sander I continuously kept dipping them in water to keep them from getting very hot. Also I do plan on removing the handles before I do any heat treating. Do I have to normalize the steel even if I haven't forged the blank? I have watched some videos on this and kinda get conflicting views on when you have to and when you don't.
|
|
#
?
Dec 19, 2010 12:31
|
|
|
widefault posted:That baby G5 is awesome and you deserve some kind of award for it.
|
|
#
?
Dec 19, 2010 12:54
|
|

|
waffleking posted:I'm not sure what it was when I was drilling the hole, because after the first drill bit got dull and I tried sharpening it, I switched to a brand new drill bit and had the same issues. It could have just became work hardened. When I was profiling them on the sander I continuously kept dipping them in water to keep them from getting very hot. Well, you were drilling into tool steel. One of the things I've noticed when I've been getting my drill bits prematurely dull is that I've had the speed WAY too high - if you're drilling in and you're using a hand drill and your finger has the trigger all the way in, your speed is WAY to high. If the bit is going that fast the bit usually isn't even making any dust anymore, let alone nice clean chips. So that, like Leper Flesh said, is not only getting the tip of your nice, precision, expensive metal-drilling bit so goddamned red hot that the extremes of temperature, friction, and wear are basically ruining the bit while not really accomplishing anything anyway. I was amazed at how much better it works just to slow it down - like to speeds that are at first seemingly counter-intuitive. Plus I'm always using something as coolant to keep everything cool and also aiding the chip getting the gently caress out of the way - up and out of the hole. THEN I found that I had my FEED way off, at times I would bearing down on the back of the hand drill with a huge amount of my weight, while I was already going way to fast anyway. Putting on moderate, but you know not a HUGE amount, of pressure while drilling at the right speed was working wonders. If the color of the metal surrounding the hole changes at all, and this could be discoloration, not like glowing red hot heat, something is wrong. I learned all of this thanks to the Gentlemen and Lady(ies) in this thread. And also good idea about the quenching in water periodically while doing heavy work, that's what I do as well. Also, leper flesh, you're alright. If I lived anywhere near the People's Republic of Canada (I'm joshing) I'd bring you a muffin and a cup of starbuck's. And I agree that widefault did some truly badass stuff there.
|
|
#
?
Dec 19, 2010 15:15
|
|
|
widefault - Those computer cases are awesome. I've always wanted to make my own. We have had very little interesting info about sheet metal work posted, so consider this your invitation to make a post about some of the details regarding construction and your equipment. waffleking - Great work on the knife, and good luck on the heat treat. Keep it up! Edit: My first customer picked up his order today... a custom antenna mount that bolts to his minivan's frame (same place a trailer hitch would bolt), which allows him to mount a rather large Ham Radio antenna. A pleased customer indeed... he has two more projects lined up! AbsentMindedWelder fucked around with this message at 18:42 on Dec 19, 2010 |
|
#
?
Dec 19, 2010 15:45
|
|
|
Thursday was the last day of my machinist class. I made a ball swage out of some air hardening tool steel. With this, you take some 1/2 or 3/4" round bar stock, neck it down a little towards the end, leaving enough untouched so you can jam it in here and rotate/hammer/rotate/hammer until you get a ball.  One 1/2 inch and one 3/4 inch hole, with a 1/4 and 3/8" access port respectively.  I should have cut it in half first and then drilled it, but there wasn't time. I'll have to use a spacer or something to keep the workpiece round. Just gotta weld a spring onto it.
|
|
#
?
Dec 19, 2010 23:25
|
|
|
The Scientist posted:Also, leper flesh, you're alright. If I lived anywhere near the People's Republic of Canada (I'm joshing) I'd bring you a muffin and a cup of starbuck's. Hey, thanks! However, I live in the People's Republic of California, and I don't care much for Starbucks. You can buy me a cup of tea or a beer or something, though!
|
|
#
?
Dec 20, 2010 08:50
|
|
|
iForge posted:Pure sex, Slung Blade!!!
|
|
#
?
Dec 21, 2010 17:00
|
|


|
Good: I have a welder! Bad: It's a piece of poo poo! My brother bought a little Campbell Hausfeld 110v 55/70 amp AC-only buzzbox awhile back to attempt some truck repair, couldn't get it to work, and abandoned the project. So I took it, and have been teaching myself to weld. It's not going well, but I have managed to make bits of scrap metal stick together and make a couple of decent beads on a flat plate. Maybe I'll get some cash for Christmas and get this lil' guy, which seems to be better in every way (DC, more adjustable, slightly more power, rave reviews). Somewhat-related question: I couldn't find the chipping hammer when I looted my brother's kit (did get two pounds of 1/16" 6013 electrodes, gloves, and helmet). I've been using a railroad spike as a chipping hammer, and it seems to be working; is the real thing better enough to be worth buying?
|
|
#
?
Dec 22, 2010 03:50
|
|
 Bad Angus! Bad!
|
Delivery McGee posted:I've been using a railroad spike as a chipping hammer, and it seems to be working; is the real thing better enough to be worth buying? The only advantage I can see with a "real" one is when it comes in this design: 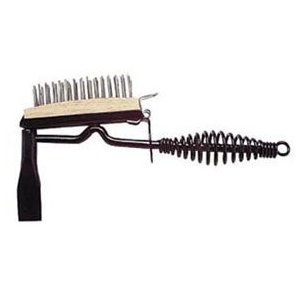 The combination hammer/brush is very handy.
|
|
#
?
Dec 22, 2010 04:09
|
|

|
You want to buy a real chipping hammer. A real one involves a wooden handle and a heavy duty head. Those ones with tiny heads and wire handles are pieces of poo poo. You want a stainless steel wire brush. Don't waste your time with cheap ones. You'll also want a braided wire wheel attachment for your angle grinder. Yes they are expensive, but they are worth it.
|
|
#
?
Dec 22, 2010 05:14
|
|
|
Dumb question that I should probably consult other resources for, but I'll ask it here since I like talking about metal with you guys: I've never understood the chipping hammer. Why do you need so much brute force? You use it to chip off slag from the outside of the solidified weld? How much is there that necessitates this bigass axe looking thing? Why can't you just kind of scrape it off with like a wire brush or something? Also I've never really had a good understanding of why those braided wire brushes are so advantageous. How is it different from just a wire cup? What effect exactly does it have, and how/why does it apply so well to welds? I assume that they're for cleaning the base metals before the weld, right?
|
|
#
?
Dec 22, 2010 05:50
|
|
|
Braided wire brushes hold together a LOT better than the crimped wire cups. You can really put force behind it and really get into the corners. I use it to take scale off before I weld, and flux off afterwards. A crimped one only lasted me a few minutes, it was a dewalt brand and I was being pretty gentle with it. Some welding flux is really easy to remove and just flakes right off if you have your heat right(7018) and some is really hard and takes some work to chip off(6010). A rail spike would be an acceptable chipping head for light duty stuff, but I would grind down the head to a point and drill a hole to weld a handle into. I do a small amount of welding and one of the spiral handle hammers is good enough for me, my braided cup brush handles the rest. If you do a lot like dv6 does, get a proper wooden handle hammer.
|
|
#
?
Dec 22, 2010 06:14
|
|
|
Is there any reason you couldn't just use one of those mason's hammers they have at every hardware store I've ever been to? The ones that look a little like ice-picks for scaling frozen waterfalls and other ridiculous ice-climbing poo poo.
|
|
#
?
Dec 22, 2010 06:20
|
|
|
dv6speed posted:You want to buy a real chipping hammer. A real one involves a wooden handle and a heavy duty head. Those ones with tiny heads and wire handles are pieces of poo poo. The Scientist posted:Is there any reason you couldn't just use one of those mason's hammers they have at every hardware store I've ever been to? The ones that look a little like ice-picks for scaling frozen waterfalls and other ridiculous ice-climbing poo poo.
|
|
#
?
Dec 22, 2010 06:54
|
|
|

|
| # ? May 25, 2024 10:20 |
|
|
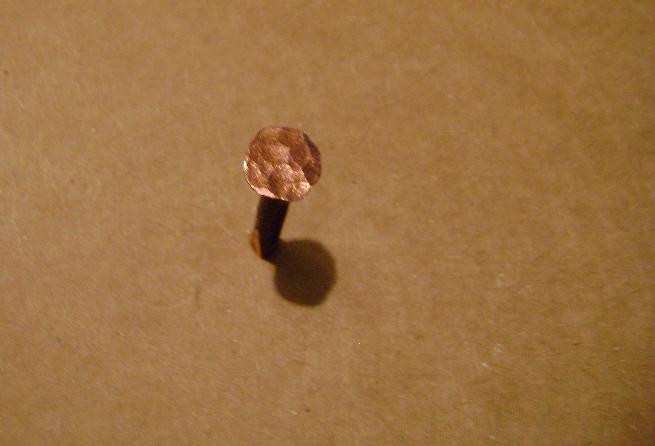
sharkytm posted:Can you post pictures of the jig? The nail looks great. Sorry I can't post a pic of the jig just yet because I made that on a prototype jig and the real one isn't complete just yet. I need to do some grinding and drilling on it first. The basic idea is that it is a 2 piece jig that has half of a hole in each side. When clamped together, they make up a full circle a TINY bit smaller than the diameter of the copper that you are working so that when you tighten it down in a vise, the copper is held securely so you can heat the bit of copper sticking out with a torch and hammer it over into a nail head. Refer to the pic below. I have the 2 jig pieces welded onto angle iron to fit in the jaws of a vise, I just haven't ground the welds down smooth and drilled my holes yet. I will be making holes for several different sizes of copper wire. 
|
|
#
?
Dec 24, 2010 00:21
|
|
