

|
SirRobin posted:For example, it took 6 rounds of test prints before I got one that I was happy to show other people of this image: You could do this in one test print, just crop a square of shadow detail and make a graduated test strip.
|
 #
?
Dec 9, 2010 00:40
#
?
Dec 9, 2010 00:40
|
|


|

|
| # ? Jun 5, 2024 09:15 |
|
|
brad industry posted:You could do this in one test print, just crop a square of shadow detail and make a graduated test strip.
|
|
#
?
Dec 9, 2010 04:26
|
|

|
SirRobin posted:I really need to come up with a witty answer to that question. Every time I show it to a photographer they have to ask. ")
|
|
#
?
Dec 9, 2010 05:21
|
|

|
psylent posted:Brilliant, I thought you'd taken multiple exposures and then deleted the light stand or something. Nice job 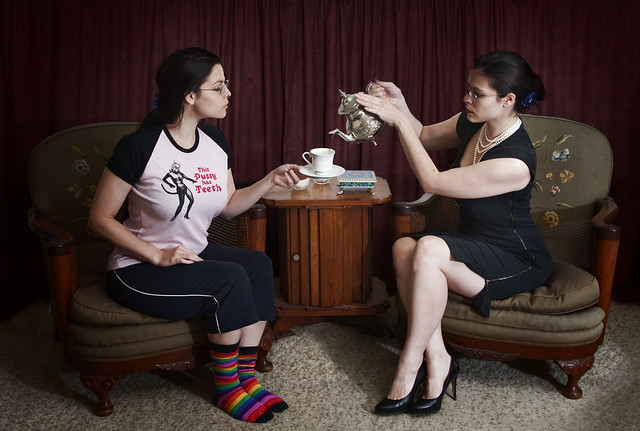 multiple-kate-tea by Paul Duncanson, on Flickr I wanted to show two sides of her personality but there is only one of her. The light stand is holding up the cup
|
|
#
?
Dec 9, 2010 11:56
|
|
|
How the crap do people use dodge/burn as a post processing tool to get the typical 'hyper-real' overprocessed look? It just seems like it would be so drat time consuming.
|
|
#
?
Dec 10, 2010 00:06
|
|
|
Cyberbob posted:How the crap do people use dodge/burn as a post processing tool to get the typical 'hyper-real' overprocessed look? It just seems like it would be so drat time consuming. You can use luminosity mask to control contrast and/or drop duplicate channels on top of. After a few tweaks with curves most of the work is done.
|
|
#
?
Dec 10, 2010 00:46
|
|

|
I was tasked with taking some pictures at the department christmas party last weekend, including this one of the organising committee, shrunk to 800px wide to avoid broken tables. I'm more-or-less OK with how it came out, but everyone's eyes have blue dots in them. Is the best way to remove these spots the clone tool on a single-pixel brush and zoomed in at 800%, or is there some other way to remove the reflectance of my flash in their eyes? Am I being uselessly paranoid, and pixel-peeping? Also, does anyone have any tips on avoiding this in future? Have the flash separate from the camera, off to one side some distance, maybe? 
|
|
#
?
Dec 11, 2010 06:21
|
|

|
Keeping the flash well away from the camera will help but so long as they're not red, a reflection highlight on an eye doesn't always look bad. Eyes are round and wet and do reflect highlights. If there are none there, they can look a little lifeless. Scaled down like this, I can barely make out highlights in any of the eyes so unless it's going to be displayed a lot larger than this you probably don't need to worry about them. What I would worry more about are the darker-haired people who are starting to disappear into the background around their edges and the massive forehead highlights on the leftmost guy, the red-top blonde and the purple-shirted guy.
|
|
#
?
Dec 11, 2010 07:17
|
|
|
ExecuDork posted:So... you're saying that you don't like catchlights...?
|
|
#
?
Dec 11, 2010 08:28
|
|
|
SirRobin posted:Keeping the flash well away from the camera will help but so long as they're not red, a reflection highlight on an eye doesn't always look bad. Eyes are round and wet and do reflect highlights. If there are none there, they can look a little lifeless. Scaled down like this, I can barely make out highlights in any of the eyes so unless it's going to be displayed a lot larger than this you probably don't need to worry about them. The too-dark hair and the too-bright foreheads both seem like tricky problems to me. I guess I'll try to select faces / hair and and play with brightness and contrast and colour balance on those as layers. If nothing else, I'll learn what not to do... Oprah Haza posted:So... you're saying that you don't like catchlights...?
|
|
#
?
Dec 12, 2010 04:57
|
|
|
To avoid the eyes reflecting the flash, you can place it low or high enough that the eyes aren't at an angle where it will reflect them. I'd probably go low rather than high, else you are going to have people with shadowy mean-looking eyes. Another option is to use two flashes on either side of the group and have them at a wide enough angle that it's not hitting the eyes directly.
|
|
#
?
Dec 13, 2010 17:50
|
|

|
What does everyone use for noise reduction? Is neatimage still where it's at? Or has something better come along lately?
|
|
#
?
Dec 26, 2010 17:13
|
|


|
A5H posted:What does everyone use for noise reduction? Is neatimage still where it's at? Or has something better come along lately?
|
|
#
?
Dec 26, 2010 18:52
|
|


|
Lightroom 3 is better than noise ninja, but noise ninja is also slightly better than neatimage. I think that's the order of how well they work. LR3>NN>NeatImage
|
|
#
?
Dec 26, 2010 19:20
|
|

|
Oh awesome. I had no idea lightroom could do it!
|
|
#
?
Dec 26, 2010 19:24
|
|
|
I'm trying out Aperture 3 and when I import images into Aperture from my camera, it wants to automatically "enhance" them by oversaturating them. Is there any way to fix this?
|
|
#
?
Dec 27, 2010 20:19
|
|

|
A5H posted:Oh awesome. I had no idea lightroom could do it! Development tab, kind of near the bottom of the adjustments. Pretty sure LR2 could also do it but LR3 really improved it. I normally just remove colour noise.
|
|
#
?
Dec 27, 2010 20:38
|
|
|
A5H posted:Oh awesome. I had no idea lightroom could do it!
|
|
#
?
Dec 27, 2010 23:38
|
|

|
How would you guys tackle removing the annoyances in the upper right corner of this photo? I tried clone-stamping it out unsuccessfully so I cheaped out and used vignet. Help! Emilie Noel by Maxime Theriault, on Flickr
|
|
#
?
Dec 28, 2010 20:57
|
|

|
A5H posted:Oh awesome. I had no idea lightroom could do it! LR3 has really nice noise reduction. I use it all the time.
|
|
#
?
Dec 28, 2010 21:28
|
|

|
Content aware delete got rid of at least the line, I'm sure there is more you can do to it to get rid of the second light reflection, but this is just one feathered/smoothed selection deleted with content-aware enabled:
|
|
#
?
Dec 28, 2010 22:04
|
|


|
IsaacNewton posted:How would you guys tackle removing the annoyances in the upper right corner of this photo? I tried clone-stamping it out unsuccessfully so I cheaped out and used vignet. Help! Try it a few more times, that looks pretty easy to clone out. It'll be good practice.
|
|
#
?
Dec 28, 2010 23:13
|
|
|
Can you realistically expect sharp images at 100% or are you post-processing knowing in advance that you'll shrink the image after you're done? I've been having trouble sharpening some pictures. They're not very sharp at 100% after some sharpening in Camera Raw and High-Pass filters, having experimented with a wide range of values on both, the results always on the disappointing side. I seem to be having to opt between some video-interlacing-like lines or just horrid softness. Maybe I should be shooting at 21MP instead of 10 to then resize? Here's an example: http://d.imagehost.org/view/0774/IMG_1587 . What am I doing wrong?
|
|
#
?
Jan 1, 2011 21:38
|
|
|
Can you put up a 1:1 of the pre-processed image somewhere? I'd be curious to see what horrid softness you're encountering.
|
|
#
?
Jan 1, 2011 22:19
|
|
|
http://d.imagehost.org/view/0606/IMG_1587_2 I really hope I'm just exaggerating. Please don't make fun of me 
|
|
#
?
Jan 1, 2011 22:39
|
|
|
What aperture did you shoot this at? It doesn't look terribly soft from what I'm seeing. If it was shot wide open, and you had a tripod then stopping it down to f/4 or f/8 would probably do 99% of what you want. Other than that, I'm not sure what your issue with post sharpening producing weird jaggies could be. I'll run it through photoshop just to see what I can spit out on my end. e: I can understand what you want to see though, you'd like tack sharp contrast/etc. I'm the same way when I look at lightroom out of camera sometimes. "Why the gently caress isn't this sharper?" e: I cranked the contrast a little bit, brought the yellows down a tad, I dunno:  Seems sufficiently sharp, unless you wanted the lamp tack sharp as well, in which case maybe your aperture was too wide, but I can't be sure. some kinda jackal fucked around with this message at 23:22 on Jan 1, 2011 |
|
#
?
Jan 1, 2011 23:13
|
|
|
I'm glad I'm not being totally unreasonable. To be honest I didn't shoot that particular image, my friend did, and he did so on a tripod. It's on f/8 and 800 ISO, he took a bunch of that particular lamp/wall combo and that was the one that was sharpest coming out of the camera (all shot in sRAW on a 5D Mk II). It's just like you say, it should be tack sharp contrast, all lines in the stone pretty define and clear as if they were on film, but I don't know if that's even reasonable to want. I'm making a transition from film to digital, so these things aren't still totally clear to me. ^^^ Looks better than mine, thanks! I'll remember that. Maverique fucked around with this message at 23:29 on Jan 1, 2011 |
|
#
?
Jan 1, 2011 23:20
|
|
|
Oh you were at f/8. Hmm. Can't really answer. I know on my D200 when I blow things out they look like poo poo, so maybe the same applies for the 5d2's sensor.
|
|
#
?
Jan 1, 2011 23:24
|
|
|
Maverique posted:I'm glad I'm not being totally unreasonable. To be honest I didn't shoot that particular image, my friend did, and he did so on a tripod. It's on f/8 and 800 ISO, he took a bunch of that particular lamp/wall combo and that was the one that was sharpest coming out of the camera (all shot in sRAW on a 5D Mk II). It's just like you say, it should be tack sharp contrast, all lines in the stone pretty define and clear as if they were on film, but I don't know if that's even reasonable to want. f/8 on what lens? Why sRaw instead of raw? and why ISO 800 if shot on a tripod? One result of higher ISO is more difficulty sharpening. Reshoot that at f/5.6, ISO 100 and see if your sharpness is better.
|
|
#
?
Jan 2, 2011 02:29
|
|

|
I wasn't operating the camera at that moment. We were using sRaw because we'd been filming on the street and I only have 2 cards so we needed the space. Thank you for the tips, that's good to know.
|
|
#
?
Jan 2, 2011 02:50
|
|
|
Try working out the other factors before complaining about it now being as sharp as film, yeah. Fullres raw at base ISO on a tripod will look a ton better than 10mp sraw at 800, and react better to sharpening. I'd be curious to see what your film stuff looks like at 100%.
|
|
#
?
Jan 2, 2011 02:54
|
|
|
I've been using LR3 for a while now and this issue has been bugging me but until now I've been too lazy to figure it out or ask about it even though I know its a simple issue. Whenever I import a RAW image, the initial preview is similar to the image I see in the LCD of my camera, ie it looks properly exposed. However, after a second or two, the preview changes and generally becomes a lot darker and so what I initially thought were properly exposed images end up having to be unnecessarily messed with to boost the exposure. Can anyone explain to me what is going on and how I can stop this from happening or control this? I'm using a D90 and the image settings are set to neutral. On a somewhat related note, does active D-lighting actually make a difference to RAW files?
|
|
#
?
Jan 6, 2011 17:26
|
|
|
Fungah posted:I've been using LR3 for a while now and this issue has been bugging me but until now I've been too lazy to figure it out or ask about it even though I know its a simple issue. This happens to me too, I always assumed it was just lightroom doing some kind of auto-adjustments. But I haven't figured out how to stop it.
|
|
#
?
Jan 6, 2011 17:31
|
|

|
The initial image you're seeing is the embedded JPEG in the RAW file, AFAIK. When you select an image, LR will generate a higher resolution JPEG, which is where the discrepancy comes in. In the develop module, at the bottom under Camera Calibration, you can set the profile to Camera Neutral, which should get you pretty close to the original image. Not sure if there's a way to have all this adjusted on import, though.
|
|
#
?
Jan 6, 2011 17:44
|
|
|
scottch posted:The initial image you're seeing is the embedded JPEG in the RAW file, AFAIK. When you select an image, LR will generate a higher resolution JPEG, which is where the discrepancy comes in. In the develop module, at the bottom under Camera Calibration, you can set the profile to Camera Neutral, which should get you pretty close to the original image. Not sure if there's a way to have all this adjusted on import, though. Do all raw images have an embedded jpeg, or is it only when shooting "RAW+L"? I've always thought it was the latter. I shoot raw only and LR3 still does the auto-adjusting. My assumption has been that the first view is the actual raw file, and when LR3 changes it, it's applying the camera's white balance settings or exposure compensation.
|
|
#
?
Jan 6, 2011 18:04
|
|

|
xzzy posted:Do all raw images have an embedded jpeg, or is it only when shooting "RAW+L"? I've always thought it was the latter. All raw have the embedded preview, it is why raw + jpeg is kind of silly, though an easy way to extract that jpeg doesn't really exist. Active D lighting is probably curves adjusted to the RAW making the jpeg, so yes, that's why it looked brighter. Learn how to use a spot meter, or find out whether your camera tends to over/under expose with center weighted and add in exposure compensation. If you find you are always preferring the initial jpeg more than what you come up with, just shoot jpeg to begin with. I like the B&W files my 5D makes a lot, and for family candid shots where I know I won't be going in to do any crazy post work, I just set it to jpeg output.
|
|
#
?
Jan 6, 2011 18:07
|
|

|
spf3million posted:Lightroom is killing me... I have my photos stored on several different external HDs since my main laptop dive is a small SSD. If I plug one of the HDDs into a USB port, LR doesn't find the photos on the drive if it was plugged into a different USB port than the last time I used it. It looks like I have to reimport them but when I go the import screen, all of the pictures are grayed out when I check the "do not import suspected duplicates" leading me to believe that they are in the catalog somewhere. When I click on the "all photographs" table in the library tab, all of my photos ever imported are there, but when I go to develop one of them "the folder can not be found". Anyone else have problems like this with multiple external HDDs? In the Library view, right click on the folder that is 'missing' and select "Update folder location". Then you show lightroom where that folder is now. You only need to do it to the root folder, lightroom will automatically find the sub folders and the photos in them.
|
|
#
?
Jan 6, 2011 20:52
|
|
|
I posted in the general questions thread, something that started as a whine but turned into "I need post-processing advice". I took some photos at the work christmas party and at the christmas family gathering, and looking at them now I realized my bad focus habits (and other bad habits) are causing me grief. You've already seen the key picture from the work christmas party (shiny, shiny foreheads), so here are some family pictures. I don't want to put these up on Flickr yet because knowing my mom, she'll grab them as soon as they appear and I'm not happy with them, yet. Family gathering Straight from camera but resized to 1024 wide (to keep Waffleimages filesize down)  Click here for the full 1024x685 image. My first use of Lightroom 3  Click here for the full 1024x683 image. My cousin expressing her disgust at the artificial worms her father recieved for fishing. Straight from camera but resized to 1024 wide  Click here for the full 1024x685 image. Messing around with GIMP  Click here for the full 872x1024 image. Resized from the camera, I haven't tried to edit this one yet. Crop and deal with the underexposure I know for sure, but is there something else you would do?  Click here for the full 1024x685 image. Even if the response is universally "learn to compose, learn exposure, turn down the suck" I think I'm benefitting from staring critically at some of these. Plus the practice with Lightroom and GIMP. Thanks in advance!
|
|
#
?
Jan 7, 2011 03:11
|
|
|
ExecuDork posted:
 Click here for the full 1024x685 image. My photoshop hackjob.
|
|
#
?
Jan 7, 2011 05:07
|
|

|

|
| # ? Jun 5, 2024 09:15 |
|
|
Fungah posted:Whenever I import a RAW image, the initial preview is similar to the image I see in the LCD of my camera, ie it looks properly exposed. However, after a second or two, the preview changes and generally becomes a lot darker and so what I initially thought were properly exposed images end up having to be unnecessarily messed with to boost the exposure. Can anyone explain to me what is going on and how I can stop this from happening or control this? I'm using a D90 and the image settings are set to neutral. Check which import preset you're using, if any. I shoot a D90 too and I can barely tell the difference. Fungah posted:On a somewhat related note, does active D-lighting actually make a difference to RAW files? evil_bunnY fucked around with this message at 09:36 on Jan 7, 2011 |
|
#
?
Jan 7, 2011 09:33
|
|